Hyper-V - Export & Import (Part 1)
Before I get going I want to get this out of the way: Export / import in Hyper-V is by no means intuitive or easy to use. It is definitely something that I hope we can improve in a future release - but for this release it is functional.
So with that behind us, let's start pulling this apart.
If you want to move or copy a virtual machine with Hyper-V, then you will need to use the export / import functionality provided by Hyper-V.
The first thing you need to do is to pick the virtual machine that you want to copy and / or move, and then select Export... from the action menu / pane. You will be presented with the following dialog:
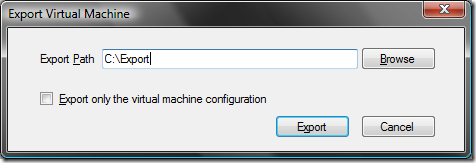
Today I will be looking at the case where you specify an export path (in my case: "C:\Export") but do not check the option to Export only the virtual machine configuration.
| Before going further I need to cover virtual machine names and IDs. Each Hyper-V virtual machine has one of each of these. The virtual machine name is what you called the virtual machine. For today's post I am using a virtual machine with a name of "Test Export VM". While you are likely to give each of your virtual machines different names - the virtual machine name is not required to be unique. The virtual machine ID is a GUID that Hyper-V generates automatically for each virtual machine. This ID is used to uniquely identify one virtual machine from another. For the most part the virtual machine ID is never displayed in the Hyper-V user interface (with the exception of error messages). The virtual machine I am using for today's post has a virtual machine ID of "6D59FE56-6D20-4129-9BF3-2457DDB58A9A". Beyond this, each snapshot that a virtual machine has has its own name and ID. |
Hitting Export will result in Hyper-V copying everything that makes up the selected virtual machine into a new folder under the export path you specify. This new folder will be named after the virtual machine name (in my case: "C:\export\Test Export VM"). Under this new directory will be the following items:
The Virtual Machines folder
This folder will contain a single .exp file, which will use the virtual machine ID for its name (in my case: "6D59FE56-6D20-4129-9BF3-2457DDB58A9A.exp"). The .exp file is the exported configuration of the virtual machine.
There will also be another folder in this folder, which is also named use the virtual machine ID. If the virtual machine was in a saved state when it was exported this sub-folder will contain two saved state files (a .vsv and a .bin file), otherwise it will be empty.
The Virtual Hard Disks folder
- This folder contains copies of each of the virtual hard disks associated with the virtual machine. Note that if you have two virtual hard disks with the same name (but different locations) associated with a virtual machine, exporting the virtual machine will fail.
The Snapshots folder
- This folder will contain:
- A .exp file for each snapshot the virtual machine had (name after the snapshot ID)
- A folder named after the snapshot ID that contains the saved state files for the snapshot in question.
- A folder named after the virtual machine ID that will contain the differencing disks used by all of the snapshots associated with the virtual machine (.avhd files).
- This folder will contain:
config.xml
- I will look at this file in more detail another day. It is not necessary for standard export / import usage.
You can freely move / copy / backup this entire directory structure now. When you are ready to import the virtual machine you will need to go the the Hyper-V Manager and select Import Virtual Machine... from the action menu / pane. You will see:
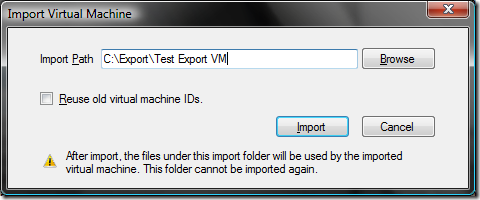
Before clicking Import there are three important things to know:
You need to specify the folder that was created during export, not the folder that was used for export. So in my case I need to specify "C:\Export\Test Export VM" instead of "C:\Export".
When you import a virtual machine it will be left in its current directory (in my case "C:\Export\Test Export VM") and it will be impossible to move the virtual machine after import. So make sure that you move the exported virtual machine to your desired location before you import it.
Importing a virtual machine deletes the .exp files, which stops you from importing it again. If you want to use an exported virtual machine as a backup / template that you will import multiple times - you need to make a copy of it before importing it.
After you click Import the file structure of the exported virtual machine will remain roughly the same, with the following exceptions:
- The .exp files will be deleted and will be replaced with .xml configuration files.
- The config.xml file will be deleted.
And now the virtual machine will appear under the Hyper-V manager and you will be able to interact with it directly.
Cheers,
Ben