
Using MinGW and Cygwin with Visual C++ and Open Folder
Content outdated
For up-to-date documentation see Open Folder support for C++ build systems in Visual Studio.
Most MinGW installations, however, include much more than just a compiler. Most distributions of MinGW include a whole host of other tools that can be used to build and assemble software on Windows using the familiar GNU toolset. MinGW build environments often contain an entire POSIX development environment that can be used to develop both native Windows software using POSIX build tools and POSIX software that runs on Windows with the help of an emulation layer.
Please download the preview and try out the latest C++ features. You will need to also make sure you install the Linux Tools for C++ workload in addition to Desktop C++ to use these new features. You can learn more about Open Folder on the Microsoft docs site. We are looking forward to your feedback.
Why MinGW
There are three reasons why you might want to use MinGW on Windows. The first is simply compiler compatibility. We all love MSVC, but the reality is that some codebases are designed from the ground up under the expectation that they will be built with GCC. This is especially true for many cross-platform projects. Porting these codebases to support MSVC can be a costly endeavor when all you want to do is get up and running with your code. With MinGW you can be up and running in minutes instead of days.
There is, however, an even more compelling reason to use MinGW than source compatibility with GCC. MinGW environments are not just a compiler, but include entire POSIX build environments. These development environments allow cross-platform projects to build on Windows with few if any modifications to their build logic. Need Make or AutoTools, it’s already installed – if you are using an environment like MSYS2 nearly every tool you might need is only a single package management command away.
Finally, some MinGW distributions such as MSYS2 allow you to build native POSIX software on Windows without porting the code to Win32. This is accomplished by an emulation layer that allows native POSIX tools to run on Windows. This same layer is what allows all your favorite POSIX build tools to run in the MinGW environment.
Install MinGW on Windows
Getting started with MinGW is simple once you have installed the latest Visual Studio Preview. First, you will need to make sure that you select the C++ workload when you install Visual Studio. Next, you will need to download MinGW itself. There are actually many ways to install MinGW. If you are particularly adventurous you can build it from source, but it is much easier to install any of the popular binary distributions. One of the more popular distributions is MSYS2 (getting started guide). A standard MSYS2 installation installs three build environments: POSIX build environments to natively target 32-bit and 64-bit Windows, and an emulation layer to build POSIX software that targets Windows.
If you have a particular project in mind that you are working with, it is also worth checking out if they have any project-specific instructions on how to install MinGW. Some projects even include their own custom tailored MinGW distributions.
Use MinGW with Visual Studio
It has been possible to use GCC based compilers with Visual Studio projects for some time already, but many cross-platform projects that build with MinGW on Windows are not organized into Solution and Visual C++ project files. Creating these assets for a real-world project can be time consuming. To streamline onboarding cross-platform projects into Visual Studio, we now support opening folders directly, and in the latest preview it is easier than ever to use alternative compilers and build environments such as MinGW.
With “Open Folder” you can edit your code with full IntelliSense, build, and debug with the same fidelity as is available with full Solution and C++ project files. However, instead of authoring hundreds of lines of XML you just need to write a small amount of JSON. Even better, you only need to write the JSON for the features you need. For instance, if you only want to edit code in the IDE and stick to the command line for everything else, you only need to write a few lines of JSON to enable IntelliSense.
Edit with Accurate IntelliSense
To get the most out of IntelliSense when using “Open Folder” you will need to create a CppProperties.json file. You can create this file by selecting “Project->Edit Settings->CppProperties.json…” from the main menu.

This file is automatically populated with four configurations: “Debug” and “Release” for the x86 and x64 architectures. If you don’t need all of these configurations you can remove them to reduce clutter. Next, you will need to configure a few options to get IntelliSense that is consistent with your MinGW build.
In each configuration, you may notice an “intelliSenseMode” key. For MinGW and other GCC based compilers you should set this to “windows-clang-x86” or “windows-clang-x64” depending on your architecture.
Next, you will need to add the include paths for your project. Configuration specific include paths can be added to the “includePath” array under each configuration. You can add project-wide include paths here as well but it may be easier to add them to the “INCLUDE” environment variable, by adding an “environment” block to your configuration file as a peer to “configurations”:
"environments": [
  {
    "MINGW_PREFIX": "C:/msys64/mingw64",
    "MINGW_CHOST ": "x86_64-w64-mingw32",
    "MINGW_PACKAGE_PREFIX": "mingw-w64-x86_64",
    "MSYSTEM": "MINGW64",
    "MSYSTEM_CARCH": "x64_64",
    "MSYSTEM_PREFIX": "${env.MINGW_PREFIX}",
    "SHELL": "${env.MINGW_PREFIX}/../usr/bin/bash",
    "TEMP": "${env.MINGW_PREFIX}/../tmp",
    "TMP": "${env.TEMP}",
    "PATH": "${env.MINGW_PREFIX}/bin;${env.MINGW_PREFIX}/../usr/local/bin;${env.MINGW_PREFIX}/../usr/bin;${env.PATH}",
    "INCLUDE": "project/lib/include;${env.MINGW_PREFIX}/mingw/include"
  }
],
Note: MINGW_PREFIX should point to your MinGW installation, if you installed MSYS2 with default settings this directory will be “C:/msys64/mingw64”.
Most GCC based compilers, including MinGW, automatically include certain system header directories. For full IntelliSense, you will need to add these to the include path list. You can get a list of these standard includes by running:
echo | gcc -Wp,-v -x c++ - -fsyntax-only
Build with MinGW
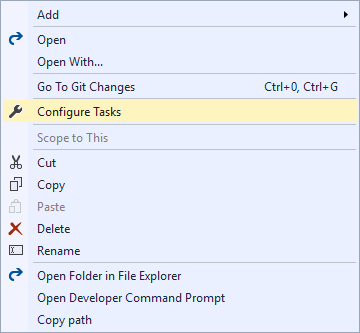
Once you have set up IntelliSense (with “MINGW_PREFIX” and its related environment variables defined and added to “PATH”), building with MinGW is quite simple. First, you will need to create a build task. Right click your build script (or any other file you would like to associate with the task) and select “Configure Tasks”:
This will create a “tasks.vs.json” file if you don’t already have one and create a stub. Since MinGW and its tools are already on the PATH, as configured in CppProperties.json, you can configure the task to use them like this:
{
  "version": "0.2.1",
  "tasks": [
    {
      "taskName": "build-all",
      "appliesTo": "hello.cpp",
      "contextType": "build",
      "type": "launch",
      "command": "${env.comspec}",
      "args": [
        "g++ -o helloworld.exe -g hello.cpp"
      ]
    }
  ]
}
This example is simple – it only builds one file – but this can call into Make or any other build tools supported by MinGW as well. Once you save this file, you should have a “Build” option available for any files matched by the “appliesTo” tag.
Selecting “Build” from the context menu will run the command and stream any console output to the Output Window.
Debug MinGW Applications
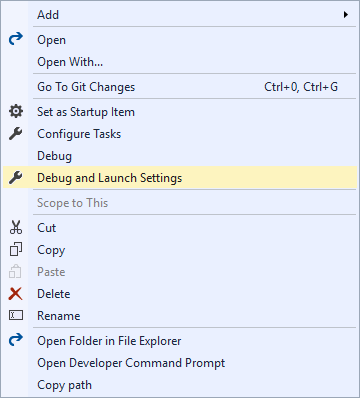
Once you have configured your project to build, debugging can be configured with by selecting a template. Once you have built an executable, find it in the folder view and select “Debug and Launch Settings” from the executable’s context menu in the Solution Explorer:
This will allow you to select a debugger template for this executable:
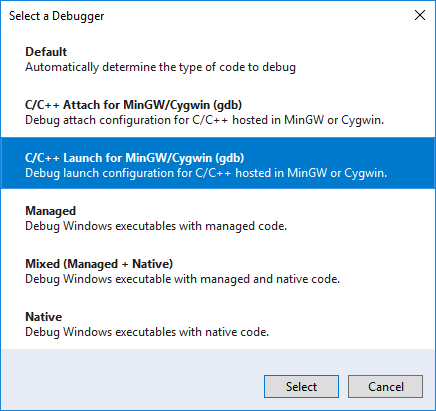
This will create an entry in the “launch.vs.json” file that configures the debugger:
{
  "version": "0.2.1",
  "defaults": {},
  "configurations": [
    {
      "type": "cppdbg",
      "name": "helloworld.exe",
      "project": "helloworld.exe",
      "cwd": "${workspaceRoot}",
      "program": "${debugInfo.target}",
      "MIMode": "gdb",
      "miDebuggerPath": "${env.MINGW_PREFIX}\\bin\\gdb.exe",
      "externalConsole": true
    }
  ]
}
In most cases, you won’t have to modify this at all, as long as you defined “MINGW_PREFIX” in the “CppProperties.json” file. Now you are ready to edit, build, and debug the code. You can right click the executable and select “Debug” in the context menu or select the newly added launch configuration in the debug dropdown menu to use F5. You should be able to use breakpoints and other debugging features like the Locals, Watch, and Autos Windows. If you are having trouble hitting breakpoints, make sure your build command was configured to emit GDB compatible symbols and debugging information.
Finally, to complete the full inner loop, you can add an “output” tag to your build task in “tasks.vs.json”. For instance:
"output": "${workspaceRoot}\\helloworld.exe",
What About Cygwin and Other Compilers in the GCC Family
While we have discussed MinGW specifically in this post, it is worth keeping in mind that very little of the content above is specific to MinGW. These topics apply equally well to other compilers and build environments so long as they can produce binaries that can be debugged with GDB. With minimal modification, the instructions under the “Use MinGW with Visual Studio” section above should work fine with other environments such as Cygwin and even other compilers like Clang. In the future, Open Folder will support an even greater variety of compilers and debuggers – some out of the box, some with a little bit of extra configuration that may be specific to your projects.
Send Us Feedback
To try out the latest and greatest C++ features and give us some early feedback, please download and install the latest Visual Studio 2017 Preview. As always, we welcome your feedback. Feel free to send any comments through e-mail at visualcpp@microsoft.com, through Twitter @visualc, or Facebook at Microsoft Visual Cpp.
If you encounter other problems with Visual Studio 2017 please let us know via Report a Problem, which is available in both the installer and the IDE itself. For suggestions, let us know through UserVoice. We look forward to your feedback!
 Light
Light Dark
Dark
2 comments
Just tested the Debug guidelines for a mingw64 build of openldap. The binaries were built from the mingw64 shell beginning with ./configure.Can’t believe I’m stepping through the source code from within VS 2019. I’m debugging ldapsearch.Well done!
Can’t get this to work. The thing that boggles me is: How do you tell Visual Studio to use the configuration settings defined in “CppProperties.json”? Shouldn’t there be some kind of “configuration” property in “tasks.vs.json”? Following the examples here, it doesn’t seem like the build task actually uses the “configuration” in “CppProperties.json”, because I can basically write what I want in that file and the build task doesn’t care…