
Targeting the Windows Subsystem for Linux from Visual Studio
Update Jan. 8, 2020: Visual Studio 2019 version 16.1 and later has native support for WSL. This eliminates the need to establish an SSH connection and is the recommended workflow for building and debugging on WSL.
The Windows Subsystem for Linux (WSL) was first introduced at Build in 2016 and was delivered as an early beta in Windows 10 Anniversary Update. Since then, the WSL team has been hard at work, dramatically improving WSL’s abilty to run an ever increasing number of native Linux command-line binaries and tools, including most mainstream developer tools, platforms and languages, and many daemons/services* including MySQL, Apache, and SSH.
With the Linux development with C++ workload in Visual Studio 2017 you can use the full power of Visual Studio for your C/C++ Linux development. Because WSL is just another Linux system, you can target it from Visual Studio by following our guide on using the Linux workload. This gives you a lot of flexibility to keep your entire development cycle locally on your development machine without needing the complexity of a separate VM or machine. It is, however, worth covering how to configure SSH on Bash/WSL in a bit more detail.
Install WSL
If you’ve not already done so, you’ll first need to enable developer mode and install WSL itself. This only takes a few seconds, but does require a reboot. You need to be on a current Insider build or wait for the release of Creators Update to use WSL with the Linux workload in VS.
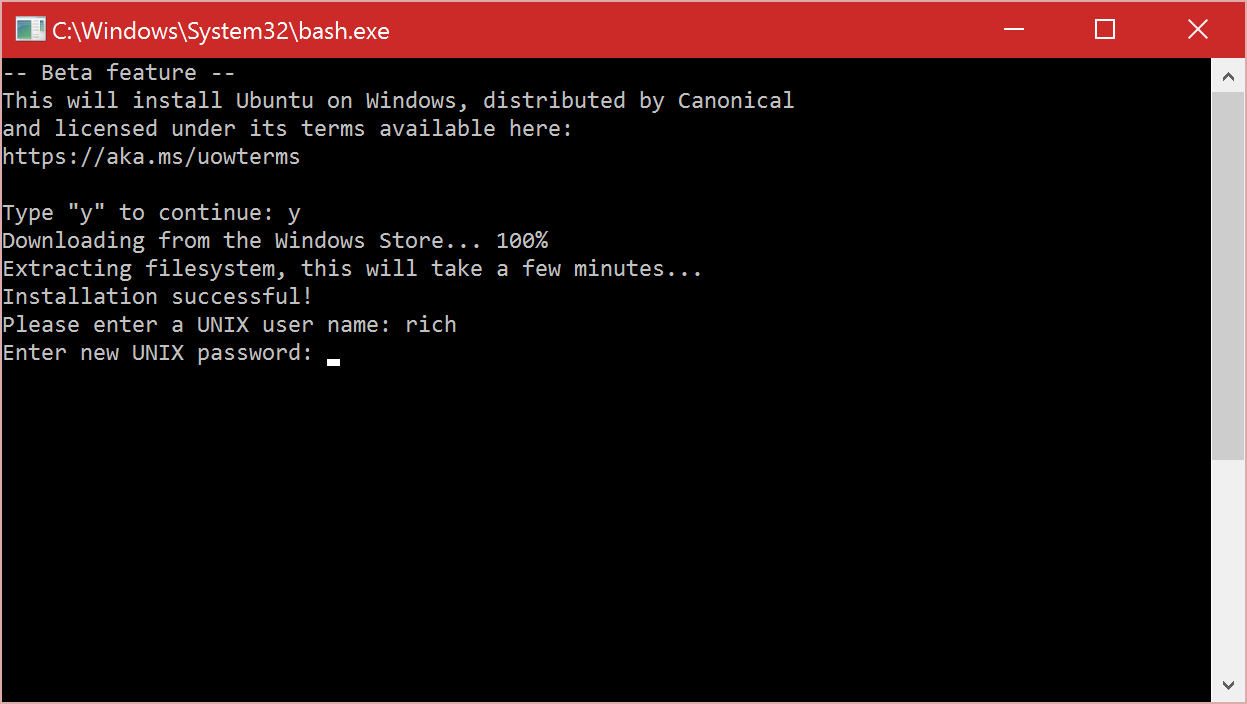
When you run Bash for the first time, you’ll need to follow the on-screen instructions to accept Canonical’s license, download the Ubuntu image, and install it on your machine. You’ll then need to choose a UNIX username and password. This needn’t be the same as your Windows login username and password if you prefer. You’ll only need to enter the UNIX username and password in the future when you use sudo to elevate a command, or to login “remotely” (see below).
Now you’ll have a vanilla Ubuntu instance on your machine within which you can run any ELF-64 Linux binary, including those that you download using apt-get!
Before we continue, let’s install the build-essential package so you have some key developer tools including the GNU C++ compiler, linker, etc.:
$ sudo apt install -y build-essential
We’ll also need to install gdbserver, a program that allows you to debug with a remote GDB debugger.
$ sudo apt install -y gdbserver
Install & configure SSH
Let’s use the ‘apt’ package manager to download and install SSH on Bash/WSL:
$ sudo apt install -y openssh-server
Before we start SSH, you will need to configure SSH, but you only need to do this once. Run the following commands to edit the sshd config file:
$ sudo nano /etc/ssh/sshd_config
Scroll down the “PasswordAuthentication” setting and make sure it’s set to “yes”:

Hit CTRL + X to exit, then Y to save.
Now generate SSH keys for the SSH instance:
$ sudo ssh-keygen -A
Start SSH before connecting from Visual Studio:
$ sudo service ssh start
*Note: You will need to do this every time you start your first Bash console. As a precaution, WSL currently tears-down all Linux processes when you close your last Bash console!.
Install & configure Visual Studio
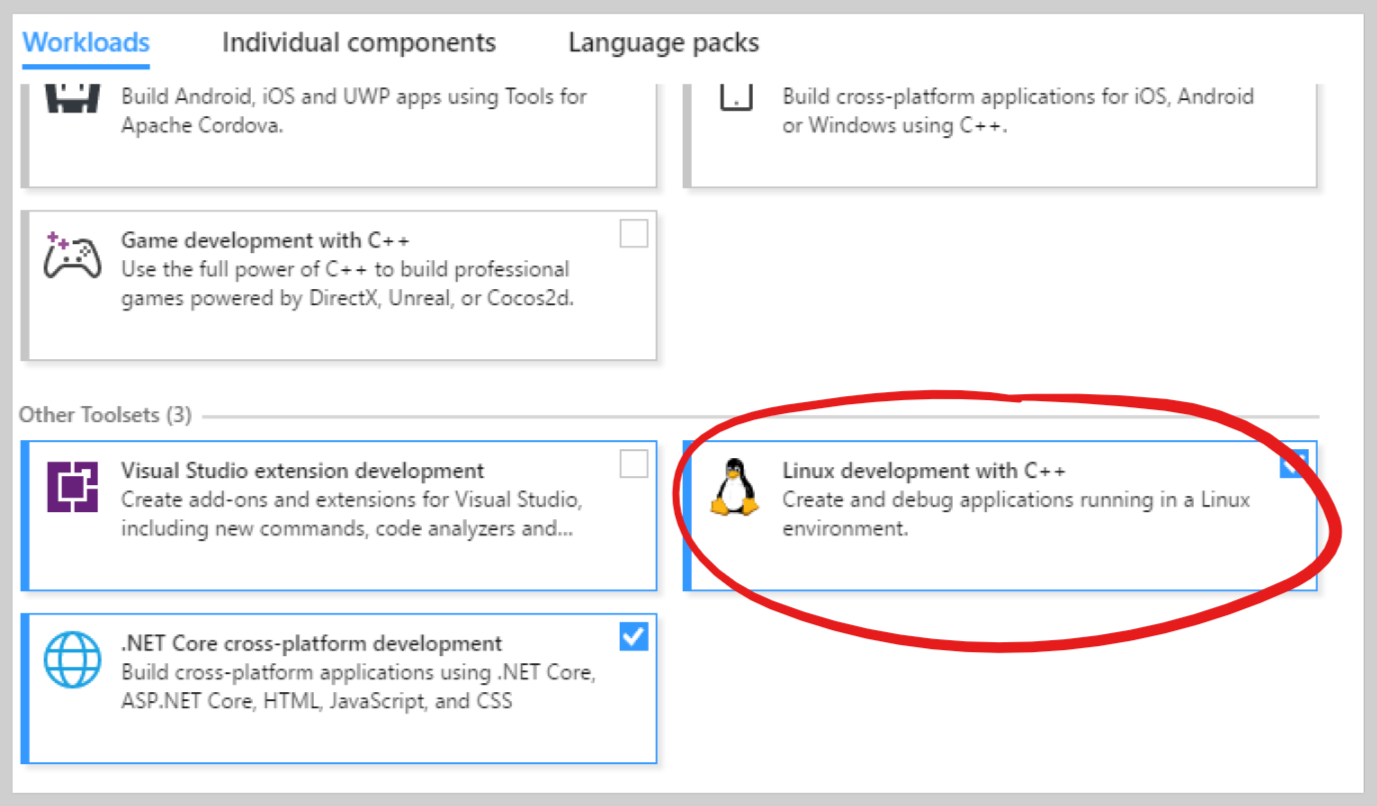
For the best experience, we recommend installing Visual Studio 2017 RC (or later) to use Visual C++ for Linux. Be sure to select the Visual C++ for Linux workload during the installation process.
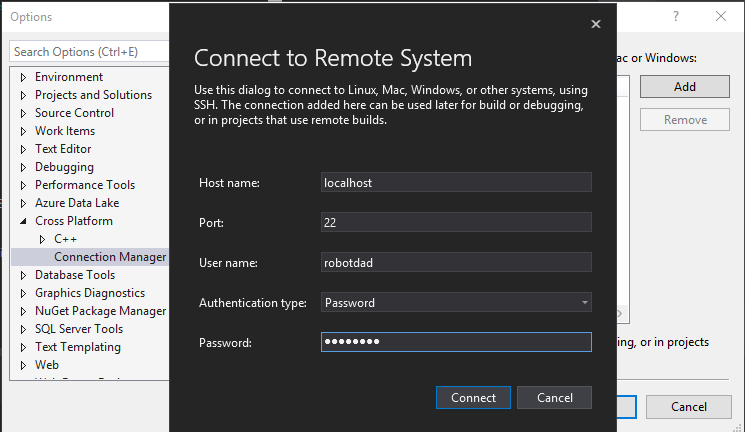
Now you can connect to the Windows Subsystem for Linux from Visual Studio by going to Tools > Options > Cross Platform > Connection Manager. Click add and enter “localhost” for the hostname and your WSL user/password.
Now you can use this connection with any of your existing C++ Linux projects or create a new Linux project under File > New Project > Visual C++ > Cross Platform > Linux.
In the future, we’ll publish a more detailed post showing the advantages of working with WSL, particularly leveraging the compatibility of binaries built using the Linux workload to deploy on remote Linux systems.
For now, now that, starting with Windows 10 Creators Update, Bash on the Windows Subsystem for Linux (Bash/WSL) is a real Linux system from the perspective of Visual Studio.
 Light
Light Dark
Dark
4 comments
Marc,
I’m replicating what you do on VS2019 & also the video Visual Studio 2017 Linux development with C++ on YouTube.
However, the problem is, even with the simplest example, aka Linux Command line template, the headers are somehow not well synchronised, and Intellisence does not work, even for
#include <cstdio>
or
printf
In VS2019/Options/Cross Platform/Connection Manager/Remote Header IntelliSense Manager, everything is checked & I click on Update to be sure.
Doesn’t work.
Any ideas?
Why can’t I start ssh server?
[Pafifi@帕菲菲 ~]$ sudo service ssh start
Redirecting to /bin/systemctl start ssh.service
Failed to get D-Bus connection: Operation not permitted
Finally figured this out. You have to run the SSH daemon from your WSL instance the old-fashioned way; with script in the /etc/init.d directory of your rootfs image.
systemd and systemctl will not run on WSL, so you have to run it yourself.
For my CentOS 7 WSL image, I copied the /etc/init.d/sshd script off of one of our RHEL dev servers and put it into the same place in the rootfs. chmod it 777, and then you can run it:
$> sudo /etc/init.d/sshd start
Then, to verify it is running, you can do:
$> ps -A
PID TTY TIME CMD
1 ? 00:00:00 init
3 tty1 00:00:00 init
4 tty1 00:00:03 bash
1969 ? 00:00:00 sshd
1986 tty1 00:00:00 ps
Hi Marc,
In my case, Visual Studio 2019 can’t connect to remote system. After I enabled WSL, I installed Ubuntu 18.04, and then I installed Visual Studio 2019 Community. When I opened Visual Studio 2019, went to Tools->Options->Cross Platform->Connection Manager, and the troubles appeared.
At first, I had trouble on Port 22, then I solved this issue according to https://stackoverflow.com/questions/28210637/unable-to-ssh-localhost-permission-denied-publickey-connection-closed-by
Then I had trouble on User name and Password, I typed the user name and password for Ubuntu 18.04, it didn’t work. Which user name and password should I input? Are the user name and password for WSL instead of Ubuntu?