
Developing Linux C++ applications with Azure Docker containers
In recent years, Visual Studio has added new features and experiences to allow developers to develop their C++ applications for non-Windows platforms such as Android, iOS and more recently Linux. One of the challenges that Linux development brings to the table is making sure your native application works across the wide set of Linux distributions available. We have experienced this first-hand when developing the Visual Studio Code C/C++ extension where we needed to test the extension across a wide variations of Linux distributions. We typically build and test our C++ code on different versions of Ubuntu, Debian, Fedora, Arch, openSUSE and more. Furthermore, there are different versions of the standard C library and compilers which bring their own set of issues. To keep costs low for Linux development we made use of Docker containers on Azure.
This blog provides a walkthrough on how to use Azure VMs, Docker containers, and Visual Studio to author your multi-distro Linux C++ application with the help of the following sections:
- Prerequisites
- Docker Containers and Images
- Creating an Azure Docker VM
- Running a Docker container
- Setting up SSH for your container
- Developing your Linux C++ application from Visual Studio
- Using dockerfiles to automate building of images
Prerequisites
Through the course of this walkthrough you will need to setup the following, so let us just go ahead do this upfront.
- An active Azure account. If you don’t have one, you can sign up for a Free Azure Trial.
- Install Azure Command Line Interface which will provide you with a set of open source shell based commands for creating and managing resources in Azure. Use the Windows MSI installer which will setup the right paths in command shell.
- Docker ToolBox which will allow you to quickly install and setup Docker environment for your computer.
- Visual Studio, with C++ and Linux Development extension which ships today as a separate extension on Visual Studio extension gallery.
Docker Containers and Images
A Docker Container is a “stripped-to-basics” version of your operating system. A Docker Image is a read-only snapshot of your software that can be “run” in a Docker Container. Docker containers can allow you to pack a lot more applications into a single physical server than a Virtual Machine can.
Virtual machines run a full copy of the operating system and a virtual copy of all the hardware that operating systems need to run. In contrast, containers only require a stripped to basic version of your operating system, supporting libraries and programs and system resources required to run a specific program.
Combine this with the additional benefit that Docker containers provide for creating a consistent development environment for development, testing and deployment. Docker is here to stay!
Alright with that very short overview on Docker lets go ahead and setup an Azure Docker VM now.
Step 1:Creating an Azure Docker VM
The easiest way to create an Azure VM is by using the cross-platform Azure command line tools. Once installed and connected to your Azure subscription, you can manage many Azure resources right from the command prompt.
Login into your subscription using the ‘azure login’ command. You will go through the following series of steps shown in the picture below.

Once you have logged in successfully to find a suitable image, run the azure vm image list command and provide additional details where you would like your VM to be hosted ‘location’ and the publisher for the VM images. All Ubuntu images on Azure are shipped by the ‘Canonical’ publisher.
azure vm image list
info:    Executing command vm image list
Location:  westus
Publisher:  Canonical
This will print for you a list of Ubuntu images. For this walkthrough, I will pick up the popular ‘Canonical:UbuntuServer:14.04.5-LTS:14.04.201609190’ image. Alternatively you can pick others from the 16.0 series as well.
The Docker Installation documentation provides step-by-step instructions on how to install the Docker Toolbox, which will in turn install Docker Machine, Engine, Compose, Kitematic and a shell for running the Docker CLI. For this tutorial you will install this on your Windows box where you have setup Visual Studio.
Once Docker is installed and running we can go the next step which is to install our Azure Docker Ubuntu VM using the docker-machine Azure driver. You will need to replace the subscription-id with your subscription-id and your vm name e.g. hello-azure-docker-cpp.
docker-machine create --driver azure --azure-subscription-id b5e010e5-3207-4660-b5fa-e6d311457635 --azure-image Canonical:UbuntuServer:14.04.5-LTS:14.04.201609190 hello-azure-docker-cpp
This will run through the following series of command setting up the VM and installing the necessary Docker tools. If you get stuck, you can follow this guide here.
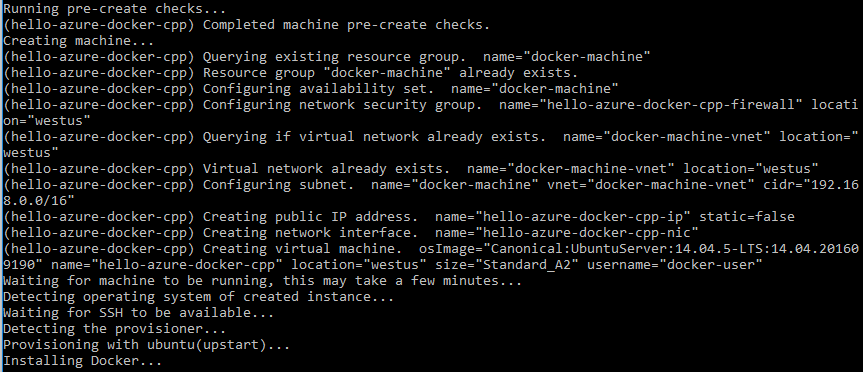
Next, set up your shell for the machine we created by running the following command, where machine name is the name of the machine you created.
docker-machine env <machine-name>

Step 2:Running a Docker container
The easiest way to get started with a Docker container is to make use of an existing container. For this purpose, we use a pre-existing Debian container by executing the following command.
docker run -p 5000:22 -t -i --restart=always debian /bin/bash
This will download the latest image for Debian from Docker and start a new container with it. You should see the following command window as you go through this step. You can replace ‘debian’ with ‘ubuntu’, ‘fedora’ or ‘opensuse’ for creating containers for other distros.
 If this step was successful, you should see your Docker running when you execute the ‘docker ps’ command as shown below:

Step 3:Setting up SSH for your container
To build your C++ application on this newly created Linux container using Visual Studio, you need to enable SSH and install necessary build tools (gdb, g++ etc.). Setting up SSH is generally not recommended for Docker containers, but it is required by the Visual Studio C++ Linux development experience today.
Attach to your running container by using the ‘docker attach <container-id>’ command and run the following commands to setup SSH.
apt-get update
apt-get install openssh-server
apt-get install  g++ gdb gdbserver
mkdir /var/run/sshd
chmod 0755 /var/run/sshd
/usr/sbin/sshd
Next, create a user account to use with the SSH connection to the Docker container we just created. We can do this by running the following commands. Replace <user-name> with the username you would like.
useradd -m -d /home/<user-name>/ -s /bin/bash -G sudo <user-name>
passwd <user-name>
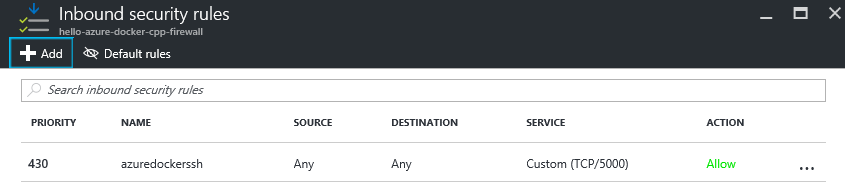
All right, we are almost there. The last thing we need to do is make sure the port we are using (5000) is allowed by the inbound-security rules by our Docker resource group’s firewall. The easiest way to do this is to use Azure portal, bring up the network security firewall for the VM we created on Azure and traverse to the inbound security rule. For the VM created in this walk-through the resource is shown below:
![]()
As a part of the Inbound security rule, Add and Allow an additional custom TCP security rule with the port you chose for your SSH connection as shown in the figure below.
You should now be able to SSH into your Linux container using your favorite SSH client application. The and in the command below will need to be replaced based on your settings.
ssh -p port-name <user-name>@<ip-address>
Step 4: Developing your Linux C++ application from Visual Studio
To setup Visual Studio for Linux C++ development, you can read this walkthrough, which we keep current. This walkthrough covers installation, project setup and other usage tips, but to summarize, you need to do two things:
First, run the following command on your Linux containers which downloads dependencies required to build and debug.
sudo apt-get install g++ gdb gdbserver
Second, download the Visual C++ for Linux development extension or get it from the Extension Manager in Visual Studio. Please note the Linux extension is only supported for Visual Studio 2015 and above.
Once Visual Studio is set up, go ahead and set up connection properties for all your containers in the Connection Manager. The Connection Manager can be launched from Tools->Options as shown in the figure below:

Notice how by using the Docker containers, you can now develop your application on Debian, different versions of Ubuntu, and Redhat simultaneously using one Virtual Machine from within Visual Studio.
Alright with everything else setup, we can finally start building and debugging Linux C++ code on our containers. You can choose from any of the following simple templates from the File->New Project-> C++ -> Cross Platform -> Linux section as shown in the figure below to get started:
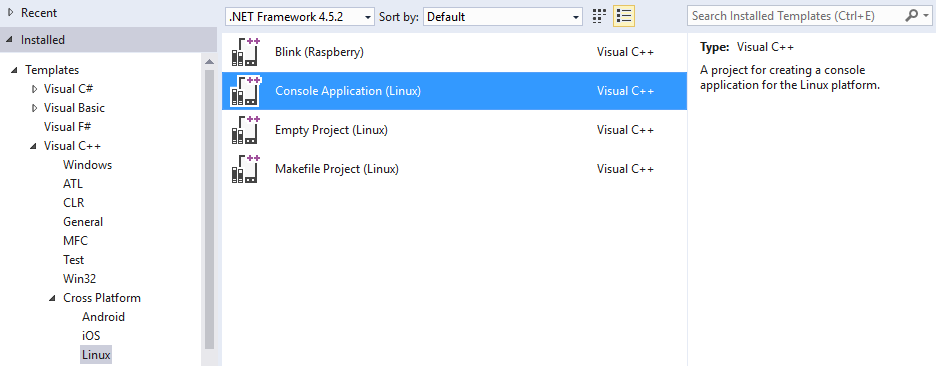 For this exercise, choose the simple Console Application template. If you want to start with something more rich you can use this simple tictactoe project.
Next, pick the Linux distro, Docker container you would like to compile and debug this on. You can choose between them by selecting the one that you would like in the Remote settings section:

You can now start debugging (F5) which will copy your sources remotely, build your application and finally allow you to debug your application.
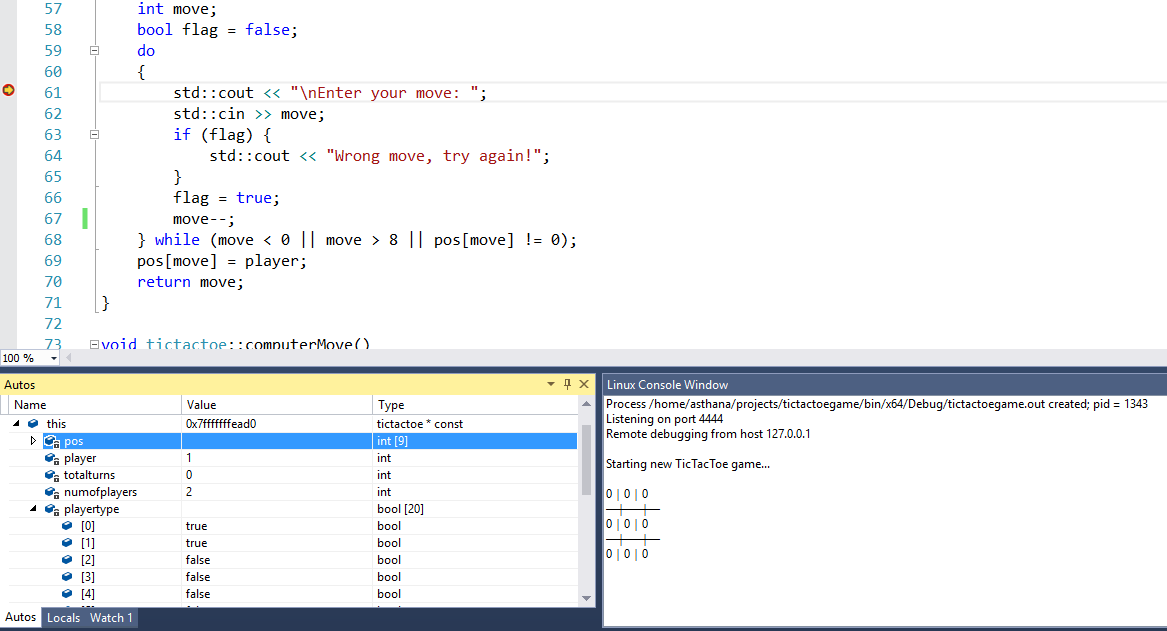
Great! you are now successfully debugging a C++ Linux application running in a container inside an Azure VM.
Step 5: Using Dockerfiles to automate building of images
So far you’ve used very basic Docker commands to create your Docker containers in the previous sections. The real power of Docker comes from not only enabling you to instantiate different versions of Linux distros on one virtual machine in a cheaper, more productive manner, but Docker also provides a way to create a consistent development environment. This is because Docker lets you use a Docker file with a series of commands to set up the environment on the virtual machine.
A Docker file is similar in concept to the recipes and manifests found in infrastructure automation (IA) tools like chef and puppet. You can bring up your favorite text editor and create a file called ‘Dockerfile’ with the following content.
FROM debian
RUN apt-get update && apt-get install -y openssh-server
RUN mkdir /var/run/sshd
RUN echo 'root:screencast' | chpasswd
RUN sed -i 's/PermitRootLogin prohibit-password/PermitRootLogin yes/' /etc/ssh/sshd_config

# SSH login fix. Otherwise user is kicked off after login
RUN sed 's@session\s*required\s*pam_loginuid.so@session optional pam_loginuid.so@g' -i /etc/pam.d/sshd

ENV NOTVISIBLE "in users profile"
RUN echo "export VISIBLE=now" >> /etc/profile

EXPOSE 22
CMD ["/usr/sbin/sshd", "-D"]

RUN apt-get install -y openssh-server g++ gdb gdbserver
You can now run the following commands to build your docker container with this docker file and get it running!
"C:\Program Files\Docker\Docker\resources\bin\docker.exe" build -t debiandockercontainer .
"C:\Program Files\Docker\Docker\resources\bin\docker.exe" run -d -P --name debiancontainer debiandockercontainer
"C:\Program Files\Docker\Docker\resources\bin\docker.exe" port debiancontainer
Running the ‘docker ps’ command will list your newly created container and you can start with Linux C++ development in Visual Studio.
Wrap up
As always, we welcome your feedback and we would love to learn from your experiences as you try this out. This blog is focused on Linux containers, in the future I will also talk about how you can extend your story with Docker containers for your Windows development.
If you run into any problems, following these steps you can email me your query or feedback if you choose to interact directly! Otherwise, we are happy to see your comments and interact with you here through comments. For general Visual Studio product suggestions, you can let us know through User Voice.
 Light
Light Dark
Dark
0 comments