
Using the Windows 8 SDK with Visual Studio 2010 – configuring multiple projects
A few months ago, we wrote about how to use the Windows Software Development Kit (SDK) for Windows 8 within your Visual Studio 2010 projects. These instructions work great if you are updating just one project, but if you need to use the Windows 8 SDK in many projects, repeating these steps for each project can be tedious.
If you want to use these settings in multiple projects, you can use property sheets to configure these settings once, then reuse the settings in different projects. You can also use these instructions to configure these settings for multiple configurations of the same project.
To get started quickly, we’ve included the content for sample property sheets for x86 and x64 configurations in this blog post, which you can use in most situations. For those of you who want to create the property sheet by using the Property Manager to further customize your build configurations, we’ve also included step by step instructions below.
When creating the property sheet, you may want to select a location that is outside of your project folder; for example, select the folder that contains your solution file. If you’re using source control, you may want to add the property sheet as a solution item to archive it along with your projects and source code.
To create the property sheet using default settings:
Note: You will need to create separate files for x86 and for x64. When targeting x64, replace x86 with x64 in the paths listed below.
- Create a text file with an extension of .props (I’ll use the name “Windows8SDK” in this walkthrough).
- Open the file in a text editor, and copy the following lines into the file:
<?xml version=”1.0″ encoding=”utf-8″?>
<Project ToolsVersion=”4.0″ xmlns=”http://schemas.microsoft.com/developer/msbuild/2003“>
<ImportGroup Label=”PropertySheets” />
<PropertyGroup Label=”UserMacros” />
<PropertyGroup>
<ExecutablePath>$(VCInstallDir)bin;$(WindowsSdkDir)bin\NETFX 4.0 Tools;$(ProgramFiles)\Windows Kits\8.0\bin\x86;$(VSInstallDir)Common7\Tools\bin;$(VSInstallDir)Common7\tools;$(VSInstallDir)Common7\ide;$(ProgramFiles)\HTML Help Workshop;$(FrameworkSDKDir)\bin;$(MSBuildToolsPath32);$(VSInstallDir);$(SystemRoot)\SysWow64;$(FxCopDir);$(PATH)</ExecutablePath>
<IncludePath>$(ProgramFiles)\Windows Kits\8.0\Include\um;$(ProgramFiles)\Windows Kits\8.0\Include\shared;$(VCInstallDir)include;$(VCInstallDir)atlmfc\include;$(FrameworkSDKDir)\include;</IncludePath>
<LibraryPath>$(VCInstallDir)lib;$(VCInstallDir)atlmfc\lib;$(ProgramFiles)\Windows Kits\8.0\lib\win8\um\x86;$(FrameworkSDKDir)\lib</LibraryPath>
<ExcludePath>$(VCInstallDir)include;$(VCInstallDir)atlmfc\include;$(ProgramFiles)\Windows Kits\8.0\Include\um;$(ProgramFiles)\Windows Kits\8.0\Include\shared;$(FrameworkSDKDir)\include;$(MSBuildToolsPath32);$(VCInstallDir)atlmfc\lib;$(VCInstallDir)lib;</ExcludePath>
</PropertyGroup>
<ItemDefinitionGroup />
</Project>
To create the property sheet using the Property Manager:
- Open your solution in the Visual Studio IDE.
- From the View menu, select the Property Manager menu item.
- In Property Manager, right-click the project or project configuration that will contain the new property sheet, and then select the Add New Project Property Sheet menu item.
- In the Add New Item dialog box, enter the name of the new property sheet in the Name text box (I’ll use the name “Windows8SDK” in this walkthrough).
- Click Add.
- Now do the steps outlined in the previous blog post to configure the Windows 8 SDK paths:
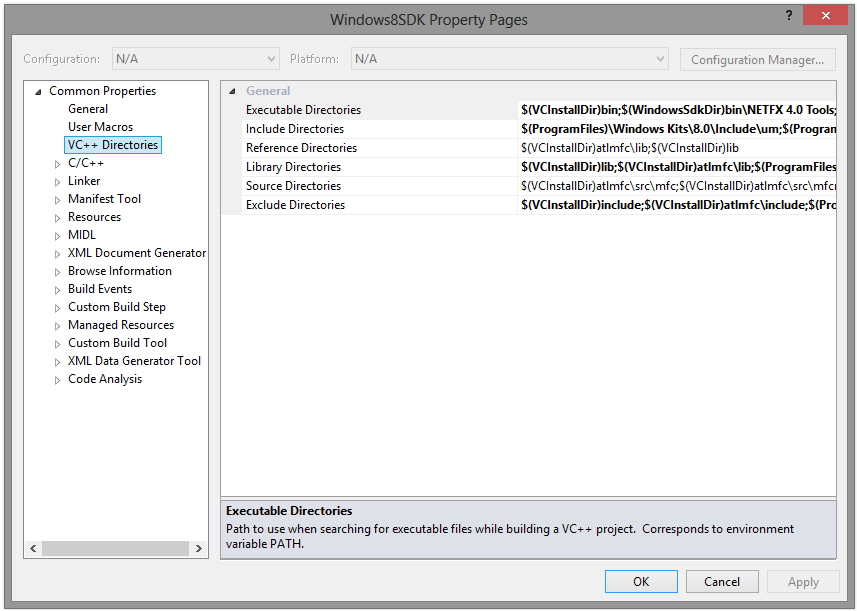
- Go to Configuration Properties -> VC++ Directories
- There are a few things to know before you begin:
- If you installed the SDK to a different location, replace the SDK path with your custom install location.
- You will need to create separate properties sheets for x86 and for x64. When targeting x64, replace x86 with x64 in the paths listed below.
- Change the following properties.
- In “Executable Directories” replace $(WindowsSdkDir)bin with $(ProgramFiles)\Windows Kits\8.0\bin\x86
- In “Include Directories” add $(ProgramFiles)\Windows Kits\8.0\Include\um;$(ProgramFiles)\Windows Kits\8.0\Include\shared at the beginning and remove $(WindowsSdkDir)include
- In “Library Directories” replace $(WindowsSdkDir)lib with $(ProgramFiles)\Windows Kits\8.0\lib\win8\um\x86
- In “Exclude Directories” replace $(WindowsSdkDir)include with $(ProgramFiles)\Windows Kits\8.0\Include\um;$(ProgramFiles)\Windows Kits\8.0\Include\shared
- This is what your property sheet should look like when you’re done.
To use the property sheet in other projects or project configurations:
- Stay in the Property Manager window. Right-click the project or project configuration where you want to add the Windows 8 SDK settings, and then select the Add Existing Property Sheet menu item.
- Select the property sheet that you created above, and make sure it’s listed first.

When creating or adding property sheets to your projects, you can choose to select multiple projects or project configurations, in order to add the same sheet to all selected projects at the same time. If you select a project name, rather than a project configuration name, the property sheet will be added to all project configurations of that project. This can save you a lot of time when adding the same settings to many projects in your solution.

Have more questions about using property sheets? Leave us feedback in the comments!
 Light
Light Dark
Dark
0 comments