
TechEd Europe Demo Session – Face-Lifting MFC Applications on Windows 7
Hello,
My name is Damien Watkins, and I am a Program Manager on the Visual C++ team. Today, I thought I would post the “overview script” for my TechEd Europe session – so those who could not attend can try it out for themselves at home. My talk was about the new MFC features we have added in Visual Studio 2010.
Just before we get started, I would like to point out that Pat Brenner has been doing some Channel 9 videos on the new MFC functionality too, you can find the first three videos here (and keep your eyes open for more in the future):
1. Pat Brenner: Visual Studio 2010 – MFC and Windows 7 (a 25 minute interview on the rationale for and design of the new MFC features)
2. MFC: Implementing handlers for preview, thumbnail and search filtering (a 3 minute “How To” style video)
3. MFC: Integrating your application with the Windows Restart Manager (a 5 minute “How To” style video)
Creating my Solution/Application
To begin, you could run Visual Studio 2010 (VS2010) as an administrator. This is needed to register the “File Type Handlers” for providing Preview, Search and Thumbnail support for your document type. Alternatively, you could run VS2010 as a normal user and run the command to register the file type handlers in an elevated command prompt.
After starting VS2010 (and executing it as an Administrator) you will create a new MFC Application (File->New->Project or CONTROL+SHIFT+n). In the New Project Wizard you will select MFC Application and enter a name for the Project. In my example below I entered “VCBlogDemo” but you can use anything you like however, if you use the same name as me it will be easier to follow the instructions below when I refer to specific classes, methods, etc. I then click “OK”. As an aside, unless I say otherwise I always select the defaults on any screen.
Now work your way through the MFC Application Wizard dialogs, selecting/enabling these features as you go:
1. On the “Overview” page, just click “Next”.
2. On the “Application Type” page, set the Project Style to Office (I will show some Ribbon features further on and so I want a Ribbon based UI) and then click “Next”.
3. On the “Compound Document Support” page, just click “Next”.
4. On the Document Template Properties page:
· Add a file extension, I entered demo-ms
· And I added support for Preview, Thumbnail and Search handler support by clicking the various buttons once they were enabled.
· Check the screenshot you have the same settings:
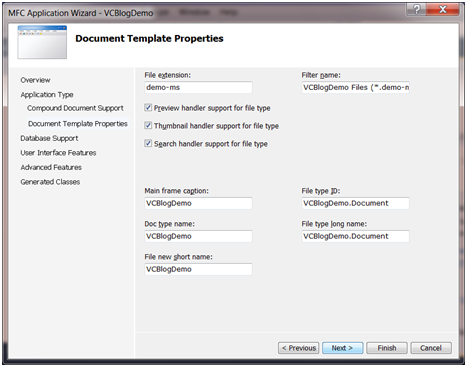
· Then click “Next”.
5. On the “Database Support” page, just click “Next”.
6. On the “User Interface Features” page, just click “Next”.
7. On the “Advanced Features”, please note that “Support Restart Manager” is already selected, and then just click “Next”.
8. On the “Generated Classes” page:
· Change the Base Class for the CVCBlogDemoView class to CEditView. The reason for doing this is that the default implementation of this class can be used to highlight the Preview, Search and Thumbnail functionality without the need for the developer to write any additional code. Your screen should now look like this:
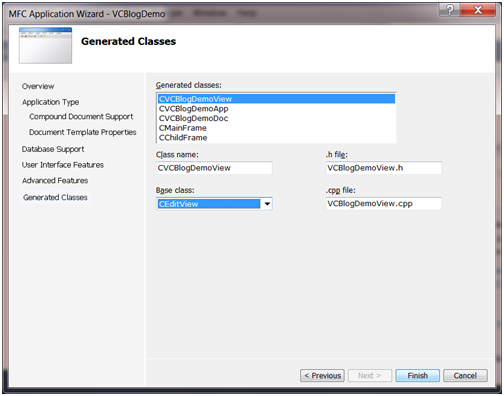
· Then click Finish
Once the Wizard completes, as a quick sanity check, I changed my “Solution Configuration” to be “Release”, build the solution (F7) and started the application without debugging (CONTROL+F5) – I essentially just closed it after it I saw it running. Then I returned to VS2010.
Configuring Restart Manger and Auto-Save
By default, the auto save interval is 5 minutes, but rather than have to wait five minutes after starting the application to demonstrate this functionality I am going to set the interval to 15 seconds. I do this by first finding the command that enables Restart Manger support in the CVCBlogDemoApp constructor and then by adding a line immediately after it. The Constructor will then have these two lines in:
m_dwRestartManagerSupportFlags = AFX_RESTARTMANAGER_SUPPORT_ALL_ASPECTS;
m_nAutosaveInterval = 15000; // add this line after the preceding line
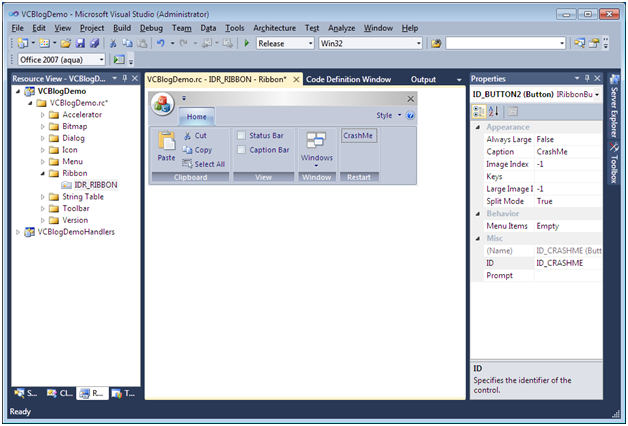
Editing the Ribbon
You can then change to the Resource View and go to the VCBlogDemo project and expand VCBlogDemo.rc. Then expand the Ribbon resources and double click on the IDR_RIBBON resource. Next I dragged a Panel from the Toolbox and plac it on the ribbon. I changed the caption of the panel to “Restart”. I then dragged a Button from the Toolbox to the Restart Panel. I then changed the button’s ID to ID_CRASHME and its Caption to CrashMe.
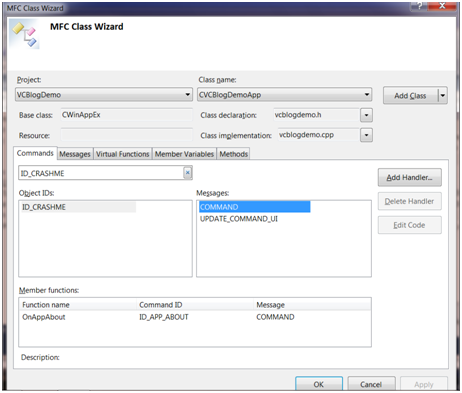
Return of the MFC Class Wizard!
Now you need to add events handlers for the “CrashMe” button in the ribbon. At this point it becomes time to welcome back an old friend, the Class Wizard. Hit CONTROL-SHIFT-X (different key binding to the original) and the Wizard appears. It is hard to imagine a more commonly requested feature than the return of the Wizard – we really hope you enjoy using it!
Now change the “Class name” field to CVCBlogDemoApp and on the Commands Tab enter ID_CRASHME in the search box. The Class Wizard screen looks like this:
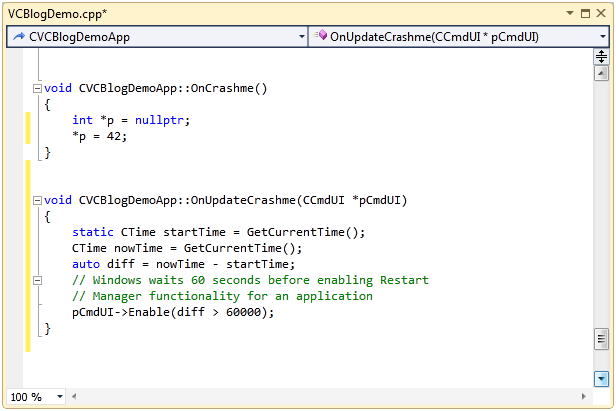
Next, selected COMMAND and clicked on “Add Handler” and then select UPDATE_COMMAND_UI and clicked on “Add Handler”. The COMMAND handler will crash our application, so we can see the Restart Manager functionality at work. The UPDATE_COMMAND handler will disable the “CrashMe” button until our application has been running for more than 1 minute so Windows Restart Manger machinery is enabled (and so the auto save timeout has expired at least once.) Now use the “Edit Code” button to add the following code (of course, you can add whatever logic you like to enable/disable the button and terminate the application – the code below is the simplest and most constrained I could think of – however it is not an example of good coding practices):
Demonstrating our application
So now rebuild the Solution and start the application (remember – it should be built for “Release”.) When you start the application without debugging (CONTROL+F5) you will notice that the “CrashMe” button is initially disabled. Next I will open two more documents (keying CONTROL-N twice will do).
1. In document one I will type “This document is saved” and click on the save icon and save the documents in the Documents folder.
2. In document two I will type “This document is not saved” (and I will NOT save it).
3. In document three I will type “This sentence is saved” and click on the save icon and save the documents in the Documents folder. Next I will type on the second line “This sentence is not saved” (and I will NOT save it).
Windows 7 Taskbar
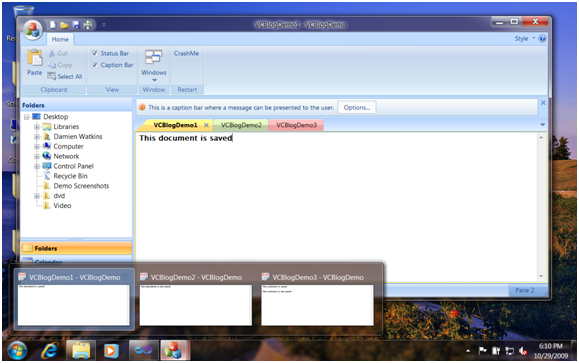
To allow the auto-save functionality time to work, at this point you can hover over the application’s icon in the new Windows 7 Taskbar. Notice how each document has a separate tab (although the writing is very small in this example) and you can see a real time view of the document – for example notice the flashing cursor in the active document (whichever one that happens to be.)
Demonstrating the Restart Manager
Now we can crash the application by clicking on the enabled “CrashMe” button. After taking a few seconds to restart, you get a nice example of our new CTaskDialog and the option to auto-recover our work.
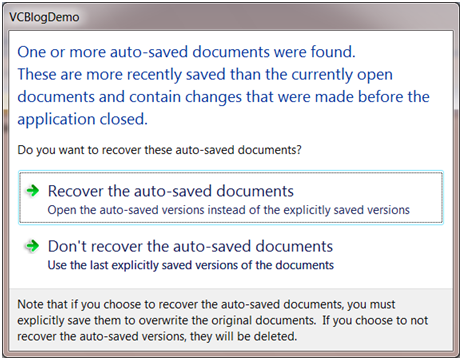
I recover everything by clicking on the “Recover the auto-saved documents” option. Now I hover on the application icon in the task bar and, when the document previews appear, I start closing the documents by clicking on the red X. You will notice how a document that has been saved is just closed, a document that has already been saved but subsequently has been updated will have the “Save” dialog enabled and a document that has never been saved will have the “Save As” dialog enabled.
Explorer Interaction
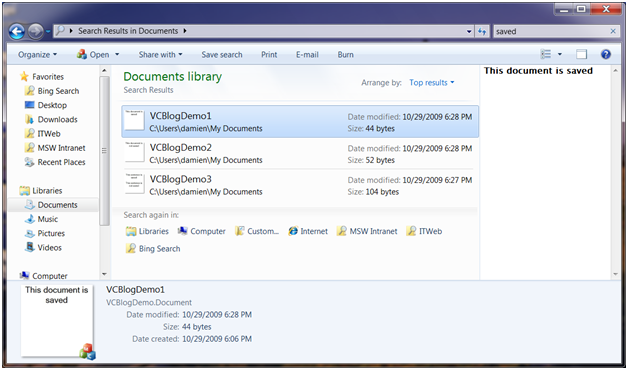
Finally, I start Explorer in the documents folder, type “saved” in the Search field and select one of the demo-ms files and thus we can see the Icon, Preview and Search functionality.
Support for High DPI
For those who have a few minutes, at this stage you can change the resolution of your screen and either restart or logoff (depending on your OS requirements) and see how MFC has added support for High DPI displays.
Summary
As you can see, using the new Windows functionality from MFC is very simple. Add to this the return of the Class Wizard and the addition of the Ribbon Editor and we hope that MFC developers will be excited about the upcoming Visual Studio 2010 release.
One other point, you may notice is that the Ribbon Designer looks a lot like the BCGSoft designer. Again, as with the MFC extensions in VS2008 SP1 (a.k.a. the MFC Feature Pack) we got some assistance from BCGSoft on some of the implementation of the new MFC Features. So that was the overview script of my TechEd Europe talk.
Thanks,
Damien
 Light
Light Dark
Dark
0 comments