
VB Universal Windows App Part 3 (for the end-user): roaming settings, and in-app purchases
This is Part 3 of the “VB Universal Windows App” series:
- Part 1: Setting up the universal Windows app in the Dev Centers, and in VS Solution Explorer
- Part 2: Sharing XAML, Assets and Code
- > Part 3: Local and Roaming settings, and In-App purchases
- Part 4: Sound effects with SharpDX
- Part 5: How to call platform-specific APIs from common code
- Download full source code
In the first two parts we set up a VS Solution that helped us to share between our two app projects. In this post, we’re going to code in the user-facing benefits of universal Windows apps.
From an end-user perspective, the benefit of universal Windows apps is that (1) if you buy the app in one store then it counts as bought in both, (2) if you buy a durable in-app purchase on one device then it counts as bought on both, (3) settings will roam between the Windows and Windows Phone versions of an app.
The first part (buy the app in one store and it counts as bought in both) is already complete, simply by registering the app with the same name in both stores. What we’re going to implement is roaming settings, and in-app purchases.
I want to point out that the entirety of today’s blog post is authored in the common PCL. We’ve “won” – we’ve set up the universal Windows app so we can do our work just once, and it works for both apps.
Roaming settings
We’ll create some settings which will roam, and some settings which are local to each device.
Don’t panic! The task of saving state can sometimes seem daunting. But as you can see it’s only a two minute video to code it up from beginning to end.
What helps is to plan your app’s data before you start coding the app. Keep in mind that all Windows and Windows Phone apps might be summarily terminated. When they’re re-launched, the user will expect them to resume right where they left off. Therefore you need a way to save the current state of your app, and reload it later. That’s the reason for the two “TODO” comments in the above code:
‘ TODO: Save application state and stop any background activity
‘ TODO: Load state from previously suspended application
Step 1: replace those comments with calls to two functions that we’re going to write:
Shared Sub LoadState()
Shared Sub SaveState()
Pro tip: The Windows and Windows Phone design guidelines recommend that if the user manually launches the app then it should start in a “fresh” state, but if app is relaunched because (for instance) it had been shut down and the user navigated back to it, then it should resume where it left off. However many users nowadays prefer apps that violate these guidelines by always resuming where the user left off. Twitter on Windows Phone does this, for instance. You can achieve this Twitter effect just by commenting-out this “If” check in the OnLaunched method, i.e. by always reloading state.
‘ If e.PreviousExecutionState = ApplicationExecutionState.Terminated Then
‘ TODO: Load state from previously suspended application
LoadState()
‘ End If
Plan in advance the three kinds of state.
Transient state is stuff that will be constructed when the application starts, and not persisted. Example: the current mouse coordinates, or a single app-wide instance of “Dim RND As New System.Random()”. (However, if you were writing say a card game and wanted to continue with the same random number sequence, then RND would be local state… see here for ideas how).
Local state is stuff that will be saved onto the current device when your app suspends, and reloaded when the app resumes. Example: the currently open page and its values; or the current position of all pieces in a Checkers game.
Roaming state is stuff that will be saved and reloaded just like local data. But it will also be synced to other devices, at times outside the control of the app developer or end user. The other device might even sync its data to your app while your app is currently running! Example: user preferences for whether they like inches or centimeters, or whether your app’s flying toasters should be lightly toasted or dark brown. Roaming state cannot be larger than 100k at present.
Pro tip: as your app “grows up”, you’ll find it easiest to completely decouple the state+logic from the UI, in a design pattern called MVVM. There are lots of training resources on the topic, e.g. MVVM in 5 Minutes and MVVM in VB.Net and MVVM in Windows 8.
Plan in advance how you will serialize your local and roaming data to disk. For instance, you’ll have to figure out how to serialize the current open page (including position of all scrollbars and checkboxes), or how to serialize the current position of all game pieces.
Again, don’t panic! There are two techniques presented here. The first, settings dictionaries, are very easy to use for small amounts of data. The second, data contracts, become easy to use once you’ve put some initial plumbing in place.
Settings dictionaries are provided by Windows and can be used to manually serialize and deserialize key/value pairs. They are convenient if there isn’t much data to serialize, but can’t hold more than 8k per setting. (Note: we’ve factored the “reload-roaming-state” into a separate method, for reasons we’ll come to later).
Shared Sub SaveState()
ApplicationData.Current.LocalSettings.Values(“x”) = x
ApplicationData.Current.LocalSettings.Values(“y”) = y
ApplicationData.Current.RoamingSettings.Values(“burntToast”) = burntToast
End Sub
Shared Sub LoadState()
x = CDbl(ApplicationData.Current.LocalSettings.Values(“x”))
y = CDbl(ApplicationData.Current.LocalSettings.Values(“y”))
ReloadRoamingState(ApplicationData .Current, Nothing)
End Sub
Shared Sub ReloadRoamingState(appData As ApplicationData, o As Object)
burntToast = CBool(ApplicationData.Current.LocalSettings.Values(“burntToast”))
End Sub
Pro tip: when you release v2 of your app and users will first install it, your apps LoadState method will find only v1 state. Make sure you plan for the future. One common idea is to include a version number in the state, so their LoadState method knows exactly what it’s loading.
DataContracts are useful if you have complex classes or structures to serialize. They are explained on MSDN here. Briefly, you put the <DataContract> attribute on your class or structure, and <DataMember> on members, and the entire whole thing serializes easily.
< DataContract >
Public Class GameState
< DataMember > Public balls As List ( Of BallInfo )
< DataMember > Public background As Color
End Class
< DataContract >
Public Class BallInfo
< DataMember > Public x As Double
< DataMember > Public y As Double
< DataMember > Public dx As Double
< DataMember > Public dy As Double
End Class
I’m going to show how to use DataContracts to serialize state to a file in the LocalFolder or RoamingFolder. By using files we bypass the 8k limit faced by Settings, but it’s more complicated to load. That’s because reading files is an async operation, which might take time to complete, so the OnLaunched method can merely kick off the state-loading process. It’s up to you to make sure the rest of your app deals gracefully with it, maybe by having your main page show a progress indicator until the load has finished.
Shared Async Function SaveStateAsync() As Task
Dim file = Await ApplicationData.Current.LocalFolder.CreateFileAsync( “settings.dat” , CreationCollisionOption .ReplaceExisting)
Using stream = Await file.OpenStreamForWriteAsync()
Dim d As New DataContractSerializer ( GetType ( GameState ))
d.WriteObject(stream, currentGameState)
End Using
End Function
Shared Async Sub StartLoadStateAsync()
‘ Async Subs are generally bad practice, because there’s no way for the
‘ caller to know when we’re finished or to catch exceptions.
‘ But in this case we have no choice – so we’ll handle exceptions ourselves,
‘ and expect the rest of the app to respond gracefully when
‘ “currentGameState” gets assigned.
Try
Dim file = Await ApplicationData.Current.LocalFolder.GetFileAsync( “settings.dat” )
Using stream = Await file.OpenStreamForReadAsync()
Dim d As New DataContractSerializer ( GetType ( GameState ))
currentGameState = CType (d.ReadObject(stream), GameState )
End Using
Catch ex As Exception When TypeOf ex Is FileNotFoundException OrElse
TypeOf ex Is SerializationException
‘ If we couldn’t load existing state, then we’ll start with fresh default state:
gs = New GameState
gs.background = Windows.UI. Colors .Aquamarine
gs.balls.Add( New BallInfo With {.x = 15, .y = 10, .dx = 1, .dy = 2})
gs.balls.Add( New BallInfo With {.x = 1, .y = 2, .dx = 3, .dy = 4})
Catch ex As Exception
SendErrorReport(ex)
End Try
End Sub
Public Shared Sub OnLaunched(e As LaunchActivatedEventArgs )
Dim rootFrame = TryCast ( Window.Current.Content, Frame )
If rootFrame Is Nothing Then
rootFrame = New Frame ()
If e.PreviousExecutionState = ApplicationExecutionState.Terminated Then
StartLoadStateAsync() ‘ Kick off this long-running method
End If
….
End Sub
How to deal with syncing of roaming data.
Roaming data should be loaded in OnLaunched, and saved upon app suspension, as normal. But you should also deal with what happens when roaming data is delivered onto the device while your app is currently running. The process is straightforward. Here are the hooks:
Sub OnLaunched(e As LaunchActivatedEventArgs )
AddHandler ApplicationData.Current.DataChanged, AddressOf ReloadRoamingState
…
End Sub
Async Function OnSuspendingAsync() As Task
RemoveHandler ApplicationData.Current.DataChanged, AddressOf ReloadRoamingState
…
End Sub
Sub ReloadRoamingState(appData As ApplicationData , o As Object )
… deserialize the data as discussed previously
End Sub
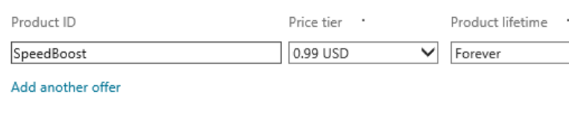
In-app purchases
We already created an in-app purchase in the two dev centers for something we called “SpeedBoost”. Now we’ll add code to use it, and to allow the user to purchase it from within the app.
The point about an in-app purchase is that the user can buy it from within the app! Here’s a screenshot of the “purchase” button I created for Paddle Game (in this case for a computer guidance system, rather than a speed boost):
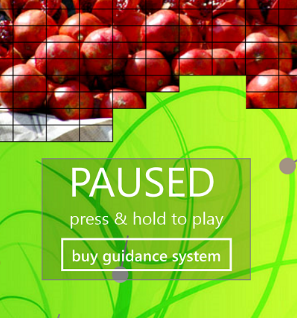
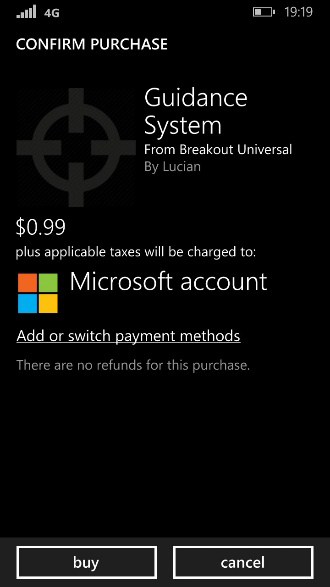
As for what the user sees after they click your purchase button, that’s entirely implemented by the system. The bad news is that you’re only going to see success or dialogs until after your app has been finished and uploaded to the stores (and even after that it sometimes takes a day or two for everything to be approved).

Step 1: add a field to App.vb to record whether user owns the in-app product. I use a nullable Boolean, where I’ll interpret “Nothing” to mean “still need to check”
Private Shared _HasSpeedBoost As Boolean? = Nothing
Step 2: add a property to App.vb to perform the check if necessary:
Shared ReadOnly Property HasSpeedBoost As Boolean
Get
If _HasSpeedBoost Is Nothing Then _HasSpeedBoost =
CurrentApp.LicenseInformation.ProductLicenses( “SpeedBoost” ).IsActive
Return _HasSpeedBoost.Value
End Get
End Property
Step 3: add a method to App.vb which will perform the purchase. In it, I reset the nullable field back to _Nothing, meaning “still need to check”. That way the property getter will be re-run, and will work correctly whether the user completed or declined the purchase.
Shared Async Function PurchaseSpeedBoostAsync() As Task
If HasSpeedBoost() Then Return
_HasSpeedBoost = Nothing
Await CurrentApp.RequestProductPurchaseAsync( “SpeedBoost” )
End Function
Step 4: add a button in your AdaptiveMainPage.xaml (or elsewhere in your UI) where the user can make the purchase:
< Button x:Name=”purchase1″ Content=”Purchase Speed Boost”/>
Step 5: respond to the button-click:
Async Sub purchase1_Click(sender As Object , e As RoutedEventArgs ) Handles purchase1.Click
Await App.PurchaseSpeedBoostAsync()
UpdatePurchaseButtonVisibility()
End Sub
Step 6: Show or hide the visibility of the purchase button according to whether the user has already purchased the speed boost:
Overrides Async Sub OnNavigatedTo(e As NavigationEventArgs )
UpdatePurchaseButtonVisibility()
….
End Sub
Sub UpdatePurchaseButtonVisibility()
purchase1.Visibility = If ( App.HasSpeedBoost(),
Windows.UI.Xaml.Visibility.Collapsed,
Windows.UI.Xaml.Visibility.Visible)
End Sub
Step 7: Remember that your app has to be made better in some way by the in-app purchase! In my case, if the user purchased the SpeedBoost, then I doubled the ball’s speed…
Shared Sub Tick()
x += dx : y += dy
If HasSpeedBoost() Then x += dx : y += dy
….
End Sub
Telemetry and debugging
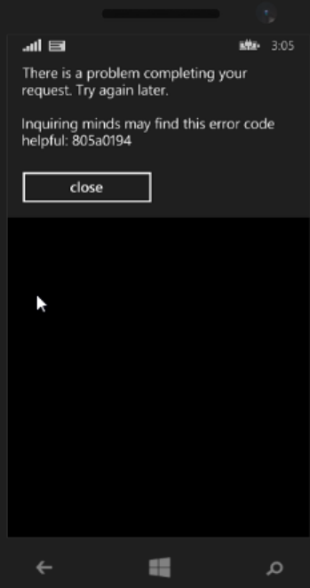
There are lots of bugs that you’ll only discover after publishing your app. It’s important that you get back good actionable feedback about them.
It’s especially important to get good feedback when in-app purchasing fails. Imagine a customer who wants to pay you money, but a glitch isn’t letting them – they’ll be doubly frustrated. It’s often better to err on the side of generosity and give them the functionality at least this time around. I also wanted good telemetry for the in-app purchasing because, until the app had been approved in both stores, I was getting strange crashes.
Here’s how I rewrote PurchaseSpeedBoostAsync to get better feedback:
Shared Async Function PurchaseSpeedBoostAsync() As Task
If HasSpeedBoost() Then Return
_HasSpeedBoost = Nothing
Dim log = CStr ( ApplicationData.Current.LocalSettings.Values( “log” ))
If log IsNot Nothing Then
‘ previous run of this app tried to purchase, but didn’t succeed…
ApplicationData.Current.LocalSettings.Values.Remove( “log” )
SendErrorReport(log)
_HasSpeedBoost = True ‘ so the user can at least use the item
Return
End If
Try
log = “About to await RequestProductPurchaseAsync”
ApplicationData.Current.LocalSettings.Values( “log” ) = log
Dim result = Await CurrentApp.RequestProductPurchaseAsync( “SpeedBoost” )
log &= vbCrLf & String.Format( “Finished await. Status={0}, OfferId={1}, TransactionId={2}” , result.Status, result.OfferId, result.TransactionId)
ApplicationData.Current.LocalSettings.Values( “log” ) = log
Catch ex As Exception
log &= vbCrLf & “EXCEPTION! “ & ex.Message & ex.StackTrace
ApplicationData.Current.LocalSettings.Values( “log” ) = log
SendErrorReport(ex)
End Try
End Function
This method “pessimistically” logs, writing its latest state to LocalSettings every step of the way. Even if it crashes part way through, then at least the log will show how far it got.
Separately, when the method starts, it checks if any previous invocation of the method had left anything in the log. If so, that means the user must have tried to make the purchase but something went wrong. The best thing to do is allow for a problem-report to be sent by email, and give the user the benefit of the doubt by assuming (for this run of the app) that the purchase went through.
Shared Sub SendErrorReport(ex As Exception )
SendErrorReport(ex.Message & vbCrLf & “stack:” & vbCrLf & ex.StackTrace)
End Sub
Shared Async Sub SendErrorReport(msg As String )
‘ Async Subs are normally bad because the caller can’t know when the method
‘ has finished and can’t deal with exceptions. But the caller will typically be
‘ inside a catch block where they can’t await. And even if they did get an
‘ exception from us what would they do? send an error report?!!!
Dim md As New Windows.UI.Popups.MessageDialog ( “Oops. There’s been an internal error” , “Bug report” )
Dim r As Boolean ? = Nothing
md.Commands.Add( New Windows.UI.Popups.UICommand ( “Send bug report” , Sub () r = True ))
md.Commands.Add( New Windows.UI.Popups.UICommand ( “Cancel” , Sub () r = False ))
Await md.ShowAsync()
If Not r.HasValue OrElse Not r.Value Then Return
‘
Dim emailTo = “my.email@address.com”
Dim emailSubject = “App1 problem report”
Dim emailBody = “I encountered a problem with App1…” & vbCrLf & vbCrLf & msg
Dim url = “mailto:?to=” & emailTo & “&subject=” & emailSubject & “&body=” & Uri.EscapeDataString(emailBody)
Await Windows.System.Launcher.LaunchUriAsync( New Uri (url))
End Sub
Conclusion
So far in this blog series we’ve created out app, and implemented most of its functionality – in-app purchases, local state, and roaming state. All this is already good enough for a great many apps. Tomorrow, though, we’ll venture into serious games programming – we’ll add sound effects using the open-source SharpDX library.
—
Lucian
 Light
Light Dark
Dark
1 comment
thanks for that RND tip – this taught me a lot !