Silverlight 4 Firestarter Series #2: How to migrate an ASP.NET Web Forms Application to Silverlight
In this walkthrough, I will demonstrate how to convert an existing ASP.NET/jQuery application that consumes data from a Windows Communication Foundation (WCF) service to Silverlight.
Here are some topics that we will cover:
- How to use the Visual Studio 2010 Silverlight Designer
- XAML and Silverlight control concepts
- How WCF services can be integrated into Silverlight applications
- Silverlight data binding techniques
- How to make asynchronous calls to services
- How to work with cross domain services
- Similarities between ASP.NET and Silverlight applications
Before you begin you need to download the offline kit from the Firestarter Labs, to use the existing applications.
You can migrate an ASP.NET Web Forms application to Silverlight in three simple steps as follows:
Step 1: Explore the ASP.NET Web Forms application
Step 2: Migrate the ASP.NET application to Silverlight
Step 3: Call a WCF Service and Bind data
Step 1: Explore the ASP.NET Web Forms application
Let’s take a look at the code that we’ll be migrating. To start exploring the ASP.NET Web Forms application, follow the following steps:
- Open Visual Studio 2010, and from the File menu and select Open Project. The Open Project dialog box is displayed.
- Open the following Visual Studio Solution file from the downloaded offline kit:
“FirestarterLabs�2 – ASP.NETSourceStarting PointVBCustomerViewer.sln” - The following projects are available in the application:
- CustomerService.Model – This project contains the entities and data repository classes that are used to access the AdventureWorks LT database.
- CustomersService – This project is a WCF service application that displays the entities to various applications.
- CustomerViewer – This is a Windows Forms project that takes data from a WCF service.
- CustomerViewer.Web – This is an ASP.NET Web Forms project that uses jQuery to make RESTful calls to a WCF service.

- In Solution Explorer, right-click CustomerService.svc in the CustomersService project.
- From the popup menu select View in Browser. This will start a local WCF server and show a test page.
- Go back to Visual Studio application.
- In Solution Explorer, right-click the CustomerViewer project.
- From the popup menu select Set as StartUp Project.
- Press F5 to run the application. The first time the application runs there will be short delay before data is loaded.
- Select a customer from the drop-down list. The details of the customer are displayed in the form, allowing the data to be updated or deleted using the AJAX techniques.
- Go back to Visual Studio application.
- To see the Entity Framework 4 model, in Solution Explorer, double-click the AdventureWorksLT.edmx file in the CustomerService.Model project. The entity model contains a Customer object that is used by the ASP.NET application.
- From the Repository folder, open the CustomerRepository.vb page and review the code that interacts with the entity model. The RepositoryBase class is responsible for all communication with Entity Framework and acts as a reusable repository layer in the application.
- Open the ICustomerService.vb page. The methods in the page are used to load the customer objects and handle the update and delete operations. Some of the operations support RESTful calls.
Note: The ASP.NET project currently uses a WCF service proxy object as well as jQuery to communicate with the different service operations. These service calls are forwarded to the CustomerRepository class. The WCF services work well in environments where data must be exposed to different types of clients without requiring a specific technology or framework. This application uses WCF services to promote data re use, allow different types of clients to consume data, and provide a standards compliant way to access the data. - In the CustomerViewer.Web project, right-click Default.aspx. From the popup menu select View Code. Review the code and note the following:
- A WCF service proxy is used to call a service that supplies customer data
- If an error occurs loading customer data, a script is sent to the client and used to display an alert
- Open the Default.aspx page and note the following:
- A stylesheet named Default.css is used to add CSS styles into the page
- A script named Default.js is loaded by the page
- div tags are used to arrange HTML controls in the page
- Open the Default.js page review the jQuery code and note the following features:
- jQuery selectors are used to locate controls in the DOM and access their values
- jQuery AJAX functions such as getJSON are used to communicate with a cross domain WCF service
Step 2: Migrate the ASP.NET application to Silverlight
Now let’s migrate the application to Silverlight. We’ll create a new Silverlight project, work with XAML, create a WCF service proxy to interact with the service, and design a user interface that mirrors the existing ASP.NET user interface.
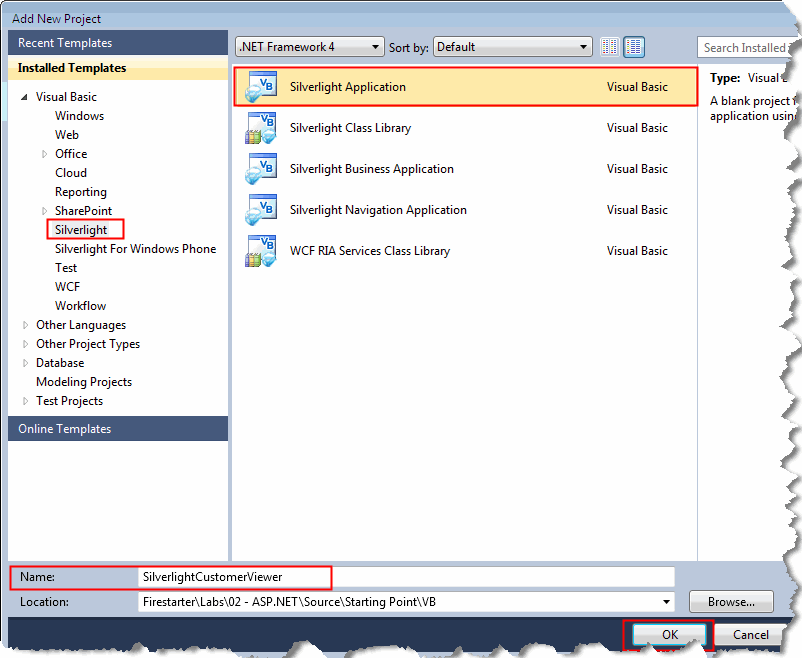
- To add a new Silverlight Application, right-click the application name and add a new project. The Add New Project dialog box is displayed.
- Browse to the Silverlight node and select the Silverlight Application template.

- Enter the name for the project as SilverlightCustomerViewer and click OK. The New Silverlight Application dialog box is displayed.

- Select <New Web Project> from the drop-down list options and confirm that the New Web project name is displayed as SilverlightCustomerViewer.Web. This project will be used to host the Silverlight application in a web page.
- Click OK to proceed. The MainPage.xaml page of the SilverlightCustomerViewer project is displayed.
- Replace the <UserControl> tag with the following code:
<UserControl x:Class=”SilverlightCustomerViewer.MainPage”
xmlns=”http://schemas.microsoft.com/winfx/2006/xaml/presentation”
xmlns:x=”http://schemas.microsoft.com/winfx/2006/xaml”
xmlns:d=”http://schemas.microsoft.com/expression/blend/2008″
xmlns:mc=”http://schemas.openxmlformats.org/markup-compatibility/2006″
mc:Ignorable=”d”
d:DesignHeight=”545″ d:DesignWidth=”550″ Width=”545″ Height=”550″>
<Grid x:Name=”LayoutRoot” Background=”White”>
</Grid>
</UserControl>
Note: The d:DesignHeight and d:DesignWidth attributes control the size of the design surface in the design mode. However, they don’t have any effect at runtime. The Height and Width attributes constrain the size of the Silverlight screen at runtime. If you don’t define the Height and Width attributes, Silverlight will automatically fill the entire area of its container.
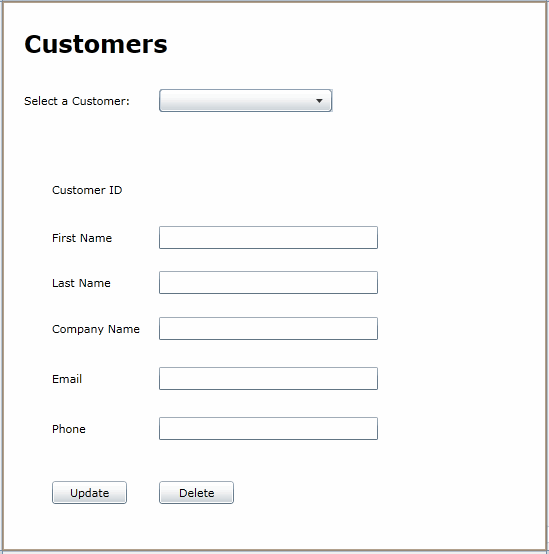
- From the toolbox, drag and drop 9 TextBlock controls, 1 ComboBox control, 5 TextBox controls and 2 Button controls to the designer surface and arrange them as the following:

Note: The TextBlock control is similar to the Label control in ASP.NET. The Silverlight Toolkit provides the Label control that can be used in Silverlight applications. You can download the Silverlight Toolkit from here. - Change the Text property of each TextBlock control such that it matches the user interface as shown above.
- Set the Content property of the first Button control to “Update” and the Content property of the second Button Control to “Delete”.
- Select the ComboBox control, and change the name of the control to a value of CustomersComboBox as shown in the following image:

- Change the DisplayMemberPath property of the ComboBox control to a value of FullName.
Note: The DisplayMemberPath is used to define the property that will be displayed is the ComboBox when it binds to a collection of Customer objects. - Change the names of the update and delete buttons in the interface to “Update” and “Delete” respectively using the Properties window.
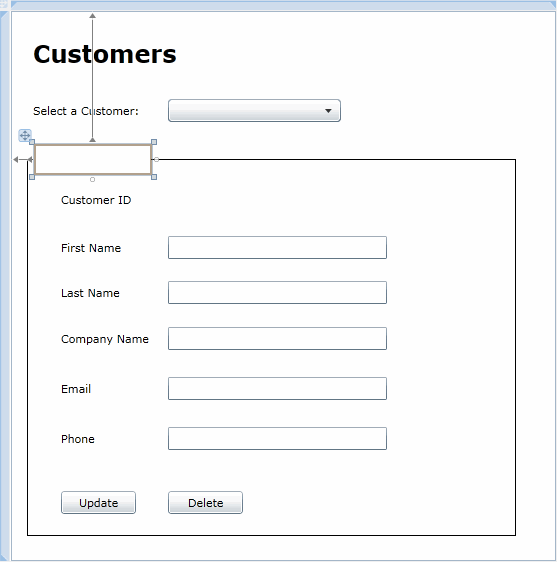
- To simulate an HTML frameset tag, from the toolbox drag and drop a Rectangle control to the designer surface.
- Right-click the Rectangle control, and from the popup menu select Order, and then select Send to Back.
- Resize and arrange the Rectangle control as shown in the following figure:

- From the toolbox, drag and drop a Border control to the design surface.

- Select the Border control and change its Background property to “White” and its BorderBrush property to “White”.
- From the Toolbox, drag and drop a TextBlock control into the Border control.
- Select the TextBlock control and change the Text property to a value of Customer Details.
- Right-click the Customer Details TextBlock and from the popup menu select Reset Layout, and then select Size.
- The user interface should look like the following:

Step 3: Call a WCF Service and Bind Data
Now let’s create a WCF service proxy that can be used to call an existing WCF service. We’ll also use a clientaccesspolicy.xml file to handle cross domain issues and bind data to controls.
- Right-click on the SilverlightCustomerViewer project and then select Add Service Reference. Add Service Reference dialog box is displayed.
- Click Discover to browse and locate the WCF services.
- To expand the CustomerService.svc service, click on the icon next to CustomerService.svc service. Drill down to browse to the ICustomerService contract. Click the contract name and ensure that it has several service operations available.
- Enter the namespace as CustomerService.Proxies.
- To create the WCF service proxy, click OK.
- Add a new Customer class to the SilverlightCustomerViewer project.
- Add the following namespace of the new class:
Namespace CustomerService.Proxies
Note: This namespace is added so as to match the namespace of the new class with that of the namespace generated by the WCF proxy.
- To display the FullName property in the ComboBox control , add the following code in the Customer class:
Partial Public Class Customer
Public ReadOnly Property FullName() As String
Get
Return FirstName & ” “ & LastName
End Get
End Property
End Class
- To import the proxy namespace, open the MainPage.xaml.vb page and add the following code:
Imports CustomerService.Proxies
- To hook the Loaded event to an event handler, add the following code within the constructor:
AddHandler Loaded, AddressOf MainPage_Loaded
- To use the WSF service proxy and make an asynchronous data request, add a MainPage_Loaded method with the following code:
Private Sub MainPage_Loaded(ByVal sender As Object, ByVal e As RoutedEventArgs)
Dim proxy = New CustomerServiceClient()
AddHandler proxy.GetCustomersCompleted, AddressOf proxy_GetCustomersCompleted
proxy.GetCustomersAsync()
End Sub
- Add the following method and associated code to handle the asynchronous callback, which will be made when the data from the WCF service is returned to the Silverlight application:
Private Sub proxy_GetCustomersCompleted(ByVal sender As Object, ByVal e As GetCustomersCompletedEventArgs)
CustomersComboBox.ItemsSource = e.Result
End Sub
Note: Once the WCF service proxy returns data it can be accessed through the GetCustomersCompletedEventArgs object’s Result property which is typed as an ObservableCollection of Customer. This collection is assigned to the ItemsSource property of the ComboBox.
- Open the MainPage.xaml page.
- Select the TextBlock control next to Customer ID and select Properties from the menu.
- Remove the text from the Text property and click on the click the icon next to the property and from the popup menu select Apply Data Binding. The Data Binding property dialog box is displayed.
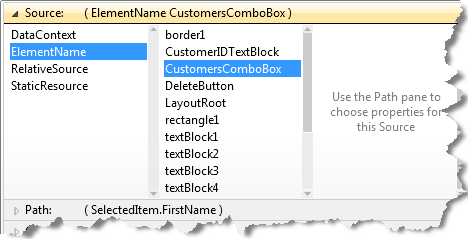
- Click ElementName and then select CustomersComboBox to set the ComboBox as the data binding source as shown in the following figure:

- Click Path area and select SelectedItem from the properties as shown in the following figure:

- In the XAML editor, locate the TextBlock control modified in the previous step and change the Text property value to the following:
Text=”{Binding ElementName=CustomersComboBox, Path=SelectedItem.CustomerID }”
- Similarly add data bindings to all of the TextBox controls in the designer surface. For this you’ll have to modify the Text property of each control within the XAML as done in the previous step to specify the appropriate property of the SelectedItem to bind to. To set the properties for each TextBox, add the following XAML code:
<TextBox Height=”23″ HorizontalAlignment=”Left” Margin=”158,225,0,0″ VerticalAlignment=”Top” Width=”219″ Text=”{Binding ElementName=CustomersComboBox, Path=SelectedItem.FirstName,Mode=TwoWay}” />
<TextBox Height=”23″ HorizontalAlignment=”Left” Margin=”158,270,0,0″ VerticalAlignment=”Top” Width=”219″ Text=”{Binding ElementName=CustomersComboBox, Path=SelectedItem.LastName,Mode=TwoWay}” />
<TextBox Height=”23″ HorizontalAlignment=”Left” Margin=”158,316,0,0″ VerticalAlignment=”Top” Width=”219″ Text=”{Binding ElementName=CustomersComboBox, Path=SelectedItem.CompanyName,Mode=TwoWay}”/>
<TextBox Height=”23″ HorizontalAlignment=”Left” Margin=”158,366,0,0″ VerticalAlignment=”Top” Width=”219″ Text=”{Binding ElementName=CustomersComboBox, Path=SelectedItem.EmailAddress,Mode=TwoWay}” />
<TextBox Height=”23″ HorizontalAlignment=”Left” Margin=”158,416,0,0″ VerticalAlignment=”Top” Width=”219″ Text=”{Binding ElementName=CustomersComboBox, Path=SelectedItem.Phone,Mode=TwoWay}” />
Note: Each TextBox binding has Mode=TwoWay added to it. This allows any change made to a TextBox control to be propagated back to the bound property automatically.
- Right-click the SilverlightCustomerViewer.Web project and select Set as StartUp Project.
- To set the html page in the project as the startup page, right-click the appropriate file and select Set As Start Page.
- Press F5 to compile and run the application.
Note: An error will occur once the Silverlight application loads. This is due to a cross domain call that is being made from Silverlight to the WCF service. This service uses a different port than the Silverlight host Web project, which causes this cross domain exception to be thrown. - To fix this cross domain issue, rename the existing clientaccesspolicy.exclude file in the CustomersService project to clientaccesspolicy.xml.
- Press F5 to compile and run the application again. Now the data loads in the ComboBox control.
- Select a customer from the drop-down list. The data from it is bound to the appropriate TextBlock and TextBox controls.
- Go back to Visual Studio application to add the Click event handlers.
- To add the event handler for the Update button, add the following code in the Update button’s click event handler:
Dim proxy = New CustomerServiceClient()
Dim cust = TryCast(CustomersComboBox.SelectedItem, Customer)
cust.ChangeTracker.State = ObjectState.Modified
AddHandler proxy.SaveCustomerCompleted, Sub(s, args)
Dim opStatus = args.Result
Dim msg As String = If(opStatus.Status, “Customer Updated!”, “Unable to update Customer: “ & opStatus.Message)
MessageBox.Show(msg)
End Sub
proxy.SaveCustomerAsync(cust)
- To add the event handler for the Delete button, add the following code in the Delete button’s click event handler:
Dim proxy = New CustomerServiceClient()
Dim cust = TryCast(CustomersComboBox.SelectedItem, Customer)
cust.ChangeTracker.State = ObjectState.Deleted
AddHandler proxy.SaveCustomerCompleted, Sub(s, args)
Dim opStatus As OperationStatus = args.Result
If opStatus.Status Then
CType(CustomersComboBox.ItemsSource, ObservableCollection(Of Customer)).Remove(cust)
MessageBox.Show(“Customer deleted!”)
Else
MessageBox.Show(“Unable to delete Customer: “ & opStatus.Message)
End If
End Sub
proxy.SaveCustomerAsync(cust)
- Run the application and test the update and delete functionality.
Summary
In this walkthrough you have examined an existing ASP.NET Web Forms application and supporting data access and service layers. You have now successfully migrated the existing functionality from the ASP.Net Web Forms application to Silverlight.
You can find the full source code for the application here.

 Light
Light Dark
Dark
0 comments