
Visual Basic Windows Phone 7 Series #2. How to create a microphone application for Windows Phone 7
In our last post, I explained how to create a mini browser for Windows Phone 7. In this blog, I want to share a sample that will help you to create a microphone application for Windows Phone 7. This application will have the feature to capture audio from a microphone and then play back the captured audio. I will now demonstrate how easy it is to create a microphone application for Windows Phone 7, using Visual Basic for Windows Phone Developer Tools.
The microphone application can be created in 4 simple steps as follows:
- Create a sample application and add controls
- Add event handlers
- Build and debug the application
- Rebuild in the release mode before publishing
Prerequisites:
- Visual Studio 2010 Professional, Premium, or Ultimate. If you do not have any of the releases, you can download any of the following trial versions as per your preference: Professional, Premium, or Ultimate.
- Windows Phone Developer Tools RTW
- Visual Basic
for Windows Phone Developer Tools – RTW
Note: You can install the newer version- Windows Phone Developer Tools 7.1 Beta instead of the above mentioned two tools as it will take comparatively less time. However, this sample was created using the previous version.
To create the microphone application, let’s follow the 4 simple steps mentioned earlier:
Step 1 – Create a sample application and add controls
Create a sample application
- Create a new project and browse to the “Silverlight for Windows Phone” node.
- Select the “Windows Phone Application” template.
- Enter a name for the application.

- Click OK. The MainPage.xaml page is displayed.

- In Solution Explorer, right-click the application name and then select Add Reference.

- Select Microsoft.Xna.Framework from the list, and then click Ok.


Add controls
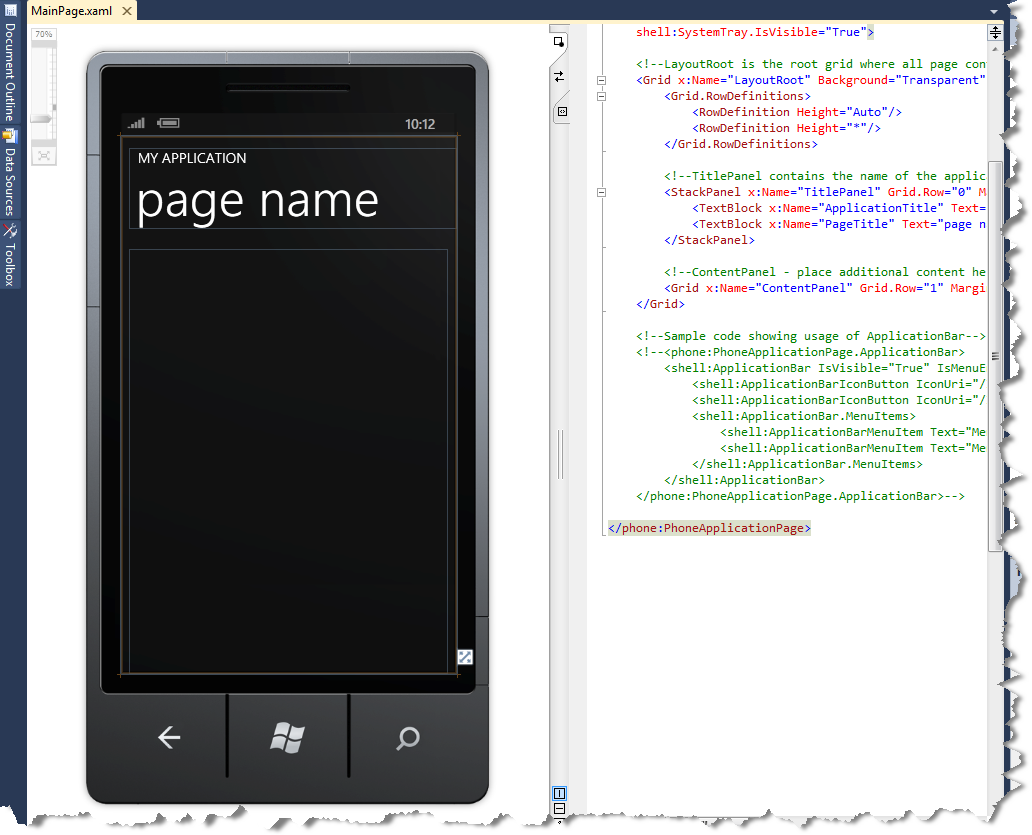
- Click the MY APPLICATION text. In the Properties window, change the text property to “SILVERLIGHT MICROPHONE SAMPLE”.
- Click the page name text. In the Properties window, change the text property to “press record”.
- In Solution Explorer, right-click the application name and add a new folder.
- Rename the new folder as “Images”, and add the required icon images to the folder.
- From the toolbox, drag and drop the Image control to the design surface.
- Click the Image control. In the Properties window, change the text property to “StatusImage”.
- Change the source property of the Image control to link it to the icon image you added in the Images folder.
- Add the following XAML code to create the record, play, and stop buttons. This code also links the buttons to the respective icon images from the Images folder.
<phone:PhoneApplicationPage.ApplicationBar>
<shell:ApplicationBar IsVisible="True" IsMenuEnabled="False">
<shell:ApplicationBar.Buttons>
<shell:ApplicationBarIconButton x:Name="recordButton" Text="record" IconUri="/Images/record.png" Click="recordButton_Click" IsEnabled="True"/>
<shell:ApplicationBarIconButton x:Name="playButton" Text="play" IconUri="/Images/play.png" Click="playButton_Click" IsEnabled="False"/>
<shell:ApplicationBarIconButton x:Name="stopButton" Text="stop" IconUri="/Images/stop.png" Click="stopButton_Click" IsEnabled="False"/>
</shell:ApplicationBar.Buttons>
</shell:ApplicationBar>
</phone:PhoneApplicationPage.ApplicationBar>
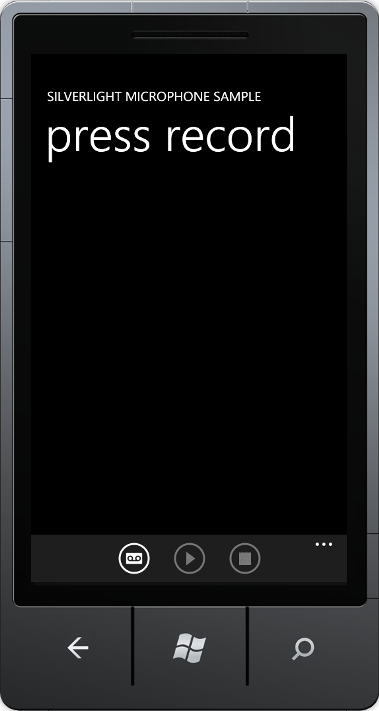
Your application now looks like this:

Step 2 – Add event handlers
Adding event handlers is one of the important tasks. These event handlers are required to start capturing an audio, stop capturing the audio, and then play back the captured audio.
To add the event handlers:
-
Open the MainPage.xaml.vb page, and add the following code:
Imports System.IO
Imports System.Threading
Imports System.Windows
Imports System.Windows.Media.Imaging
Imports System.Windows.Threading
Imports Microsoft.Phone.Controls
Imports Microsoft.Phone.Shell
Imports Microsoft.Xna.Framework
Imports Microsoft.Xna.Framework.Audio
- To simulate the XNA Framework, add the following code to the constructor of your MainPage class:
' Timer to simulate the XNA Framework game loop (Microphone is from the XNA Framework).
Dim dt As New DispatcherTimer()
dt.Interval = TimeSpan.FromMilliseconds(33)
AddHandler dt.Tick, AddressOf dt_Tick
dt.Start()
- To create a new Microphone.BufferReady event handler, add the following code:
AddHandler microphone.BufferReady, AddressOf microphone_BufferReady
After adding all the code mentioned in the previous steps, your constructor should look like the following:
''' Constructor
Public Sub New()
InitializeComponent()
' Timer to simulate the XNA Framework game loop (Microphone is from the XNA Framework).
Dim dt As New DispatcherTimer()
dt.Interval = TimeSpan.FromMilliseconds(33)
AddHandler dt.Tick, AddressOf dt_Tick
dt.Start()
AddHandler microphone.BufferReady, AddressOf microphone_BufferReady
End Sub
- To implement the BufferReady event handler, add the following code:
Private Sub microphone_BufferReady(ByVal sender As Object, ByVal e As EventArgs)
microphone.GetData(buffer)
stream.Write(buffer, 0, buffer.Length)
End Sub
Note: While recording, this method copies the data from the microphone to a buffer. Later, it copies that buffer to a stream so that the audio can be played back again.
- Add the following code to create an event handler for the record button.
Private Sub recordButton_Click(ByVal sender As Object, ByVal e As EventArgs)
‘ Get audio data in 1 second chunks
microphone.BufferDuration = TimeSpan.FromMilliseconds(1000)
‘ Allocate memory to hold the audio data
buffer = New Byte(microphone.GetSampleSizeInBytes(microphone.BufferDuration) – 1) {}
‘ Set the stream back to zero in case there is already something in it
stream.SetLength(0)
‘ Start recording
microphone.Start()
SetButtonStates(False, False, True)
UserHelp.Text = “record”
StatusImage.Source = microphoneImage
End Sub
Note: This method will start capturing the audio. It also allocates memory to hold the audio for 1 second.
- Add the following code to create an event handler for the stop button. This method will stop capturing the audio.
Private Sub stopButton_Click(ByVal sender As Object, ByVal e As EventArgs)
If microphone.State = MicrophoneState.Started Then
' In RECORD mode, user clicked the
' stop button to end recording
microphone.Stop()
ElseIf soundInstance.State = SoundState.Playing Then
' In PLAY mode, user clicked the
' stop button to end playing back
soundInstance.Stop()
End If
SetButtonStates(True, True, False)
UserHelp.Text = "ready"
StatusImage.Source = blankImage
End Sub
- Add the following code to create an event handler for the play button.
Private Sub playButton_Click(ByVal sender As Object, ByVal e As EventArgs)
If stream.Length > 0 Then
‘ Update the UI to reflect that
‘ sound is playing
SetButtonStates(False, False, True)
UserHelp.Text = “play”
StatusImage.Source = speakerImage
‘ Play the audio in a new thread so the UI can update.
Dim soundThread As New Thread(New ThreadStart(AddressOf playSound))
soundThread.Start()
End If
End Sub
Note: This method will allocate a new SoundEffect object and play back the captured audio.
Voila! Now your microphone for Windows Phone 7 is ready! You just need to build and debug the application.
Step 3 – Build and debug the application
- To build the application, select Build > Build Solution. The project should build without any errors.
- To debug the application, set the deployment target of the application to “Windows Phone 7 Emulator”.

- Select Debug > Start Debugging. The emulator window is displayed.

- To start recording the audio, click the Record button.

- To stop recording the audio, click the Stop button.

- To play back the captured audio, click the Play button.


Note: To stop debugging the application, select Debug > Stop Debugging.
Finally, your microphone application for Windows Phone 7 is ready to be published into the marketplace. Now, you just need to rebuild your application for the release.
Step 4 – Rebuild in the release mode before publishing
- On the standard toolbar, change the configuration manager to Release.

- To rebuild the application, select Build > Rebuild. The XAP file of the application is generated.
To submit your application to the market place, you can refer to upload your application walkthrough.
Summary
That’s it! We’ve now seen that creating a microphone application for Windows Phone 7 isn’t that tough. In fact, you’ve created it in just 4 simple steps!
You can find the full source code for the Visual Basic Silverlight Microphone application here.
 Light
Light Dark
Dark
0 comments