
Walkthrough: TDD Support with the Generate From Usage Feature in VS 2010 (Lisa Feigenbaum)
As part of the October VS 2010 CTP, we also shipped a set of walkthrough documents explaining how to use the product to experience the new features. The CTP was released as a Virtual PC image, and can be a pretty hefty download to undertake. So for those of you just interested to know what’s there, reading the walkthroughs can be a good alternative!
Below is the combined VB/C# walkthrough for “Generate From Usage”. Please tell us your feedback on this new IDE feature, either at the end of this blog post or at the following forum:
Thanks,
Lisa
Walkthrough: TDD Support with the Generate From Usage Feature
This walkthrough demonstrates how to use the new Visual Studio 2010 Generate From Usage feature that supports Test-Driven Development (TDD).
TDD is an approach to software design in which you first write unit tests based on the product specifications, and then write the source code required to make the test succeed. Visual Studio 2010 supports TDD by generating new types and members in your source code when you first reference them in your test cases.
Visual Studio 2010 generates the new types and members with minimal interruption to your workflow. You can create stubs for types, methods, properties, or constructors without leaving your current location in code. When you invoke a dialog box to specify options for type generation, the focus returns immediately to the current open file when the dialog box closes.
In the release version of Visual Studio 2010, the Generate From Usage feature can be used in conjunction with any test framework that integrates with Visual Studio. In this walkthrough, the Microsoft Unit Testing Framework is demonstrated.
To set up a project and test project
1. In Visual C# or Visual Basic, create a new Windows Class Library project and name it GFUDemo_VB or GFUDemo_CS, depending on which language you have chosen.
2. In Solution Explorer, right-click the solution icon at the top, point to Add, and then click New Project to open the Add New Project dialog box. In the Project Types pane on the left, click Test.
3. In the Templates pane on the right, click Test Project and accept the default name of TestProject1.
4. Click OK to close the Add New Project dialog box.
You are now ready to begin writing tests.
To generate a new class from a unit test
1. The test project contains a file named UnitTest1. Double-click this file in Solution Explorer to open it in the Code Editor.
Locate the declaration for class UnitTest1 and rename it to AutomobileTest. Locate TestMethod1 and rename it to DefaultAutomobileIsInitializedCorrectly. Inside this method, create a new instance of a class named Automobile. Notice that a wavy underline immediately appears, indicating a compile-time error, along with a smart tag under the type name. Also notice that the exact location of the smart tag varies, depending on whether you are using Visual Basic or C#, as shown in the following illustrations:
Visual C# code 
Visual Basic code 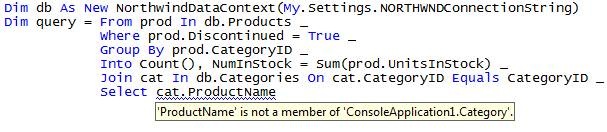
2. Rest the mouse pointer over the smart tag to see the error message that indicates that no type named Automobile has been defined yet. Click the smart tag or press CTRL+. (CTRL+period) to invoke the Generate From Usage context menu, as shown in the following illustration:
Visual C# code 
Visual Basic code 
3. Now you have two choices. You can click Generate Class ‘Automobile’ to create a new file in your test project and populate it with an empty class named Automobile. This option provides the quickest way to create a new class type in a new file with default access modifiers in the current project. However, you may prefer to place the new file in your source code project, or you may want to place the class in an existing file or specify its access modifiers. In such cases, click Generate other to open the New Type dialog box.
In the Project location list box, click GFUDemo_VB or GFUDemo_CS to instruct Visual Studio to place the file in the source code project, as opposed to the test project. Note that you can also specify the access of the type, in addition to whether the new type is a class, a struct, or an enumeration, in this dialog box. You can also choose to generate the type in an existing file.
4. Click OK to close the dialog box and create the new file.
5. In Solution Explorer, look under the GFUDemo_VB or GFUDemo_CS project node to verify that the new file has been created. Note that, in the Code Editor, the focus is still in AutomobileTest.DefaultAutomobileIsInitializedCorrectly, so you can continue writing your test with a minimum of interruption.
To generate a property stub
Assume that the product specification states that the Automobile class has two public properties named Model and TopSpeed. These properties are required to be initialized with default values of “Not specified” and -1 by the default constructor. This unit test will verify that the default constructor sets the properties to their correct default values.
1. Add this line of code to DefaultAutomobileIsInitializedCorrectly:
Visual C# code
Assert.IsTrue(myAuto.Model == “Not specified” && myAuto.TopSpeed == -1);
Visual Basic code
Assert.IsTrue(myAuto.Model = “Not specified” And myAuto.TopSpeed = -1)
2. Because the line references two undefined properties on Automobile, a smart tag appears. Invoke it and then click Generate property stub for ‘TopSpeed’. After this stub is generated, a new smart tag appears under the Model property. Generate a property stub for that property as well. The following illustrations show these smart tags.
Visual C# code 
Visual Basic code 
3. If you want to, you can navigate to the automobile.cs or automobile.vb source code file to verify that the new properties have been generated.
To generate a stub for a new constructor
1. In this test method, you will generate a constructor stub that will initialize the Model and TopSpeed properties with values that you specify. In the next step you will add additional code to complete the test. Add the following variables and test method to your AutomobileTest class:
Visual C# code
[TestMethod]
public void AutomobileWithModelNameCanStart()
{
string model = “550 Barchetta”;
int topSpeed = 199;
Automobile myAuto = new Automobile(model, topSpeed);
}
Visual Basic code
<TestMethod()>
Public Sub AutomobileWithModelNameCanStart()
Dim model As String = “550 Barchetta”
Dim topSpeed As Integer = 199
Dim myAuto As New Automobile(model, topSpeed)
End Sub
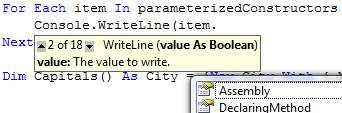
2. Invoke the smart tag under the new class constructor and then click Generate constructor stub…. In the Automobile class file, note that the new constructor not only has correctly inferred the types of the arguments, but has also examined the names of the local variables that are used in the constructor call, found properties with the same names in the Automobile class, and supplied code in the constructor body to store the argument values in the Model and TopSpeed properties. (Note that in Visual Basic, the_model and _topSpeed fields in the new constructor are the implicitly defined backing fields for the Model and TopSpeed properties.)
3. After you generate the new constructor, a wavy underline appears under the call to the default constructor in DefaultAutomobileIsInitializedCorrectly. The error message informs you that the Automobile class has no constructor that takes zero arguments. To generate an explicit default constructor with no parameters, invoke the smart tag and click Generate constructor stub….
To generate a stub for a method
1. Assume that the specification states that a new Automobile can be put into a Running state if its Model and TopSpeed properties are set to something other than the default values. Add the following lines to the method:
Visual C# code
myAuto.Start();
Assert.IsTrue(myAuto.IsRunning == true);
Visual Basic code
myAuto.Start()
Assert.IsTrue(myAuto.IsRunning = True)
2. Invoke the smart tag for the myAuto.Start method call and click Generate method stub…. Next, invoke the smart tag for IsRunning and click Generate property stub….
The Automobile class now looks like this:
Visual C# code
public class Automobile
{
public int TopSpeed { get; set; }
public string Model { get; set; }
public void Start()
{
throw new NotImplementedException();
}
public bool IsRunning { get; set; }
public Automobile(string model, int topSpeed)
{
// TODO: Complete member initialization
this.Model = model;
this.TopSpeed = topSpeed;
}
public Automobile()
{
// TODO: Complete member initialization
}
}
Visual Basic code
Public Class Automobile
Sub New(ByVal model As String, ByVal topSpeed As Integer)
‘ TODO: Complete member initialization
_model = model
_topSpeed = topSpeed
End Sub
Sub New()
‘ TODO: Complete member initialization
End Sub
Property TopSpeed As Integer
Property Model As String
Property IsRunning As Boolean
Sub Start()
Throw New System.NotImplementedException
End Sub
End Class
To run the tests
1. From the main menu, click Test, point to Run, and then click All Tests in Solution. This command runs all tests in all test frameworks that have been written for the current solution. In this case, there are two tests, and they both fail, as expected. The Test Results window looks like this:

To navigate to the source code
Now that the tests have run and failed, the next step is to navigate to the Automobile class and implement the code that will cause the tests to pass. Quick Search is a new feature in Visual Studio 2010 that enables you to quickly enter a text string, such as a type name or part of a name, and navigate to the desired location by clicking the element in the result list.
1. Open the Quick Search dialog box by clicking in the Code Editor and pressing CTRL+, (CTRL+comma). In the text box, type Start, as shown in the following illustration: 
To implement the source code
- When the Start method is called, it should set the IsRunning flag to true only if the Model and TopSpeed properties have been set to something other than their default value. Remove the NotImplementedException from the method body and implement the desired behavior in any way that will cause the tests to succeed. Do the same for the default constructor.
- Add code to the default constructor so that the Model, TopSpeed and IsRunning properties are all initialized to their correct default values of “Not specified”, -1, and True (true).
To re-run the tests
From the main menu, click Test, point to Run, and then click All Tests in Solution. This time, the tests pass. The Test Results window looks like this:
 Light
Light Dark
Dark
0 comments