
LINQ for the Web Using VB (By Paul Yuknewicz)
Happy holidays! It’s been a long time since I’ve written a post, so I figure I can bring in the new year answering some great questions submitted by you.
Just this week someone gave me this feedback:
“I am having a difficult time finding information to help me adapt to LINQ in my webforms. I am hoping that someone from the team can offer a direction. “
You bet! We have a lot of attention to LINQ and Forms-over-data in VB in our learning content, but we’re lacking content with attention to LINQ and Web-based Forms-over-data.
There are a number of great innovations in the Web space that make it easy to leverage LINQ’s querying capabilities and mesh that with the richness and flexibility of Web-based UI. It’s easy.
There are a few concepts you should learn or know about to get started:
- LinqDataSource control — allows you to use a LINQ query as a data source in Web-based data binding
- LinqDataSource.Selecting event – allows you to set any LINQ custom query (including anonymous queries) as the data source. Simply pick LinqDataSource and Selecting events from the VB editor dropdowns, and set e.Result = <your LINQ query> in the event handler code
- OR Designer and Linq to SQL – if you’re connecting directly to a SQL database with your LINQ query (instead of objects, xml, etc), this is an easy way to create queries and what we call DataContext objects. “OR” is short for Object-Relational mapping, i.e. mapping relational database data to .NET objects
- ASP.NET data binding expressions – allows you to evaluate ASP-style <%# Eval(“YOURFIELD”) %> expressions from data source fields or properties in simple controls or lists of controls
Creating a Simple Web Form with LINQ To SQL
The first post will cover the simplest Web form that will demonstrate this end to end span of concepts. I’ll then take input from you to add features and expand on this sample in future posts.
Here’s a sample of the initial desired Web form output – a very simple Employee list report for an HR application – admittedly it’s bare bones and in need of UI design love:
![Photo Number XXX]()
EmployeeID: 2
Andrew Fuller
Andrew received his BTS commercial in 1974 and a Ph.D. in international marketing from the University of Dallas in 1981. He is fluent in French and Italian and reads German. He joined the company as a sales representative, was promoted to sales manager in January 1992 and to vice president of sales in March 1993. Andrew is a member of the Sales Management Roundtable, the Seattle Chamber of Commerce, and the Pacific Rim Importers Association.
![Photo Number XXX]()
EmployeeID: 1
Nancy Davolio
Education includes a BA in psychology from Colorado State University in 1970. She also completed “The Art of the Cold Call.” Nancy is a member of Toastmasters International.
If you are pretty familiar with Visual Studio I expect this will take about 10-15 minutes to walk through on your own machine.
Preparation
– make sure you have Visual Studio 2008 or Visual Web Developer 2008 Express installed. Express Editions are available for download here.
– make sure you have SQL Server 2005 Express installed and running. It typically gets installed by default with VS or VS Express, however, you can also install it from here.
-if you don’t have Northwind.mdf on your machine, download it from the attached files on this post.
Adding Data to the Web Site
First we’re going to add the database to our project and create necessary classes to use the database in LINQ (using Linq to SQL). Note, you could choose to skip this step and create your own custom LINQ query to any other data source.
- create a new Web site on the local file system via File -> New Web Site … -> ASP.NET Web Site
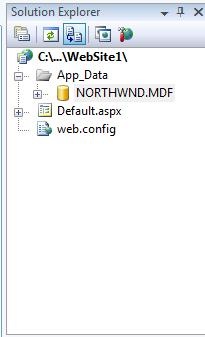
- add the Northwind database to your web site’s App_Data folder
- download Northwind.mdf file from this blog entry and save it to disk
- drag and drop this file into the App_Data folder in Solution Explorer

- Create LINQ to SQL classes for Northwind using the OR Designer. Linq to SQL classes will be stored in a .dbml file and can be opened in the visual OR Designer.
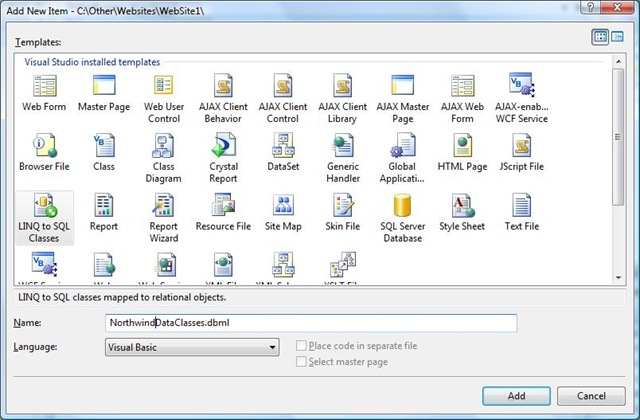
- Right-click on the WebSite node in Solution Explorer, Add New Item -> Linq To SQL Classes
- Rename the file from “DataClasses.dbml” to “NorthwindDataClasses.dbml”. (This is important so classes can be found in code and in VS wizards).

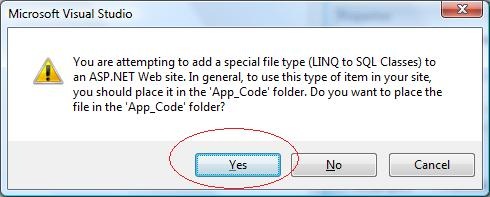
- When prompted, click Yes to add this file to the App_Code folder. This is important b/c the Web sitfe needs to dynamically compile generated code created by the designer.

- Double click NorthwindDataClasses.dbml to open it in the OR Designer.
- Add Employee table objects to your Linq to SQL classes
- Open Server Explorer (or Database Explorer in Express)
- Expand Northwnd.MDF -> Tables -> Employees
- Drag and Drop the Employees table node from Server Explorer to the NorthwindDataClasses.dbml design surface (NOTE: you could continue to add more Tables, or Stored Procedures, or customize the names/properties in the designer).
- Save All files

Laying Out Form UI & DataSource Controls
Now that we’ve added the database to the Web site and created necessary LINQ to SQL classes, it’s time to create some UI and wire up the data to the UI. I won’t do anything too fancy – just repeat data bound labels in a DataList (you could replace this with GridView, FormView or choose your favorite control).
- Double-click Default.aspx to open the page in the designer
- Drag n drop a DataList from the data tab of Toolbox to the Default.aspx design surface (or to the correct DIV area in mark up “Source” view)
- Drop n drop a LinqDataSource control from the data tab of the Toolbox to the Default.aspx design surface (or just below the DataList in “Source” view)
Wiring up the LinqDataSource to Underlying Data (LINQ to SQL – DataContext)
The LinqDataSource needs to be wired up to the underlying LINQ data. In this case data is provided by any DataContext object or query over an object of the NorthwindDataClasses type (a LINQ to SQL file). The DataList then simply needs to use the LinqDataSource as the data source, and display data from bound fields using traditional Eval(“”) statements. The designer will generate a set of defaults for you if you use the Smart Tags. Let’s give it a shot with defaults, and then we can fine tune it from there.
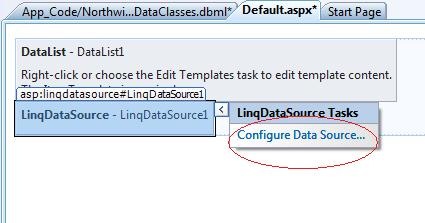
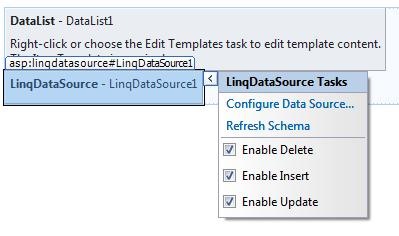
- Select the LinqDataSource control in the designer. Expand the smart tag and click Configure Data Source…

- A wizard pops up and should default to picking your NorthwindDataClasses as the source. (any other queryable sources you add will show up here). Click Next.

- You can optionally pick any specific subset of columns/fields. I just chose * for this example. You could even configure a Where clause — however I honestly think it’s easier to do parameterized queries and other query operations in code. I’ll show that later … Click Finish.
-
- Optionally you can Enable Delete, Insert, and Update for the LinqDataSource using the Smart Tag. TIP: This is handy if you’re going to build a read/write web form.


Here is the resulting mark up for the LinqDataSource as seen in “Source” view. Note how the ContextTypeName=”NorthwindDataClassesDataContext” — this matches the name of the type we created in the designer (the code gen appends “DataContext” to the end — whew that’s long!). The TableName is set to the Table or Property we want to display — Employees in this case. You could use this pattern to bind to any DataContext type and class property within.
<asp:LinqDataSource ID="LinqDataSource1" runat="server" ContextTypeName="NorthwindDataClassesDataContext"
    TableName="Employees">
</asp:LinqDataSource>
Binding UI Controls to LinqDataSource
Now let’s wire up the DataList to the LinqDataSource. The nice thing here is the DataList only cares about the field names returned from the LINQ query via the LinqDataSource — this shields you as you continue to refine the fields and row results of your dynamic LINQ queries.
- Select the DataList in the designer. Expand the smart tag and Choose Data Source = LinqDataSource1
- Customize the DataList’s ItemTemplate
- Run it! (F5 or View in Browser)
The wizard will create a series of bound labels by default. You can use the designer in edit mode to get the specific fields, look and feel you want. TIP: This is typically where I drop in the html mark up “Source” view. In my example, I’ll simply show the full name, notes, and have a place holder to show an employee photo image. I also format the data in a two column table.
If you look at the DataList mark up, you see the ItemTemplate contains a number of bound labels. Binding to data from the query is simply a matter of typing in <%# Eval(“YOURFIELDNAME”) %> in your server control fields using classic ASP-style & VB data binding eval statements. This gives you a lot of flexibility to display just the data you want, formatted how you want. Here’s my customization:
<div>
    <asp:DataList ID="DataList1" runat="server" DataKeyField="EmployeeID" DataSourceID="LinqDataSource1">
        <HeaderTemplate>
            <table>
        </HeaderTemplate>
        <ItemTemplate>
            <tr>
                <td>
                    <img src="PLACEHOLDER.jpg" class="" style="border: 4px solid white"
                          alt='Photo Number XXX' />
                    <br /><br />
                </td>
                <td>
                    EmployeeID:
                    <asp:Label ID="EmployeeIDLabel" runat="server" Text='<%# Eval("EmployeeID") %>' />
                    <br />
                    <asp:Label ID="LastNameLabel" runat="server"
                          Text='<%# Eval("FirstName") & " " & Eval("LastName") %>' />
                    <br />
                    <asp:Label ID="NotesLabel" runat="server" Text='<%# Eval("Notes") %>' />
                </td>
            </tr>
        </ItemTemplate>
        <FooterTemplate>
            </table>
        </FooterTemplate>
    </asp:DataList>
</div>
Using Custom LINQ Queries
The technique above provides a zero-code method for binding Web forms to LINQ data. However, you might be asking yourself, where is the LINQ and VB here? It’s true the LinqDataSource hides all the querying code and constrains what you can do via the designer. This is fine for some simple cases, but the real power of LINQ is being able to use your own free form queries and VB logic. The good news is LinqDataSource supports using your own LINQ queries using the LinqDataSource.Selecting event. This is your hook to tell the control exactly what query should be used. It’s easy. Here’s how:
- Right-click on Default.aspx and select View Code … to see the VB code behind file (Default.aspx.vb).
- In the left-hand-side dropdown above the code editor, select the LinqDataSource1 object.
- In the right-hand-side dropdown above the code editor, select the Selecting event. The event handler is stubbed out.

- Write your custom LINQ query in the event handler. Make sure you set e.Result = <your LINQ query variable> before the event handler routine is finished running.

In my example I will query over Northwind employees, define a custom expression column called FullName (=First + Last), filter by full name starting with A or N, and sort by last name. Note I’m creating aliases for each property and hence the query is now an anonymous type — and the schema is now custom vs. my default NorthwindDataContext with all (*) columns. TIP: if you’re getting runtime errors when you try this make sure all the fields expected by your Web form are there — e.g. if the form is expecting “EmployeeID” make sure your query Selects it.
Protected Sub LinqDataSource1_Selecting(ByVal sender As Object, ByVal e _
                                        As System.Web.UI.WebControls.LinqDataSourceSelectEventArgs) _
                                        Handles LinqDataSource1.Selecting
    Dim northwind As New NorthwindDataClassesDataContext
    'custom anonymous LINQ query
    Dim query = From emp In northwind.Employees _
                Select emp.EmployeeID, emp.FirstName, emp.LastName, emp.Notes, _
                    FullName = emp.FirstName & " " & emp.LastName _
                Where FirstName.ToUpper.StartsWith("A") Or FirstName.ToUpper.StartsWith("N") _
                Order By FullName
    'sets LinqDataSource query equal to custom query.
    'use data binding expressions to look up aliased fields above.
    e.Result = query
End Sub
You can run the app again and see the custom query is working — only two rows are returned — Andrew Fuller and Nancy Davolio. We could also tweak the markup to make use of our new aliased expression column — “FullName”. Here’s how that would look in the DataList:
<asp:DataList ID="DataList1" runat="server" DataKeyField="EmployeeID" DataSourceID="LinqDataSource1">
    <HeaderTemplate>
        <table>
    </HeaderTemplate>
    <ItemTemplate>
        <tr>
            <td>
                <img src="PLACEHOLDER.jpg" class="" style="border: 4px solid white" alt='Photo Number XXX' />
                <br /><br />
            </td>
            <td>
                EmployeeID:
                <asp:Label ID="EmployeeIDLabel" runat="server" Text='<%# Eval("EmployeeID") %>' />
                <br />
                <asp:Label ID="LastNameLabel" runat="server" Text='<%# Eval("FullName") %>' />
                <br />
                <asp:Label ID="NotesLabel" runat="server" Text='<%# Eval("Notes") %>' />
            </td>
        </tr>
    </ItemTemplate>
    <FooterTemplate>
        </table>
    </FooterTemplate>
</asp:DataList>
Summary & More Info
To wrap things up, it’s easy to map what you know about Web Forms to what you’re learning about Linq in VB. The LinqDataSource connects your underlying Linq to SQL DataContext, or any generalized Linq query, to the rest of your Web Form. You can create totally custom queries in the LinqDataSource.Selecting event and pass that to the control via e.Result. And then you can get at any field or property in your Linq query using classic Eval(“MYFIELD”) data binding expressions.
What do you think? What additions would you like to see?
If you want more info now, ScottGu put together an awesome series of Linq to SQL posts for the Web, and he included VB sample code. Another great portal for learning and How To content is www.asp.net.
Best,
Paul
———————————-
Paul Yuknewicz
Lead Program Manager
Microsoft Visual Studio
http://msdn.com/vbasic/
 Light
Light Dark
Dark
0 comments