Taking Control of the HRD Experience with the New WIF 4.5 Tools (with a Little Help from JQuery)
One of the key differences between using claims-based identity for one enterprise app and an app meant to be used on the web has to do with which identity providers are used, and how.
Of course there are no hard and fast rules (and the distinction above makes less and less sense as the enterprise boundaries lose their adiabatic characteristics) however in the general case you can expect the enterprise app to trust one identity provider that happens to be pretty obvious from the context. Think of the classic line of business app, an expense note app or a CRM: whether it’s running on premises or in the cloud, chances are that it trusts directly your ADFS2 instance or equivalent. Even if it’s a multitenant app, accessed by multiple companies, it is very likely that every admin will distribute to his employees deep links which include a pre-selection of the relevant STS (think whr) making it an automatic choice.
What happens when the typical Gino Impiegato (Joe Employee) uses the app?
- Gino arrives at work, logs in the workstation, opens a browser and types the address of the LoB app
- Some piece of software, say WIF, detects that the current caller is not authenticated and initiates a signin flow. When this happens regardless of the resource being requested, we call the settings triggering this flow blanket redirect.
- Gino’s browser gets redirected to his local ADFS2. Gino is signed on a domain machine, hence he gets back a token without the need of even seeing any UI
- The browser POSTs the token to the LoB app, where WIF examines it, creates a session for it, and finally responds to the request with the requested page from the application
Gino is blissfully unaware of all that HTTP tumult going on. His experience is: I type the app address, I get the app UI. As simple as that. Nothing in between.
Now, let’s talk about a classic web application on the public Internet. Imagine Gino at home, planning his upcoming vacation. Gino opens up the browser, types the address of one of those travel booking sites, hit enters… and the browser shows a completely different page. The page offers a list of identity providers: live id, facebook, google… and no sign of anything related to travelling. What just happened? The travel booking site decided to allow its users to sign in with their social account, and implemented the feature using the blanket redirect.
The blanket redirect works great when the IdP to use is obvious and the user is already signed in with it, as it happened with the LoB app, but that’s not what is happening here. The travel app does not know a priori which identity provider Gino wants to use. Even if it would know in advance, chances are that Gino might not be signed in with it and would be prompted for credential: that would mean typing the address of the app, and landing on say the live id login page instead. Poor Gino, very confusing.
Luckily the blanket redirect is just a default, and like every default it can be changed: WIF always gave the possibility of overriding the redirect behavior, and ACS does provide the code of a sample HRD page to incorporate in your site if you so choose.
With the new WIF tools we make a step forward in helping you to take control of how the authentication experience is initiated. I personally believe that we can do much better, but we need to start from somewhere… ![]()
Without further ado, let’s take a quick look at how to take advantage of the approach.
Fire up your brand new install of Visual Studio 2012 RC (make sure you have the WIF 4.5 tools installed!), head to the New Project dialog, and create a new ASP.NET MVC 4 Web Application. Pick the Internet Application template.
Now that you have a project, let’s configure it to use ACS with the blanket redirect approach; after that, we’ll see how to change the settings to offer to the user a list of identity providers directly in the application. CTRL+click on this link to open in another tab the tutorial for adding ACS support to the application; once you are done, come back here and we’ll go on.
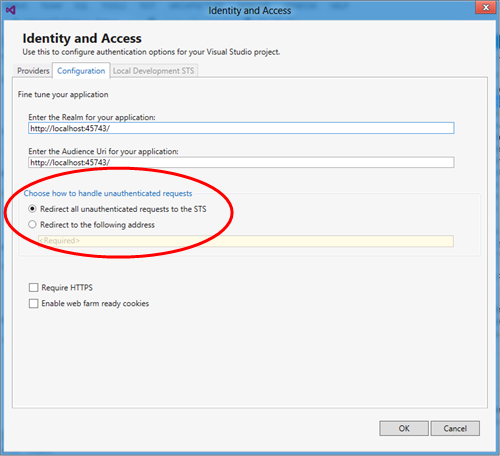
All done? Excellent. Now, go back to the WIF tool and click on the Configuration tab. This is what you’ll see:
That’s the default. When you configured the application to use WIF, the tool got rid of the forms authentication settings from the MVC template,added the necessary sections in the web.config and changed the <authorization> settings to trigger a redirect to the STS every time.
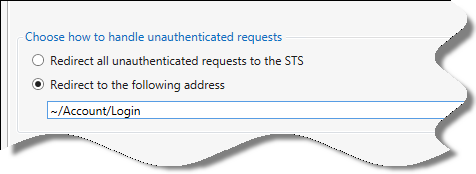
Let’s choose “Redirect to the following address” and let’s paste “~/Account/Login” in the corresponding text field.
Click OK. This will have the effect of re-instating the forms authentication settings: by default all requests will succeed now. The WIF settings which describe the ACS namespace you chose as the trusted authority are still there, they are simply no longer triggered automatically. In fact, go ahead and add [Authorize] to the About action, run the project and click “About”: you’ll get the default behavior from the MVC, the Login action from the Account controller.
Our job is now to modify the Login so that, instead of showing the membership provider form, it will show links corresponding to the identity providers configured in the ACS namespace.
We actually don’t need to change anything in the controller: let’s head directly to the Login.cshtml view in Views/Account. Once there, rip out everything between the hgroup and the @section Scripts line. Let’s keep things simple and just add an empty <div> where we will add all the identity providers’ links. Give it an id you’ll remember. Also, change the title to match the new behavior of the view. You should end up with something along the lines of what’s shown below
    1: @model MvcApplication8.Models.LoginModel
    2:
    3: @{
    4:     ViewBag.Title = "Log in";
    5: }
    6:
    7: <hgroup class="title">
    8:     <h1>@ViewBag.Title </h1>
    9:     <h2> using one of the identity providers below</h2>
   10: </hgroup>
   11:
   12:     <div id="IPDiv"></div>
   13:
   14: @section Scripts {
   15:     @Scripts.Render("~/bundles/jqueryval")
   16: ...
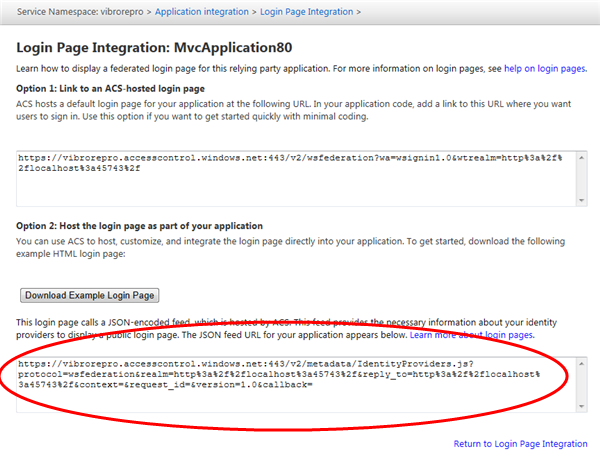
Great. Now what? From this other post, we know that ACS offers a JSON feed containing the login URLs of all the identity providers trusted by a RP in a namespace. Now, that post goes far too deep in the details of what’s inside the feed: we are not all that interested in that today, we are rather looking after how to consume that feed from our application. Luckily, that’s super easy. Head to the ACS management portal for your namespace. Pick the Application Integration link on the left side menu, choose Login Pages, pick your application, You’ll land on a page that looks like the following:
What you need is highlighted in red. Getting in the details is really not necessary, you can look them up in the other post if you are interested. The main thing to understand here is how to use this in your application. The idea is very simple: you add a <script> element to you app and you use the above as its src, then you append to it (after “callback=”) a javascript function (say that you call it “ShowSignInPage” with great disregard for the MVC pattern ![]() ) containing the logic you want to run upon receiving the list of identity providers. When the view will be rendered, once the execution will reach the <script> element the JSON feed of IdPs will be downloaded and passed to your function, where you’ll have your shot at adding the necessary UI elements to the view.
) containing the logic you want to run upon receiving the list of identity providers. When the view will be rendered, once the execution will reach the <script> element the JSON feed of IdPs will be downloaded and passed to your function, where you’ll have your shot at adding the necessary UI elements to the view.
Assuming that you are a good web citizen and you subscribe to the unobtrusive javascript movement, and assuming that you’ll define your ShowSignInPage function in ilmioscript.js, your new Login.cshtml will look like the following (line 18 has been formatted to fit this silly blog theme)
    1: @model MvcApplication8.Models.LoginModel
    2:
    3: @{
    4:     ViewBag.Title = "Log in";
    5: }
    6:
    7: <hgroup class="title">
    8:     <h1>@ViewBag.Title </h1>
    9:     <h2> using one of the identity providers below</h2>
   10: </hgroup>
   11:
   12:     <div id="IPDiv"></div>
   13:
   14: @section Scripts {
   15:     @Scripts.Render("~/bundles/jqueryval")
   16:
   17:     @Scripts.Render("~/scripts/ilmioscript.js")
   18:  <script src="https://vibrorepro.accesscontrol.windows.net:443/v2/metadata/IdentityProviders.js?protocol=wsfederation&realm=http%3a%2f%2flocalhost%3a45743%2f&reply_to=http%3a%2f%2flocalhost%3a45743%2f&context=&request_id=&version=1.0&callback=ShowSigninPage" type="text/javascript"></script>
   19:
   20: }
Grreat, now we moved the action to the ilmioscript.js file and the ShowSigninPage function. Tantalizing, right? Be patient, I promise this is the last step we need before being able to hit F5.
As you can see from the screenshot above, ACS provides you with a sample page which shows how to reproduce the exact behavior of its default home realm discovery page, including all the remember-in-a-cookie-which-IP-was-picked-and-hide-all-others-next-time brouhaha. However here we are interested in something quick & dirty, hence I am going to merrily ignore all that and will provide appropriately quick & dirty minimal JQuery to demonstrate my point.
Create a new js file under the Scripts folder, and paste in it the following:
    1: function ShowSigninPage(IPs) {
    2:     $.each(IPs, function (i, ip) {
    3:         $("#IPDiv").append('<a href="' + ip.LoginUrl + '">' + ip.Name + '</a><br/>');
    4:     });
    5: }
Isn’t JQuery conciseness astounding? It gets me every time. In barely 3 lines of code I am saying that for every identity provider descriptor in the feed I want to append a new link to my base div, with text from the name of the IdP and href to the login URL. Bam. Done.
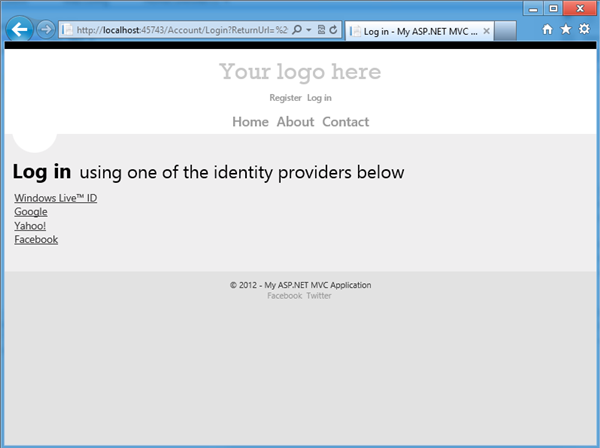
Save the entire contraption and hit F5, then click on About:
Marvel oh marvel, the Login view now offers me the same list of IdPs directly within my app experience instead of redirecting me in strange places. Also, I can add helpful messages to prepare the user to what will happen when he’ll click one of the links, why he might want to do so, and whatever else crosses my mind. Oh my, all this power: will it corrupt you as it corrupted me? ![]()
Go ahead and click on one of those links: you’ll be transported thru the usual sign in experience of the provider of choice, and you’ll come back authenticated. That’s because WIF might no longer be proactive, but it certainly can recognize WS-Federation wsignin1.0 message when it sees one and that will trigger it to go through the usual motions: token validation, session cookie creation… just like it normally happens with the blanket redirect.
Here I was pretty heavy-handed with my simplifications: I disregarded all cleanups (there still code form the MVC template that won’t be used after this change), I went the easy route (you might want a more elaborate HRD experience, or you might want to keep the membership provider and add federated identity side by side: it’s possible and not too hard) and I didn’t tie all the loose ends (when you login you aren’t redirected to the About view, as you’d expect: restoring that behavior is simple, but it will be topic for another blog post).
Despite all that, the core of the idea is all here: I hope you’ll agree with me that once you’ve seen how it works this looks ridiculously easy.
Now it’s your turn to try! Is this really as easy as I make it look? Would you like the tools to go even further and perhaps emit this code for you when you choose the non-blanket option? Or do you only write enterprise apps and you don’t need any of this stuff? The floor is your, we look forward for your feedback!


