Windows Azure Toolkit for Windows Phone 7 1.2 will Integrate with ACS

I am sure many of you already know about the Windows Azure Toolkit for Windows Phone 7, a set of Visual Studio templates and samples which makes it easier for you to take advantage of the Windows Azure platform from your Windows Phone 7 applications.
This morning Wade disclosed the next phase in the Windows Azure initiatives for mobile platforms: he announced the availability of a new toolkit for taking advantage of Windows Azure from iOS applications, and anticipated some juicy details about the next release of the Windows Azure Toolkit for Windows Phone 7 (expected to release during TechEd next week).
The new feature I’ve been helping out with is the ACS integration: the Visual Studio template in the TechEd release of the Windows Azure Toolkit for Windows Phone 7 will offer you the possibility of using ACS for handling authentication and authorization for your Windows Phone 7 application.
Now, I don’t want to ruin the surprise too much for you, and we are not 100% done on the new release hence some minor details may still change, but we thought it would be nice to give you a bit of a teaser.
The feature
One of the main strengths of the toolkit lies in its simplicity: install the kit, create a new project using its template, cruise from an absolutely minimalistic dialog and bam, you’re done. Hit F5 and you’re already in business. With the current versions you don’t need a Windows Azure subscription to experiment with the toolkit, in fact you don’t even need an internet connection (which is quite remarkable for a toolkit about cloud technologies!  ).
).
In the same thrift spirit, authentication and authorization were handled as simply as they could be: a classic brute-force membership store with associated role provider.
Since the toolkit release (and since WP7 developer tools, actually) we heard loud and clear that you guys want to take advantage of claims-based identity on the phone too. Last April we added a new lab to the Identity Developer Training Kit and the Windows Azure Platform Training Kit, a lab which shows how to take advantage of ACS for handling sign-in and authorization via Windows Live ID/Facebook/Google/Yahoo in your phone apps. That lab is great (I’m told  ) for understanding how the integration works, but if you want immediate satisfaction and just get the feature in your app the lab is not the right delivery vehicle.
That’s why we decided to add ACS integration within the toolkit template: if you have a namespace with ACS, even if it’s completely empty, with just few clicks you can go from zero to federated sign-in.
This introduces new requirements for running the toolkit, namely an internet connection and a namespace with ACS, however some of those are inherent to the scenario being enabled (if you want to allow your users to sign in using Facebook, they better have access to the Internet), some are very mild (you do know that you can subscribe and use ACS in production FOR FREE until at least the end of 2011, right?) and we made sure you can always fall back on the former membership approach, in which case you still don’t need the Internet.
The Project Template Setup Wizard
We wanted to keep things as simple as possible: that largely means gathering only the data we can’t do without and use reasonable defaults everywhere else. That means that somebody will want to tweak things here and there, but for my experience I think we nailed what most people wants in the general case. Don’t hold back with the feedback!
In a nutshell, what we did was transforming the existing template setup dialog into the first screen of a wizard:

Once you made your choice between using the cloud or the emulator, you can hit Next:

Here you get a choice. You can keep the default and hit OK, which will fall back on the membership authentication strategy the toolkit uses today.
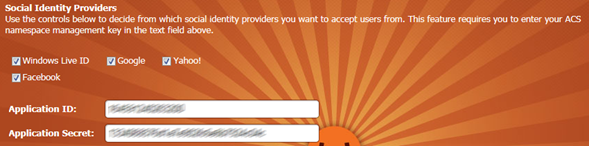
Or you can select “Use the Windows Azure Access Control Service”: you stay in Wonderland and I show you how deep the rabbit-hole goes. Wait no, that was the wrong quote: what I meant is that the wizard displays extra options for setting up ACS.

Your namespace and your management key: that’s the bare minimum we need to ask you in order to set up the project in a way that will allow you to hit OK, hit F5 immediately afterwards and already have a fully functional application. Here there’s what we do just after you hit OK on that screen:
- Go to the ACS namespace and
- add the sample application service as one RP (as described by the ACS+WP7 lab)
- Add all the pre-configured identity providers (Windows Live ID, Google, Yahoo)
- Generate pass-through rules for all the identity providers configured in the namespace and assign the rule group to the RP
- retrieve the signing key of the SWT tokens for the RP
- On the phone app
- hook up the ACS namespace so that the IP list and STS URLs can be correctly generated
- On the service
- add the necessary config values so that the service can validate the incoming tokens from ACS (via DPESamples.OAuth extensions to WIF)
It literally could not get simpler than this for the developer. Of course, the tradeoff is that there’s not much control over the process.
The main decisions we are doing for you here are
- adding all the preconfigured IPs (the one we can add without having to ask you extra info) and make all the claims available to the service
- using all the IPs you may previously added to the namespace (including ws-federation and Facebook ones) and generating pass-through rules for all of them
We could have given you more control already on the Wizard pages, for example allowing you to choose which individual IPs to turn on and the means to enter a Facebook IP; after all, that’s exactly what we’ve done for the ACS extensions for Umbraco (see below). However we felt that in this case simplicity was the highest order bit. After all, nothing prevents you from using the ACS management portal after the fact and modifying the settings created by the template wizard. If you feel you’d like us to take a different approach, let us know!
The Sample Application
The application generated is a variation of the existing template, where instead of signing up and in with newly generated username and password you use a token obtained via ACS from one of the configured IPs. The general architecture (client which invokes a service façade for Windows Azure resources) remains the same.
The rest of the solution changes accordingly: the service is secured via OAuth2 and WIF, just like you learned in the lab; and the authorization is handled via the same portal, but matching specific claims coming from the IPs of choice. The enforcement is entrusted to a custom ClaimsAuthorizationManager, which reads the settings from the DB at service invocation time and grants or deny access accordingly.
The sign-up flow is a bit different, due to the different nature of the credentials involved. Instead of requesting a registration step upfront, the application just presents the login screen to the user (in this case it’s the usual HDR list). If the user happens to pick an account that was never used before, the sign-in operation morphs into a sign-up. Note, the screenshots below do not include the UI elements for installing the HTTPS certificate used for securing the communications with the service.

All steps are explicit so that the user knows what’s going on at all times; we could have implemented an implicit registration, but that may not have been in the best interest of the user. For example, I may already have signed up with a Google account at some earlier time and now by mistake I signed in with my Yahoo account; an implicit registration would create a new user and I would be disoriented not finding the resources I created when signed in with the Google account. The registration page also allows the user to specify a user name and email address: those values are pre-populated if suitable claims are made available by the IP of choice (Windows Live ID won’t, for instance) but the user may want to specify different values (ie I may want to sign in using Google but I want my notifications to be sent elsewhere). Would you prefer if the toolkit would behave differently? Make sure to leave your feedback in the discussion section of the codeplex site.
Well, that’s it for this sneak peek. In one week I’ll hopefully get back to us with the announcement that the version 1.2 of the Windows Azure Toolkit for Windows Phone 7 is out, and with it the ACS2 goodness I described here. Until then, I suggest having some fun with the current version of the toolkit!