A visual tour of the .NET Access Control service, part 2: fun with scopes and issuers
Here we are again. I am just back from Belgium’s TechDays, and I can still savor the nice feeling you get from talking in front of a very interested audience :-) I’m really glad to see that both the cloud and claims based identity are enjoying the attention they deserve! I have been asked to share the samples I have shown in my two sessions: sharing the end to end demo I have shown for Geneva will require some time & creativity, but I can certainly give more details about one of the ACS demo. In fact, that’s the perfect excuse for writing the promised follow-up to the Visual Tour of the ACS post.
Recap
In the last installment we took a good look at the structure of an ACS solution, by examining the Echo sample from the SDK with the Azure Services Management Console.
We briefly went through the steps of solution provisioning and solution credentials management; then we examined the list of STSes we get for every solution, focusing on the one dedicated to the ServiceBus. We listed the various elements we can use for defining our access logic: scopes, claim types, issuers, certificates… and above all, rules. We examined the default rules that are available in the default ServiceBus scope, and observed their behavior while running the Echo sample. It’s now time to snap out of this look-don’t-touch spell and mess with some settings!
The “Vote for Hardware” Scenario
Let’s say that your business is leasing hardware to business customers and providing all-inclusive maintenance. For example: Contoso equips its workforce with laptops and phones leased from you. When something breaks, you take care of fixing or substituting it. When the lease expires, let’s say every 2 years, you get back your hardware: Contoso then starts a new leasing with new hardware hardware equipment, and the cycle goes on until Contoso is happy with your services.
The end of a lease cycle is approaching, and you are planning your hardware refresh not just for Contoso, but for many different business customers. You observed that the more the workforce is satisfied with the laptop and phone models you provide, the less they tend to call your cost center: hence you’d like to poll the workforce of your various customers for making sure that you meet their preferences. That’s not an easy task: you need to poll a very heterogeneous population, partitioned through multiple identity providers, in different connectivity conditions, perhaps behind firewalls whitelisting the list of websites a browser can visit, and so on and so on. Luckily you can count on the .NET Services :-) the outline of the solution is as follows:
- You create two ServiceBus services, VoteForPhone and VoteForLaptop. Those two services are hosted on your premises and will take care of gathering the preferences for phone and laptop models, respectively
- You configure your .NET solution for trusting the IPs of all your customers
- You distribute the client, so that every customer can invoke your services while authenticating by using its own identity provider
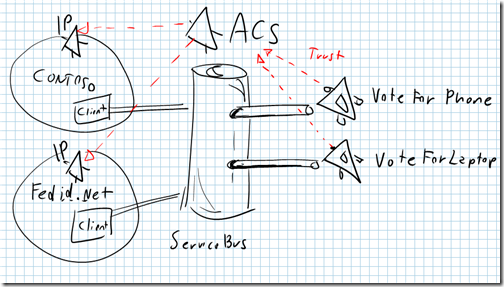
The Services & the Client
Of course this is a demo, designed for making a point from stage; hence it contains various naiveties that you are not advised to repeat in production. Also, my purpose here is not teaching how to use WCF for writing good services: in fact, since we are interested in the access control part, any couple of ServiceBus services exposed through the same .NET solution will do. You can copy the echo sample in a new directory, slightly change its address, then run the original and the modified version at the same time: to all practical means, that’s all you’d need for reproducing what I am going to demonstrate here.
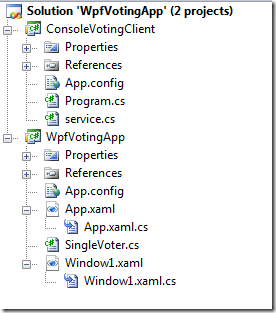
Just for giving you the backstage view, however, in my case I created a ServiceContract that accepts an int as a vote; I have a servicehost that creates two separate instances of the contract, one for the phone voting service and one for the laptop voting service; both services communicate the preferences they receive via delegate, to a WPF app which constantly shows the current results of the tally as it unfolds. As anticipated, this is an application for the stage :) pseudocode below:
 using System;
using System.ServiceModel;
using Microsoft.ServiceBus;

namespace WpfVotingApp
{

    [ServiceContract]
    public interface ISingleVoter
    {
        [OperationContract]
        void Vote(int a);
    }

    public interface SingleVoterChannel : ISingleVoter, IClientChannel { }

    public interface IDisplayVote
    {
        //..
    }

    public delegate void VoteDelegate(int a);

    [ServiceBehavior(ConcurrencyMode = ConcurrencyMode.Single, InstanceContextMode = InstanceContextMode.Single, UseSynchronizationContext = true)]
    public class SingleVoterService : ISingleVoter
    {
        VoteDelegate delVote;
        public SingleVoterService(VoteDelegate vd)
        {
            this.delVote = vd;
        }

        public void Vote(int a)
        {
            delVote(a);
        }
    }

    public class VoterPhone : SingleVoterService
    {
        public VoterPhone(VoteDelegate vd):base(vd){}
    };
    public class VoterLaptop : SingleVoterService
    {
        public VoterLaptop(VoteDelegate vd) : base(vd) { }
    };


    internal class MyDoubleServiceHost
    {
        internal static ServiceHost myServiceHost1 = null;
        internal static ServiceHost myServiceHost2 = null;

        internal static void StartService1(VoterPhone instance)
        {
            //..
        }

        internal static void StartService2(VoterLaptop instance)
        {
            //..
        }

        internal static void StopService()
        {
            //Call StopService from your shutdown logic
            //...
        }
    }

}
From my WPF app (WpfVotingApp) I simply start the two services (both published on the ServiceBus using the solution password) and I pass on the delegate that updates the UI.
The client is very simple: in fact, it’s just a console app which allows you to authenticate with the service bus by using a managed card and cast your votes. This is very, very similar to what we do in the ACS hands on lab in the training kit. Below there’s a code fragment that hints at how the client works:
 namespace ConsoleVotingClient
{
    class Program
    {
        static void Main(string[] args)
        {
            TransportClientEndpointBehavior behavior = null;

            Console.WriteLine("Enter a number to vote for a phone (or [Enter] to skip):");
            Console.WriteLine("[1]XPERIA [2]TOUCH [3]OMNIA");

            string input = Console.ReadLine();

            try
            {

                behavior = new TransportClientEndpointBehavior();
                behavior.CredentialType = TransportClientCredentialType.FederationViaCardSpace;
                behavior.Credentials.FederationViaCardSpace.ClaimTypeRequirements.Add(new ClaimTypeRequirement("https://ipsts.federatedidentity.net/group"));

                VoteForPhone(behavior, input);

            }
//..
       static void VoteForPhone(TransportClientEndpointBehavior bev, string inp)
       {
           Uri serviceUri = new Uri(String.Format("sb://{0}/services/{1}/VoterPhone/", ServiceBusEnvironment.DefaultRelayHostName, ConfigurationSettings.AppSettings["userURIfragment"]));


           ChannelFactory<SingleVoterChannel> channelFactory = new ChannelFactory<SingleVoterChannel>("PhoneRelayEndpoint", new EndpointAddress(serviceUri));
           channelFactory.Endpoint.Behaviors.Add(bev);

           SingleVoterChannel v = channelFactory.CreateChannel();
           v.Open();

           if (inp != string.Empty)
           {
               v.Vote(int.Parse(inp));
               Console.WriteLine("Your vote for a phone has been sent to the server.");
           }
       }
I am resisting the temptation to just post the code here, because I’d really like to encourage you guys to write your own: it’s not hard, and you learn much more by doing. Worst care, remember that you don;t need a fancy UI": again, 2 instances of the echo service with different URIs (but SAME SOLUTION) would work, too.
Enabling a trusted partner to invoke our services
Our objective is clear: we want to expose the services above to our customers. We don’t have to worry about connectivity, thanks to the ServiceBus features: but we do need to explicitly grant access to the right user population. We’ll do it for one federated partner, and you’ll see that by extension it’s not hard to repeat the same procedure for any additional partners. As in good tradition, we’ve done this in past posts and in the training kit, we are going to use federatedidentity.net as our mockup partner. In fact, here I assume that you went through Task 1 and the steps 7+ of the access control lab in the training kit: those steps are necessary for creating your account on federatedidentity.net, obtaining a managed card and configuring the ACS as a valid token destination.
Let’s open our solution in the MMC as explained in the former installment and see where we left it last time: navigate to the servicebus node and select its scope. You’ll get a view similar to the following:
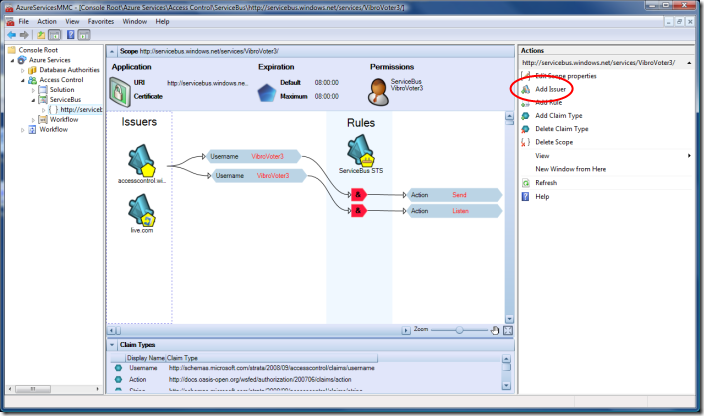
If we want to accept identities coming from a partner, the first thing we have to do is… adding the partner in our list of trusted issuers. The red ellipse above shows the UI element we need to use for adding an issuer. We will get a dialog as the following:
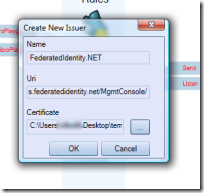
Again, this is the same as task 2.1f in the ACS HOL in the training kit. Note that the cert you find in the kit may be expired by now: you can retrieve a new one by using the code from Dominick’s blog or step 2 from this old post of mine.
Once you’ll click OK, federatedidentity.net will appear in the list of issuers. Note that, since it’s a user generated issuer (as opposed to system ones), the icon is of a different color.
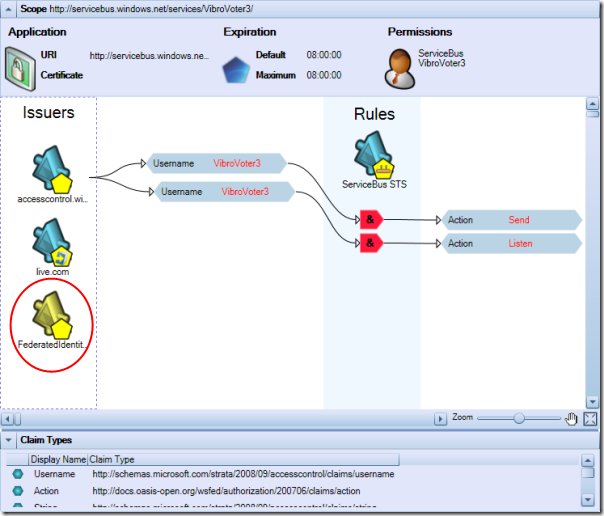
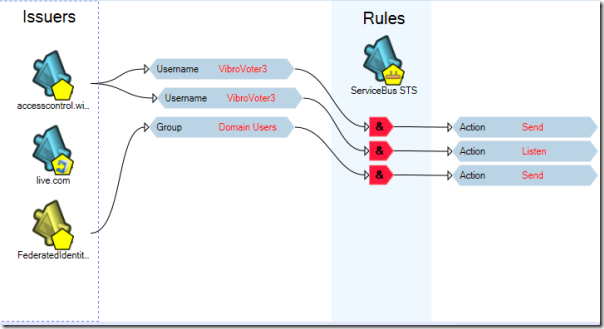
Veeery well, now we can work with tokens coming from federatedidentity.net (fedid.net from now on). Are we done yet? Recall what we learned last time: in order to be able to invoke a servicebus service, we need to get a token containing an output claim “Action” with value “Send”. Hence, we need to create a rule that transforms claims from fedid into the right Action claim. For the way in which we configured fedid.net, we know that we will get from it a claim “Group” with value “Domain Users”. This claim type is not part of the default types, hence we need to add it. If we click on the “Add Claim Type” link in the action pane on the right of the MMC, we’ll get the following:
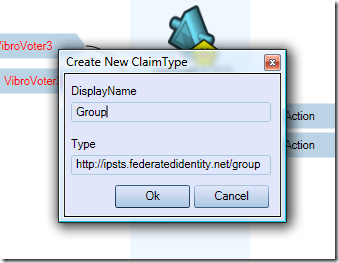
Fill in the dialog with the values shown in the pic above, and hit OK: the claim types list will now include out custom type.
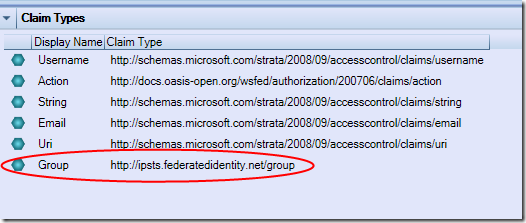
Now we finally have all the elements for expressing our access cotnrol rule. Let’s hit “add new rule” on the action pane and fill the dialog as shown below:
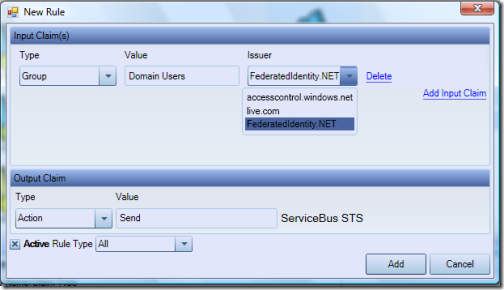
Easy: it reads “if you receive a token from fedid.net containing a claim Group with value Domain Users, include in the output token the claim Action with value Send”. The main view is updated accordingly:
Finally we are ready to give our services a spin. Let’s start the app that will host the services, and hit “Start Services >>”:
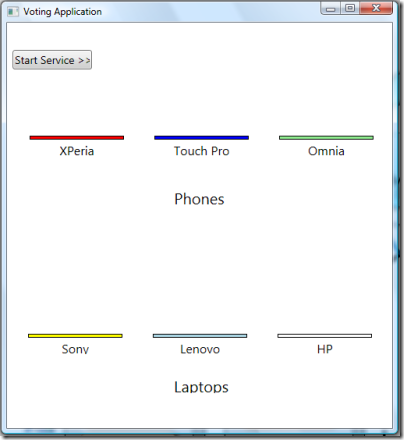
Our app is now ready to accept calls. Remember, this app runs on your premises and accepts calls from everywhere. Let’s start our client, which instead is supposed to run on the desktops of our customers:
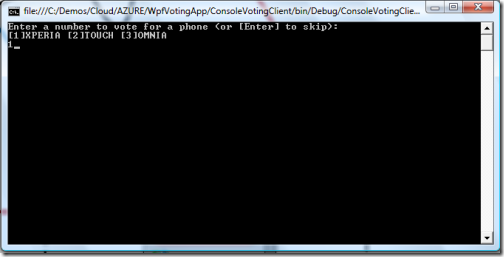
Nice UI, eh? :-) for our purposes, it should suffice. Let’s vote for the Xperia by typing ‘1’ and hitting enter.
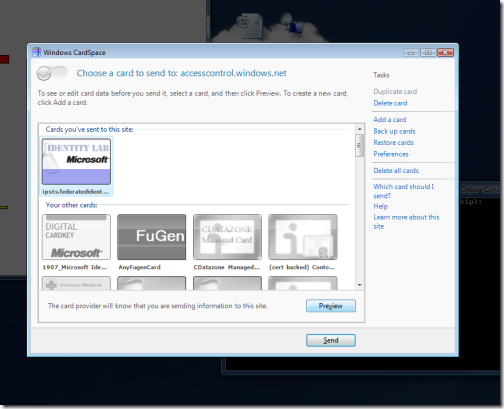
As soon as we do so, the client attempts to acquire the token that will be needed for contacting the ACS:as a result, the cardspace prompt appears. The only suitable card is the one from fedid.net: let’s select it and hit Preview, since we want to take a look at the token we’ll get before forwarding it to the ACS.
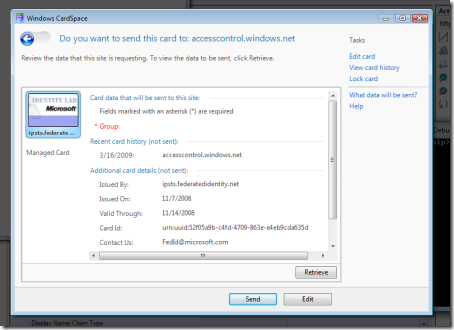
The token we are requesting indeed contains the claim Group; let’s hit Retrieve.
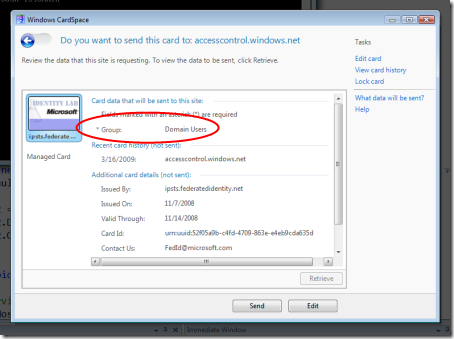
Yep, that’s exactly the value we specified in the input clause of our rule: hence we are confident that it will work as expected. Let’s hit Send.
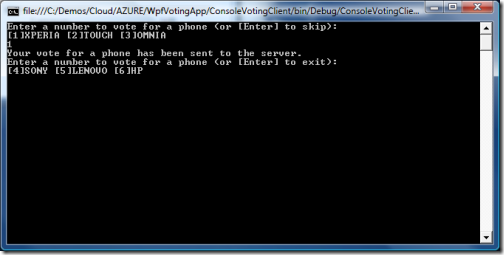
The phone vote has been sent to the server, and we are already prompted for our laptop vote. Let’s see what happened to the voting app:
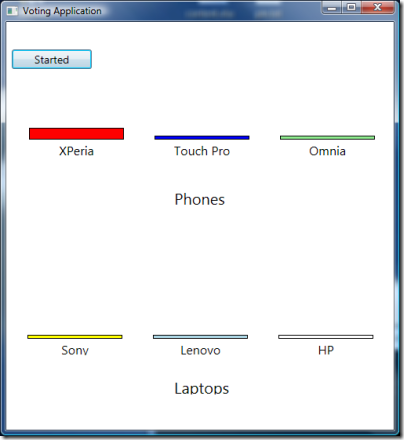
Sure enough, the application received and accepted our vote! That wasn’t too hard to enable partner access, was it :-)
Let’s also vote for a laptop:
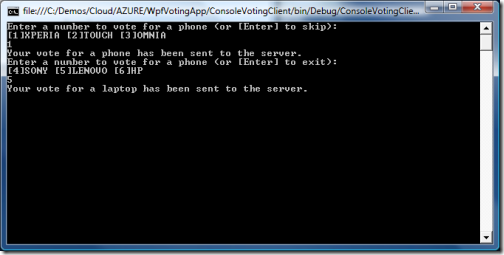
and our vote is promptly recorded:
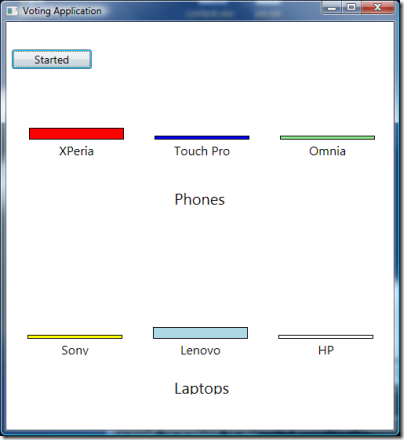
Interestingly enough, we don’t get prompted again for a token: that’s because I am using the same TransportClientEndpointBehavior for both channels, hence the call to the second service uses the same token obtained in the call to the first.
Ok, now that we accomplished our primary goal we can fool around a bit; let’s play with scopes. Don’t close the voting app just yet!
Fun with scopes
As mentioned elsewhere, scopes are a tool that you can use for manage your rules and for fine-tune the behavior of different endpoints. Since we are not in production, let’s experiment a bit before explaining things further; for example, we can add a scope corresponding to our VoterLaptop service and see what happens.
Adding a scope is easy: you point to the node of the STS you want to manage, in our case the ServiceBus one, right click and simply choose Add Scope:
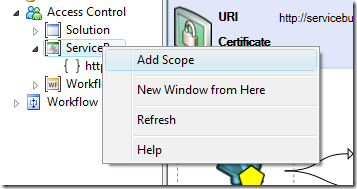
fill in the right URI, and after a short server sync your tree will have a new scope node:
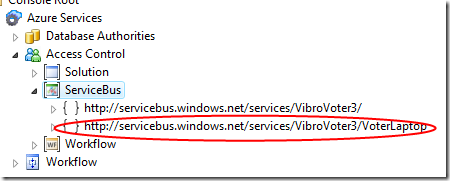
If you select the new node, you’ll discover that by default it contains… nothing:
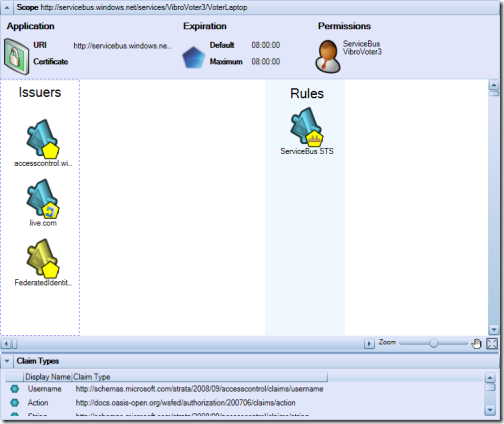
Well, not exactly nothing: it does not have default rules, but it does contain our custom issuer and claim type.
Let’s re-launch our client and hit again on our running instance of the voting app. Our new vote for a phone works well:
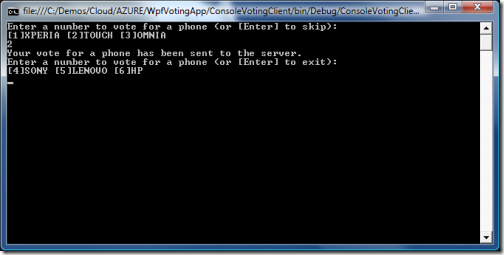
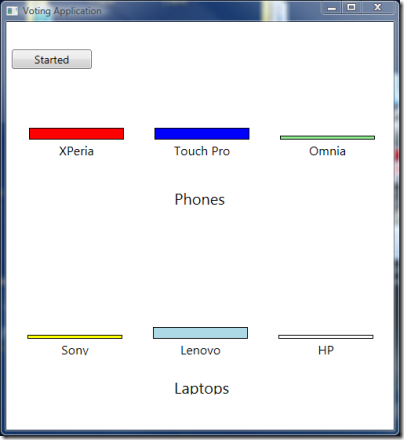
Our attempt to vote for a laptop, however, is not as lucky:
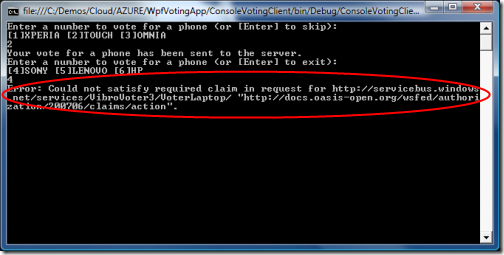
We get an error: the servicebus complains that we didn’t have the necessary Action claim. Really? How come? If you think about it for a moment, it makes perfect sense. When we called the VoterPhone service, the scope that gave the best match was the root one (https://services.windows.net/services/VibroVoter3); that scope does contain a rule that enables us to call the service with a fedid.net token. When we call VoterLaptop, however, the scope which gives the best match is is indeed our newly created scope https://services.windows.net/services/VibroVoter3/VoterLaptop; and that scope does not contain any rule, hence no Action claims for you!
The solution is pretty simple: we just create the suitable rule in the scope, following the same procedure as before.
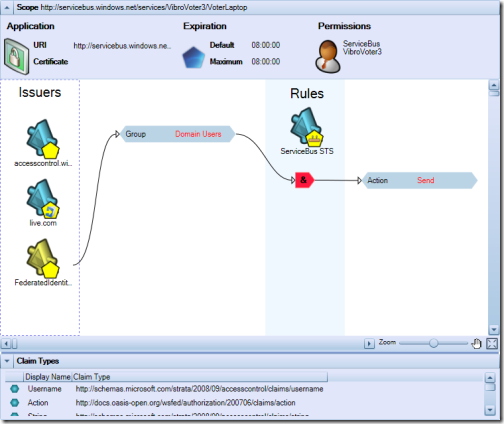
Note: here we are setting up the same rule for simplicity, since we have just one user for this scenario, however notice how I could use this for achieving finer grained control. For example I may use this scope for imposing that VoterLaptop can be called only by users presenting in input a claim Group with value Managers instead of Domain Users, while every other service would still match the top scope. Nice :-)
Just for showing you that it works, let’s go through another round of votes:
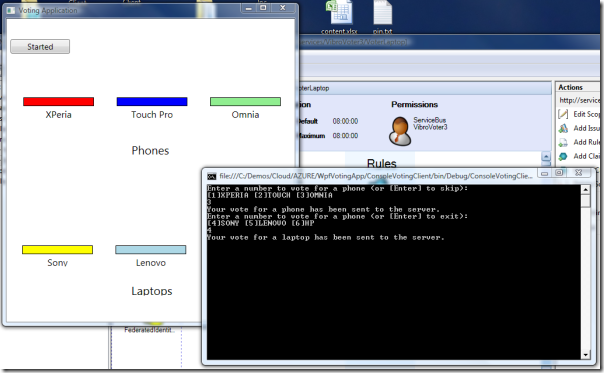
This time, everything worked as expected.
Now, I am sure that some of you are on the verge of erupting with “Wait a minute! Why did you have to re-create the Send rule in the new scope, but you didn’t have to do the same with the Listen rule?”. Good point, good point. The fact is that for the entire duration of our walkthrough I have never closed the WPF voting application. The presence of the Listen claim is verified at the time in which one service is attempting to publish itself on the ServiceBus, and at the time of publication our service had the necessary claim available. Let’s put this theory to test. Let’s shut down the WPF application, and let’s restart it: if we are right, the app should fail to start the services. And in fact:
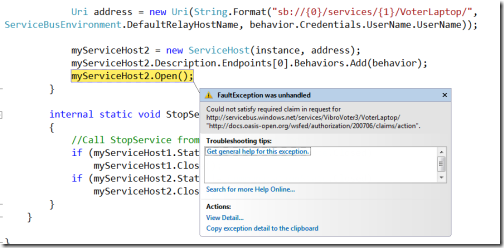
As soon as we try, sure enough we get slapped with the same error as above: by now we know the cure: we just need to add the listen rule in the new scope. That should be really straightforward: we just follow the procedure above for adding a rule, right?
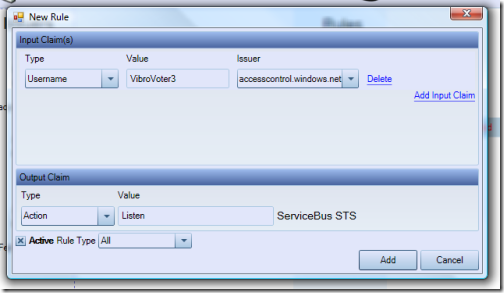
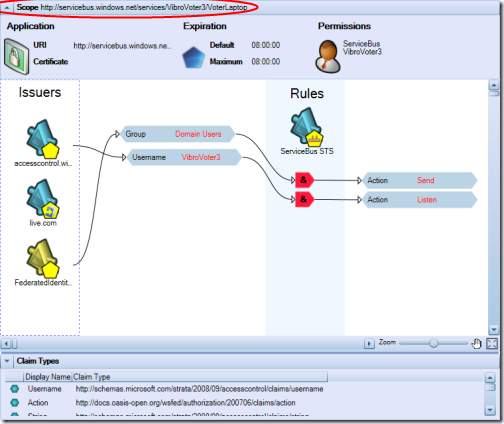
In theory, that would be it: in practice, the MMC has a bug for which rules with input claims from accesscontrol.windows.net end up with a malformed issuer string. We need to fix it by using the portal, which BTW is the OFFICIAL way of managing your solution. For completeness, let’s see the screenshots of the sequence you need to follow.
Navigate to https://portal.ex.azure.microsoft.com/ and sign in with your Live ID
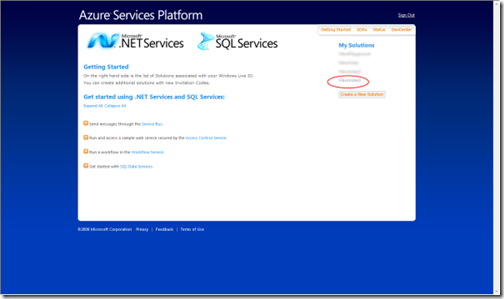
Choose your solution
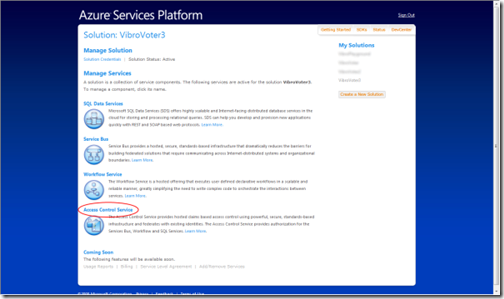
Choose the ACS
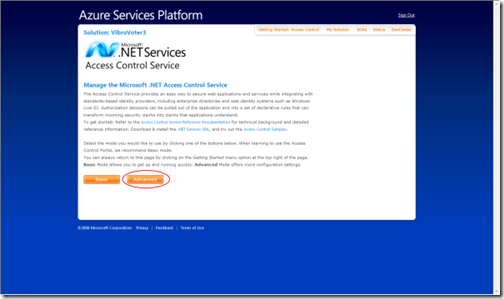
Choose Advanced
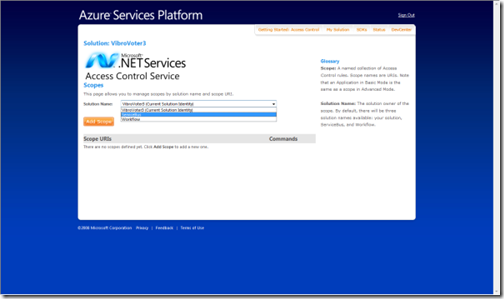
Pick the ServiceBus scopes
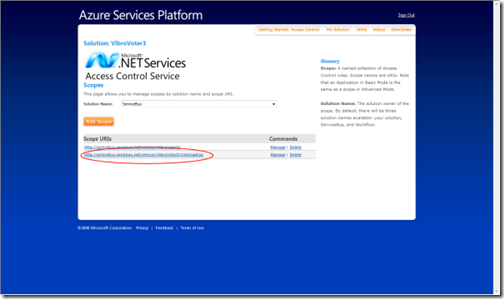
Pick the nested scope
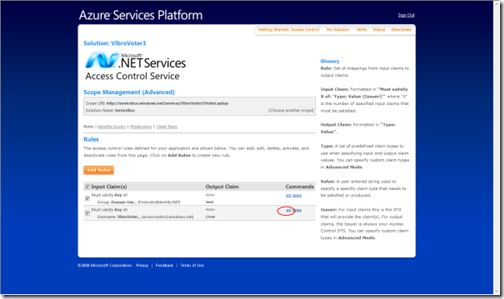
Edit the Listen rule
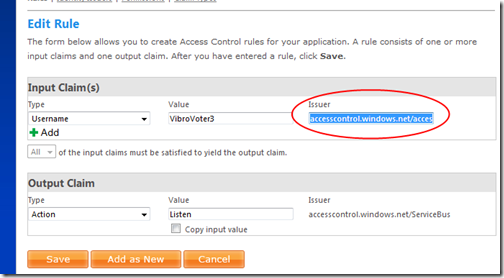
Note that the Issuer field contains accesscontrol.windows.net/accesscontrol.windows.net. Change it to be just accesscontrol.windows.net. Hit save
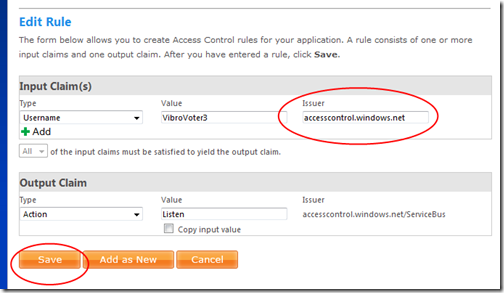
And you are up & running! If you didn’t do any typos, both phones & laptop votes should again allow calls secured by fedid.net tokens.
Summary
This surely took a lot of screenshots! In this installment I tried to give you a feeling of how easy it is to get the ACS to accept tokens from trusted issuers; I have shown how you can easily call multiple services in your solution without having to re-enter your credentials multiple times; I also fiddled a bit with scopes, demonstrating how they can be used for applying your access control at a finer granularity. I hope this inspires you to try new things and play further with the ACS :-)