Setting up a basic CardSpace RP ASP.NET website... using Zermatt
With few weeks of delay I finally forced in my schedule the conclusion of my little getting started series "... using Zermatt" (links to former episodes: setting up an STS for smartcard-backed managed cards & issuing smartcard-backed managed cards).
The first posts I wrote about Zermatt were all about producing identity info: today we'll take a look at consuming those info, something that will be done a lot more (there are only few mints, but an ocean of ways to spend the money they produce) and, fortunately, is also a dramatically simpler programming task.
Before we go any further: Please. Read. Keith's. White paper. This series of posts is a quick & dirty guide, designed to get you started and to be easily found via search engines when you need a quick lookup: Keith's article is exhaustive & well polished, hence (together with the product documentation) should be your main reference. I am Vittorio Bertocci and I approve of this message (if you don't live in the US, nevermind :-)).
Aaaaalllrighty, back to business. Thanks to the 2 former posts, we have an active STS and its associated managed card. Now we want to write a website which uses that STS for acquiring some info about our users in form of claims. Here the highest order bit is not the security paraphernalia we need to be familiar with when we work at the STS level: when designing an RP, the application biz requirements should be king. Taking that in mind, let's wear our web site dev hat and work backward from the app features to the steps we need for weaving identity capabilities in it with Zermatt. Where appropriate we'll switch to the identirati hat and will comment on the deeper meaning of what we are doing, but I'll try to keep that to a minimum.
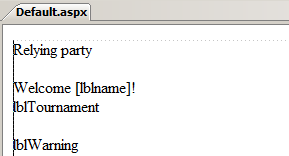
Let's say that we are creating the pages of a local tournament of some sport, and we accept subscription applications online. We won't do anything fancy, I just want to show how to receive identity info and apply some logic to it without requiring any true knowledge of the details of the underlying auth technology used. The first step we need to do is creating an ASP.NET website in visual studio (let's call it simply "RP"), and add components & logic to our Default.aspx page.
Let's say that our personalization logic includes welcoming the user by using his/her name and stating in which category he/she will compete. The page layout will contain some text and labels:
The logic in the code behind is really really trivial:
 public partial class _Default : System.Web.UI.Page
{
    protected void Page_Load(object sender, EventArgs e)
    {
        DateTime birthdate;
        string theName;
        int hairlenght;

        //...
        lblName.Text = theName;

        if(birthdate>(new DateTime(1998,1,1)))
            lblTournament.Text = "sorry, you're too young to compete";
        if(birthdate<(new DateTime(1980,1,1)))
            lblTournament.Text = "you'll run as Senior";
        else
            lblTournament.Text = "you'll run as Junior";
        if (hairlenght > 5)
        {
            lblWarning.Text = "by the way, you should probably CUT YOUR HAIR!!!";
        }
    }
}
No notion of identity so far. I have three variables, storing the info I need (name, birthdate, ahem.. hair length), some magic for initializing the (represented by the //...) and the logic for driving the page appearance according to those values. Namely, we instantiate the name in the welcome line and we give details of the tournament category based on the age. I added a silly line about hair length, since when I was young and still more or less fit my various sensei often politely pointed out that my long hair were a disadvantage (they were right).
That's the use we want to do of the identity info (and ultimately the true reason for which we are writing the RP; the identity part is commodity). How do we get those values into our variables? Well, not surprisingly we expect those values to be dispatched to us in form of claims. Zermatt has a nice mechanism that will deliver those claims directly in the current IPrincipal & IIdentity. Yes you read well, it's the classic .NET IPrincipal & IIdentity I am talking about: Zermatt provides derived IClaimsPrincipal & IClaimsIDentity, which are extended with claims capabilities (and other goodies: here I am keeping the info to the base essential, check out Keith's paper & docs for more). Let's add a reference to the Zermatt assembly (Microsoft.IdentityModel), and let's fill in the necessary code to assign suitable claim values to our variables:
 // Zermatt "usings"
using Microsoft.IdentityModel.Claims;
using Microsoft.IdentityModel.Protocols.WSIdentity;

public partial class _Default : System.Web.UI.Page
{
    protected void Page_Load(object sender, EventArgs e)
    {
        DateTime birthdate;
        string theName;
        int hairlenght;

        //get ClaimsIdentity
        ClaimsIdentity identity = User.Identity as ClaimsIdentity;

        //get claim values
        theName = (from c in identity.Claims
                            where c.ClaimType == WSIdentityConstants.ClaimTypes.Name
                             select c.Value).Single();
        birthdate = DateTime.Parse((from c in identity.Claims
                                             where c.ClaimType == WSIdentityConstants.ClaimTypes.DateOfBirth
                                             select c.Value).Single());
        hairlenght = int.Parse((from c in identity.Claims
                                    where c.ClaimType == "https://www.maseghepensu.it/hairlenght"
                                    select c.Value).Single());

        lblName.Text = theName;

        if(birthdate>(new DateTime(1998,1,1)))
            lblTournament.Text = "sorry, you're too young to compete";
        if(birthdate<(new DateTime(1980,1,1)))
            lblTournament.Text = "you'll run as Senior";
        else
            lblTournament.Text = "you'll run as Junior";
        if (hairlenght > 5)
        {
            lblWarning.Text = "by the way, you should probably CUT YOUR HAIR!!!";
        }
    }
}
We added a couple of new using directives (beside the default page usings, not shown) for Zermatt namespace, and we added our magic code for
- Getting an instance of our special claims-friendly IIdentity implementation
- Querying it for retrieving the claim values we need. Here we use Linq, one of the methods that the Zermatt documentation suggests; the other one is a foreach. Personally I like to keep the access logic plumbing hidden, for clarity of code: this can be achieved by simply customizing the principal in the token processing pipeline (see below), perhaps by adding an indexer on the claims type; but that's a matter of tastes.
Is our code ready to run? Not yet. We wrote the code processing the identity info as they come out of our input pipeline: now we need to set up the pipeline itself.
Zermatt introduces an HttpModule, the FederationAuthenticationModule (FAM for friends & close relatives); this is where most of the metamorphosis from token to identity happens. We won't go into details in this post: let's say that FAM loads the necessary logic for deserializing, validating & transforming token info before feeding it to the application logic in form of IClaimsPrincipal. The web site can work with form authentication, and the FAM can be configured to work accordingly. Practically any aspect of the processing pipeline can be customized, however here we'll stick with the defaults as much as possible. The FAM needs to be set up by adding few strategic lines in the website web.config: let's go through those.
 <configuration>
    <configSections>
    <!-- Registers the microsoft.IdentityModel configuration section -->
    <section name="microsoft.identityModel" type="Microsoft.IdentityModel.Configuration.MicrosoftIdentityModelSection, Microsoft.IdentityModel, Version=0.4.1.0, Culture=neutral, PublicKeyToken=31bf3856ad364e35"/>
    <!---->
 ...
    </configSections>
The first place we modify is the configSections element, where we add the reference to Zermatt's microsoft.identityModel config.
 <system.web>
     ...
     <authentication mode="Forms"/>
    <!-- Denies "?", so unauthenticated users are always redirected to the login page. -->
    <authorization>
      <deny users="?"/>
    </authorization>

       ...
     <!-- Registers the FederatedAuthenticationModule in classic ASP.NET applications -->
    <httpModules>
      <add name="FederatedAuthentication" type="Microsoft.IdentityModel.Web.FederatedAuthenticationModule, Microsoft.IdentityModel, Version=0.4.1.0, Culture=neutral, PublicKeyToken=31bf3856ad364e35"/>
     ...
    </httpModules>
</system.web>
The system.web element is next. We set up Forms authentication (not strictly necessary for Zermatt), then we add the FAM in the httpModules.
 <microsoft.identityModel>
   <serviceCertificate>
     <certificateReference findValue="CN=localhost" storeLocation="LocalMachine" storeName="My"/>
   </serviceCertificate>
   <tokenHandlers>
     <remove type="Microsoft.IdentityModel.Tokens.Saml11.Saml11TokenHandler, Microsoft.IdentityModel, Version=0.4.1.0, Culture=neutral, PublicKeyToken=31bf3856ad364e35"/>
     <add type="Microsoft.IdentityModel.Tokens.Saml11.Saml11TokenHandler, Microsoft.IdentityModel, Version=0.4.1.0, Culture=neutral, PublicKeyToken=31bf3856ad364e35">
       <samlSecurityTokenRequirement>
         <allowedAudienceUris>
           <add value="https://localhost/RP/Default.aspx"/>
           <add value="https://localhost/RP/Login.aspx"/>
           <add value="https://localhost/RP/login.aspx"/>
         </allowedAudienceUris>
       </samlSecurityTokenRequirement>
     </add>
   </tokenHandlers>
   <federatedAuthentication enabled="true">
   </federatedAuthentication>
 </microsoft.identityModel>
What we have done before merely inserts the FAM in the ASP.NET pipeline: the section microsoft.identityModel is what actually influences the FAM behavior. The first subelement tells to the FAM which cert shoukd be used for decrypting tokens: typically it will be the same cert that the web site uses for https (if the https binding is active). In this case we are using the selfsigned cert that comes with the Zermatt samples. The last subelement, federatedAuthentication, is used for turning the FAM on and off without having to comment or delete the conf lines.
The tokenHandlers section contains most of the action. In this case we want to accept Saml1.1 tokens, and we are happy with the default token handler (we can write our own, for any kind of token). However if we want to configure it (and we want), we have to remove the default instance and re-add it with our values. Here the only noteworthy config we add is the allowedAudienceUris set; this is a value associated to an element in the SAML token format, AllowedAudienceURI. which is a mechanism for preventing improper re-use of tokens with destinations that are different from the intended receiver: but I promised I'll keep complexity to a minimum, so let's just say that if you don't list a page of your website here the FAM will prevent you to land there. Those Uris are case sensitive, as requested by the associated RFC: keeping that in mind saves you from having to chase unnerving errors. Note that I added a login.aspx page, since we configured the web site to use forms auth (usual right click on the project->add new item..->web form).
        The system.webServer section is required for running ASP.NET AJAX under Internet
        Information Services 7.0.  It is not necessary for previous version of IIS.
    -->
    <system.webServer>
        <validation validateIntegratedModeConfiguration="false"/>
    <!-- Registers the FederatedAuthenticationModule in IIS7 "integrated mode" applications -->
    <modules>
      <add name="FederatedAuthentication" type="Microsoft.IdentityModel.Web.FederatedAuthenticationModule, Microsoft.IdentityModel, Version=0.4.1.0, Culture=neutral, PublicKeyToken=31bf3856ad364e35" preCondition="managedHandler"/>
..
    </modules>
  ..
     </system.webServer>
..
</configuration>
The last config piece we add is for our good friend IIS7, which has a special place for HttpModules.
Now the FAM is sitting steadily in front of our web site. Are we finally ready to rock? Nooope. If somebody sends us a token, we are ready to process it: but we are not doing anything for asking the user for a token, nor we are saying anything about which info we need (name, birth date, hair length), in which format or from where.
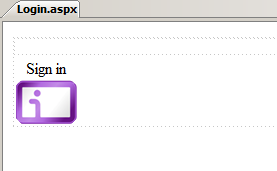
The login.aspx page is the ideal place to do that; and we can use cardspace for specifying our requirements above. As we know by now, Zermatt comes with some ASP.NET control that can help the developer to add identity capabilities to web pages: in this case we can use the InformationCard control, which gives us both an UI element for starting the identity selector prompt and a way to publish our policies & integrate with the FAM.
Let's go ahead and drag an InformationCard control instance on Login.aspx.
You'll note that the look of your control as just dragged is different from the one here: that's because I fiddled with the control properties for changing its appearance. Most properties have a self explanatory name:
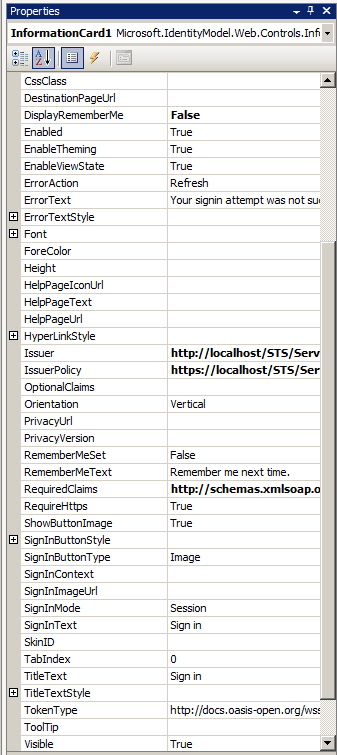
For example, here I've set the DisplayRememberMe to false.
The most important properties are the ones that influence its behavior: SignInMode, for example, configures the control to create a FAM session with the token it requires or (if set to Single) it can ask for a one-off token without touching the session.
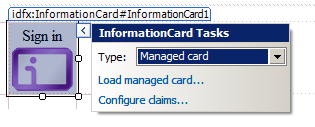
Other properties such as the ones describing the policy requirements (Issuer, IssuerPolicy, RequiredClaims...) can be easily set by using a wizard, which can be accessed by clicking on the right topmost area of the control on the page surface:
Remember when at the end of the last episode we obtained a managed card from MySTS? If you saved the file instead of installing it directly, we cal load it here for automatically acquiring issuer information and the set of claims we can obtain with that card (if you didn't, just visit the STS page and follow the generation procedure once more, then save. We had an hardcoded cardID, so the card generation operation should be idempotent if you give the same input).
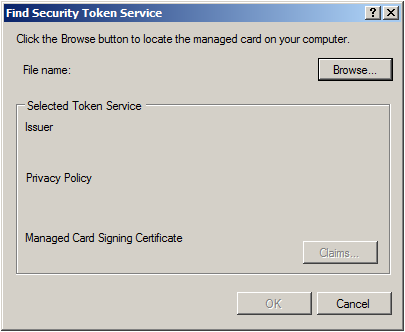
If you hit Load Managed Cards, you'll get the dialog above; once you browse to the crd file of our custom STS, you'll have in all the info about the issuer and we'll be ready to choose the claims we require.

Here you can see that all the claims supported by our card are nicely listed. Well, not that nicely, since I've been sloppy and I didn't supply a display name for our custom claim hair length (the system uses the claim URI instead) but you get the point.
Do i need to do anything more? Not really, we are finally ready to test our entire system (web site, STS and generated card); but I want to point out a couple more things before giving it a spin.
The first one is that the InformationCard control, like every other Zermatt control, comes with a collection of events that you can implement for inserting your logic at various stages of the token processing: you can see a list of those below.
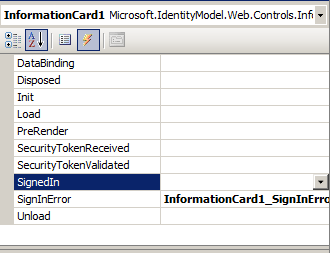
In this case I implement just SignInError, a practice that I recommend if you want to see details of what goes wrong. For this example I don't do anything fancy:
 public partial class Login : System.Web.UI.Page
{
    protected void Page_Load(object sender, EventArgs e)
    {

    }
    protected void InformationCard1_SignInError(object sender, Microsoft.IdentityModel.Web.Controls.ErrorEventArgs e)
    {
        throw new Exception("error signing in, see if you can figure out why: " + e.Exception.Message, e.Exception);
    }
}
As you can see, the code behind is real easy here; everything is handled elsewhere, in the FAM. That's the best way from the architectural standpoint.
The second thing I wanted to point out has to do with the session. Now that our login creates a session, we may want to give to the user a way of explicitly signing out. This is certainly useful when you are developing, and you want to test your logic with different claim values in rapid succession hence you want to get rid of a former session and sign in again with a new claims set. Needless to say, this is brain-dead easy with Zermatt: just go to the Default.aspx page, and drag on it a SignInStatus control.
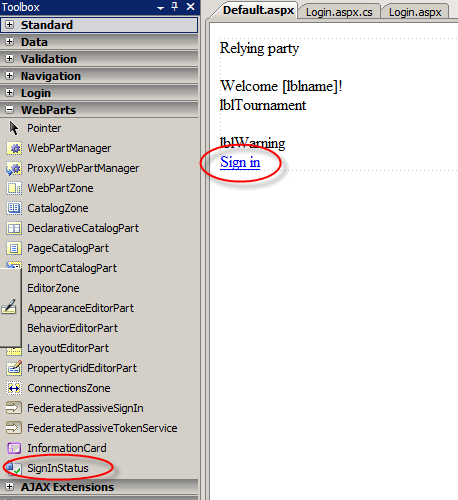
The SignInStatus control hooks up completely automatically to the FAM session. You don't even need to look at the properties, let alone writing code (but you could, if you want to).
OK, enough blabbering: David & co should come to pick me up for curry soon, it's time to close the circle and test if everything works as expected. Let's compile and fire up a browser, and navigate to https://localhost/RP/Default.aspx.
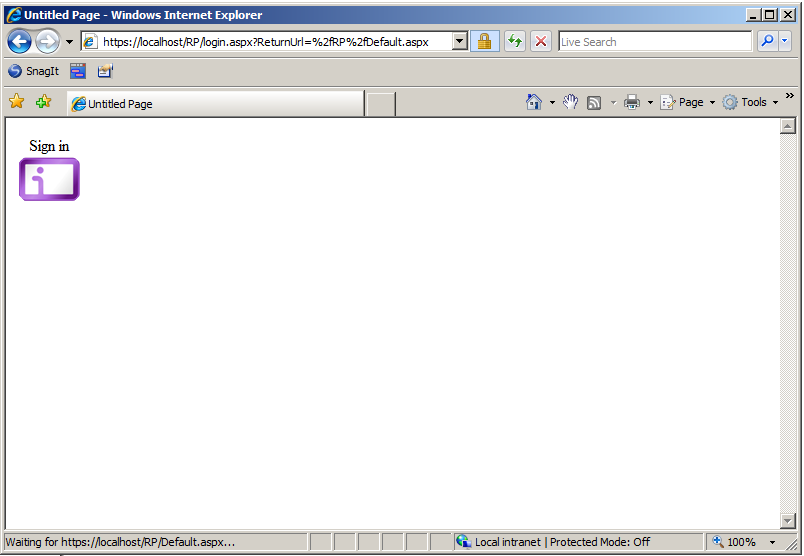
Our good old forms auth settings promptly redirect us to https://localhost/RP/login.aspx?ReturnUrl=%2fRP%2fDefault.aspx. Let's click on the information card icon:
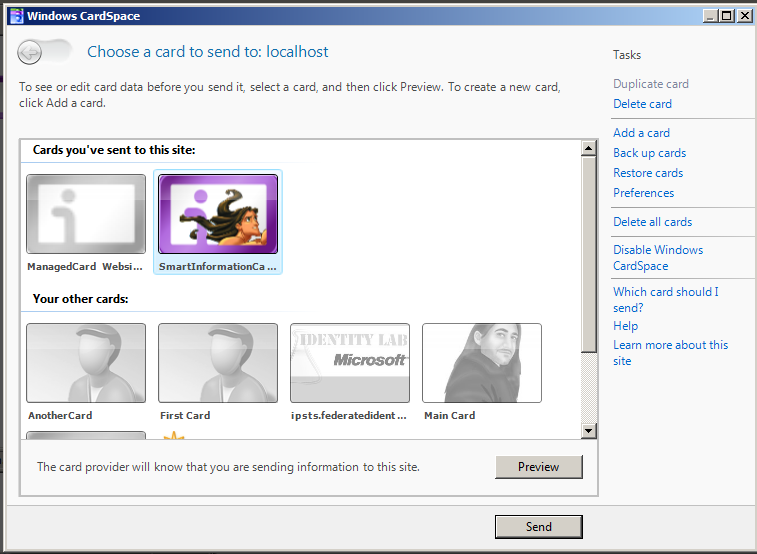
Do you recognize the only card not grayed out? As expected, it is the one we issued in the former episode. Let's see (by clicking preview) what claims we are required to present:
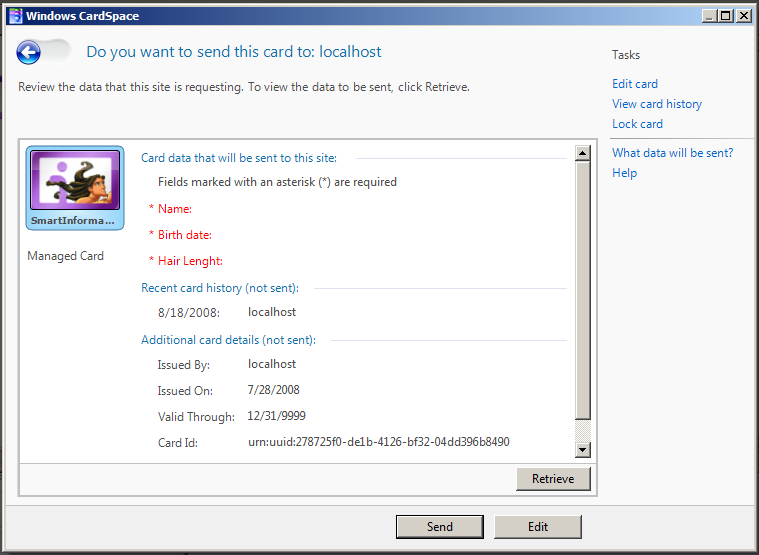
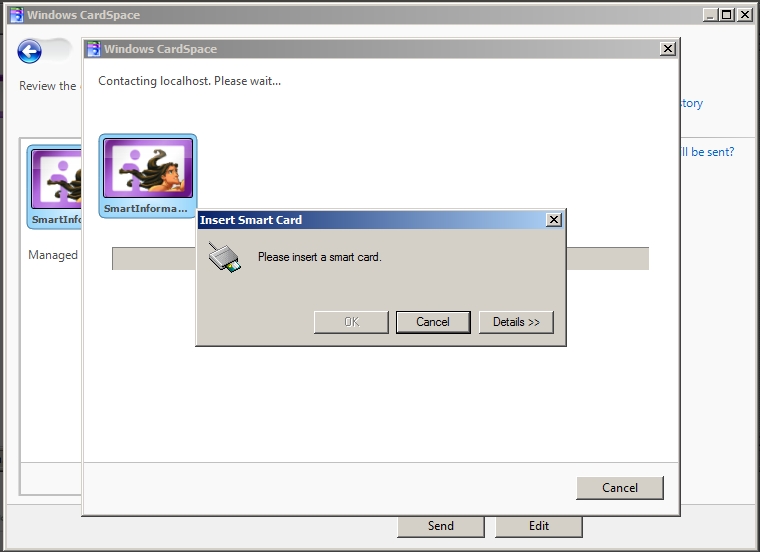
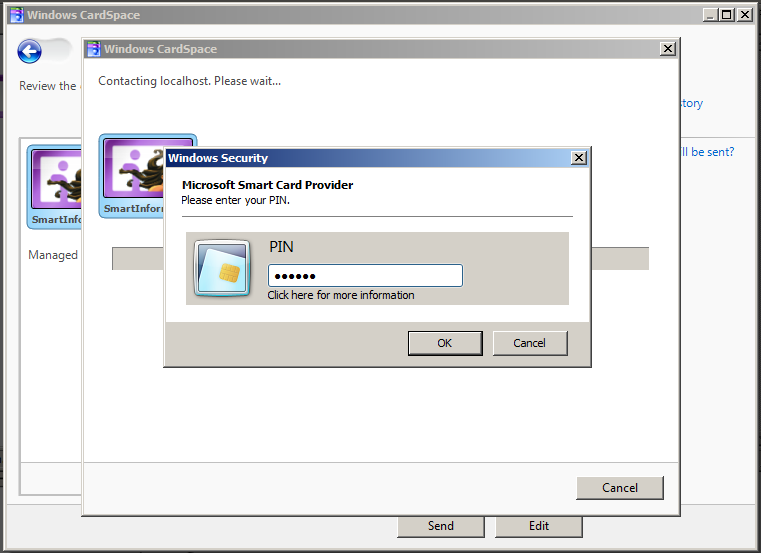
Exactly the ones we were expecting. Right on! Let's click retrieve, we will be prompted to insert our smartcard and type our PIN:
And here we go! CardSpace shows us the values we required (from the display token), so that we can take an informed decision if we want to share it with the RP.
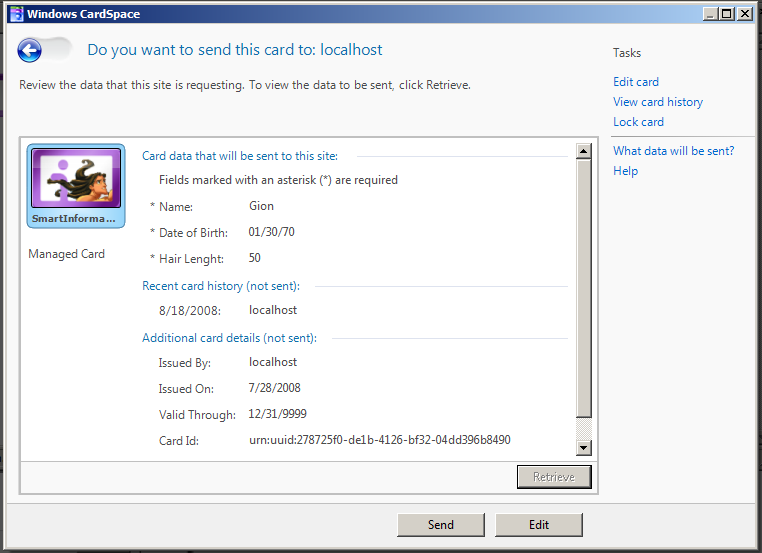
Let's go ahead (those are fake data anyway;-) incidentally the same that we hardcoded in the STS episode) an press send.
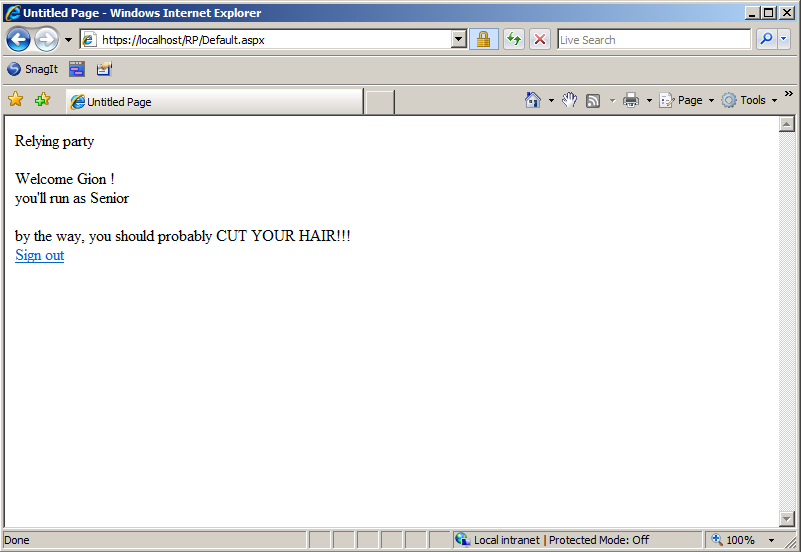
Oh marvel! The RP received the claims correctly: it welcomes me as Gion, informs me that we'll be in the senior category and gently reproaches me for my heavy metal mane. Observe the behavior of the SignInStatus control: it figured out that it is being instantiated in the context of an active session, hence it automatically adjust the text to "Sign out". Handy!
As promised, we managed to write a simple RP without the need to understand much about underlying authentication technology. Things can be further simplified, as I hope I'll manage to show in an upcoming post, but for now I'd say we can be pretty satisfied already :-)
That's it, this concludes this first three-parts tutorial about Zermatt: I hope it helped to give you an idea of how much easier things can be with this new baby! I also hope that I'll manage to post more, this time about advanced scenarios, but reality is that I am heads down for PDC. I have a couple of very long flights that I could use for writing while disconnected, though. We'll see :-)