Issuing smartcard backed managed cards... using Zermatt
We are back! I hope you had fun with the STS tutorial I posted yesterday night; here we move a step further and examine how to equip our STS with managed card issuance logic & UI.
As anticipated, this is going to be MUCH faster. If you recall, in the last post I asked you not to delete the Default.aspx page that the new web site template created for you: we are going to put our card issuance UI there. At thsi point the visual studio project should look as follows:
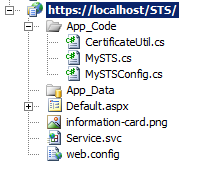
The only new element I added is the information card image information-card.png, which will be used as the background of the information cards we'll issue. Of course nothing prevents you to get all fancy and allowing the user to upload an image for personalization purposes, but here we want to be quick & dirty (well, at least quick ;-)). The little image is below, for your viewing pleasure.

Time to add some UI. Let's open Default.aspx inn the designer and let's drag some controls.
<%@ Page Language="C#" AutoEventWireup="true" CodeFile="Default.aspx.cs" Inherits="_Default" %>
<!DOCTYPE html PUBLIC "-//W3C//DTD XHTML 1.0 Transitional//EN" "https://www.w3.org/TR/xhtml1/DTD/xhtml1-transitional.dtd">
<html xmlns="https://www.w3.org/1999/xhtml">
<head runat="server">
<title>Untitled Page</title>
</head>
<body>
<form id="form1" runat="server">
<div>
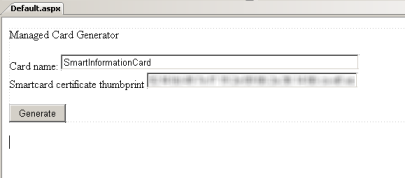
Managed Card Generator<br />
<br />
Card name:
<asp:TextBox ID="txtCardname" runat="server" Width="426px">SmartInformationCard</asp:TextBox>
<br />
Smartcard certificate thumbprint <asp:TextBox ID="txtCertthumb" runat="server" Width="301px">xx xx xx</asp:TextBox>
<br />
<br />
<asp:Button ID="btnGenerate" runat="server" onclick="btnGenerate_Click"
Text="Generate" />
</div>
</form>
</body>
</html>
Now: remember that we want to generate a managed card backed by a smartcard. This means that our issued card will need to contain a reference to the certificate of the smartcard that is supposed to be used along with our managed card; in turn, this means that we need to know certain info about that certificate at card creation time. In a realistic scenario it would be reasonable to assume that the identity provider already knows about the certificate: if you think of an electronic ID, chances are that the identity provider is also the entity that emitted and maintains the smartcard & certificates in the first place. In our little example, however, we do not assume prior knowledge hence we require the user to paste in the thumbprint of the certificate at issuance time. Later in the post I will show you how it's done.
Let's move to the real meat of the issuance logic. The method below is fired by the Generate button, and takes care of generating the card bits and sending them down through the http response. Take a look at the code, we'll comment below.
 using System;
using Microsoft.IdentityModel.Services.CardService;
using System.Security.Cryptography.X509Certificates;
using Microsoft.IdentityModel.Claims;
using Microsoft.IdentityModel.Protocols.WSIdentity;
using Microsoft.IdentityModel.Services.SecurityTokenService;
using System.IdentityModel.Tokens;
using System.Runtime.Remoting.Metadata.W3cXsd2001;

public partial class _Default : System.Web.UI.Page
{
    protected void Page_Load(object sender, EventArgs e)
    {

    }
    protected void btnGenerate_Click(object sender, EventArgs e)
    {
        X509Certificate2 signingCertificate = CertificateUtil.GetCertificate(StoreName.My, StoreLocation.LocalMachine, "CN=localhost");

        string issuer = "https://localhost/STS/Service.svc";
        string stsAddress = "https://xxxxx.redmond.corp.microsoft.com/STS/Service.svc";
        string mexEndpoint = "https://localhost/STS/Service.svc/Mex";

        InformationCardReference icr = new InformationCardReference("urn:uuid:278725f0-de1b-4126-bf32-04dd396b8490", 1);
        InformationCard card = new InformationCard(signingCertificate, issuer, icr, DateTime.Now);

        card.Language = "en";
        card.CardImage = new CardImage(Context.Request.PhysicalApplicationPath + @"\information-card.png");
        card.CardName = txtCardname.Text;
        card.RequireStrongRecipientIdentity = true;

        card.SupportedTokenTypeList.Add("https://docs.oasis-open.org/wss/oasis-wss-saml-token-profile-1.1#SAMLV1.1");

        card.SupportedClaimTypeList.Add(new DisplayClaim(WSIdentityConstants.ClaimTypes.Name,"Name","Your first name"));
        card.SupportedClaimTypeList.Add(new DisplayClaim(WSIdentityConstants.ClaimTypes.DateOfBirth,"Birth date","Your date of birth"));
        card.SupportedClaimTypeList.Add(new DisplayClaim("https://www.maseghepensu.it/hairlenght", "Hair Lenght", "Your hair lenght"));

        card.TokenServiceList.Add(
            new TokenService(
                new TokenServiceEndpoint(
                    stsAddress, signingCertificate, mexEndpoint, UserCredentialType.X509V3Credential
                ),
                new X509CertificateCredential(
            new X509ThumbprintKeyIdentifierClause(SoapHexBinary.Parse(txtCertthumb.Text).Value)

                )
            ));

        InformationCardSerializer serializer = new InformationCardSerializer();
        Response.ClearContent();
        Response.AddHeader("Content-Disposition", "attachment; filename=InformationCard.crd");
        Response.ContentType = WSIdentityConstants.InformationCardMimeType;
        serializer.WriteCard(Response.OutputStream, card);
        Response.End();
    }
}
I hope it does not look like a lot of code to you; if it does, I suggest going to take a second look at our old card writer example and I am sure you'll get the full feeling of the giant leap we made with Zermatt :-)
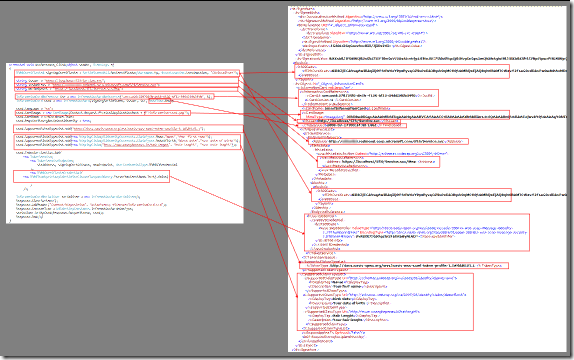
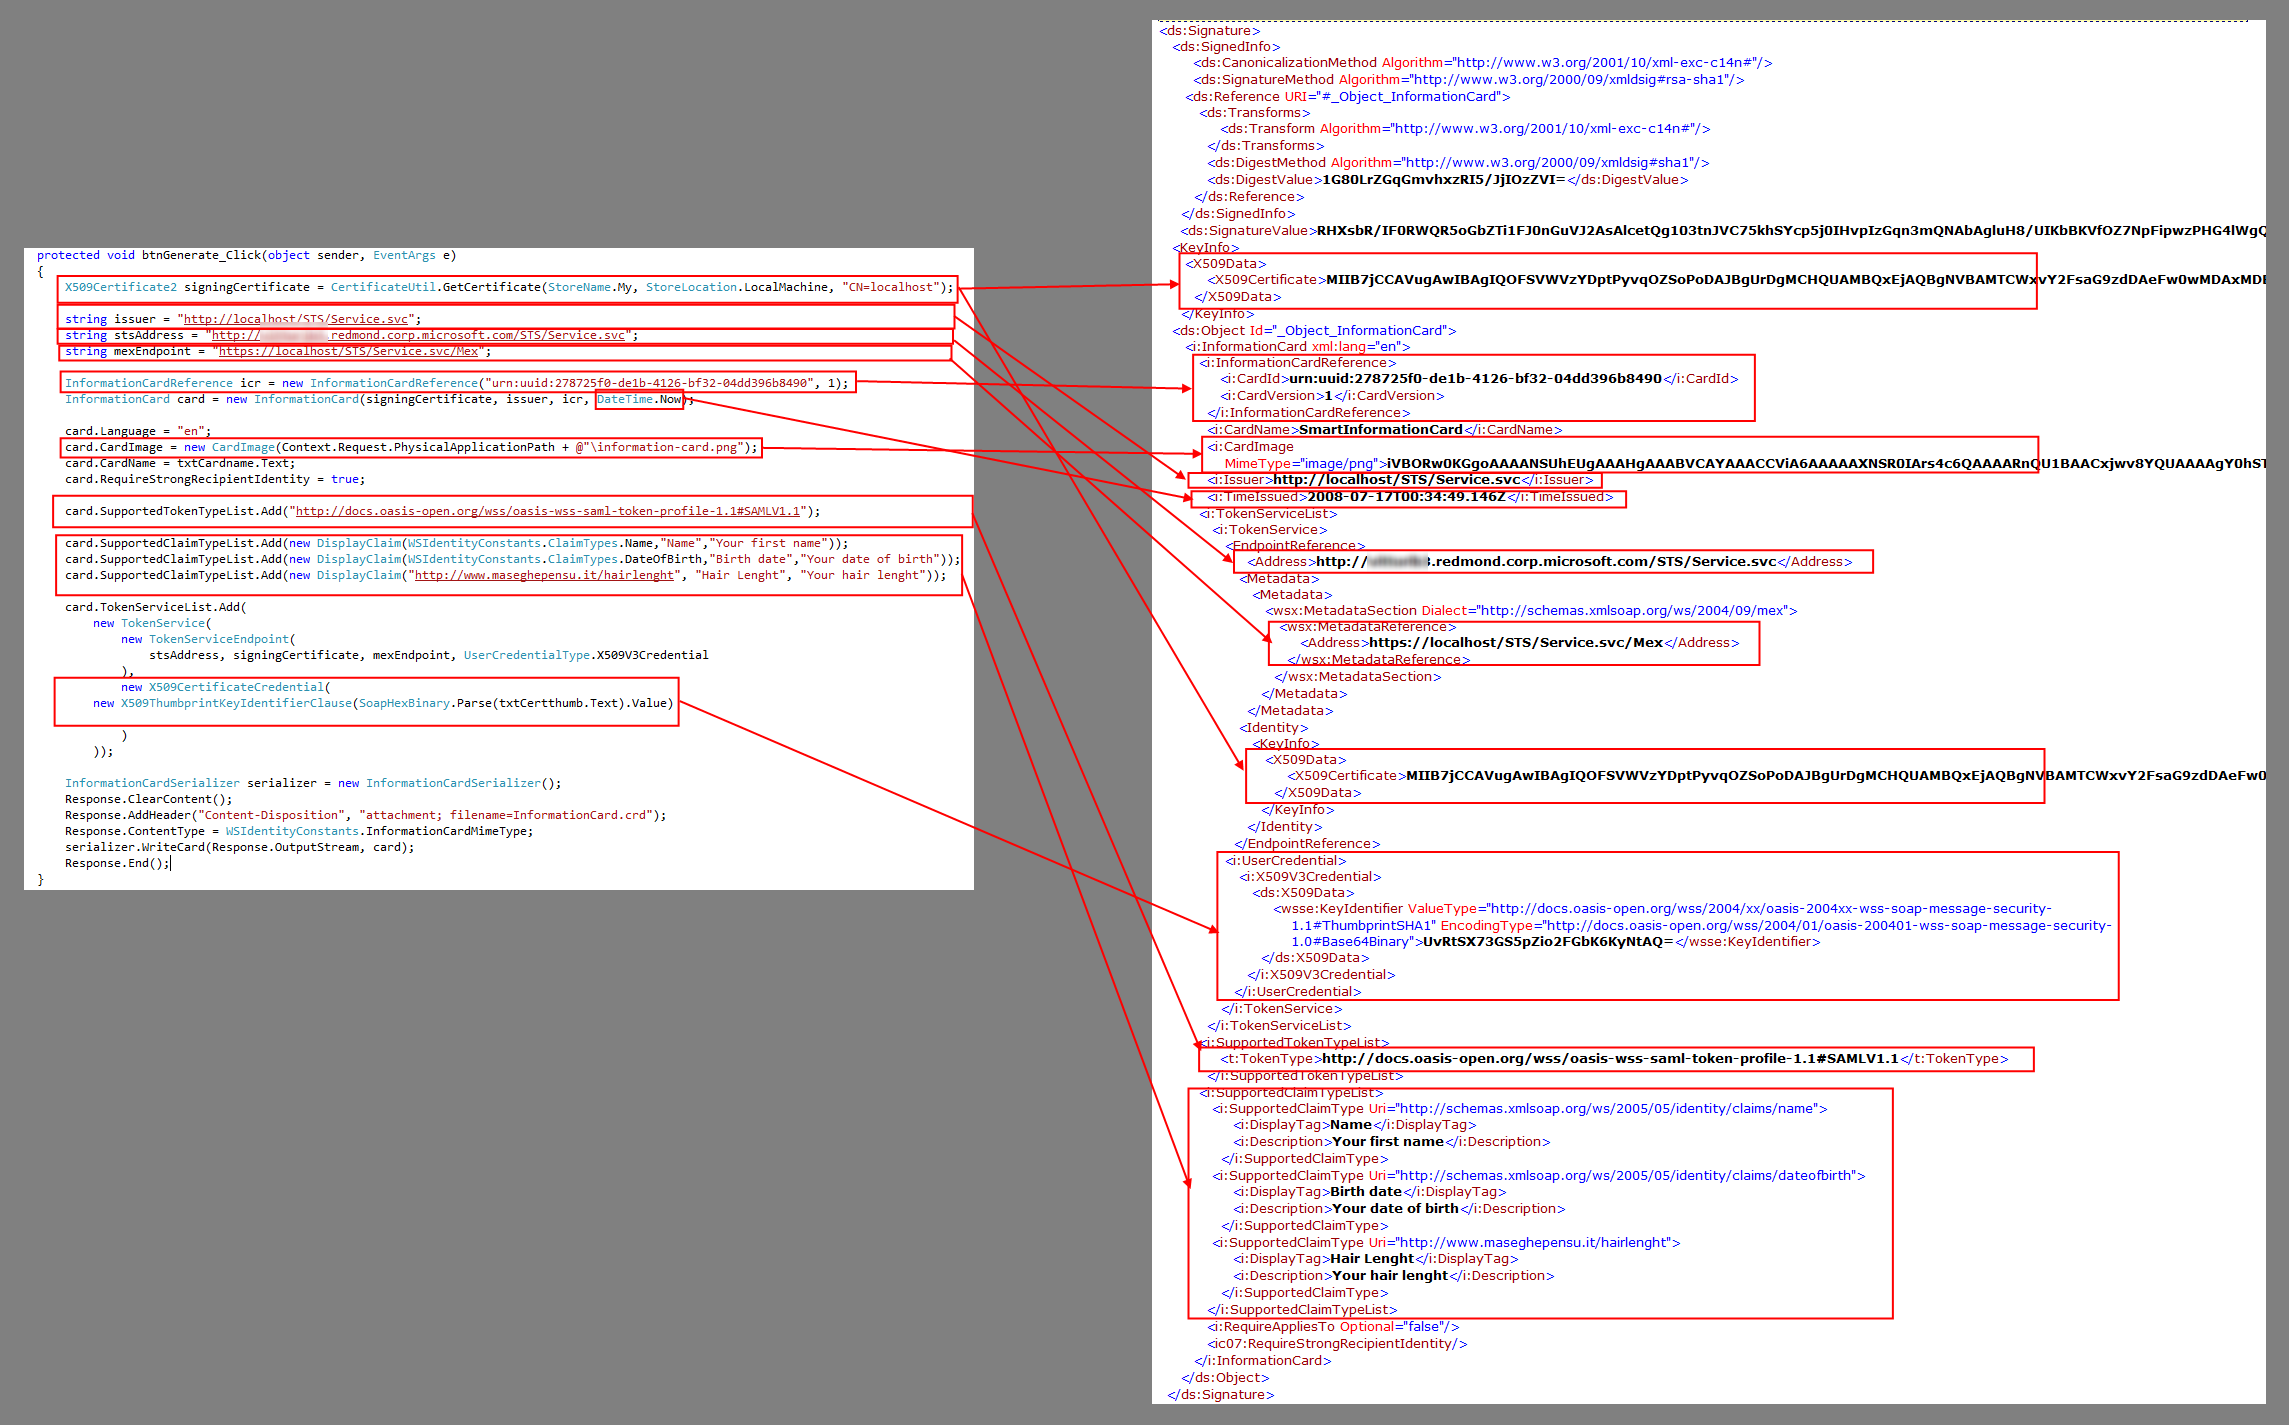
The code is pretty straightforward; in fact, it is a simplification of what the ActiveSTSWithManagedCard sample does (i,.e.: here I hardcode the URIs while the example derives them from the app context). Instead of commenting line by line, which would bore the both of us, below I provide you with a (pretty big) picture which shows how some of the key code lines influence the output in the resulting crd file. Follow the link for the full size version.
Note that in real settings you would probably want to keep track of the cards that you issue, especially in relation to users & versions; here the cardid is fixed, hence you will always overwrite cards issued earlier, but in general you want to maintain control over what what issued to whom; besides the stabdard verisoning considerations, this is crucial for handling revocation policies.
All right! Let's give the project a spin and let's see if we manage to get a card.
Navigate to https://localhost/STD/Default.aspx.
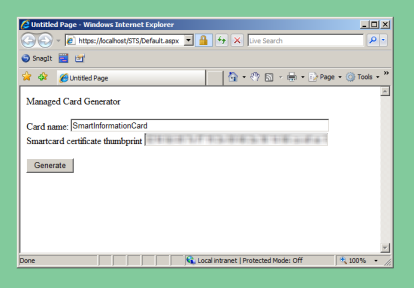
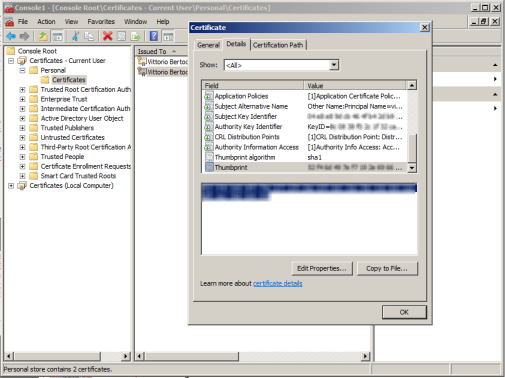
What should we fill in the "smartcard certificate thumbprint"? Easy. open an mmc console, add the certificates snapin, and pick the certificate you want to associate with the card. Here i use my smartcard, but any certificate for which you have the private key (an dwith the suitable intended usage) will do. Paste it in the textbox, and nevermind about blanks; the parser will take care of everything.
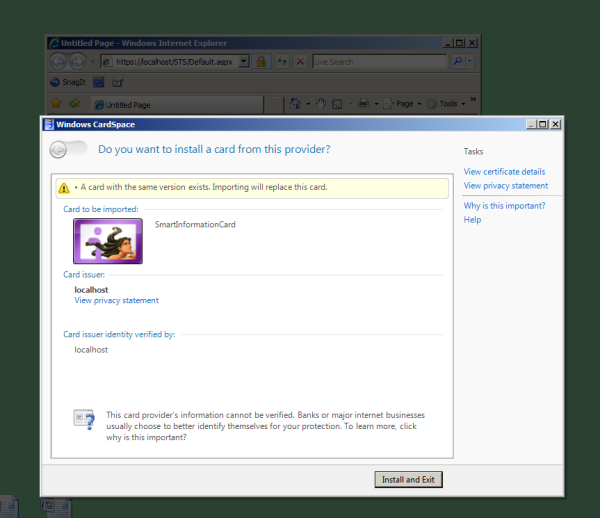
If you hit Generate, you'll get to the dialog below: click "Install & Exit", and we are done.
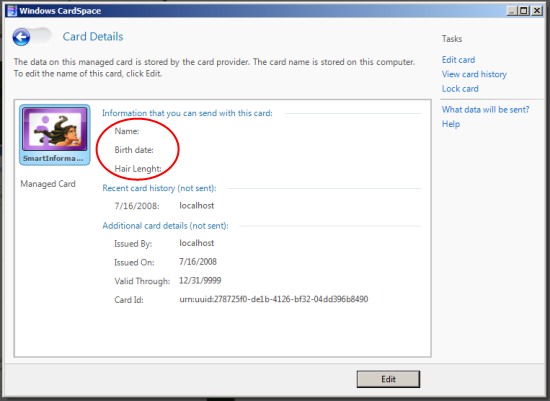
We didn't get any error message, which is comforting; but as good skeptics we want to verify that everything worked as expected. if you fire up cardspace form the control panel, you'll see that the card is now part of our collection and that it contains the expected claims.
Great! That concludes part II of the tutorial. In the next post we'll finally put all this to good use, by writing a suitable relying party.