Using FederatedIdentity.net managed cards with Biztalk Services SDK
Last Friday I announced that the new version of the Biztalk Services SDK introduced support for managed cards; I also promised I would have given more details about how to use it.
Well, a promise is a promise: this post will walk you through a sample that uses managed cards from a publicly available IP to authenticate with a WCF service exposed via the Relay; the sample will also show how to play with the policy engine of the Internet Service Bus for managing authorization.
We will get our sample managed card from one STS exposed by Federatedidentity.net: also known as Microsoft Identity Lab, this is a website maintained by my good friend (& coauthor) Caleb & colleagues in the federated identity division. From the about page:
Identity Lab is a set of hosted services to support testing of Identity Protocols. As the world shifts to increasing the security of digital identities, it is important to ensure that the underlying protocols used to transfer information about identities are interoperable, which helps to ensure the cohesiveness of the Identity Metasystem.
We aim to provide a set of test endpoints to test the interoperability of Identity Protocols amongst multiple partners and vendors.
The site will continue to evolve as the Identity space evolves. We are committed to adding features that will help ease the effort required to test the interoperability of Identity Protocols.
Federatedidentity.net has a lot of interesting features per se, and I encourage you to explore it. It is used in the context of the OSIS interop tests we are doing with all other vendors for this RSA, so if you already participated in that effort (it's fun!) and you already have a managed card you may skip steps 1 and 2. Also note: you should be able to use ANY managed card from a provider that issues holder-of-key tokens, I am using Federatedidentity.net as an example. Also note that the primary raison d'etre of Federatedidentity.net is what is mentioned in the about: that means that the address or the certificate of the endpoints can change without notice.
So, how is all this going to work? Simple. The Internet Service Bus features a R-STS: that R-STS can be configured for accepting tokens from specific IP-STSes, and perform various claim transformation including emitting authorization claims. Services published on the Internet Service Bus can take advantage of the R-STS for handling their access control. Bottom line: you can federate with any IP you want, simply by configuring the R-STS of the service bus to accept & manipulate the corresponding token. From the consuming side, you can easily access services published on the bus by using the managed card you already own without the need of subscribing for an account. This is pure coolness :)
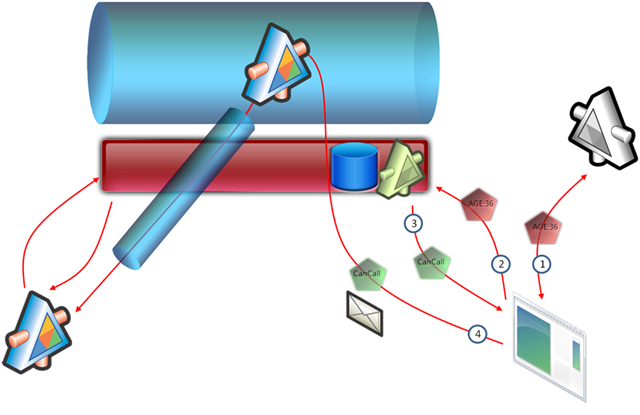
The pic above exemplifies what happens. On the left you have a service, which gets published ("projected") on the bus after successful authentication (that traverses NATs and firewalls like a heated knife through ice cream, but that's another story).
On the right there is a client that wants to call that service. In sequence:
- The subject is prompted to choose a managed card; the user picks one and obtains the corresponding token from the grey IP-STS. The token contains a claim Age
- The client sends a RTS to the R-STS of the Service Bus (in gold), securing it with the token obtained in 1
- the R-STS applies some rules and gives gab a new token, containing an authorization claim
- the client invokes the services with the new token
Pretty simple, right? Well, the rest of the post walks you though a sample that does just that. It also helps you to obtain a card from federatedidentity.net, which can come in handy for other occasions, and helps you to set up your labs.biztalk.net account. Suggestion: while you go through the individual steps, do not lose sight of the big picture and of why you are doing that particular action: that's the biggest danger in hands on labs and tutorials.
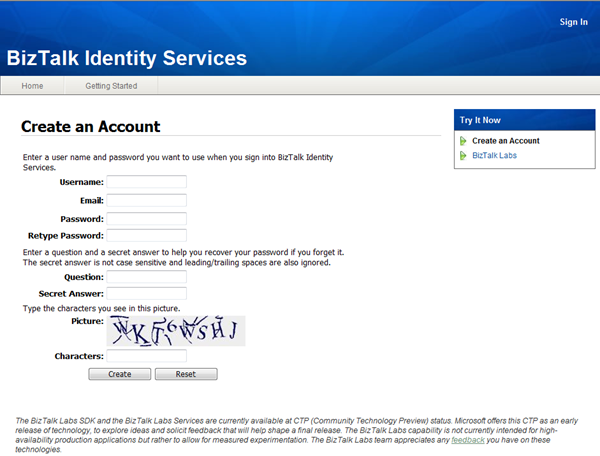
1. Create an account on federatedidentity.net
Go to https://ipsts.federatedidentity.net/MgmtConsole/Default.aspx and go through the Sign up procedure (we can't use the preconfigured card, later it will be clear why).
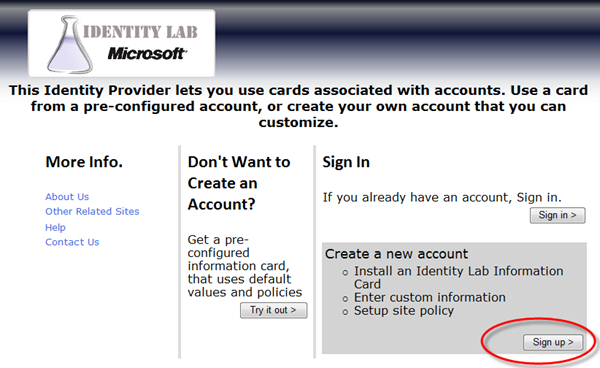
That's pretty straightforward; remember to check out the terms of use.
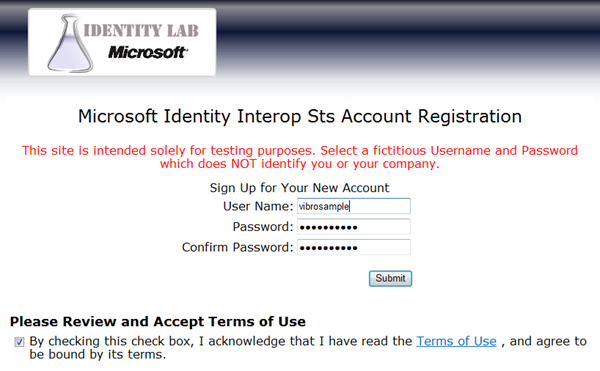
Once you hit Submit & Continue, you'll land in your account management page.
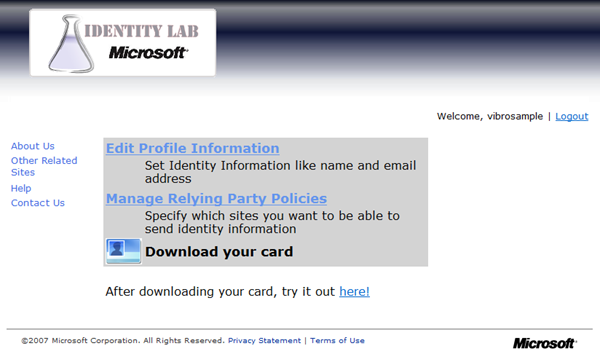
Let's think for a second here. We created an account with an Identity Provider. However the IP knows very little about us so far: just what we said, that is to say the username we picked and the password (neither qualify as claims since they're a mechanism for supporting credential verification rather than being descriptive of the subject, but that's just my opinion). If we want the IP to be able to say something interesting about us, we have to to tell it to it in the first place. That's what the "Edit Profile Information" is about.
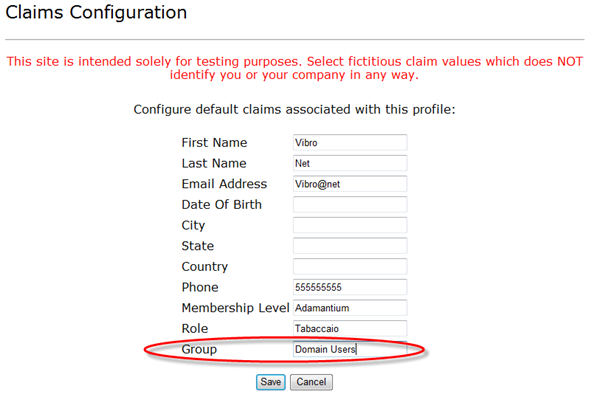
Here you can feed the IP with some useless junk, in respect to the testing purposes; I would ask you, though, to give to the "Group" claim the value "Domain Users". Or, at least, to remember the value you gave at this point. Hit save and you're done.
2. Download a managed card and the STS certificate
The IP now knows what it needs to know about you (for testing purposes): you can now download a managed card, that you can use with RPs that requires the claims you've seen in the former step. Just click on the card picture "Download your card" in your account management page (2 figures ago).
At this point you also want to get the STS certificate, since we'll need it later in the process. Unfortunately the .cer file is not available for download: I was already prepared to write an extra 3 pages of tutorial for explaining how to use IE for installing the cert in the local store and use the MMC for exporting it in a .CER file; luckily I was chatting with Caleb, awake as well late at night for IMing about CardSpace (yes, we like the topic to this point) and he pulled out of his magic hat a snippet of code that does just that.
 using System;
using System.IO;
using System.Net;
using System.Security.Cryptography.X509Certificates;


namespace CertDownloader
{
    class Program
    {
        static void Main(string[] args)
        {
            string siteUrl =
              "https://ipsts.federatedidentity.net/MgmtConsole/";
            string certFile = "fedid.cer";
            //string siteUrl = "https://identity.biztalk.net/Login.aspx";
            //string certFile = "bts.cer";

            HttpWebRequest req =
             (HttpWebRequest)WebRequest.Create(siteUrl);
            HttpWebResponse res =
             (HttpWebResponse)req.GetResponse();

            ServicePoint currentServicePoint = req.ServicePoint;

            X509Certificate siteCert = currentServicePoint.Certificate;
            FileStream fs = File.Create(certFile);
            fs.Write(siteCert.GetRawCertData(), 0,
                     siteCert.GetRawCertData().Length);
            fs.Flush();
            fs.Close();
        }
    }
}
Simply paste this code in a console app and run it, you'll get the certificate file right away. Thanks Caleb, you awarded me an extra hour of sleep minimum :-)
3. Create an account on labs.biztalk.net
We are done with federatedidentity.net for the time being, let's now move to labs.biztalk.net.
Go to https://labs.biztalk.net/GetStarted.aspx. There you can create your labs.biztalk.net account, if don't have one already (you'll need it): you create it old fashion, by picking a u/p pair and filling up a small form; but once you have your account you can associate to it a personal card or a LiveID. Of course I immediately associated a card to it and now I blissfully forgot my password. HA :-) in fact I sort of assume that you associate a card, so if you want to be able to follow the tutorial verbatim I suggest you go ahead and do it at this point (you may not do it and use a different token provider, but that requires tweaking the code below a bit).
4. Download & install the Biztalk Services SDK
The next thing you want to do is installing the SDK, which can be downloaded from the same page. Make sure you wipe any former versions first.
5. Open in Visual Studio the Federation sample
The SDK features a sample that does almost exactly what we want: you can find it in <Program Files>\Microsoft BizTalk Services SDK\Samples\Communication\ExploringFeatures\RelayAuthentication\Federation\CS30\Federation.sln. In fact we need to change one single line, but it's still a good idea to try understanding what goes on there: luckily it is all very simple.
The solution contains 2 projects, Service & Client. Ignore the readme, this blog post overrides it.
Service
Glancing at EchoContract.cs and EchoService.cs we see that the service is really easy: it just sends back whatever string you send its way. The body of Main is more interesting:
 CardSpaceTokenProvider tokenProvider = new CardSpaceTokenProvider();
string userName = tokenProvider.GetUserName();

Uri address = new Uri(String.Format("sb://{0}/services/{1}/EchoService/",
  RelayBinding.DefaultRelayHostName, userName));

ServiceHost host = new ServiceHost(typeof(EchoService), address);
host.Description.Endpoints[0].Behaviors.Add(tokenProvider);
host.Open();

Console.WriteLine("Service address: " + address);

Console.WriteLine("Press [Enter] to exit");
Console.ReadLine();

host.Close();
First, we instantiate a CardSpaceTokenProvider; we'll use it for getting for our service a ticket for a ride on the service bus.
Then we call GetUserName on it; this has the effect of attempting an authentication to the service bus. In this case the xxxTokenProvider of choice is cardspace, so the user will be prompted to pick a card; choosing the card that you associated with your biztalk services account should do the trick. Upon successful authentication, the method returns the username you chose when you created your biztalk services account. That username is important, since it influences the URI on which your service will be published: in fact the following line builds such a URI (note the sporty protocol schema sb://).
The rest is just creating the host for the service and running it, with the exception of the line in which we add our CardSpaceTokenProvider in the endpoint behaviors; that's because it is the credentialtype required by the relayBinding (specified in the app.config), which BTW is what operates all the firewall piercing magic. I used a similar solution for my token caching example here. That's all you need, your RP is ready! I have to make a small note, though. If you'd be using this in a real situation, you probably would not use a self issued card for publishing a service on the bus. The reason is simple: using a personal card is an inherently interactive ceremony, whereas a service needs to be able to recover from process failures & reconnect without requiring human intervention every time. Hence, I would use other authentication methods offered by the Biztalk Services: the best would be X509, but passwords (bleah, i know, but remember that it is an application identity and not a user identity) would do the trick too.
Client
The client mirrors the service in its use of the bus. Again, let's look at the body of the Main method.
 Console.Write("Enter the name of the user you want to connect with: ");

string serviceUserName = Console.ReadLine();
Uri serviceUri = new Uri(String.Format("sb://{0}/services/{1}/EchoService/",
    RelayBinding.DefaultRelayHostName, serviceUserName));

CardSpaceTokenProvider tokenProvider = new CardSpaceTokenProvider();
tokenProvider.ClaimTypeRequirements.Add(
    new ClaimTypeRequirement("https://schemas.xmlsoap.org/claims/Group"));

ChannelFactory<EchoChannel> channelFactory =
new ChannelFactory<EchoChannel>("RelayEndpoint",
                                 new EndpointAddress(serviceUri));
 channelFactory.Endpoint.Behaviors.Add(tokenProvider);

EchoChannel channel = channelFactory.CreateChannel();
channel.Open();
//...interactive stuff
The first three lines are dedicated to reconstruct the URI of the service we want to invoke. I agree, it is a bit weird to have a username to scope a service; but please consider this that 1) this is one example designed for being tested by one single person, so that's the natural thing to do and 2) in a real scenario, this would not be presented as a "username" (that's the bus business, not the client's) but simply as a string that is somehow representative of the service provider (say "Contoso").
For accessing the bus we need to authenticate ourselves; and we've learned in the service code how to do that with CardSpace. The interesting news is that we can actually specify the requirements of the token we want to use. Here we state that the token should contain the claim https://schemas.xmlsoap.org/claims/Group; this will influence the behavior of the identity selector, which will light up only the cards which can produce such a claim.
Once we've done this, it's good old WCF: we create a channel, we add our tokenprovider as credentials behavior and we open the dances.
What do you expect will happen? CardSpace will pop up; assuming you have the right managed card[s] (we'll worry about that later) will light up; you'll select it and the corresponding token will be sent to the bus. More precisely, it will be sent to an R-STS that will do something with it (we'll worry about it later) and will give us back another token. That token will be used by the relay binding for invoking the service, according to the interactive code below.
 Console.WriteLine("Enter text to echo (or [Enter] to exit):");
string input = Console.ReadLine();
while (input != String.Empty)
{
             try
             {
                 Console.WriteLine("Server echoed: {0}", channel.Echo(input));
             }
             catch (Exception e)
             {
                 Console.WriteLine("Error: " + e.Message);
             }
             input = Console.ReadLine();
}

channel.Close();
channelFactory.Close();
Here the issued token from the managed card is serving a double function. For one, it is the credential that allows the client to access the service bus, much like the personal card we used for registering the service on the network. The obvious difference is that while the personal card is, well, personal, accepting a managed card may enable all the people who are entitled to a card from the accepted issuer. Very handy!
6. Modify the example so that it will require one claim expressed by the managed card obtained in 2.
Ok, now you're going to be disappointed by how easy this is. The client code in the sample requires a token containing the claim "https://schemas.xmlsoap.org/claims/Group", but the managed card from federatedidentity.net can't produce it: hence, we change the requirement with something that federatedidentity.net can produce.
 //tokenProvider.ClaimTypeRequirements.Add(
//   new ClaimTypeRequirement("https://schemas.xmlsoap.org/claims/Group"));
tokenProvider.ClaimTypeRequirements.Add(
     new ClaimTypeRequirement("https://ipsts.federatedidentity.net/group"));
That happens to be the claim for which I asked you to assign the value "Domain Users" in step 1. That's all we have to do in code; the rest comes from the endpoint configuration on the bus.
7. Configuration on identity.biztalk.net: accepted issuer, claim types & claim mapping
Now we have a client that will get a token from federatedidentity.net, and a service that will echo whatever is sent to it by authenticated users; what's left is defining who the authenticated users are. This basically entails introducing the federatedidentity.net STS to the service bus, define which claims we are interested into and what authorization actions we want to perform.
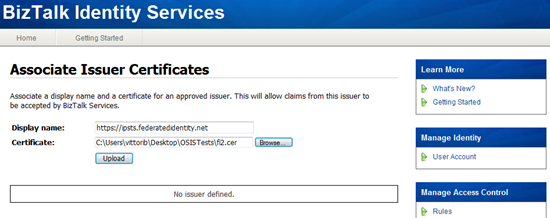
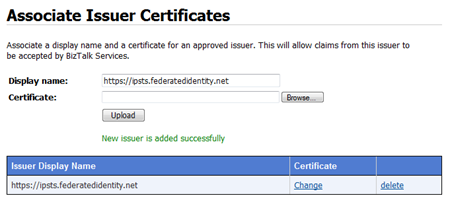
a. Add federatedidentity.net as issuer
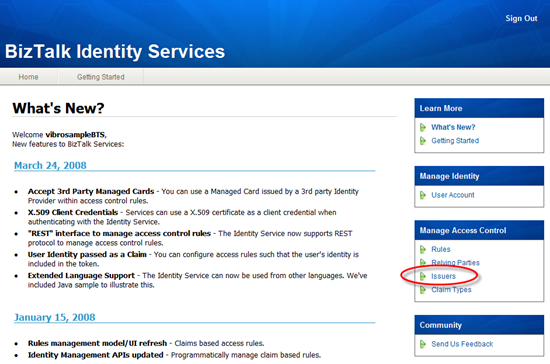
When you sign in in the Biztalk Services portal you land in the page above. The circled link brings you to a page where you can define what are the approved issuers from which your service will accept tokens.
That's the moment in which you need to retrieve the certificate you saved in step 2. Give a name as shown, select the certificate and click upload.
Alright, from now on federatedidentity.net is an officially recognized issuer.
b. Add the claim type you requested in 6
Follow the "Claim Types" link (just under "Issuers"). You'll get to a form that you can use for inserting in the recognized claims list the claim we requested in step 6.
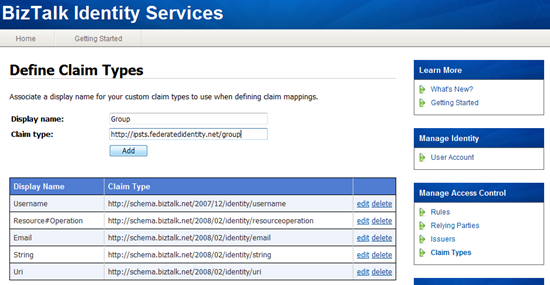
Make sure that the URI is exactly matching the one in the code.
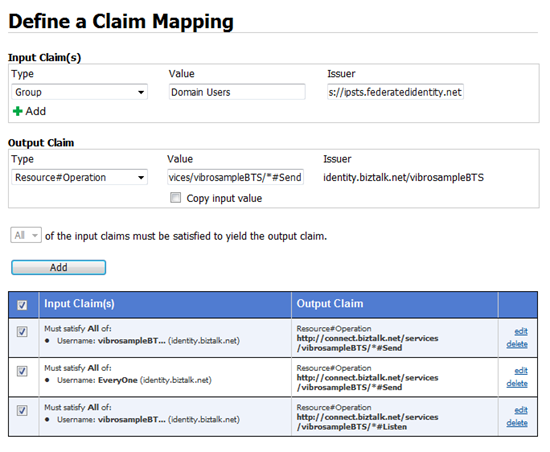
c. Add a claim mapping rule
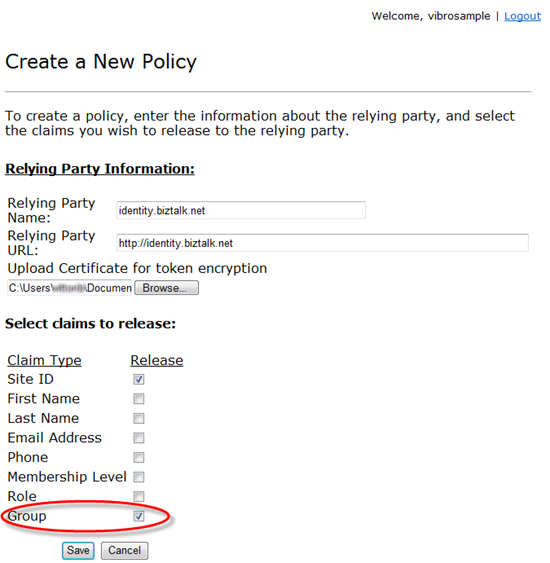
Beautiful. Now we can use the policy engine of the service bus for defining some claims mapping rule for the R-STS; for example, we can have the R-STS emit an authorization claim when one claim from the incoming token contains a certain value. Follow the link Rules, you'll get to the page below:
In the input claim section we want to select the case of the claim we required:
- the dropdown "Type" will be "Group"
- The "Value" will be the value we entered in our IP in step 1, that's to say "Domain Users"
- The issuer will be "https://ipsts.federatedidentity.net" as we defined in a.
The output claim is the authorization action we are emitting: the field "Value" will be of the form "https://connect.biztalk.net/services/<username>/*#Send", where <username> is your account name for labs.biztalk.net created in step 3.
This concludes what we needed to do on the biztalk services management portal. We have our access rules in places, we're almost ready to roll!
8. Create an entry for R-STS in the RP policies of federatedidentity.net
The last thing we need to do is making sure that we'll be able to obtain a token from federatedidentity.net. "But Vittorio, we have the card and the u/p credentials: aren't we already entitled to get a token?". We would, if it weren't for a small detail. Federatedidentity.net is an auditing STS, which maintains a list of RPs to which it is willing to issue tokens for. Hence we have to do the counterpart of 7.a, we have to add labs.biztalk.net in the list of approved RPs.
As we did in 2, we can use Caleb's magic code for getting the certificate we need and save it locally; just comment the lines with the URI and the cert file, and de-comment the corresponding ones.
At that point we can go to the account management pages of federatedidentity.net, follow the "Manage Relying Party Policies" link and click on "Add a New Policy".
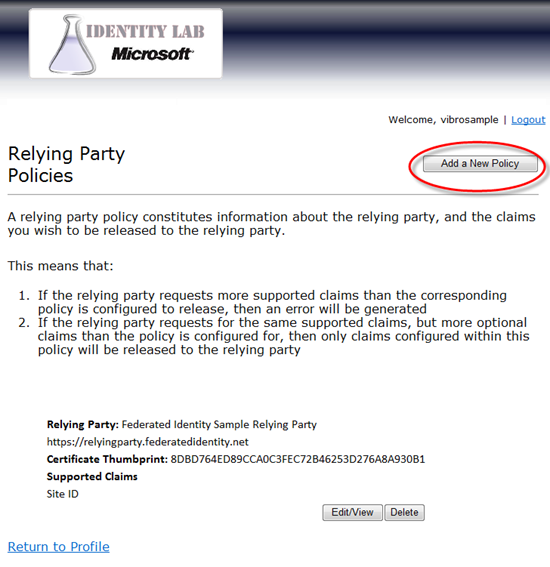
In the new policy we mainly specify that we want to issue tokens to (the URI of the R-STS), that we'll use the certificate we just downloaded for encrypting those certificates and that we'll be willing to issue Sote ID and Group claims.
9. Run the thing already!
Now we are really ready. From now on, you can follow the instructions of the original sample ReadMe (with some modifications here and there):
Before running any of the samples for the first time make sure you've satisfied the prerequisites above.
To compile the solution, you can hit Ctrl-Shift-B in Visual Studio when the Federation solution is open.
After compiling the solution, please perform the following steps to run the application:
- From a command shell, run the service (Service\bin\Debug\Service.exe)
- When prompted, select the self-issued card you use to authenticate with the Biztalk Services portal. At this point, the service should indicate that it is listening at the configured address
- From another command shell, run the client (Client\bin\Debug\Client.exe)
- When prompted enter the chatroom name you want to connect to. (This is the <username> you use to authenticate with the Biztalk Services portal, and it is used to compose the URI of the service we started in 1)
- When prompted, select your federatedidentity.net managed card
- Enter the user's backing credentials, Username and Password, associated with this managed card.
- When prompted, enter text to send to the service (e.g., "send me echo already!") and then press Enter.
- When finished, press Enter to exit the client and the service.
Et voila'. You used a managed card for obtaining a token from an IP; that token went to a R-STS, which applied policy rules and performed claim transformation by issuing a new token; that token went to your service, that was directly visible on the Internet thanks to the properties of the Relay.
Summary
I already made this sample with a prerelease, but for writing this post I did everything all over again from scratch for making sure that what I describe works as expected. I am happy to report that it does! In the above seems long, it's because I condensated many actions in a single tutorial and because I give you a screenshot of every step. In fact, the federation experts among you will have realized that this service approach is incredibly agile. The power of managed cards, coupled with the ease with which you can manipulate policies at the bus level, is an explosive combination. The implications of this will keep us busy for quite some time :-)
If you have feedback, drop me a line!