Using Horizontal and Vertical Split Panels in Unified Service Desk
Are you a fan of Outlook Reading Pane? Well, then you would really like to configure a similar feature in Unified Service Desk. USD provides us special layout’s that we can apply to hosted controls and display them as split view, similar to outlook reading pane.
HorizontalSplit and VerticalSplit are special layouts that allows users to split hosted control layouts either horizontally or vertically, and it also allows us to host and manage USD Components within each of them when needed. It contains a splitter with a top panel and a bottom panel (or) a left panel and a right panel. It is typically used to display a list view in one of the panel (top or left panel) and a detail view in the other panel (bottom or right panel). Typically these are used within the MainPanel as a hosted control, however they can also be used with other panels too.
Below is a quick representation of Horizontal Split & Vertical Split layouts and its panels. All of these panels can be hosted and loaded with USD components and also optionally Window Routing Rule's can be configured against them to load dependent components\popup's from one panel into another.
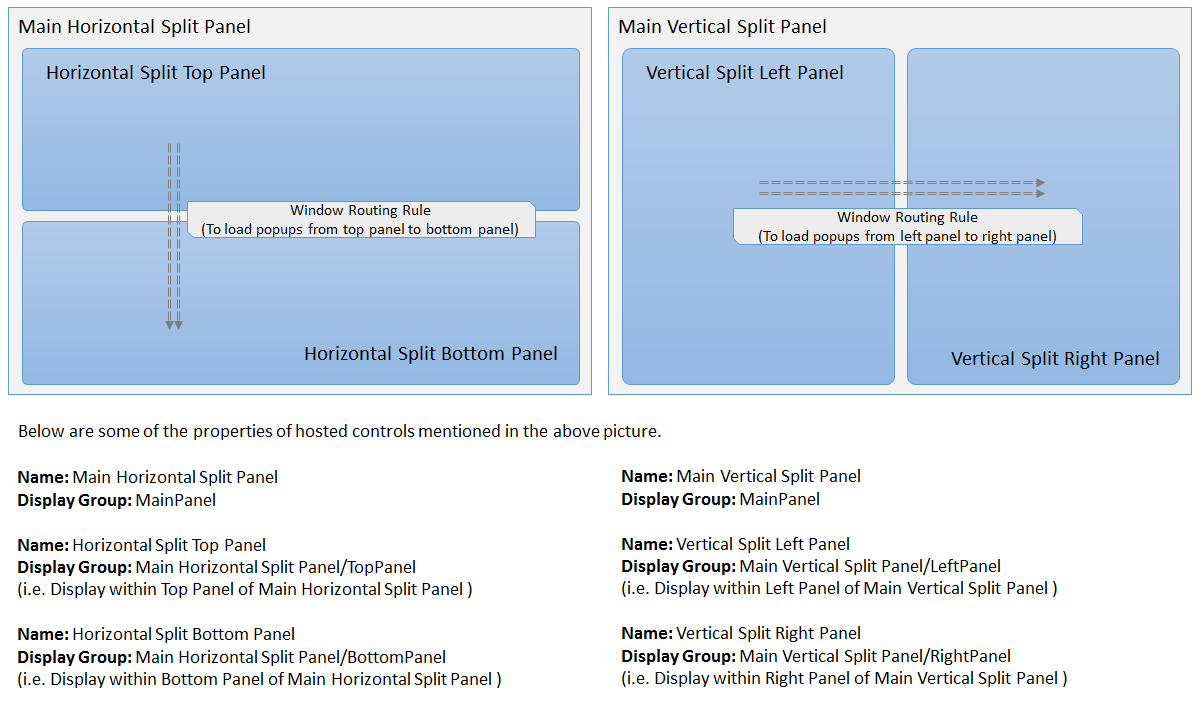
Display Group plays a major role in this configuration, it allows you to tell the hosted controls to display themselves in its panels that are defined in your configuration. This is done using a special syntax.
Panel Layout Control Name/Name Of Panel Inside Control
| Panel Layout Control Name - Name of hosted control that is configured as type Panel Layout. |
| Name Of Panel Inside Control - Name of the panel inside this panel layout. |
Example:
In the below example we will create a Vertical Split Main Panel and display CRM Activities View and selected activity in the corresponding left and right split panel. As a part of this walkthrough we will be creating and configuring Hosted Controls, Window Navigation Rule and Action Call to achieve this functionality.
Creating Split Hosted Controls: In the below steps we will be creating a vertical split hosted control, and 2 other hosted controls that will be loaded within vertical split hosted control.
- Navigate to Settings --> Unified Service Desk --> Hosted Control.
- Click NEW to create a new hosted control record and enter the below mentioned details.
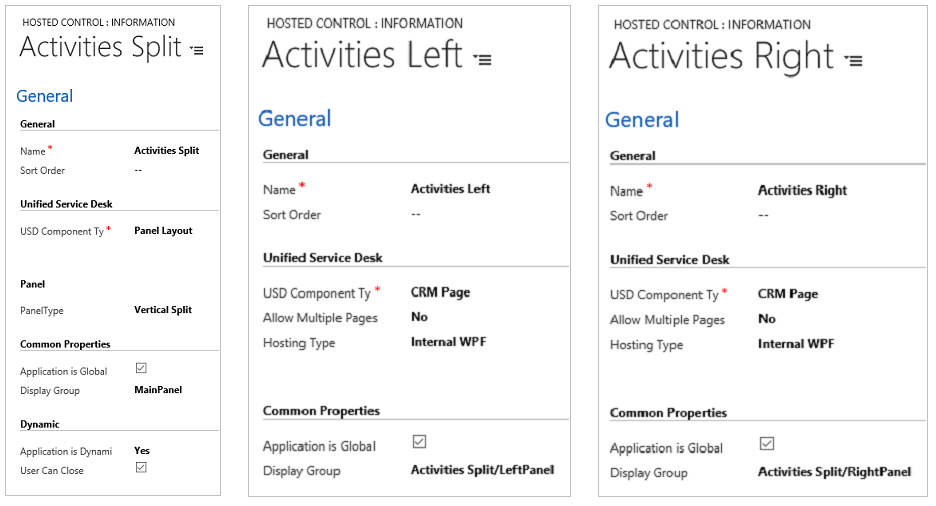
- Name: Activities Split
- Sort Order: 1
- Display Name: ACTIVITIES
- USD Component Type: Panel Layout
- Panel Type: Vertical Split
- Application is Global: Checked (Yes)
- Display Group: MainPanel
- Application is Dynamics: Yes
- User Can Close: Checked (Yes)
- Click ‘Save and Close’ to save and close the record.
- Click NEW to create a new hosted control record and enter the below mentioned details.
- Name: Activities Left
- Sort Order:
- Display Name:
- USD Component Type: CRM Page
- Allow Multiple Pages: No
- Hosting Type: Internal WPF
- Application is Global: Checked (Yes)
- Display Group: Activities Split/LeftPanel
- Click ‘Save and Close’ to save and close the record.
- Click NEW to create a new hosted control record and enter the below mentioned details.
- Name: Activities Right
- Sort Order:
- Display Name:
- USD Component Type: CRM Page
- Allow Multiple Pages: No
- Hosting Type: Internal WPF
- Application is Global: Checked (Yes)
- Display Group: Activities Split/RightPanel
- Click ‘Save and Close’ to save and close the record.
Creating Action Calls and associating to Events: In the below steps we will create Action Calls and hook it to events to load CRM Activities View into USD Activities Left hosted control.
- Navigate to Settings --> Unified Service Desk --> Events.
- Search and Open ‘DesktopReady’ event record.
- Add a New Action Call to the DesktopReady event record using the below mentioned details.
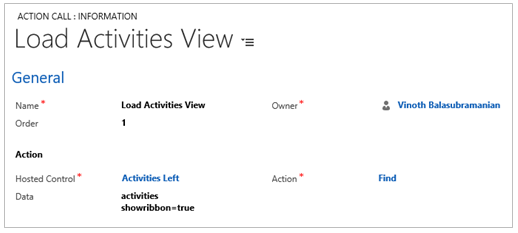
- Name: Load Activities View
- Order: 1
- Hosted Control: Activities Left
- Action: Find
- Data: activities
showribbon=true
- Click ‘Save and Close’ to save and close the record.
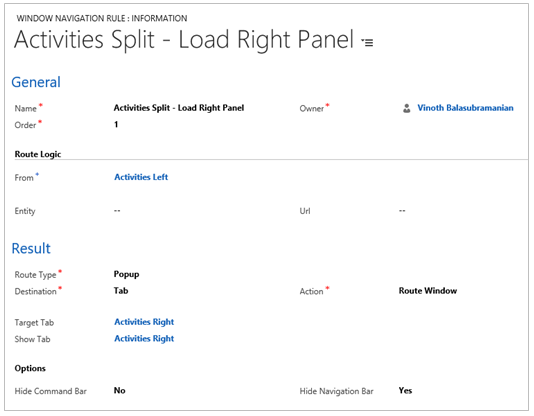
Creating Window Navigation Rule: In the below steps we will create Window Navigation Rule to load Activities Right hosted control with any popup from Activities Left hosted control.
- Navigate to Settings --> Unified Service Desk --> Window Navigation Rules.
- Click NEW to create a new window navigation rule record and enter the below mentioned details.
- Name: Activities Split - Load Right Panel
- Order: 1
- From: Activities Left
- Route Type: Popup
- Destination: Tab
- Action: Route Window
- Target Tab: Activities Right
- Show Tab: Activities Right
- Hide Command Bar: No
- Hide Navigation Bar: Yes
- Click ‘Save and Close’ to save and close the record.
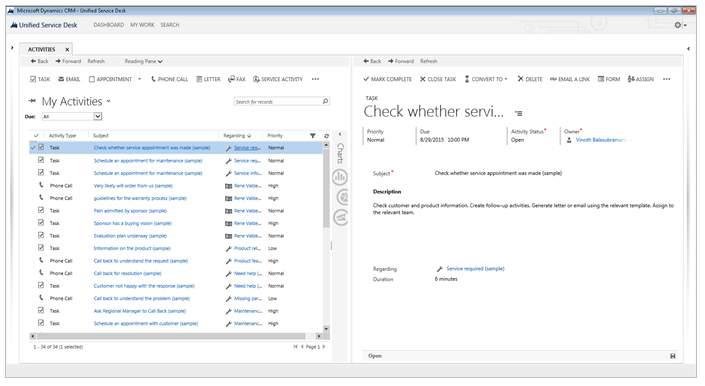
Once all the above mentioned configurations are performed, you can go ahead and launch Unified Service Desk. You will see Activities Tab with 2 split panels loaded with activities view in the left side, double click on any of the activities from view or command bar to load the corresponding activity in right side similar to outlook reading pane.
Similar to Vertical Panel you can configure Horizontal Panel to display top bottom view of activities view and activity record as shown in below screenshot.

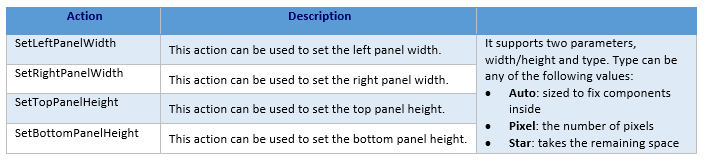
Also USD allow us to adjust the height and width of these split panels at the runtime using the UIIActions exposed by split hosted control. Below are the details of the actions. You can use these UIIActions in your Action Calls to set the height and width of the split panels as needed.