The ins and outs of Unified Service Desk's Agent Scripting tool
Background
The Unified Service Desk Agent Scripting tool is a component that provides a script to be used on a phone call or via chat along with a decision tree for agents to quickly get to the work they need to perform. The tool provides for CRM admin based configuration, can provide next steps, hints, instructions, and drive other application behavior through Action Calls. For additional information, see the documentation for this component at: https://msdn.microsoft.com/en-us/library/dn864915.aspx
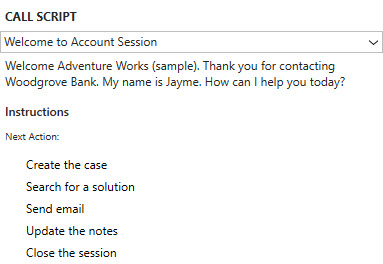
The UI component consists of 4 parts:
- A drop down list that shows the current Agent Script Task that is visible. When you select the list, you'll see a history of where the user has been. You can select from this history to go back to a previous step.
- The script text section displays text that may be read to the customer or sent via chat.
- The Instructions section is similar to script text except that it is in a slightly different font and allows the admin to specify instructions to the user, if any to get their work done.
- The last section is a series of indented links that, when clicked, take you to another task and/or run action calls. These are referred to as Answers.
Usage Scenarios
While the Agent Scripting component can be used for scripting and workflow control as previously described, it is meant to be somewhat generic in nature thus allowing for alternate uses. One such use includes selecting from a hierarchical selection for call reason that can be recorded against the CRM activity that you might create behind the scenes.
Another common scenario includes the creation of a checklist of steps to perform to complete work. For those that are familiar with CCA, this is very similar use to that of the old Workflow component in CCA. In that component, you would select a "workflow" and it should show a series of steps to complete. As you click the steps, check boxes would show up to the left of the links to indicate they were completed and the click would perform actions or automations in CCA. Similarly the Agent Scripting component can display just such a checklist by creating answers with no destination task or having the destination the same as the source (looping back on the same task). Then as you click through the list, it will run the Action Calls on the answers and will display a check box to indicate the step is complete.
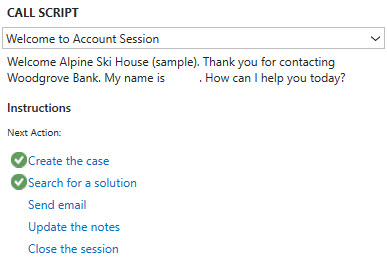
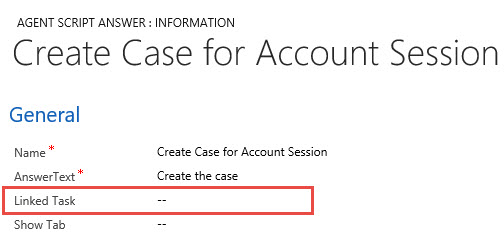
To achieve this, create answers with either no linked task or select the source task so it comes back to the same task. Since the items that have already been visited by the user show check marks next to them, this has the effect of checking the items as the user clicks them.
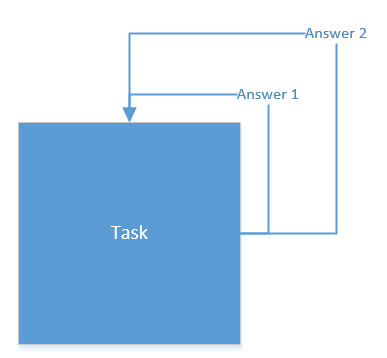
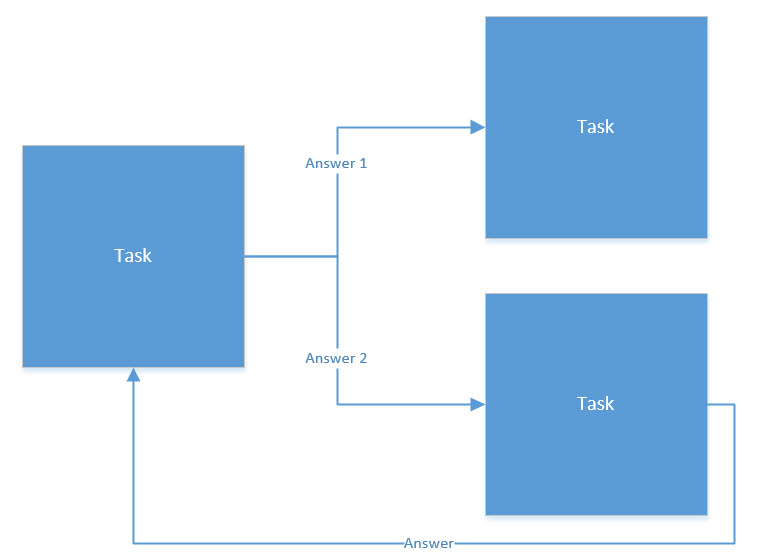
Another way to look at the answers is to see them as pointing back to the same task as shown in the following diagram.
So how you do respond when all of the items in a checklist have been checked? Lets say, I want a check list but the user might check them out of order so I can't just move to the next task when the last item is checked. We only want to continue to the next task when all the items have been completed (checked). It turns out that when all the answers in a task have been checked, the AllAnswersVisited event is fired with the name of the task passed as the "task" parameter. You can then create an action call where the condition filters on a specific task name that calls GotoTask with the next desired step. This achieves the result described.
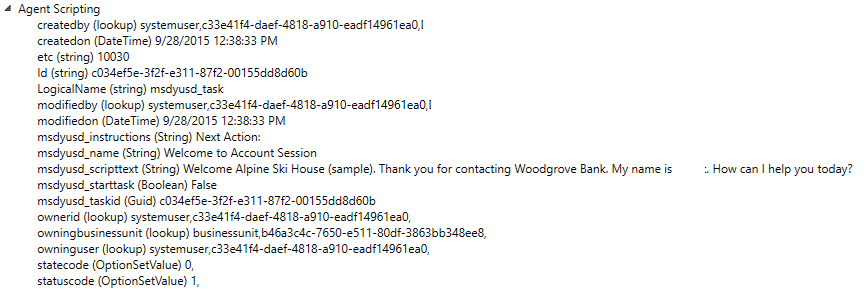
Another use that I have seen is to use the component as a hierarchical selection of templates to you, for example, to respond to chat or email. The multi-level selection ability makes it much more convenient for larger lists than a simple flat list and the answers can be linked to Action Calls that auto create an email or send text out a chat channel. The data parameter populated by Agent Script contains all the fields of the current agent script task. This includes any custom fields that you may have added to the agent script task entity. An admin can utilize this information by adding custom fields to the Agent Script Task form to collect data that may be used for automations or populating other programs, etc. For example, you might add a field that represents the email template in the agent script task. Then when the user clicks through the hierarchy and arrives at a task with a template populated, the action call can automatically create the email and pull the template from the data parameter list that is used to auto-populate the email. As an alternative, you could use standard email templates and add a field in the agent script task where you provide the name of the email template to use for the task.
The Admin Experience
The Agent Scripts are administered in the area indicated below.

Just click on the link and it will take you to a list view of Agent Script Tasks.
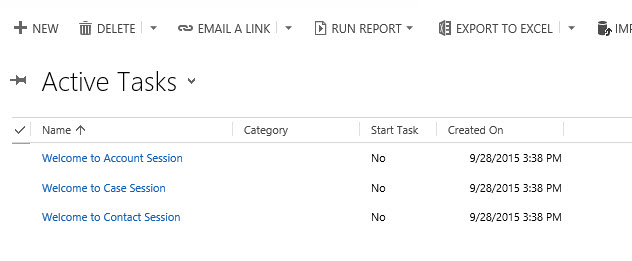
Clicking on one of the tasks, will take you to the Task Form as shown below.
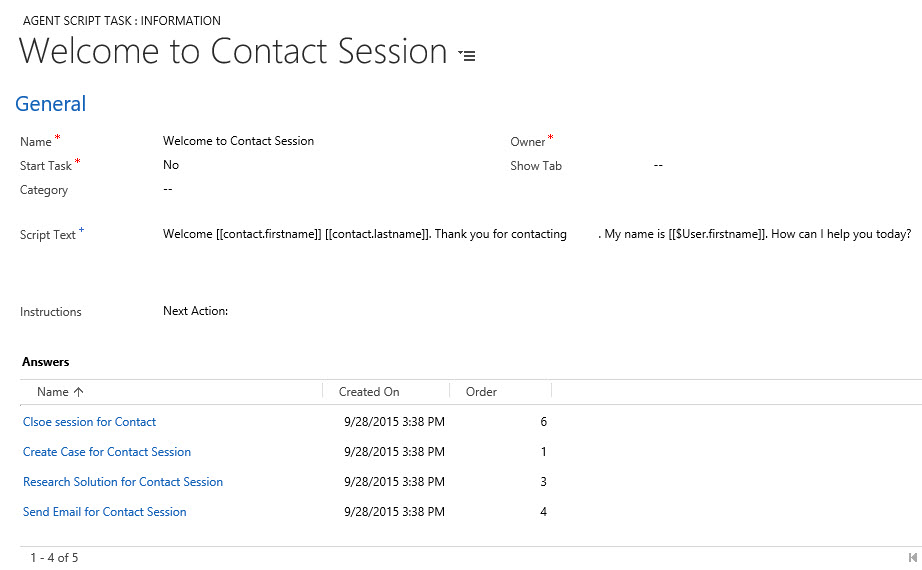
Name
The name you give the agent script task is not only used for admin but is the text that is displayed in the drop down list as the current task and is used in the list as the history name. It is important to pick a name that properly identifies the task to the user.
Start Task
You can setup your agent scripts with or without one identified as a Start Task. If you mark a single task out of all your tasks as the Start Task, then when you load the Agent Scripting component by calling it's default action, it will display the Start Task you selected. If you were to mark several tasks as Start Tasks, then a menu will be displayed instead, allowing you to select from the list of start tasks.
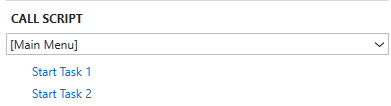
Notice the [Main Menu] in the task name area. Main Menu is not a task that you have defined. It is a special auto-created one that allows the display of the start tasks for user selection.
To consider a use for this feature, consider for a moment that your company has several departments... Your Customer Service department and your Consumer Sales department, for example. Now consider that Mary first started working at your company in the Customer Service Department. While working in this department, she would have a single Customer Service Department start task that will display her list of functions she can do in the department. Recently, however, Mary has been cross trained so she can now also cover Consumer Sales Department calls. Now both start tasks are shared with Mary and she is now presented with a menu that allows her to select which department a particular call was meant. Of course, with some CTI magic, she wouldn't need the menu either, the CTI adapter could automatically go to the appropriate departments start task based upon the DNIS digits or selection information passed from an IVR.
Category
The category is not required and is there only to allow the admin to categorize their tasks for easier viewing and sorting in the list view. You can create categories to suit your needs.
Show Tab
This field allows you to select a hosted control. When arriving at this task in the agent's UI, the system will make sure the hosted control in this field is visible. This is particularly useful when the Task applies to a specific application. You would want that application in view. As an alternative to using this field, you could also add an action call to the task, which would run automatically when the user arrives at the task. The ShowTab action is attached to Global Manager.
Script Text
This field contains the text to display to the user when this task is displayed. The text here can utilize replacement parameters to substitute data from applications including CRM data. This field is commonly thought of as text to read to a caller, and while it can be used for this, this use has become less common over the last few years. We do, however, use this text frequently for output text to the chat window. It can save a good deal of time and help the agent avoid typing information repeatedly. If this field is left blank in the admin, it is removed from the display when the task is shown to the user.
Instructions
This field is very similar to script text but it is displayed in a slightly different font. It is not intended to be read back to the user and is not intended to be output via the chat window. This is a good place to provide the agent with instructions on how to handle the current task they are working. If this field is left blank in the admin, it is removed from the display when the task is shown to the user.
Answers
Answers are the links to other tasks. In the UI, they show up as buttons or clickable areas. It is sometimes easier to think of answers like the lines in a flow diagram and shown here.
Notice that both the Task and the Answer forms in the CRM admin have Action Call views. Action Calls attached to a Task run whenever a task becomes the current task while the Action Calls attached to an Answer run whenever an Answer is clicked. Attaching an Action Call to one of these two make a subtle but important difference. In a scenario where you have created a checklist, the Action Calls attached to the task will run every time any answer is clicked. Action Calls attached to the answer will only run when the specific answer is clicked. To consider another scenario, lets say we want to create a task to end our script that says something like, "thank you for contacting us today, is there anything else I can help you with?" Because this is the last step, all the paths in our script would end here. If we had different action calls we needed to run to say cleanup our workspace that were different depending on where we were, we would want to add those action calls to the answers so we can have just one final task in common.
Key Actions
GotoTask
This action is often used in place of using Start Task's. At the beginning of your session, you can use the GotoTask action to display a specific task in the Agent Scripting component. Of course, anytime you call an action, the control will automatically be loaded. This is a particularly useful action if you want to display different tasks depending on IVR/CTI options, or actions taken by the user. For the Data field of an Action Call, just specify the name of the Task to load.
Back
This is a way of going back one task in your history. This is very similar to your Back button in your HTML browser.
ShowSendButton
This action should be called at the beginning of a session that was started in response to a chat event. When the user clicks the button, the SendClicked event is fired. In this scenario, you would want to add an Action Call to this event that takes the script text from the data parameters and send it out the chat application. Of course, this part isn't automatically done for you because any chat system can be integrated and the method for doing this is likely to be different for each of them.
GoHome
This action simply goes to the top level item in the history list. It is the same as the user clicking the history drop down and selecting the first item.
ClearHistory
This action can be used to clear the history (and the green check marks). This is particularly useful when the user has reached the end of the script but the caller wants to do something else on the call. This clears all the check marks so that it can start over with check lists, etc.
RegisterVisitedAnswerList
This action is used in advanced scenarios where you want to react to situations where specific items in a checklist are checked by the user and others are not checked. This action request an event to be fired whenever a certain combination of checks and non-checks are matched on a give task. The following are the expected parameters.
name=<The name of the registration that you want to use. It will be supplied back in the event when it is fired>
step=<The name of the task for which this registration applies. The answers will all be relative to this task.>
<Answer Name>=true/false
The <Answer Name>=true/false is a series of name/value pairs each on individual lines. true indicates the answer should have a check box next to it while false means that we expect it to not have a check box next to it. If you don't care, then don't include the answer in your list, and it will be ignored when checking for a match.
When the pattern is finally matched, the system will fire the RegisteredVisitedMatch event. Three parameters are passed to this event including the task (same as the step name), taskid (the guid for the task), and the name (name provided in the registration). You can use this event to respond appropriately with action calls.
Key Events
TaskUpdated
Every time a task is displayed in the Agent Scripting component, regardless of the previous step, and after the history is updated and the data parameters updated, this event is fired. This event is similar to putting Action Calls in the task itself, however, you would use conditions here to filter which events you want to handle with your Action Call instead of them being tied to a specific step.
RegisteredVisitedMatch
When a previously registered list (set by the RegisterVisitedAnswerList action) is matched, this even this event is fired.
AllAnswersVisited
Fired automatically when all the items in the list are checked in the currently visible answer list.
SendClicked
Fired when the user clicks the Send button next to the agent script text.