Producing Functional Test Automation Using Visual Studio 2015
Introduction:
This post will provide you a single source for producing your test automation for your Web Application, your UWP Apps and Mobile Apps on Android by just writing 2-3 reusable lines of code. It also provides the capability of executing the tests on different platforms e.g. Windows machine, mobile devices (Windows and Android).
Targeted Audience:
QA team members and DevOps team members who wanted to generate their automated tests for their regression suites and Continuous Integration in their Application life cycle.
Pre-Requites:
For TFS support:
- Download Team Explorer 2013 https://www.microsoft.com/en-in/download/details.aspx?id=40776
Install Excel Providers on the machines:
- OLEDB Setup on Test Agents and Controller: https://www.microsoft.com/en-us/download/details.aspx?id=13255
- Ace Driver setup on Test Agents and Controller: https://www.microsoft.com/en-us/download/confirmation.aspx?id=23734
Running UWP Tests:
- Download the WinDriver for appium https://download.microsoft.com/download/6/8/7/687DEE85-E907-4A95-8035-8BC969B9EA95/WindowsApplicationDriver.msi
Appium Test Running on real devices and Emulator
Pre Requisites:
- Install Visual Studio SDK.
- Download Appium from https://appium.io/
- Java SDK from https://www.oracle.com/technetwork/java/javase/downloads/jdk8-downloads-2133151.html or any latest version.
- Android SDK https://developer.android.com/sdk/installing/index.html
- Install Node JS from https://nodejs.org/en/download/
- For UWP app testing, Download and install the WinDriver for appium https://download.microsoft.com/download/6/8/7/687DEE85-E907-4A95-8035-8BC969B9EA95/WindowsApplicationDriver.msi
- Developer mode is on Windows machine and Devices/Emulator(s).
Configure the environment variables in your machine:
- JAVA_HOME: Pointing to the Java SDK folder\bin
- ANDROID_HOME: Pointing to the Android SDK Folder.
- Add the following paths in the Path variable: %JAVA_HOME%, %ANDROID_HOME%, %ANDROID_HOME%\tools\, %ANDROID_HOME%\platform-tools\, %JAVA_HOME%\bin\
- Visual Studio Android Emulator: https://www.visualstudio.com/en-us/features/msft-android-emulator-vs.aspx
- Hyper V is enabled (only for running test on Emulator)
Developing Automated Tests in Visual Studio:
First download the Develop Automated UI Tests extension from Visual Studio Gallery and install it.
After that go for creating a new Project in Visual Studio and select the Template "Develop UI Test Automation", provide a desired name to project and click on "Ok" button to create the project.
Expends the Solution Explorer, it will show the structure as given below:
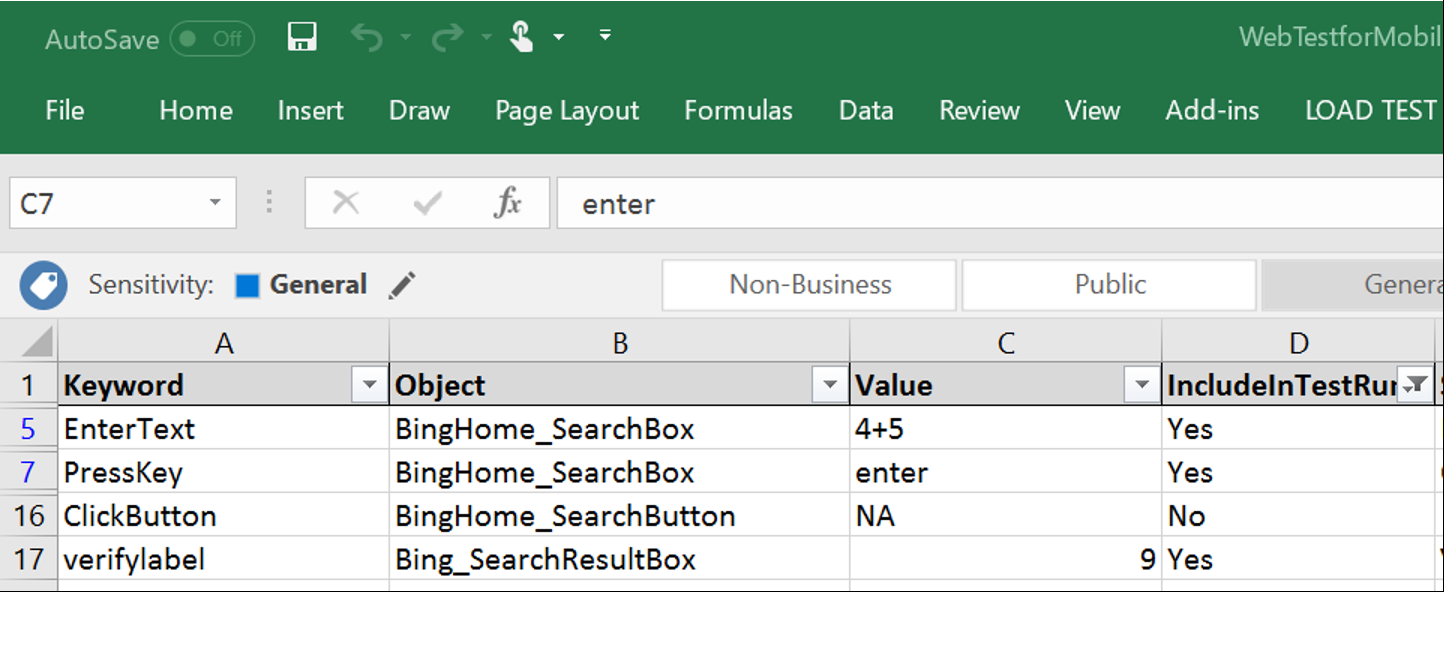
It has some sample test included in the project. Expend the TestCases Folder to view the test cases, here the format for test cases is in the form of Excel file. This format is very handy business users to write their scenario which we can later convert into automated tests. Following is a typical structure of test case file, it has predefined list of Keywords, Objects are the user defined names to identify the objects, Value field contains the value to be enter on UI or to be validated on UI and Last IncludedInTestRun field specified if particular test steps need to be executed or not while running the tests:
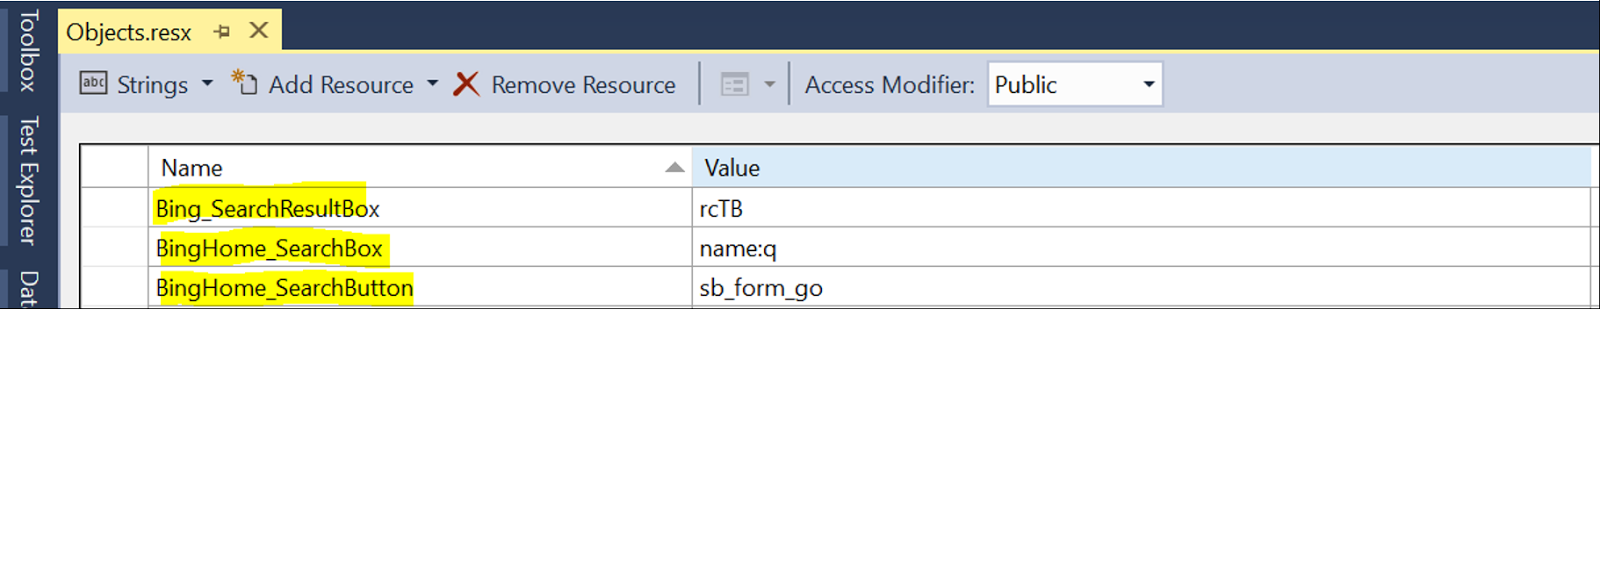
This framework stores the Objects definition in a resource file associated with the project i.e. Objects.resx file. This file has definition(s) for objects in the test case file given above by having property value of test objects for application under test. E.g. for above Objects following details of objects stored:
Once we are done with updating the Objects.resx file and creating the Test Case excel file, save the file under Test cases (or under a Subfolder) folder in the solution.
Add a new unit test case class file or update existing unit test case file, create a new test method and copy paste following lines and make changes as illustrated below:

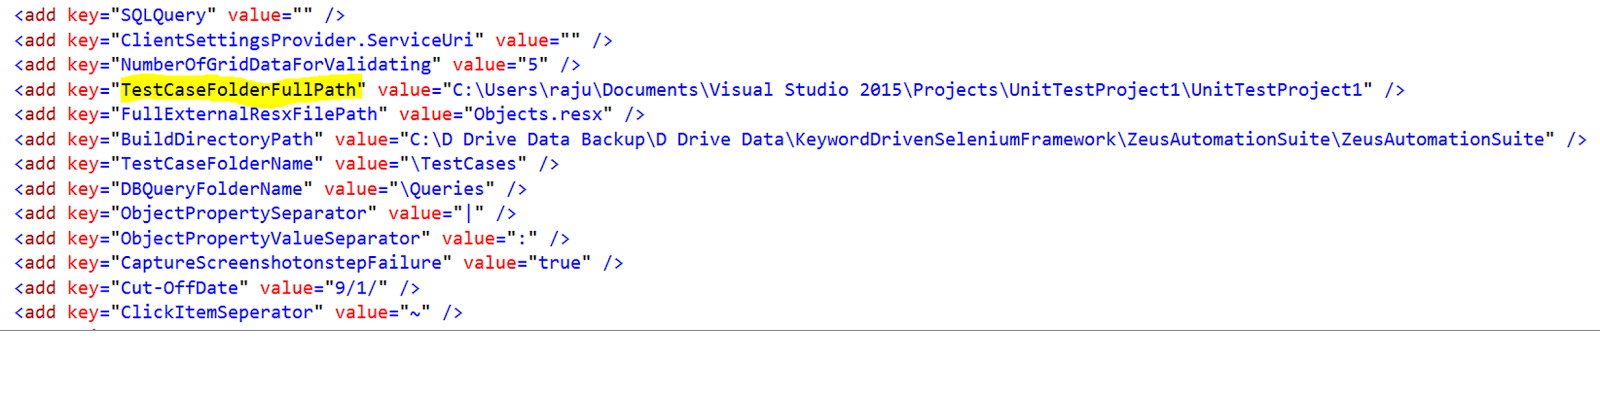
Update App.config file:
Make sure to update the highlighted keys according to your system:

Update the Key TestCaseFolderFullPath to point to correct path:
Run the tests and view the results, it provides proper results e.g. following output from a failed test case:

Result for a passed test case:

Keyword(s) Details:
| Keyword | Description |
| Entertext | Used to provide the user values to a text box or an edit box. |
| + | |
| It also contains the conditions for Username & password. | |
| clickbutton | Used to perform a click operation on buttons or similar controls. |
| Ex: Clicking a Login button in login page | |
| setpage | Used to set the page when there is change in pages during consecutive navigations. This will ensure for the easy identification of objects for the next action |
| + | |
| Navigate to a page | |
| + | |
| Set the current page with or without title | |
| clicklink | Used to perform a click operation on links or similar controls |
| Ex: Clicking on a Select link after filtering the respective role | |
| opendropdown | Used to perform an action of opening a drop down item |
| selectdropdownitem | Used to perform an action of selecting a drop down item |
| verifydropdownitem | Used to compare the drop down items for a specific search criteria in application against to the data retrieved from database for the same search criteria |
| Ex: The Grade options retrieved for a specific School and School Year | |
| openmenu | Used to perform an action on Menu items like Admin, Support etc. for providing more options for consecutive actions |
| verifylabel | Used to validate the content of a label |
| waitforprocess | Used to make the script wait for different conditions like : Wait for control ready |
| validategrid | Used to compare the Grid results in application against to the data retrieved from database |
| Ex: Student Contact Information, Student category information | |
| clickitem | Used to perform click operation on div or similar controls |
| Ex: Clicking on Section Editor div | |
| dismisswindowpopup | Used to dismiss the popup window |
| Ex: Clicking on “OK” or “Cancel” button | |
| verifymessageonpopupwindow | Used to validate the message on popup window |
| verifyproperty | Used to validate the existence of any control |
| setfocus | Used to set the focus on control before performing any action |
| Ex: Setting focus on the button before clicking it | |
| DragAndDrop | Used to perform drag and drop a control(with value as optional) from source location into target container |
| DoubleClick | Used for double-clicking a control |
Tools used for getting the properties used for find objects and running tests:
- For UWP app, we have to use Inspect.exe for finding the objects properties. It comes by default on Windows 8 or later and typical location for this is Program Files(x86)\Windows Kit\8.0\bin\ and then type of your system i.e. x64 or x86.
- For Android we can use the UIAutomatorViewer tool, which come bundled with Android SDK, once you setup the Pre requisites, you can access it just by opening up command prompt and typing uiautomatorviewer.
- For normal web based application in Device or on desktop we can use Dev toolbar in browsers (by pressing the F12 key) to find the objects.
Troubleshooting:
- If getting the error on running test in Chrome then download the latest version of Chrome driver 2.28 from Google's site and copy it to following folder in Appium: \node_modules\appium\node_modules\appium-chromedriver\chromedriver\win
- UIAutomatorViewer for getting native app's controls. Make sure devices name in Appium and Code are same and devices should have Debugging Mode enabled.