Creating your 1st Game (1 of 5) – by Ben Coley, Academic Developer Evangelist
Back in September last year, I wrote a small guide on how to set up XNA Game Studio Express. What I didn’t do was show you how to build your own game from start to finish! In this first of a five part guide, I’ll walk you through how to create a game character, create a world for the action to take place in, and set up boundaries for the game.
So presuming you’ve read my original guide, you’ll have XNA Game Studio Express installed on your Windows PC. There’s actually a newer version of XNA Game Studio (version 2), if you follow my original instructions but swap Game Studio Express for Game Studio 2.0, then you should have Game Studio 2.0 installed.
But what next??? We’ll start off by building some basic game-play. On your PC, launch Game Studio, and create a new Windows Game (File > New Project > XNA Game Studio 2.0 > Windows Game (2.0). Because XNA does all the plumbing for you, you’ll be able to start writing game-play immediately.

The first thing we’ll need to do is add a game character. I’m using a standard pacman character, but feel free to use something different if you like.

What we’ve got to do, is get this character in our game. If you look on the right, there’s a Content icon, which we can add stuff to; this is where we’ll put our game character. Right-click Content, Add > Existing Item... and select your character image (in my case, pacman.png). Now you should be able to see the character image name under Content – click on it to view its properties underneath. See the property called ‘Asset Name’? Remember that – we’ll need it when we import the character into our game.
Now for some code!! A bit of code has been generated for you, and there are plenty of comments to get you started; I’ll be using these comments so you know where to make the necessary changes. Under the line that says...

...we’re going to add some code so we know a bit about our character. What we need is a name for our character to go by in the code, and a place to store the X and Y co-ordinates of the character in our world. I’ve added the following code:
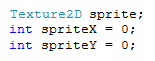
I’ve created a 2D (flat) texture called sprite – that’s my character. I’ve then defined two numbers to refer to the co-ordinates of where the character is, in my world. Now we can pull that graphic we added earlier into our code. Find the LoadContent() code, and add the following after the “TODO” line:

Remember that Asset Name we used earlier? We’ll need that here (I’ve used “pacman” as mine). So now we have a sprite, sitting at the co-ordinates [0,0] – we need to make the sprite visible. If you scroll further down the code, you’ll find some Draw(GameTime gameTime) code. Under the “TODO” line, I’ve added the following code:

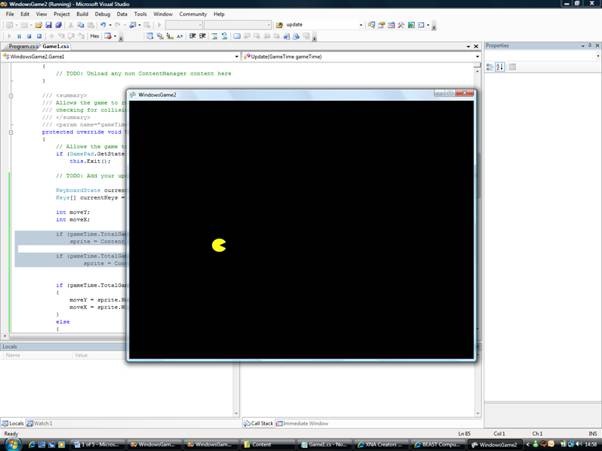
What this code does is draws my character at the specified co-ordinates. I also altered the colour of my world to black here (from CornflowerBlue), but you can use anything you like here. Add your code, remembering to substitute any name changes you might have made, then go ahead and run it (hit F5).
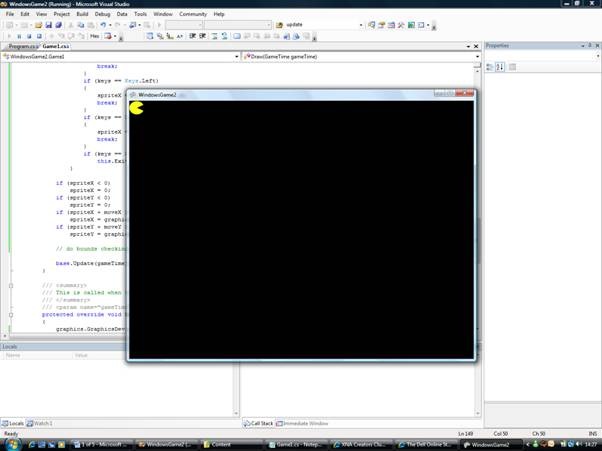
You’ll see that your character has been imported into the game, and that it’s sitting at the co-ordinates [0,0]. Now, we’re going to add some input handling, so we can move our character around our world. Seeing as I’ve used pacman as my example here, I’m going to make the character move like pacman used to (each time he moves about a full step in a given direction) but you can smooth out the movement if you like – I’ll explain that when we get there.
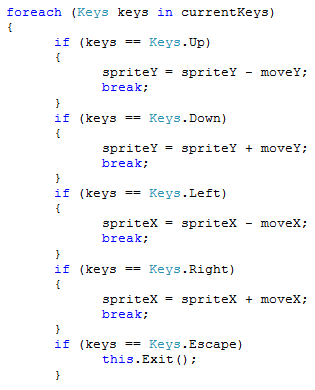
Go back to your code, and find the Update(GameTime gameTime) code. Under the “TODO” line here, we’ll add our input handling code. Firstly, presuming you’re using a keyboard to control your game (as I am), we’ll need to find out which keys are being pressed. You can do that by using this code:

This basically drops a list of all the keys currently being pressed into an array, called ‘currentKeys’. Under that, I’ve defined two numbers that hold how far the character can move in a given direction:

What I’ve done next is to limit the movement of my character. Being pacman, he can only move a step at a time, so I’ve limited him moving to every 20 milliseconds, otherwise he moves far too quickly (you can exclude this if you wish, just be sure to set a value for moveX and moveY so your character can move!):

Also, pacman can only move in one direction at any given time, so I’ve limited my character from moving in multiple directions by using the break command (you can exclude the break command if you wish):
So we can now move our character. If you run the game now, you’ll find your character is able to move about in your world. If you stray from your world to the edges of the screen, you’ll find your character is actually able to disappear from view. This is because we’ve not included any bounds checking in our code.
If you go back to the code you’ve just added, you can do some bounds checking here, such as:
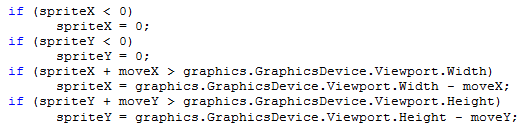
We’re now unable to move a character off the top, left, right or bottom edges of the screen, keeping them in view, and if you hit F5 now, you’ll find you’re restricted to the viewable parts of the world only.
Something else that’s specific to pacman is the character animation. Pacman continually animates whilst moving around the world, so I recreated that in my game too. Again, feel free to include this in your own way, or to exclude it entirely.
If we look back to our Update(GameTime gameTime) code, we can start to animate our character. Above the if (gameTime.TotalGameTime.Milliseconds % 20 == 0) code, we can add some more code to animate our character. But wait! There’s one more thing we need to do before this will work; we need to add another image for the character to animate into. Seeing as my pacman character has an open mouth, I made another graphic that looked like he had a closed mouth, for my animation.

This graphic is called pacman2.png. Right-click Content, Add > Existing Item... and select your alternative character image to see it added under the Content branch. Again, note the ‘Asset Name’ for use in the code. Now back in the code, I’ve added the following lines to complete the animation of my pacman character:
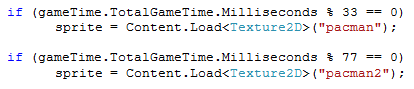
Every 33 milliseconds, my character resembles the normal pacman character, while every 77 milliseconds, my character morphs into its alternative character. Again, feel free to change these delays if you require.
Now you should find you’re able to move your animated character around the screen, without going outside your world! Next issue, we’ll be adding some interaction to the game-play, dealing with objects such as walls and enemies.