How to create a site provisioning capability within SharePoint’s Sandbox constraints
This article offers a design for providing a controlled mechanism for SharePoint sub-site creation through an approval process, within the constraints of the SharePoint Sandbox. This approach could be used in a SharePoint Online/Office 365 scenario, or for within a corporate environment where there is a need to build and manage solutions more quickly.
This article includes some example code and screenshots but is really intended to provide design guidance for you to implement your own solution using references to code, examples or documentation available elsewhere.
Problem
You want to allow users to create sites within a site collection, based on specific templates (which could be standard, custom or saved site templates), with an approval/governance process, within an environment that only allows sandboxed solutions, i.e.. where you can’t deploy a farm solution or call code outside the Sandbox in order to provision or configure the site.
The envisaged user scenario
- A user requests a new site by completing an online form
(possibly choosing a template, entering any required parameters, e.g.. for a site directory, configuring security, choosing users, choosing a location in a site hierarchy) - The form is submitted
- Approver/administrator receives notification of the request, opens the request, and then approves or rejects
- Upon approval:
- Site is created/configured, and any additional tasks performed (security configured, added to a site directory, features enabled)
- Requestor notified that site is approved and ready
- Upon rejection:
- Requestor notified that site request was rejected and given a justification
- Upon approval:
The design has been influenced by a number of requirements and constraints:
- The process assumes that regular users cannot create sites themselves directly, and that only a user with the correct permissions can create sub-sites.
- Help ensure site meta-data is populated – information to help others find this site in the future through a central site listing/directory.
- Help end users by making some initial tasks easier, such as adding users to appropriate security groups.
- Provide a level of governance, allowing anyone to request a site and have this requests routed to the appropriate person for approval before creation.
- The SharePoint Sandbox has a default 30 second timeout. What happens if you create a site programmatically and it takes longer than 30 seconds to create? (Boom!). The timeout can only be changed by an Administrator using PowerShell.
- How to use a single form for the site request and approval – toggling different fields depending on role and current state?
- How to do all of this, leveraging the full capabilities of the Sandbox to solve these challenges?
Solution
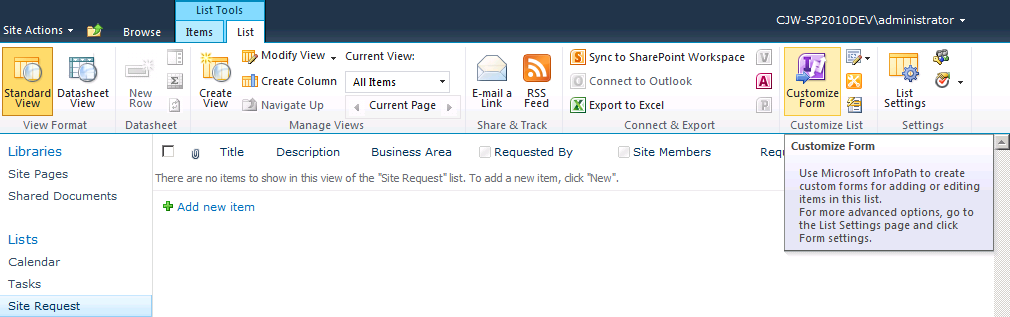
The solution uses a customized SharePoint list form, a SharePoint Designer workflow and a Sandbox workflow action, to provide a basic framework that can do this.

1. The Site Request list
To request a new site, users will add an item to this list using a customized form. First create a new custom list and add fields you want both requestors and approvers to fill-in. For my scenario I added fields for the requestor: the title for the site, a description, and some meta-data to be used for a site directory. For workflow processing it is also helpful to have one or more status fields, e.g.. Request Status (New, Submitted, Pending Approval, Approved, Rejected, Cancelled), and Creation Status (Pending, Processing, Completed, Failed). I also added fields for security requirements (which specific users should have visitor or contributor access).
SharePoint forms can be customized using InfoPath browser-based forms. They can provide greater layout, customization, and multiple views.
So start by customizing the Site Request list forms. Ensure that the default view is what end users requesting a site will see, and create another view for the approver’s view. You could also add views for different states, such as New Site Request, Site Request Submitted, Approve Site Request, Site Creation Pending, Site Created.
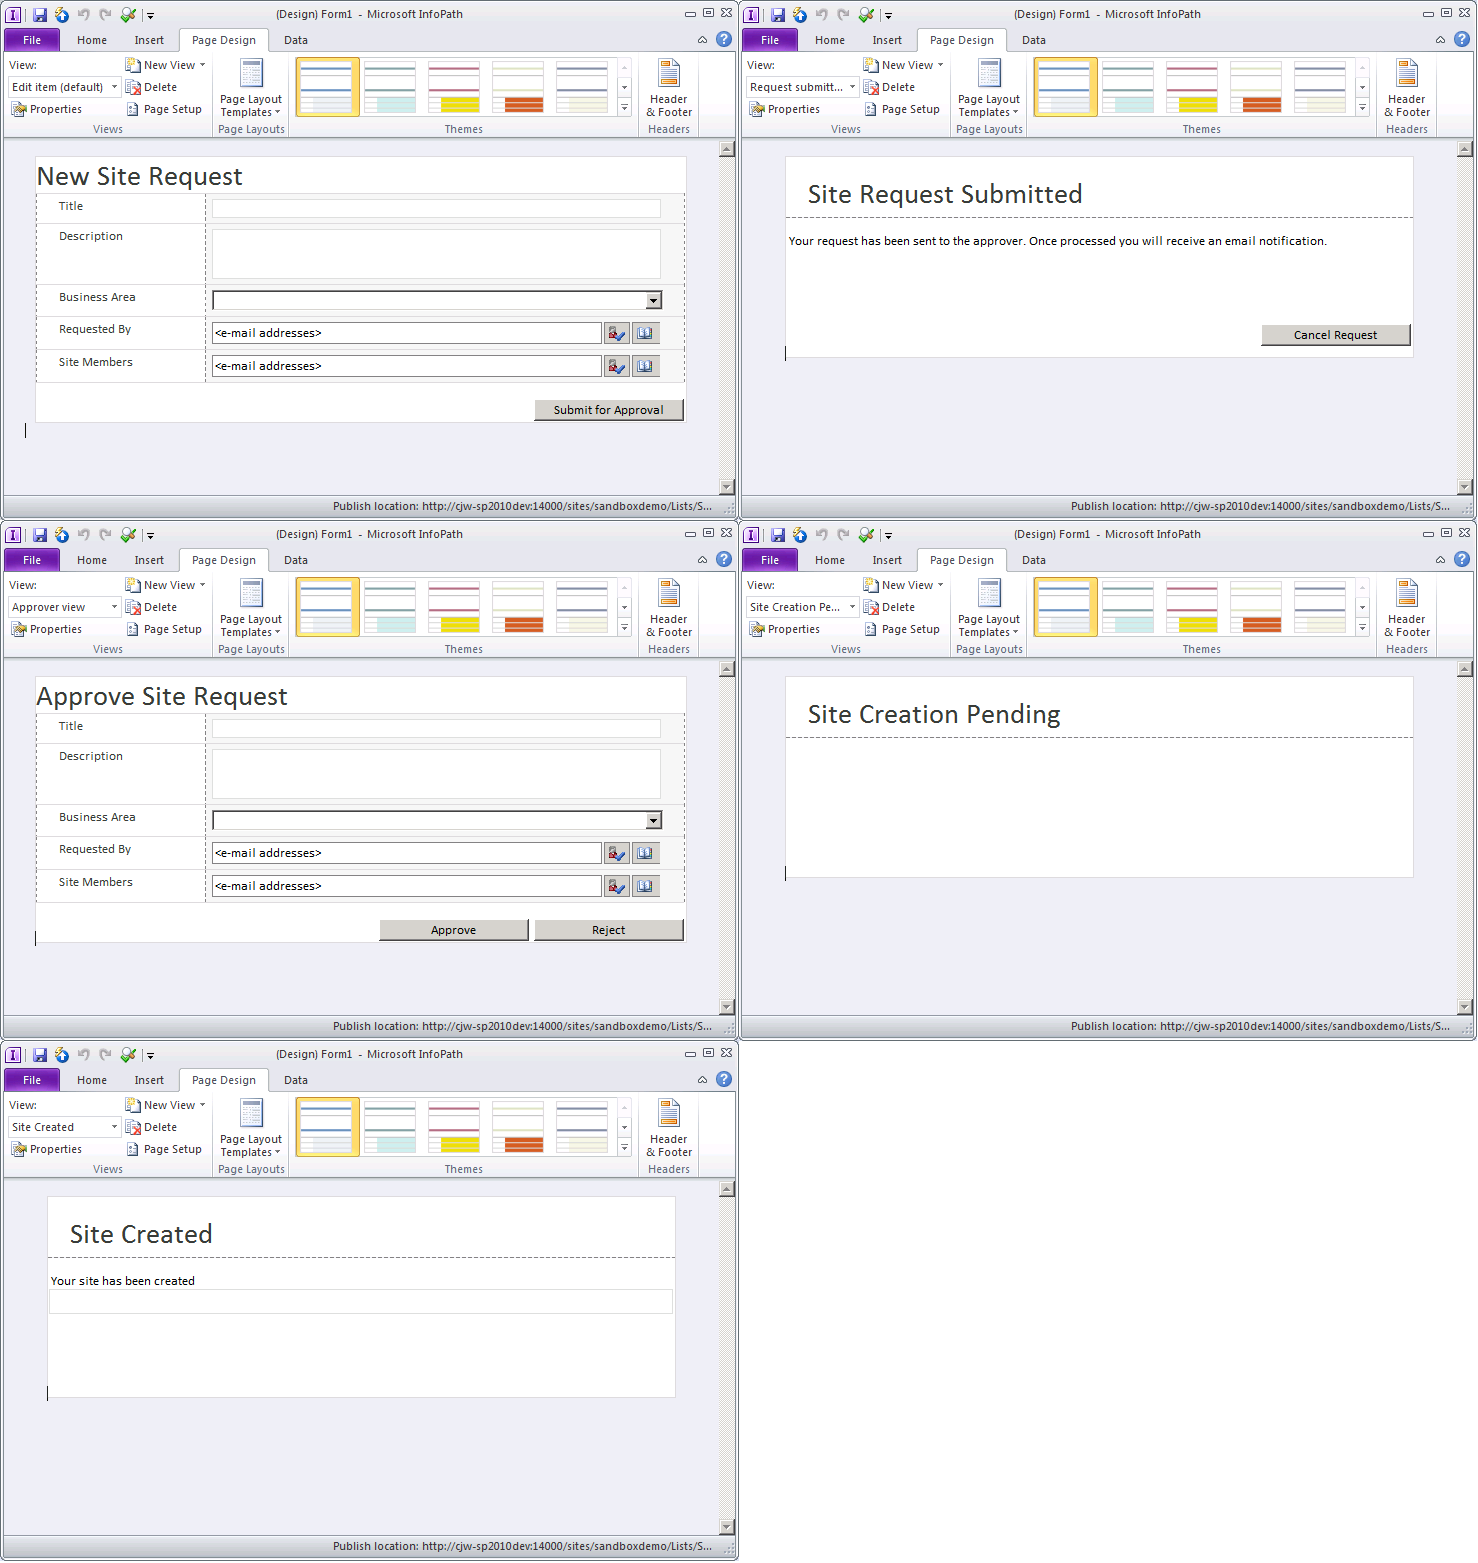
The InfoPath client supports role-based views, for example, where the requesting user sees only fields required to submit a request, whereas an approver would see additional fields and have the option to approve. Unfortunately, InfoPath browser-based forms don’t support role-based views, but there are several different workarounds.
One approach is to check what the current user’s role is by attempting to access items that have been secured with item-level permissions. For my scenario I created a second list that can be hidden from users that contains only one item – it doesn’t matter what this item is, just that it exists. Then configure item level permissions on this item to allow only your Approvers to read the item. You may want to create a new SharePoint group for the users you want to approve requests, or you could use an existing group like Owners. Now using Item level permissions we can verify if the user has sufficient rights to approve the request, from the InfoPath browser-form, by attempting to access this item. Using InfoPath Designer we can add a data connection to this list, and then use a rule to check the count the number of items in the list. If the number of items is 0 – then the user can’t read the item and therefore cannot approve the request, and if the count is 0, then the user can approve the request.
To implement this:
Using InfoPath Designer, customise the Site Request list form and add an On Form Load rule. Add a data connection to the hidden list (I called mine “Role Check”), and in the Form Load rule, add a condition to check what the item count is this list. If item count is 1, then change the view to the Approver view. Note this is just a simple example of what could be done and more specific checks may be appropriate for your needs, and I wouldn’t recommend this if you absolutely need a secure solution as I am sure devious minds could work around this.

The expression I used was:
count(xdXDocument:GetDOM("Role Check")/dfs:myFields/dfs:dataFields/d:SharePointListItem_RW) = 1
You will also need to consider who approval requests get sent to – is it a single person, group, or do you need to route different requests to different users for approval?
2. Approval workflow
Add an approval workflow, you could start from scratch, or customize a standard SharePoint approval workflow.
Here’s the start of a minimal solution – using a List Workflow associated with the Site Request list could look something like this:
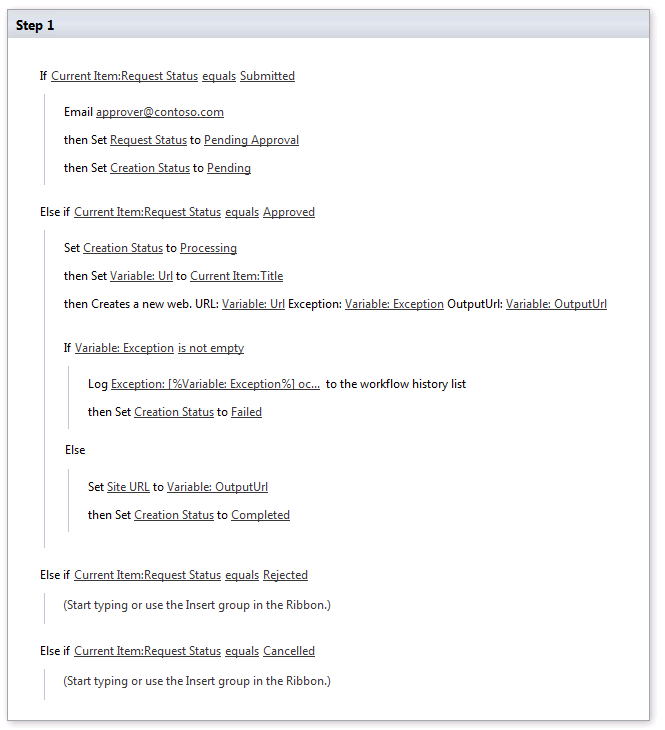
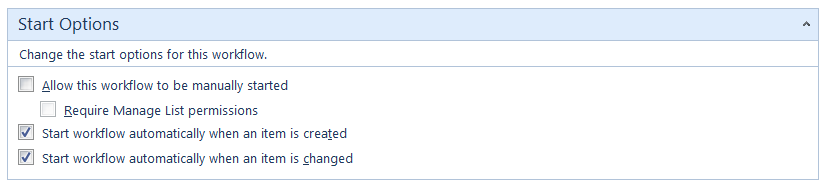
In this scenario we don’t want users to start the workflow themselves, we want the workflow to be triggered when the form is created or updated, and the workflow responds to changes in values set in the form.
NOTE:
Sandbox workflow actions run as the current user. Therefore, for all the steps you want to undertake, ensure that the user executing the step in the workflow has the permissions to do so. For example, the requestor may only have permission to add/edit their items in the request list, but not be able to create sub-sites. The approver must be able to create sub-sites, therefore, we can only call the site creation workflow action (or initiate a secondary workflow), as the Approver.
3. Site Creation Workflow Action
SharePoint Designer workflows provide a number of standard workflow actions but there isn’t one for creating a new SharePoint site. The last step is to create a sandboxed workflow action using Visual Studio that will handle the site creation. This is simpler and easier than a non-sandboxed workflow action. The purpose of the Workflow Action is to create the site for the requesting user. In this case the workflow action requires that the Approver has the necessary permissions to create the site.
Some requirements to consider:
- What choice of site templates will the user have? Will you need to offer a list of these in your Site Request form?
- What permissions will the new site have? Will you need to add the requesting user to Owners group of the new site?
Some suggestions:
- Use the SPWorkflow.CreateHistoryEvent to log what is happening in your workflow action
- Log how long the workflow action is taking. If you workflow action takes longer than the default 30 second timeout it will not successfully return to the workflow.
Here's some sample code to get you started:
public class SiteRequestActions
{
public Hashtable CreateWeb(SPUserCodeWorkflowContext context, string url)
{
Hashtable results = new Hashtable();
results["OutputUrl"] = string.Empty;
results["Exception"] = string.Empty;
results["Status"] = string.Empty;
try
{
using (SPSite site = new SPSite(context.CurrentWebUrl))
{
using (SPWeb web = site.OpenWeb())
{
SPWorkflow.CreateHistoryEvent(
web,
context.WorkflowInstanceId,
0,
web.CurrentUser,
TimeSpan.Zero,
"Information",
string.Format("CreateWeb function called. Url: {0}", url),
string.Empty);
using (SPWeb newWeb = web.Webs.Add(url))
{
results["Status"] = "Success";
results["OutputUrl"] = string.Format("{0}, {1}", newWeb.Url, url);
}
}
}
}
catch (Exception ex)
{
results["Exception"] = ex.ToString();
}
return results;
}
}
The elements file that matches up the In and Out parameters, to the function call parameters, and the return values in the Hashtable.
 <?xml version="1.0" encoding="utf-8"?>
<Elements xmlns="https://schemas.microsoft.com/sharepoint/">
  <WorkflowActions>
    <Action Name="Create Web"
            SandboxedFunction="true"
            Assembly="$SharePoint.Project.AssemblyFullName$"
            ClassName="SiteRequestManager.SiteRequestActions"
            FunctionName="CreateWeb"
            AppliesTo="all"
            Category="Site Request Actions">
      <RuleDesigner Sentence="Creates a new web. URL:%1  Exception:%2 OutputUrl:%3" >
        <FieldBind Field="url" Text="Url" DesignerType="ParameterNames" Id="1"/>
        <FieldBind Field="Exception" Text="Exception" DesignerType="ParameterNames" Id="2"/>
        <FieldBind Field="OutputUrl" Text="OutputUrl" DesignerType="ParameterNames" Id="3"/>
      </RuleDesigner>
      <Parameters>
        <Parameter Name="__Context"
                   Type="Microsoft.SharePoint.WorkflowActions.WorkflowContext,
                         Microsoft.SharePoint.WorkflowActions"
                   Direction="In"
                   DesignerType="Hide"/>
        <Parameter Name="url"
                   Type="System.String, mscorlib"
                   Direction="In"
                   DesignerType="ParameterNames"
                   Description="The name of the new web for the URL"/>
        <Parameter Name="OutputUrl"
                  Type="System.String, mscorlib"
                  Direction="Out"
                  DesignerType="ParameterNames"
                  Description="The absolute URL for the new web"/>
        <Parameter Name="Exception"
                   Type="System.String, mscorlib"
                   Direction="Out"
                   DesignerType="ParameterNames"
                   Description="Exception encountered"/>
      </Parameters>
    </Action>
  </WorkflowActions>
</Elements>
After you have built and deployed your Workflow Action, edit your workflow in SharePoint Designer and insert your Site Creation workflow action and configure the parameters.
In my scenario, I needed to create sub-sites that were based on end user created site templates. It is important that these can be created in less than 30 seconds, if not, you’ll need a mechanism to ensure they are created properly since the Sandbox has a default 30 second timeout. If you try to create a site with a template and it exceeds the timeout the workflow will error and you can’t be sure whether it succeeded or not. With workflows using Sandbox workflow actions, it is better to do small pieces of work that you know will complete within this duration.
References
How To: Customise the SharePoint list form using InfoPath
How to: Create a Sandboxed Workflow Action
Written by:
 Christopher Walker
SharePoint Consultant