Deploying Files to the Root of a SharePoint Web Application
I’ve recently been working on a project where a Silverlight App sitting on a separate url calls through to a WCF service hosted in SharePoint. For this to work, a “clientaccesspolicy.xml” file is required at the root of the SharePoint web application. This file will contain the following:
    1: <?xml version="1.0" encoding="utf-8"?>
    2: <access-policy>
    3:   <cross-domain-access>
    4:     <policy>
    5:       <allow-from http-request-headers="SOAPAction">
    6:         <domain uri="*"/>
    7:       </allow-from>
    8:       <grant-to>
    9:         <resource path="/" include-subpaths="true"/>
   10:       </grant-to>
   11:     </policy>
   12:   </cross-domain-access>
   13: </access-policy>
I have seen multiple approaches to this so far, as follows:
- Browsing to the website via SharePoint Designer and manually adding the file.
- Creating another “proxy” web application contains the ClientAccessPolicy.xml and a proxy service (that calls the actual service hosted in SharePoint).
Note that scripting either approach into our deployments (and supporting multiple web-front ends) seemed to be quite complex, so instead I opted to write a feature receiver to deploy the file to the root of a web application on all web front ends. The steps for doing this are shown below (note that this does not just apply to the ClientAccessPolicy.xml file, but also any file that you want to deploy to the web application root directory).
Create a New Project and Feature
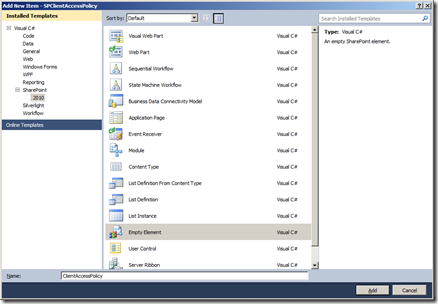
- To begin, create an Empty SharePoint project in Visual Studio 2010. Specify the local site to use for debugging and ensure that it’s deployed as a “farm solution”.
- Within the solution explorer, right click on the “Features” node and select “add feature”.
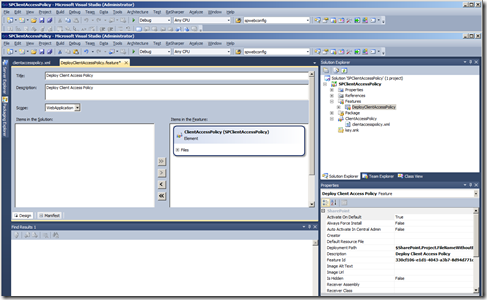
- Rename this feature in the solution explorer (e.g. to DeployClientAccessPolicy) and set the title and description in the feature explorer. Also change the scope of the feature to “WebApplication”.
- From the properties pane select the Deployment Path attribute and remove the “$SharePoint.Project.FileNameWithoutExtension$_” prefix.
- Our intention here is to deploy the ClientAccessPolicy.xml file to the 14\Template\Features\ DeployClientAccessPolicy\ location, so that it can then be copied to the web root. As this file is going to be deployed via a feature receiver, you can remove the “elements.xml” file created by our new “Empty Element” (simply right click this file and select delete).
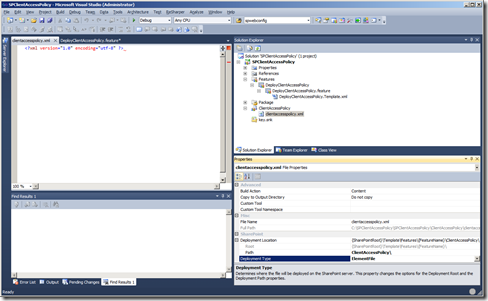
- Right click on ClientAccessPolicy Empty Element node and add a new xml file called “clientaccesspolicy.xml”.
- Once created, select this file and alter the “Deployment Type” in the properties pane to “ElementFile”. This will ensure that this gets build into the wsp file and deployed to the 14\Template\Features\ DeployClientAccessPolicy\ location.
- Add content to this file accordingly (e.g as per the listing for Contents of ClientAccessPolicy.xml at the top of this article).
- Finally, double click your DeployClientAccessPolicy feature and on the feature explorer ensure that your ClientAccessPolicy element is part of that feature.
Creating a New Job Definition
- To deploy the file to each web front end, we need to create a custom job definition. To do this, right click on the DeployClientAccessPolicy feature and select Add -> New From Template -> Class. Call this “ClientAccessPolicyDeploymentJob.cs”
- Within the class, add the following code…
    1: using System;
    2: using System.Collections.Generic;
    3: using System.IO;
    4: using Microsoft.SharePoint.Administration;
    5: using Microsoft.SharePoint.Utilities;
    6:
    7: namespace SPClientAccessPolicy.Features.DeployClientAccessPolicy
    8: {
    9:     public class ClientAccessPolicyDeploymentJob : SPJobDefinition
   10:     {
   11:         public ClientAccessPolicyDeploymentJob()
   12:             : base()
   13:         {
   14:         }
   15:
   16:         public ClientAccessPolicyDeploymentJob(string jobName, SPService service, SPServer server, SPJobLockType targetType)
   17:             : base(jobName, service, server, targetType)
   18:         {
   19:         }
   20:
   21:         public ClientAccessPolicyDeploymentJob(string jobName, SPWebApplication webApplication)
   22:             : base(jobName, webApplication, null, SPJobLockType.None)
   23:         {
   24:         }
   25:
   26:         public override void Execute(Guid targetInstanceId)
   27:         {
   28:             var webApp = this.Parent as SPWebApplication;
   29:             foreach (KeyValuePair<SPUrlZone, SPIisSettings> setting in webApp.IisSettings)
   30:             {
   31:                 var webRootPolicyLocation = setting.Value.Path.FullName + @"\clientaccesspolicy.xml";
   32:                 var featuresPolicyLocation = SPUtility.GetGenericSetupPath(@"TEMPLATE\FEATURES\DeployClientAccessPolicy\ClientAccessPolicy\clientaccesspolicy.xml");
   33:                 File.Copy(featuresPolicyLocation, webRootPolicyLocation, true);
   34:             }
   35:
   36:             base.Execute(targetInstanceId);
   37:         }
   38:     }
   39: }
Create a Feature Receiver
- The final step is to create a feature receiver, which installs and runs our Job Definition, hence pushing the file to each Web Front End on the farm. To do this, right click on the feature and select “add event receiver”.
- Within the class, add the following code…
    1: using System;
    2: using System.Runtime.InteropServices;
    3: using Microsoft.SharePoint;
    4: using Microsoft.SharePoint.Administration;
    5:
    6: namespace SPClientAccessPolicy.Features.DeployClientAccessPolicy
    7: {
    8:     [Guid("fca183e0-3f93-47be-b28e-630c383d6e76")]
    9:     public class DeployClientAccessPolicyEventReceiver : SPFeatureReceiver
   10:     {
   11:         private const string JobName = "ClientAccessPolicyJob";
   12:
   13:         public override void FeatureActivated(SPFeatureReceiverProperties properties)
   14:         {
   15:             var site = properties.Feature.Parent as SPWebApplication;
   16:             RemoveJobIfRegistered(site);
   17:
   18:             var clientAccessPolicyJob = new ClientAccessPolicyDeploymentJob(JobName, site);
   19:             var schedule = new SPOneTimeSchedule(DateTime.Now);
   20:             clientAccessPolicyJob.Schedule = schedule;
   21:             clientAccessPolicyJob.Update();
   22:
   23:             site.JobDefinitions.Add(clientAccessPolicyJob);
   24:             site.Update();
   25:
   26:             clientAccessPolicyJob.RunNow();
   27:         }
   28:
   29:         public override void FeatureDeactivating(SPFeatureReceiverProperties properties)
   30:         {
   31:             var site = properties.Feature.Parent as SPWebApplication;
   32:
   33:             RemoveJobIfRegistered(site);
   34:         }
   35:
   36:         private void RemoveJobIfRegistered(SPWebApplication site)
   37:         {
   38:             foreach (SPJobDefinition job in site.JobDefinitions)
   39:             {
   40:                 if (job.Title == JobName)
   41:                 {
   42:                     job.Delete();
   43:                 }
   44:             }
   45:         }
   46:     }
   47: }
Conclusion & Troubleshooting
Right click on the project to deploy. Your feature will deploy the ClientAccessPolicy.xml file to the root of your web application.
If you encounter any issues, try the following (in no particular order)…
- Navigate to SharePoint central admin and view the job history
- Check the files are deployed to the 14\features folder.
- With SharePoint central admin, deactivate and reactive the feature (web-app scoped).
- Recycle the timer and admin services.
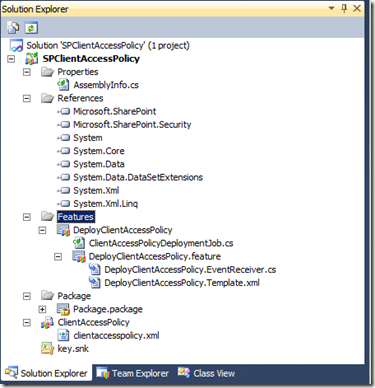
When you have completed development, the solution should look similar to this…
Follow Up
For Silverlight, the clientaccesspolicy.xml file may require anonymous access. I was originally hoping to add this into the web.config via a SPWebConfigModification object ran on my feature receiver as follows:
    1: <location path="clientaccesspolicy.xml">
    2:   <system.webServer>
    3:     <security>
    4:       <authentication>
    5:         <anonymousAuthentication enabled="true" />
    6:       </authentication>
    7:     </security>
    8:   </system.webServer>
    9: </location>
This is not possible however, as the C:\Windows\System32\inetsrv\config\ApplicationHost.config file blocks overriding of anonymous authentication. To overcome this, we will need to alter the applicationhost.config on each web front end to permit anonymous access to this file.
I intent to post our findings / final implementation of this.
Rob Nowik
Senior Consultant
Microsoft Consulting Services UK


