Blueprints Example: View-Presenter - Part 2
This article follows on from part 1, so make sure you know how far we got. Basically we can generate a project according to our required template, so next we want to be able to add a new View-Presenter enabled Web Page to the project.
We’ll do this using some T4 text templates – one for each file we need to create.
Note: Remember this is based on the November 2008 CTP, so it may not work in future versions.
Menus and Commands Primer
To allow us to do this, Blueprints has notions of Menus and Commands that work together to achieve what we want. Both are configured by right-clicking your Blueprint Factory (the “ViewPresenterFactory” project in our case) and selecting Blueprints->Edit Configuration. The Menus and Commands tabs contain configuration for each item.
A command is something that can be executed, that does the work for us. These commands can be built-in, written in C#, or declared as Windows Workflow XOML files. In this post we’ll look at writing a C# one, known as a “C# Command Extension”.
A menu is simply a way to provide an entry point to a command for the user. We specify what the menu item should be displayed as, and when it should be available. When clicked, it can invoke our C# command.
Creating a Command Extension
As with almost all Blueprint Factory tasks, we start by right-clicking our Blueprint Factory project and selecting Blueprints, this time clicking “Add Command Extension…”. Specify a name for your extension library – in my case, I chose “Commands”.
The Blueprints runtime then actually unfolds a Blueprint (the command extension Blueprint) to create a new project for you and set up a post-build copy of the Commands assembly into the ViewPresenterFactory project’s “extensions” directory. This ensures the command is included in the Blueprint package when you come to deploy it.
Next, right-click your solution and select “Project Dependencies”. Ensure that ViewPresenterFactory depends on Commands; this means that Commands will always be built first, so when you do a build the factory output will contain the latest Commands implementation.
The core of a command extension is the “ExtensionClass” class that is generated for you. You could rename this if you like – although I haven’t in this example. This class is instantiated at runtime, and the “execute” method is called with some parameters, including the name of the command to execute. Therefore, in my execute method I have code like this;
switch (command)
{
case "CreateWebPage":
CreateWebPageCommand(context);
break;
default:
break;
}
The meat of the “CreateWebPage” command is handled in another method.
What we want to do, then, is as follows:
1. Prompt for a Web Page name, such as “MyWebPage.aspx”.
2. Generate five files from T4 templates that make up the Web Page and its matching View-Presenter classes.
3. Add all five files to the host project.
These five files are;
· “MyWebPage.aspx”, to hold the HTML markup.
· “MyWebPage.aspx.cs”, to hold the code-behind.
· “MyWebPage.aspx.designer.cs”, to hold the designer-generated code behind (that a developer wouldn’t normally touch).
· “MyWebPagePresenter.cs”, to hold the Presenter class. This is stored in the Presenters folder.
· “IMyWebPageView.cs”, to define the View interface. This is stored in the Views folder.
I’ve created some helper classes to make this easy, so my command code looks pretty neat and tidy at the moment;
// create the T4 arguments
Dictionary<string, T4PropertyData> args =
new Dictionary<string, T4PropertyData>();
args.Add("ViewName",
new T4PropertyData(chosenName, typeof(string)));
args.Add("ModuleNamespace",
new T4PropertyData(env.SelectedProjectNamespace,
typeof(string)));
// build a list of files to transform
List<TransformItem> transforms = new List<TransformItem>()
{
new TransformItem(
"IView.cs.t4",
format("Views\\I{0}View.cs")),
new TransformItem(
"Presenter.cs.t4",
format("Presenters\\{0}Presenter.cs")),
new TransformItem(
"ViewPage.aspx.t4",
format("{0}.aspx")),
new TransformItem(
"ViewPageCodeBehind.aspx.cs.t4",
format("{0}.aspx.cs")),
new TransformItem(
"ViewPageDesigner.aspx.designer.cs.t4",
format("{0}.aspx.designer.cs"))
};
// perform all the T4 transforms
TransformHelper.CreateFilesFromT4(
transforms,
args,
context);
// add all transformed files to the project
// the user clicked on
List<string> files =
transforms.Select(
t => t.TargetFilename).ToList();
env.AddProjectItemsToSelectedProject(files);
We build up the list of parameters to pass to each T4 template – in my case they all need up to two parameters, which are the same for each template, and specify the name of the Web Page and the namespace. Then we build a list of templates to transform and their target filenames. This list is passed to a helper to perform the transforms themselves.
Finally, a quick LINQ statement pulls out the list of target filenames and uses another helper to add each file to the project that was clicked on.
An Example T4 Template
Before we go any further, let’s have a quick look at one of the T4 templates. These are all stored in the “ViewPresenter” folder of the Commands project. They must also be manually copied to the “content” folder of the “ViewPresenterFactory” project in order to be included in the factory package. I suspect this will change in the future, but for now, don’t forget!
<#@ Template Language="C#" #>
<#@ Assembly name="System.dll" #>
<#@ assembly name="Microsoft.SoftwareFactories.BlueprintsAPI.dll" #>
<#@ Import Namespace="System" #>
<#@ property processor="T4PropertyProcessor" name="ViewName" #>
<#@ property processor="T4PropertyProcessor" name="ModuleNamespace" #>
using System;
using System.Collections.Generic;
using System.Text;
namespace <#= this.ModuleNamespace #>.Views
{
public interface I<#= this.ViewName #>View
{
}
}
This template shows how the definition of the View interface is generated. I’ve declared the language of the template, and imported any required assemblies and namespaces. Note that you must have a reference to Microsoft.SoftwareFactories.BlueprintsAPI.dll as this is the host for the T4 engine in Blueprints.
The other key part of setup is declaring the properties this template depends on. In this case, we have ViewName and ModuleNamespace – they should be familiar from the setup of the T4 arguments in the command code above, in the ExtensionClass class.
Finally, the syntax of templates is very similar to ASP.NET – the use of <#= #> sections allows the injection of code that is executed when the template is processed. If you like the syntax highlighting above, I’d recommend checking out Clarius’ T4Editor Visual Studio plug-in.
Inside the TransformHelper
I’ve included the code with this post because it is simple enough to have a look through, rather than spend many words explaining here. The TransformHelper is based on the sample code generated when you first create a C# Command Extension – I’ve just tweaked it a little to suit my needs further.
The core of the task is in getting a reference to the T4 service and requesting a render;
object t4Obj = BPMServices.BPMGetResource(
new Guid(BPMConstants.T4ResourceGuid));
IT4ResourceAPI myT4 = t4Obj as IT4ResourceAPI;
if (myT4 != null)
return myT4.Render(
context,
templateText,
templateFilename,
args);
This uses some Blueprints infrastructure to get hold of the T4 service, and then executes it – notice the “args” parameter to Render is the Dictionary we created in our Command.
Wiring up a Menu
Last but not least, we need to make it possible to reach this Command. As we’ve said already, the trick is the combination of Commands and Menus.
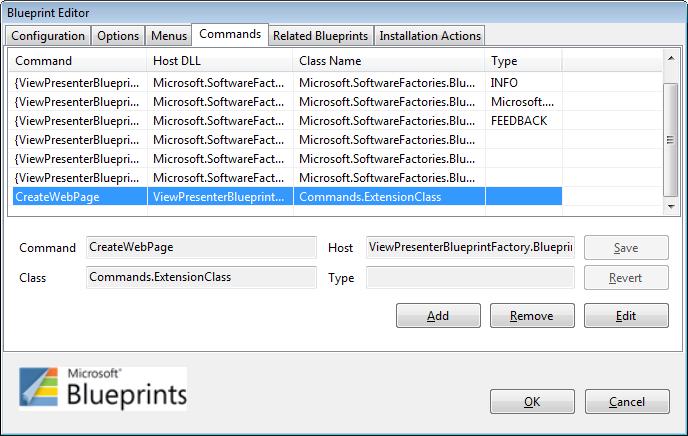
First we must effectively “register” our new command. Open the Blueprint configuration for the factory, and click on the Commands tab. Click the “Add” button, and we can add our custom command.
We must be careful to ensure the settings on this screen match how we have created our command to be successful, so to summarise;
· “Command” should be the name of the command that you respond to in the switch statement inside ExtensionClass.execute. In my case, this is “CreateWebPage”.
· “Host” should be the full assembly name of your “Commands” project. Note that this is not “Commands.dll” (which is what I expected). The Blueprints Factory actually set mine to “ViewPresenterFactory.Blueprint.ExtensionClass.dll”. Check this by viewing the Project Properties dialog for your command extension project.
· “Class” should be the name (including full namespace) of your extension class. In my case this was easy; “Commands.ExtensionClass”.
The result is a screen that looks like this;
Next, we must make this available to the user by linking it to a Menu.
This is really easy; click on the Menus tab, and hit Add. This time, the following fields should be filled in;
· “Caption” should be whatever you want to appear on the context menu.
· “Command” must match the name of the command in the previous step, which also matches the string you check for in your switch statement in the command extension.
· “Visibility” defines when the menu option should be displayed. For now I’ve set this to “ThisProject”, which will display it as part of the context menu on the project itself (I wanted to do this at folder level but couldn’t get it to work yet). There is more information on Visibility Filters in the Blueprint Factory workflow, under “Adding context menu items and BPM extensions”.
Mine looks like this;

Done! Give the Blueprint a build and you’re ready to test it. Do this by opening a new Visual Studio instance, creating a blank solution, and then unfolding the View Presenter Blueprint into it using the Blueprints Manager from the Tools menu.
How Does It Look?
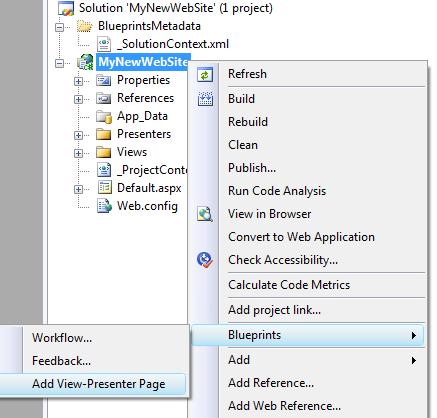
The end result is that I can right-click on the newly unfolded template project and choose to add a View-Presenter Web Page;
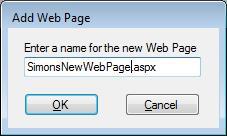
I then get a prompt for the name of the Web Page using a simple dialog I have written;
… and finally, a new page with a matching IView and Presenter are created for me.
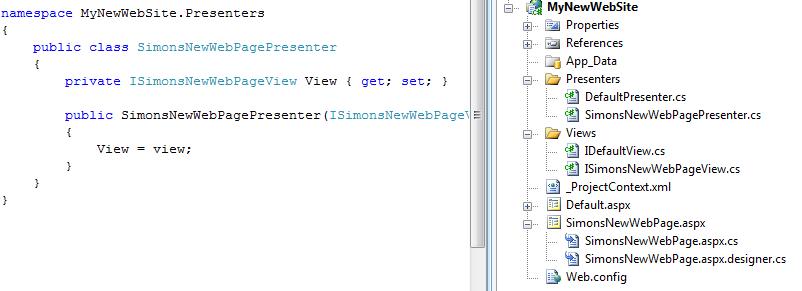
I can then immediately start adding code. I’m sure you’ll see this example isn’t perfect – I can’t put pages in subfolders yet, but this is a CTP after all!
Conclusion
That’s all been pretty straightforward, but I hope it has demonstrated how quick and easy it is to get up and running with providing guidance that adds real value. I believe using approaches like this to bring consistency to development provides real tangible benefits.
Also, bear in mind we’ve done one of the trickier Use Cases of generating code – I haven’t covered just creating textual advice in the Blueprints process workflow (although the downloadable source code includes a bit), which is really really easy, yet in itself could be invaluable to many development teams.
Originally posted by Simon Ince on December 19th 2008 here.