Blueprints Example: View-Presenter - Part 1
I’m sure I’ve warned you before – I’m a big believer in Software Factories… but I’ve been quiet about this for a while now. That’s because I’ve been waiting for the ‘next big thing’… enter stage left: “Blueprints”!
I had the pleasure of attending a talk that Michael Lehman and Jezz Santos gave in Seattle a while back, and more recently I’ve spent a little time recently playing with the CTP available on codeplex, and getting a feel for how it works. I thought others might find another example useful, hence I’ve posted my thoughts here. Basically I wanted a simple example to use to generate a Blueprint, and so I chose adding a web page that adheres to the View-Presenter pattern.
If you’re after background information, you can’t miss the codeplex site, the MSDN landing page, and Michael’s webcasts.
One word of warning: This is based on the Nov 17th 2008 CTP, so chances are it’ll break in future releases.
Creating a Template Project
The usual behaviour of a Blueprint Factory when invoked is to “unfold” a project template into your solution. By default this is a basic C# project, but we want a Web Application project with some structure in it.
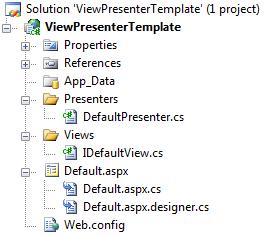
To do this, we can first create a simple “ViewPresenterTemplate” Web Application project in Visual Studio 2008 as you would normally, and add “Views” and “Presenters” folders. Then implement the View-Presenter pattern on the “Default.aspx” page… the result looks a bit like this;
Next, we need to export this as a template that the Blueprints Factory can consume; so in Visual Studio select File->Export. Then export the project as a template (ensuring you don’t “automatically import…” it into Visual Studio again), and locate the new zip file.
So now we have a nice template project, we need to create our Blueprint Factory.
Creating a Blueprint Factory
Once you’ve installed all the Blueprints bits, you can access the functionality from the Blueprints Manager on the Tools menu. First create a nice blank solution, and then pop the Blueprints Manager up and choose to unfold the “Microsoft Blueprints Factory 2.1.1” Blueprint. It will then prompt you for the Project Name of the Blueprint Factory. I chose “ViewPresenterBlueprint”.
Next you can fill in some the basic details of your new Blueprint. Just fill in the Configuration tab for now. Note that the “Description” field is what is displayed to the user when selecting a Blueprint to unfold, so make it fairly explanatory.
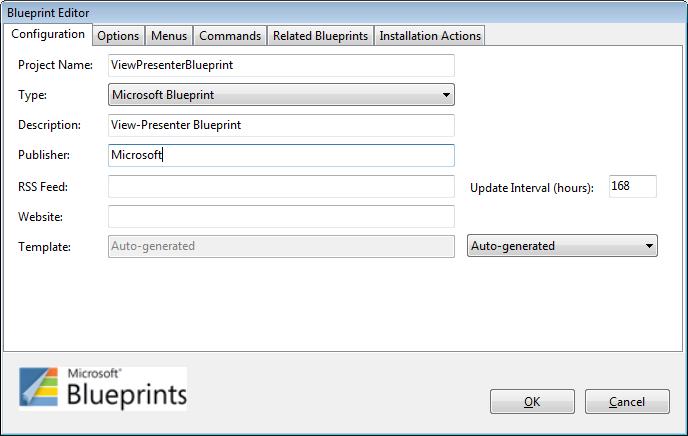
The Template field is important for us in this example. By default, it is set to “Auto-generated”, which means when you unfold a Blueprint it will generate a new C# project for you. That’s not what we want, so we’ll come back here in two minutes.
Attaching our Template
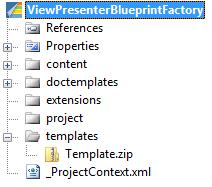
After hitting OK you’ll see your new Blueprint Factory project all ready to go, and the guidance window (or “Blueprint Workflow”) will be displayed. Next, we need to find our template ZIP file that Visual Studio created for us. I renamed mine to “Template.zip”.
A Blueprints Factory project has a special folder to hold templates, aptly named “templates”. The easy bit, then… drag your “Template.zip” file into the “templates” folder in your ViewPresenterFactory project. It should look a little like this;
Finally, to ask the Blueprints Factory to unfold our new template instead of the default C# project, we need to edit the configuration.
Right click the ViewPresenterBlueprintFactory and choose Blueprints->Edit Configuration. Replace the “auto-generated” Template option with “User supplied”, and type in the filename of your newly added template;

Hit OK, and give your Blueprint a build.
Testing the Blueprint
At this point, you could unfold your new Blueprint into the same solution, but I prefer to do it in another instance of Visual Studio. This is because Command Extensions (what we’ll see next time) remain in memory, so you need to restart Visual Studio to unload them anyway. But I also find it doesn’t make such a mess of my factory solution’s local directory.
So, spin up a new Visual Studio, open the Blueprints Manager, pick your Blueprint and click Unfold. It will ask you for a solution to add it to, so just select “Other Project Types->Visual Studio Solutions->Blank Solution”, and give it a filename. Then you’ll be prompted for the project name for our Web Application project.
One thing you’ll find when testing is that you create a lot of these solutions (which is probably why some prefer to unfold into the same solution as the factory). Therefore I’d recommend putting them all under “C:\Testing” or something that will remind you they can be deleted.
When you unfold your new Blueprint you will see an exact copy of the ViewPresenterTemplate project we created earlier.
What next?
So far our factory doesn’t do a lot, you’re thinking! It creates a template project, and nothing else. But in the next step we’ll be taking it further... specifically by allowing a user to add a View-Presenter enabled Web Page.
Watch this space for the next post shortly.
Originally posted by Simon Ince on 17th of December 2008 here.