Microsoft Cognitive Services – Face API, with Jupyter Notebooks and Python
The Face API which is part of the Microsoft Cognitive Services helps to identify and detect faces. It can also be used to find similar faces, to verify if two images contain the same person and you can also train the service to improve the identification of people.
In this blog post I will show you how to get started with Python and Jupyter Notebooks using Microsoft Azure Notebooks, https://Notebooks.azure.com
Microsoft Cognitive Face API https://azure.microsoft.com/en-gb/services/cognitive-services/face/ has two main functions: face detection with attributes and face recognition.
Face Detection Face API detects up to 64 human faces with high precision face location in an image. And the image can be specified by file in bytes or valid URL.
Face rectangle (left, top, width and height) indicating the face location in the image is returned along with each detected face. Optionally, face detection extracts a series of face related attributes such as pose, gender, age, head pose, facial hair and glasses. Refer to Face - Detect for more details.
Face recognition is widely used in many scenarios including security, natural user interface, image content analysis and management, mobile apps, and robotics. Four face recognition functions are provided: face verification, finding similar faces, face grouping, and person identification.
Face Verification Face API verification performs an authentication against two detected faces or authentication from one detected face to one person object. Refer to Face - Verify for more details.
The application will use the detect service which detects faces and shows the age, gender, emotions and other data of the detected face.
Prerequisites: Create the Face API Service in Azure
As all Microsoft cognitive services, you can also create the face API service in Azure via the portal. It is part of the “Cognitive Services APIs”, so just search for it and create it. Select the Face API as the type of the cognitive service and check the pricing options: As per my previous post on the translation API the FREE services is more than suitable for introducing Cognitive Services. Simply select the F0 FREE plan
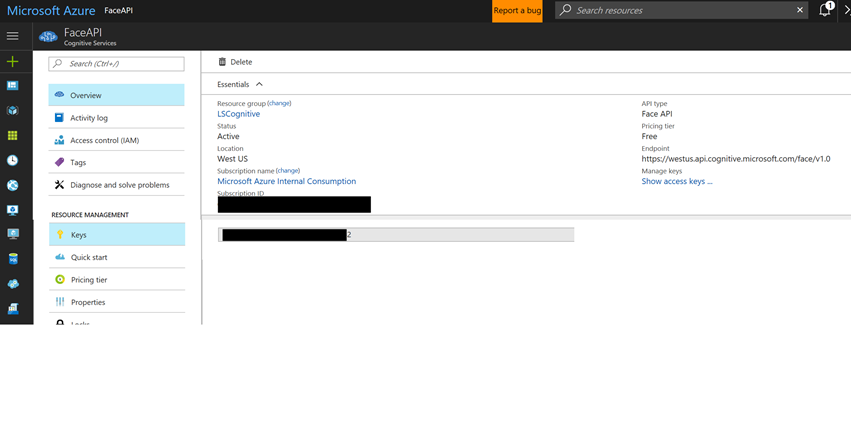
After the creation, we just need to note the API key and the API endpoint. Navigate to the service in the Azure portal and you will see the endpoint url in the overview. It’s currently only available in west-us, so the endpoint url will be: https://westus.api.cognitive.microsoft.com/face/v1.0
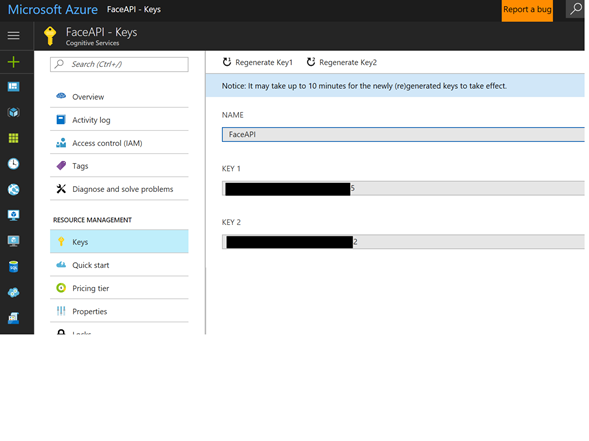
The keys can be found in “Keys” – just copy one of them and use it later in the application:
Using Azure Juypter Notebook
https://notebooks.azure.com/run/LeeStott-Microsoft/CogPy?dest=%2Fnotebooks%2FFaceDetectionAPi.ipynb
Python Code for Notebook or Python Application
 #just showing you can import standard python libs
 import time
 import requests
 import cv2
 import operator
 import numpy as np
 from __future__ import print_function

 #import http and URl libs
 import http.client, urllib.request, urllib.parse, urllib.error, base64, requests, json

 #Import library to display results
 import matplotlib.pyplot as plt
 %matplotlib inline
 #Display images within Jupyter
 #Subscribtion to Cognitive Services
 #Simply replace subscription key with your Cognitive API Subscription Key the key below is for Demo purpose only
 subscription_key = 'Enter your cognitive API Key'
 uri_base = 'https://westus.api.cognitive.microsoft.com'
 # Request headers.

 headers = {

     'Content-Type': 'application/json',

     'Ocp-Apim-Subscription-Key': subscription_key,

 }
 # Request parameters.

 params = {

     'returnFaceId': 'true',

     'returnFaceLandmarks': 'false',

     'returnFaceAttributes': 'age,gender,headPose,smile,facialHair,glasses,emotion,hair,makeup,occlusion,accessories,blur,exposure,noise',

 }

 #Enter URL of Images to be sampled by Cognitive Services


 #Example - Taylor Swift Image taken from web search
 body = {'url': 'https://cdn1.theodysseyonline.com/files/2016/01/09/635879625800821251-1566784633_1taylorswift-mug.jpg'}

 #Example - Donald Trump
 #body = {'url': 'https://d.ibtimes.co.uk/en/full/1571929/donald-trump.jpg'}


 try:

      # Execute the REST API call and get the response.

     response = requests.request('POST', uri_base + '/face/v1.0/detect', json=body,data=None, headers=headers, params=params)


     print ('Response:')

     parsed = json.loads(response.text)

     print (json.dumps(parsed, sort_keys=True, indent=2))


 except Exception as e:

     print('Error:')

     print(e)
Output (JSON)
 Response:
 [
   {
     "faceAttributes": {
       "accessories": [],
       "age": 26.7,
       "blur": {
         "blurLevel": "low",
         "value": 0.0
       },
       "emotion": {
         "anger": 0.027,
         "contempt": 0.001,
         "disgust": 0.014,
         "fear": 0.001,
         "happiness": 0.513,
         "neutral": 0.015,
         "sadness": 0.0,
         "surprise": 0.43
       },
       "exposure": {
         "exposureLevel": "goodExposure",
         "value": 0.61
       },
       "facialHair": {
         "beard": 0.0,
         "moustache": 0.0,
         "sideburns": 0.0
       },
       "gender": "female",
       "glasses": "NoGlasses",
       "hair": {
         "bald": 0.02,
         "hairColor": [
           {
             "color": "blond",
             "confidence": 1.0
           },
           {
             "color": "other",
             "confidence": 0.51
           },
           {
             "color": "brown",
             "confidence": 0.39
           },
           {
             "color": "gray",
             "confidence": 0.21
           },
           {
             "color": "black",
             "confidence": 0.08
           },
           {
             "color": "red",
             "confidence": 0.05
           }
         ],
         "invisible": false
       },
       "headPose": {
         "pitch": 0.0,
         "roll": -3.0,
         "yaw": -13.4
       },
       "makeup": {
         "eyeMakeup": true,
         "lipMakeup": true
       },
       "noise": {
         "noiseLevel": "low",
         "value": 0.0
       },
       "occlusion": {
         "eyeOccluded": false,
         "foreheadOccluded": false,
         "mouthOccluded": false
       },
       "smile": 0.513
     },
     "faceId": "aa43fbe1-9c9f-48c6-9c78-b5c018d2f1cd",
     "faceRectangle": {
       "height": 503,
       "left": 189,
       "top": 341,
       "width": 503
     }
   }
 ]
So this simple example has shown the introduction of using Python to access the Microsoft Cognitive APIs from this students can go on and develop application or feature for face detection, emotion etc.


