Running JupyterHub on and off campus Architectural Scenarios
Dedicated Hardware Environments for hosting JupyterHub
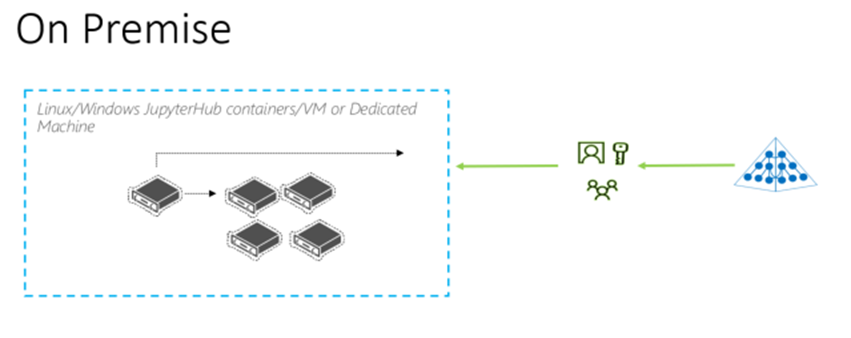
On premise – Own Maintain, secure and Operate the services
Installation
JupyterHub can be installed with pip (and the proxy with npm) or conda:
pip, npm:
 python3 -m pip install jupyterhub
npm install -g configurable-http-proxy
python3 -m pip install notebook  # needed if running the notebook servers locally
conda (one command installs jupyterhub and proxy):
 conda install -c conda-forge jupyterhub  # installs jupyterhub and proxy
conda install notebook  # needed if running the notebook servers locally
Test your installation. If installed, these commands should return the packages' help contents:
 jupyterhub -h
configurable-http-proxy -h
Start the Hub server
To start the Hub server, run the command:
jupyterhub
Visit https://localhost:8000 in your browser, and sign in with your unix credentials.
To allow multiple users to sign in to the Hub server, you must start jupyterhub as a privileged user, such as root:
sudo jupyterhub
Authentication: PAM (Local Users, Passwords)
Adding SSL Cert to JupyterHub
openssl re –x509 – nodes –days 365 –newkey rsa:1024 \ – keyout jupyterhub.key – out jupyterhub.crt
To get a FREE SSL Cert you can use https://letsencrypt.org/getting-started
wget https://dl.eff.org/certbot-auto chmod a+x certbot-auto./certbot-auto certonly –-standalone –d mydomain.tld
key & Cert Locations
key: /etc/letsencrypt/live.mydomain.tld/privkey.pe
cert: /etc/letsencrypt/live/mydomain.tld/fullchain.pem
Adding SSL to config file
c.JuypterHub.ssl_key =’jupyterhub.key’
c.JupyterHub.ssl_cert = ‘juypterhub.crt’
c.JupyterHub.port = 443
Starting Jupyter
Create a Jupyterhub config file – /etc/jupyter/juypterhub_config.py
jupyterhub –generate—config
Using Containers
Starting JupyterHub with docker
The JupyterHub docker image can be started with the following command:
docker run -d --name jupyterhub jupyterhub/jupyterhub jupyterhub
This command will create a container named jupyterhub that you can stop and resume with docker stop/start.
The Hub service will be listening on all interfaces at port 8000, which makes this a good choice for testing JupyterHub on your desktop or laptop.
If you want to run docker on a computer that has a public IP then you should (as in MUST) secure it with ssl by adding ssl options to your docker configuration or using a ssl enabled proxy.
Mounting volumes will allow you to store data outside the docker image (host system) so it will be persistent, even when you start a new image.
The command docker exec -it jupyterhub bash will spawn a root shell in your docker container. You can use the root shell to create system users in the container. These accounts will be used for authentication in JupyterHub’s default configuration.
Setting up Kubernetes on Microsoft Azure Container Service (ACS)
Install and initialize the Azure command-line tools, which send commands to Azure and let you do things like create and delete clusters.
- Go to the azure-cli github repo to download and install the azure-cli tools.
- See the az documentation for more information on using the
aztool with the Azure Container Service.
Authenticate the
aztool so it may access your Azure account:az loginSpecify a Azure resource group, and create one if it doesn’t already exist:
 export RESOURCE_GROUP=<YOUR_RESOURCE_GROUP>
export LOCATION=<YOUR_LOCATION>
az group create --name=${RESOURCE_GROUP} --location=${LOCATION}
where:
--namespecifies your Azure resource group. If a group doesn’t exist, az will create it for you.--locationspecifies which computer center to use. To reduce latency, choose a zone closest to whoever is sending the commands. View available zones viaaz account list-locations.
Install
kubectl, a tool for controlling Kubernetes:az acs kubernetes install-cliCreate a Kubernetes cluster on Azure, by typing in the following commands:
 export CLUSTER_NAME=<YOUR_CLUSTER_NAME>
export DNS_PREFIX=<YOUR_PREFIX>
az acs create --orchestrator-type=kubernetes \
    --resource-group=${RESOURCE_GROUP} \
    --name=${CLUSTER_NAME} \
    --dns-prefix=${DNS_PREFIX}
Authenticate kubectl:
 az acs kubernetes get-credentials \
    --resource-group=${RESOURCE_GROUP} \
    --name=${CLUSTER_NAME}
where:
--resource-groupspecifies your Azure resource group.--nameis your ACS cluster name.--dns-prefixis the domain name prefix for the cluster.
To test if your cluster is initialized, run:
kubectl get nodeThe response should list three running nodes.
Documentation
https://jupyterhub.readthedocs.io/en/latest/
Using Jupyterhub on the Microsoft Data Science Virtual Machine
Juypterhub comes preinstalled on the Microsoft Data Science VM on Windows 2012, 2016, CentOS or Ubuntu
Webinar Link: https://info.microsoft.com/data-science-virtual-machine.html
More Product Information: Data Science Virtual Machine Landing Page
Community Forum: DSVM Forum Page
Cloud Hybrid approach to implementing Jupyterhub and Data Science Virtual Machine
A new understanding of the world through grassroots Data Science education at UC Berkeley. In an effort to empower more data-driven thinking, Microsoft is working with U.C. Berkeley to help realize its vision of giving every undergraduate easy access to the university’s Data Science Education Program.
To succeed, the program had to be accessible to 1000+ students beyond the realm of computer science. One way the program does this is through a flexible and scalable technology infrastructure that enables students to quickly set up labs for hands-on practice—they don’t have to spend time installing programs or learning nuances of complicated applications. https://github.com/data-8/
‘By hosting it in Azure, we can control the environment Students just log in and they’re ready to go.’
- Ryan Lovett, Systems Manager for the Department of Statistics at UC Berkeley.
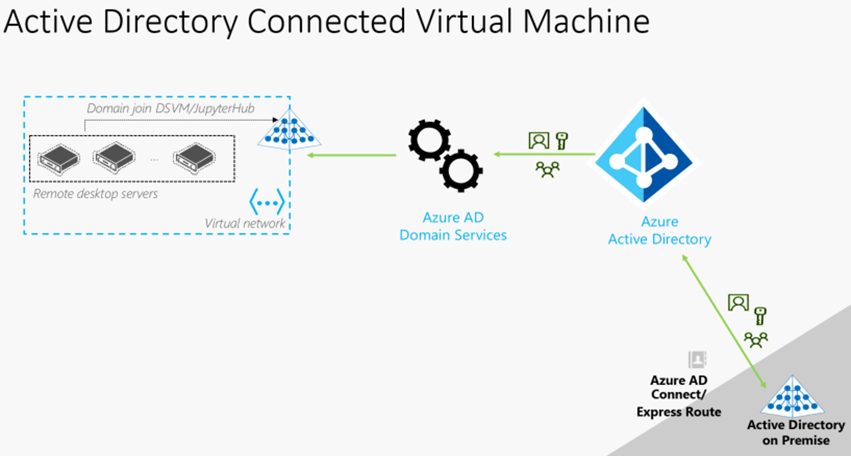
Remote desktop in Azure Infrastructure as Service (IaaS) Data Science Virtual Machine Windows or Linux
•Azure Remote Desktop domain-joined VMs can be deployed against AAD Domain Services domains
•Users simply SSH or RDP into servers
•Data Science VM comes preinstalled with Jupyter and JupyterHub
•Known issue: Remote Desktop licensing service does not work – no license reporting
•Workaround: Track per-user licensing separately (out-of-band)
Setup Documentation
•Joining an Ubuntu Data Science VM to AD https://github.com/Azure/DataScienceVM/blob/master/Scripts/ActiveDirectory/UbuntuDSVMJoinAD.md
•Joining CentOS Data Science VM to AD https://github.com/Azure/DataScienceVM/blob/master/Scripts/ActiveDirectory/CentOSDSVMJoinAD.md
•Joining Windows Data Science VM, to AD https://github.com/Azure/DataScienceVM/blob/master/Scripts/ActiveDirectory/WindowsDSVMJoinAD.md
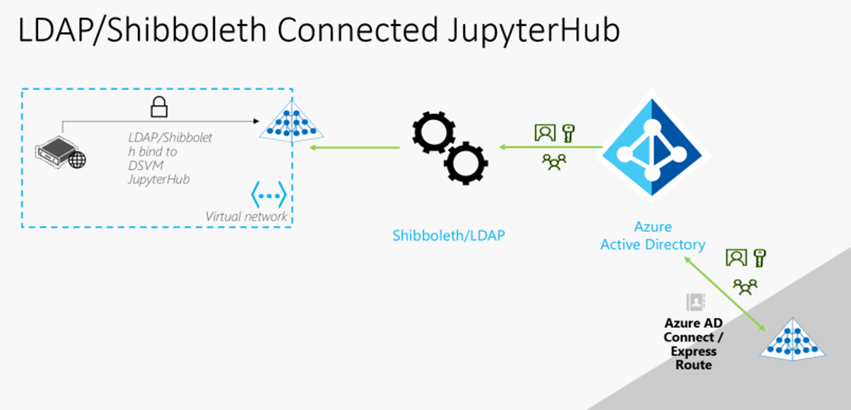
Application level security:
Jupyter Hub application uses a web-form to collect user credentials and authenticates users via LDAP bind to the directory.
•This application can be migrated & deployed in Azure VMs.
•End-users sign in using their existing corporate credentials.
•The app is deployed in Azure, transparent to end-users.
Setup Documentation
Using OAuth
If you wanted to use Github as OAuth services ttp://github.com/settings/applications/new
For Microsoft See https://docs.microsoft.com/en-us/azure/active-directory/develop/active-directory-v2-protocols
See https://www.slideshare.net/willingc/jupyterhub-tutorial-at-jupytercon
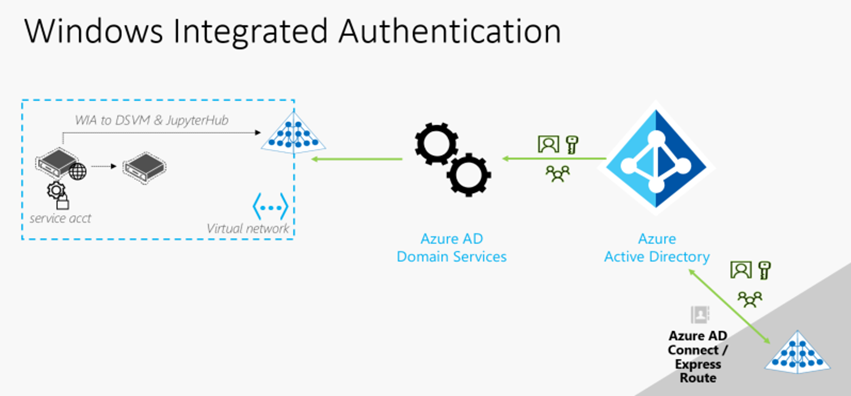
Applications that use Windows Integrated Authentication
An application uses an AD service account for its web front-end to authenticate access to a backend server.
•Deployed in Azure VMs.
•You can create custom OUs & provision service accounts within those OUs.
•You can assign custom password policies (eg. password-never-expires) to service accounts.
GMSAs (Group Managed Service Accounts) work as well.
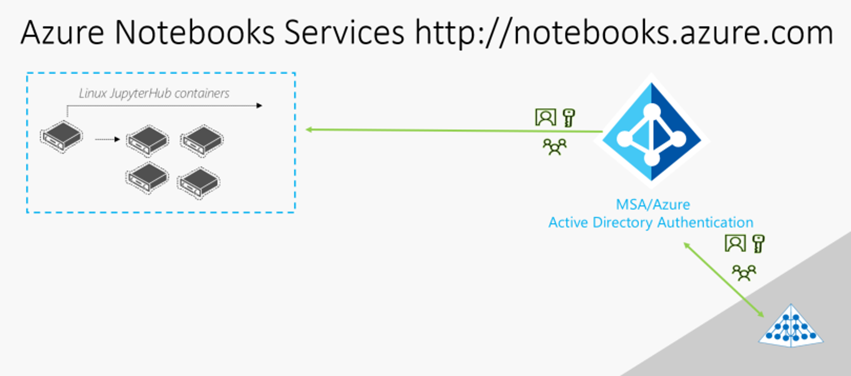
Fully Cloud Hosted Solution
No maintenance, installation, patching or support requirements
As the pace of global innovation continues to accelerate, the University of Cambridge is evolving engineering curriculum to teach core concepts faster using higher level, open source tools in the public cloud. For example, a professor increased learning in an introductory computing class by having students use Microsoft Azure Notebooks, which allows them to spend more time mastering concepts and enhancing problem solving skills and less time on language syntax. This technology switch also gives students anytime, anywhere access to required tools needed to complete assignments, and it facilitates greater collaboration between professors, students, and the larger community. In addition, after Cambridge adopted a public cloud solution, IT infrastructure doesn’t limit the ingenuity of bright minds.
‘By using Azure Notebooks, students aren’t hindered by installation issues. They can just start working straight away. All they need is a decent browser and an Internet connection.’
- Dr. Garth Wells, Hibbit Reader in Solid Mechanics, Department of Engineering, University of Cambridge
Azure Notebooks use Windows Integrated Authentication using O365 or MSA user accounts
Jupyter notebooks to write Python 2, Python 3, R and F# code interactively
Network: Your code can access Azure, github, PyPI, CRAN, OneDrive, DropBox and Google Drive
Memory is limited to 4Gb
Storage: We reserve the right to remove your data from our storage after 60 days of inactivity to avoid storing unused/abandoned user data
Usage should be limited to learning, research, general computing, etc. and must abide by the Microsoft Azure Terms of Use see https://notebooks.azure.com
Additional Resources
For setting up Jupyterhub on VMs or Docker see https://www.slideshare.net/willingc/jupyterhub-tutorial-at-jupytercon for a Step by Step setup guide
Running Jupyter Notebooks as Software as Services (Maintenance/Management Free) see https://Notebooks.azure.com
