Micro:bit: the ‘All-in-one’ device that you have been missing out on
Guest blog by Ana-Marie Nicolaie Microsoft Student Partner at University College London.

My name is Ana-Maria Nicolaie and I am a second year Biomedical Engineering student at UCL. I am originally from Romania, but I chose to pursue my further studies in the United Kingdom because I felt that this place is ‘The Holy Grail’ of education and ‘The land of all opportunities’ in Europe.
My curiosity about the human body and my willingness and passion to help others pointed me in the direction of medicine, but there still was a part of me who was eager always ready to solve problems and to innovate, part which told me to choose engineering as my main field of study; therefore I had to find a way to combine them both, and this is the reason why I chose biomedical engineering as my degree.
I started studying Pseudocode, C++ and SQL in high-school, but my interest in technology was ‘awakened’ when I came to university. I had to learn to code in Java as a part of the ‘Scenarios’ in my degree, when I had to make a pulse oximeter application for Samsung devices and that was the moment it clicked. I could use C++ or C to program some microcontrollers or Matlab (another language I learnt during my first year) to create apps and do data analysis. After some research, I discovered how amazingly fast technology has evolved in healthcare during the past few decades- now we actually have ‘organs on chips’-which are aiming to eliminate clinical trials for new drugs done on animals, 3D holograms of organs for medical students, not even mentioning the 3D printers, high-tech ultrasound and CT scanners which are already quite ‘old’. Apart from technology in Medicine, I am also interested in FinTech, as Finance and Accounting will be the minor of my degree. Outside the academic life, I am a part-time model and some of my hobbies include dancing (street and sportive), basketball, reading and going on trips (like most people in their 20’s).
Overview
Now that I talked enough about myself, it’s high time I discuss what this blog entry will be about. Below are the things that I am aiming to cover to help NON CS or coders become interested in developing code:
· The Micro:bit : background
· The Micro:bit: hardware+software
· Coding your Micro:bit: tutorials
· External resources
A. Background
Photo credits: www.bbc.co.uk |

The Micro:bit is a small device (4x5 cm) which is given to year 7 students ( age group 11-12 ) for free in order to encourage the young generation to pursue a STEM degree and to start coding and programming. As technology is moving ahead faster than ever, there will be a tremendous increase in demand for technology jobs, and therefore the younger generation must be prepared for the
upcoming changes and ready and eager to tackle the upcoming technology challenges that are just around the corner. It comes with a USB cable and battery holders. Software wise, it can be coded in Java, Python and for students that have never coded before, Microsoft MakeCode provides them with a website where they can ‘drag-and-drop’ blocks of code, just like building a puzzle, with the language behind the blocks being available for checking in JavaScript.

When I first read and discovered the Micro:bit, part of me was somehow upset that I hadn’t come across it earlier, because I would have probably chosen to pursue a degree in Computer Science rather than Biomedical Engineering. So imagine my excitement and surprise when I received not only 1 Micro:bit…but 7 of them to Help the MSP team at UCL reach out to students running engaging hacks and events,

Therefore, my first impulse was to start to play around with it (I just changed the welcoming message, but the excitement of seeing it working was invaluable)
(Later in this blog I will show a few tutorials, keep on reading! )
B. Hardware
|
Photo Credits: microbit.org |

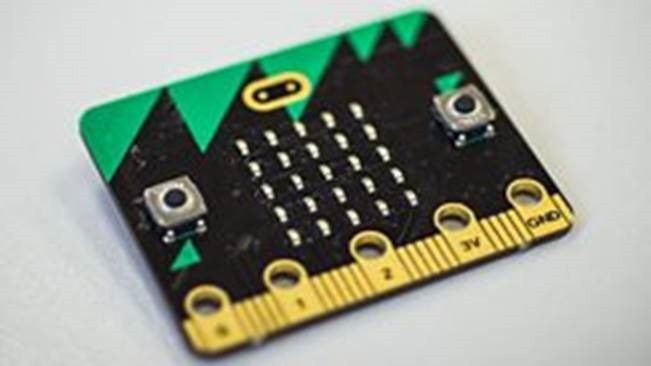
1. The front
The photo on the left hand-side shows the front of the Micro:bit. It is composed of 25 programmable LEDs, 2 buttons (A & B) on the 2 sides of the board, a USB slot on top and 5 pins.
The first 3 pins are for input/output, meaning you can attach different sensors to your Micro:bit through these pins (temperature, pressure, flow, moisture, magnetic-possibilities are endless)-Medical Sciences, Biomedical Engineering students and not only might find this application of the Micro:bit helpful.
The 3V and GND are designed to be power supply pins (as Electrical and Electronic Engineering students would have already figured out), meaning that the Micro:bit can be part of a larger system, namely an engine, a motor (Mechanical engineers might be interested in doing so), a breadboard or another electrical board(E&EE students). This makes this tiny device invaluable, as it can actually be used not only by year 7 students, but also at a university-level for tutorials and projects.
2. The back
The back of the Micro:bit (right hand-side image) shows its other components in detail:
The USB slot is used to connect your Micro:bit to your computer/tablet/phone.
The battery connector is used to connect your Micro:bit to an external power supply- 2 AAA 1.5 V batteries-when you are using more than 1 Micro:bit or you want to use it when it’s not connected to an electrical device.
The compass and the accelerometer are the add-ins that make the Micro:bit so cool. The compass can detect the direction and orientation it is pointed at. The accelerometer detects change in speed- the reason why the Micro:bit can sense shake, free-fall, tilt and so on; hence the software options when it comes to coding.
BLE(Bluetooth Low Energy) Antenna- used to send commands from your computer to your Micro:bit wirelessly and vice-versa.
The processor- For the geeks out here, it is a 32-bit ARM CPU(designed to store less instructions in exchange for a higher processing speed) with 16 K RAM and 16 MHz, also containing Bluetooth Low Energy(mentioned above).
C. Software
First, let me just say that one of the best perks of using a Micro:bit is that you can learn how to code in Java and Python, without any prior coding experience.

Generally, Microsoft & BBC provide users with 4 options users can choose from when it comes to programming the Micro:bit: Python, JavaScript, Microsoft Touch Develop and Block Editor. You can see and try them yourself at https://www.microbit.co.uk/create-code, depending on what you want your learning outcomes to be.
For the time being and for the newbies in the technology world, I will focus on the Microsoft MakeCode, as it is the easiest to begin with.
First, you need to go to https://makecode.microbit.org/ and you will see this:

If you already have some pieces of code in your script, you can simply go to projects(top left) -> new project.
You can always switch between the Blocks and the JavaScript; this is beneficial for students who are familiar with Java, as this will allow them to program the Micro:bit faster and to students who have never used Java before, because as they ‘build the blocks puzzle’ the Java script is automatically written. Therefore, they can learn a new programming language in hours!


- coding blocks- if you click on them, you will see their add-ins; take the one below as an example; this shows some basic features that the Micro:bit has.
- this is the preview. As you go along coding and building your blocks, you will see the changes in the virtual Micro:bit in real time. You can also stop it, restart it, see it in slow motion, turn on the sound or put it in full screen mode. If there is any error in your code, it will not display anything, so it would be time to start looking for mistakes.

D. Tutorials & explanations
Step 1: First, you need to connect your Micro:bit to your computer/laptop/tablet. You can do so by plugging in the USB cable provided in the package in the USB slot on your Micro:bit and the one on your electronic device. It should appear as an external drive.


Step 2. Go to https://makecode.microbit.org/ . You should see an orange button on the right hand side on top, ‘Getting started’-https://youtu.be/WIkLzAkxVEA
Step 3. Write your own code. For instance, I am going to create an alarm clock that is going to tell me when to stop studying, take a break and come back to work after a certain amount of time, as I sometimes have trouble coming back to work when I take a break because of my phone, which should be off when I am studying(and maybe some of you can relate). Numbers in the ‘pause’ button should be changed according to your study schedule(e.g. for the 20-5-2 rule- concentrate 20 minutes, 5 minutes break in blocks of 2 hours), you might want to change the first ‘pause’ block to 1200000 and the second one to 300000 and the ‘repeat’ block to ~ 5. Numbers used above are for the sake of demonstration.


For this particular code I will also need 2 crocodile clips to connect the 0 and GND pins of my Micro:bit to my headphones/audio system. https://youtu.be/GVcq5-WZqgo

I will make another code that is more relevant to my field of study. I will record the number of seizures of a patient that suffers from Parkinson disease, as the number of tremors is dependent on numerous factors, among which the stage of the disease; I wrote the code in Java, as I was more familiar with the language than the MakeCode.
Step 4. Download the code you have just written to your computer (download for MakeCode, Compile for the JavaScript) and copy-paste it on the MICROBIT external device. As simple as that!
Step 5. You can now start testing it and optimize it. In my case, had I had more time, I would have 3D printed a glove for the Micro:bit and for the battery holder, so that the subject would not be stuck to a computer for the duration of the experiment.
I hope this blog entry encouraged you to work on your coding skills. Never ever has it been easier to learn a new programming language and it is never too late to start.
And a word before I leave…
It is my firm belief that women and young girls are underrepresented when it comes to pursuing a career in technology or pursuing a STEM degree. Studies show that some of the reasons this happens are:
1) feeling unsure and unconfident
2) not being able to see the link between the information gathered from lectures and workshops to real-life applications of technology- there might be a problem either with the curriculum or with the lack of opportunities to put their knowledge into practice
3) not having a mentor to guide them and help them achieve their goals
4) not having enough opportunities to discover the world of technology.
It is high time females of all ages are provided with the support (financial, personal) they need to explore this area and acknowledge all the opportunities and start developing that kind of mind-set orientated towards success in order to develop their technical skills which might not have yet been discovered.
How we are engaging using Micro:bit:
1) Workshops and after-school activities in order to help individuals get hands-on experience with coding, programming and technology in general;
2) Providing females with mentors, people that have expertise in the technology industry, to help them gain confidence and to guide them to achieve their goals once they find their passion or once their interest and curiosity about technology is ‘awakened’
3) Open days and insight days exclusively for females; in this way they can attend talks, presentations and even network with important people in the tech industry
4) Clubs, societies at their school or university to gather like-minded people with similar interests so they can discuss their opinions, beliefs and share tips
5) ‘Do it yourself (DIY)’ activities to gain confidence in a field where the majority of employees are men
6) , By making female students aware of their existence and about the fact that they are free to use , several workshops can be organized on a weekly basis where females get hands-on experience with programming a Micro:bit and, after seeing that they could make something work all by themselves and seeing the changes in the output as they code, they could gain confidence when it comes to technology and in this way, it is highly possible there will be a spark of interest for this industry, allowing them to find out more and get involved in even more extracurricular technology activities and finally, even decide to pursue a career in this field of study.
Integrating women in the technology field has already become a priority for numerous well-known, big companies worldwide(1) with websites already making female-orientated job hunts(2), coding workshops and online courses(3) , mentorship programs(4) , boot camps (5) , networking events(6) and even groups on MeetUp, the popular website that aims to gather people with similar interests and passions together!(7)
Make sure to check the external links below.
Also keep an eye on the upcoming events here https://www.techuk.org/focus/programmes/women-in-tech/insights https://londontechweek.com/
https://www.techuk.org/focus/programmes/women-in-tech
2. https://www.womenintechnology.co.uk/
4. https://london.girlsintech.org/programs/git-m/
5. https://london.girlsintech.org/programs/bootcamp/
6. https://developher.org/events-2/
7. https://www.meetup.com/topics/witi/gb/17/london/ ; https://www.techuk.org/peoplelikeme
Other resources
If you are still looking for some inspiration or for some additional help, below are some useful links:
101 ideas of what to do with your Micro:bit - https://www.microbit.co.uk/blocks/lessons
- https://microbitgadgets.co.uk/microbit-projects
More on hardware & software -
https://tech.microbit.org/hardware/
https://www.microbit.co.uk/open_source
Tutorials
https://www.youtube.com/watch?v=mnBYkQ9ku8I
- https://www.youtube.com/watch?v=2cysIqOPkXU
- https://www.youtube.com/watch?v=oZUibNazjno
Lesson Plans
Micro:bit Make Code School resources https://microbit.org/en/2017-06-20-microsoft-curriculum/