Migrating data between different cloud providers
I wanted to share a few options to how you can easily migrate data between various cloud providers such as Google or Amazon to Microsoft Azure.
For various reasons, many customers want the ability to easily and efficiently move data from other providers or services such as Amazon Web Services’ Simple Storage Service (S3) to Microsoft Azure storage. In this blog, I want to share some of the ways and tools you can uses to move data.
There are several solutions available today for moving data from AWS to Azure. These include any number of simple applications that copy data one file at a time, usually by moving the file to a client machine and then uploading it to Azure. Other solutions use Amazon Direct Connect and Azure Express Route to make the copy operations much faster as both provide direct data center-to-cloud connectivity bypassing the internet for those on JaNET and using Azure you should have Express Route connections.
Each of these solutions has value in certain circumstances. However, in many cases the sheer size a transfer, often in terabytes or larger, makes basic file-by-file copying slow and inefficient. By utilizing the inherent scale and parallelism in Azure, an innovative approach can dramatically reduce the overall elapsed time of a large copy operation.
A great tool which is now available within https://portal.azure.com is the Azure Data Factory, Azure Data Factory is a cloud-based data integration service that orchestrates and automates the movement and transformation of data to Azure. With Azure Data Factory you can create data integration solutions using the Data Factory service that can ingest data from various data stores, transform/process the data, and publish the result data to a Azure data stores. Azure Data Factory service allows you to create data pipelines that move and transform data, and then run the pipelines on a specified schedule (hourly, daily, weekly, etc.). It also provides rich visualizations to display the lineage and dependencies between your data pipelines, and monitor all your data pipelines from a single unified view to easily pinpoint issues and setup monitoring alerts.
Data movement activities
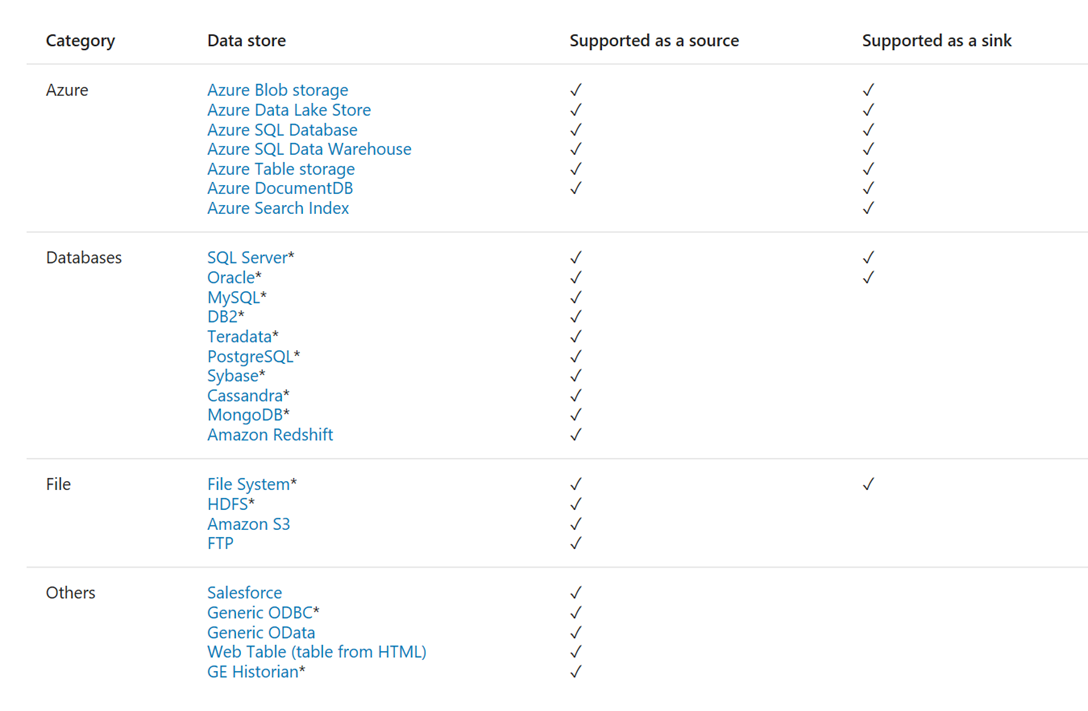
Copy Activity in Data Factory copies data from a source data store to a sink data store. Data Factory supports the following data stores. Data from any source can be written to any sink. Click a data store to learn how to copy data to and from that store.+
Data stores with * can be on-premises or on Azure IaaS, and require you to install Data Management Gateway on an on-premises/Azure IaaS machine.
See Data Movement Activities article for more details.
Data transformation activities
Azure Data Factory supports the following transformation activities that can be added to pipelines either individually or chained with another activity.
Hive HDInsight [Hadoop]
Pig HDInsight [Hadoop]
MapReduce HDInsight [Hadoop]
Hadoop Streaming HDInsight [Hadoop]
Machine Learning activities: Batch Execution and Update Resource Azure VM
Stored Procedure Azure SQL, Azure SQL Data Warehouse, or SQL Server
Data Lake Analytics U-SQL Azure Data Lake Analytics
DotNet HDInsight [Hadoop] or Azure Batch
You can use MapReduce activity to run Spark programs on your HDInsight Spark cluster. See Invoke Spark programs from Azure Data Factory for details. You can create a custom activity to run R scripts on your HDInsight cluster with R installed. See Run R Script using Azure Data Factory.
See Data Transformation Activities article for more details.
If you need to move data to/from a data store that Copy Activity doesn't support, or transform data using your own logic, create a custom .NET activity. For details on creating and using a custom activity, see Use custom activities in an Azure Data Factory pipeline.
Tutorial
Build a data pipeline that processes data using Hadoop cluster
In this tutorial, you build your first Azure data factory with a data pipeline that processes data by running Hive script on an Azure HDInsight (Hadoop) cluster.
Build a data pipeline to move data between two cloud data stores
In this tutorial, you create a data factory with a pipeline that moves data from Blob storage to SQL database.
Build a data pipeline to move data between an on-premises data store and a cloud data store using Data Management Gateway
In this tutorial, you build a data factory with a pipeline that moves data from an on-premises SQL Server database to an Azure blob. As part of the walkthrough, you install and configure the Data Management Gateway on your machine.
Using Azure Data Factory
The Azure Data Factory Copy Wizard allows you to easily and quickly create a pipeline that implements the data ingestion/movement scenario. Therefore, we recommend that you use the wizard as a first step to create a sample pipeline for data movement scenario. This tutorial shows you how to create an Azure data factory, launch the Copy Wizard, go through a series of steps to provide details about your data ingestion/movement scenario. When you finish steps in the wizard, the wizard automatically creates a pipeline with a Copy Activity to copy data from an Azure blob storage to an Azure SQL database. See Data Movement Activities article for details about the Copy Activity.
Go through the Tutorial overview and prerequisites article for an overview of the tutorial and to complete the prerequisite steps before performing this tutorial.
Create data factory
In this step, you use the Azure portal to create an Azure data factory named ADFTutorialDataFactory.+
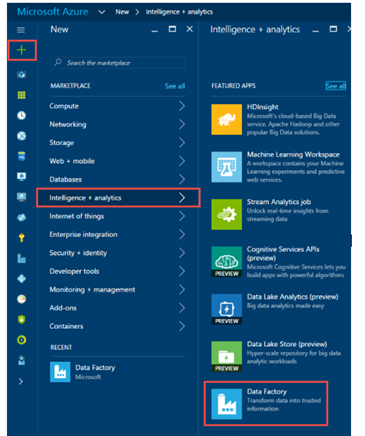
After logging in to the Azure portal, click + NEW from the top-left corner, click Intelligence + analytics, and click Data Factory.
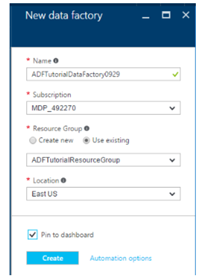
In the New data factory blade:
Enter ADFTutorialDataFactory for the name. The name of the Azure data factory must be globally unique. If you receive the error: Data factory name “ADFTutorialDataFactory” is not available, change the name of the data factory (for example, yournameADFTutorialDataFactory) and try creating again. See Data Factory - Naming Rules topic for naming rules for Data Factory artifacts.
Note The name of the data factory may be registered as a DNS name in the future and hence become publically visible.
Select your Azure subscription.
For Resource Group, do one of the following steps:
Select Use existing to select an existing resource group.
Select Create new to enter a name for a resource group.
Some of the steps in this tutorial assume that you use the name: ADFTutorialResourceGroup for the resource group. To learn about resource groups, see Using resource groups to manage your Azure resources.
Select a location for the data factory.
Select Pin to dashboard check box at the bottom of the blade.
Click Create.
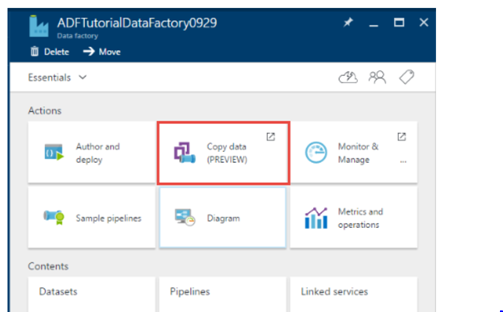
After the creation is complete, you see the Data Factory blade as shown in the following image:
Launch Copy Wizard
On the Data Factory home page, click the Copy data tile to launch Copy Wizard.
Note If you see that the web browser is stuck at "Authorizing...", disable/uncheck Block third party cookies and site data setting (or) keep it enabled and create an exception for login.microsoftonline.com and then try launching the wizard again.
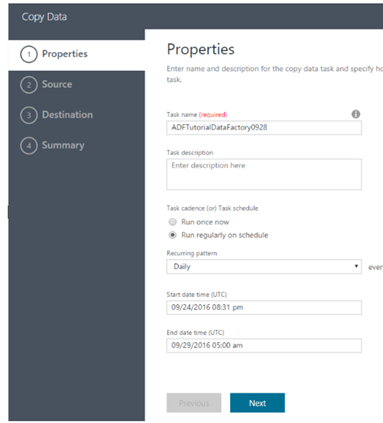
In the Properties page:
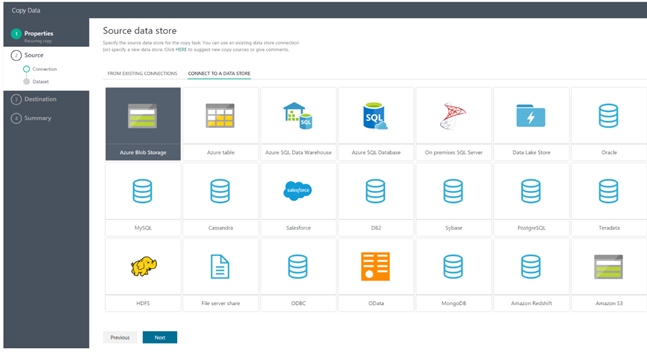
On the Source data store page, click Azure Blob Storage tile. You use this page to specify the source data store for the copy task. You can use an existing data store linked service (or) specify a new data store. To use an existing linked service, you would click FROM EXISTING LINKED SERVICES and select the right linked service.
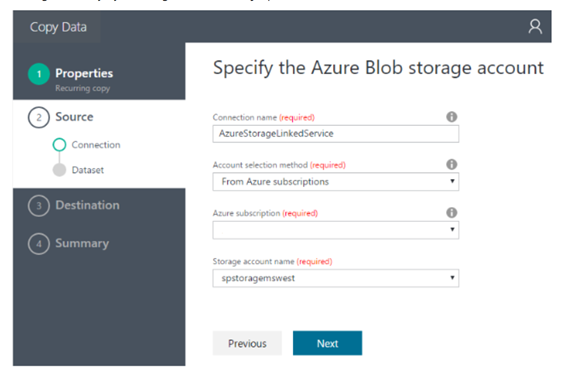
On the Specify the Azure Blob storage account page:
Enter AzureStorageLinkedService for Linked service name.
Confirm that From Azure subscriptions option is selected for Account selection method.
Select your Azure subscription.
Select an Azure storage account from the list of Azure storage accounts available in the selected subscription. You can also choose to enter storage account settings manually by selecting Enter manually option for the Account selection method, and then click Next.
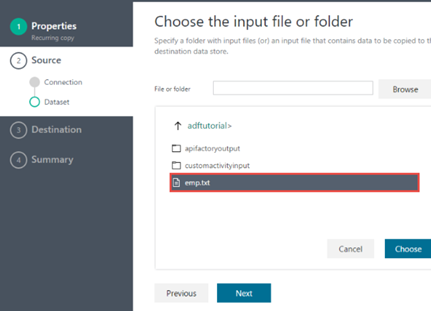
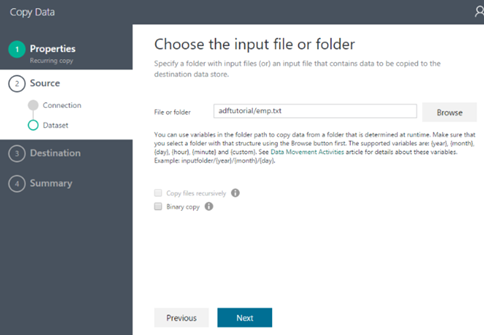
On Choose the input file or folder page:
On the Choose the input file or folder page, click Next. Do not select Binary copy.
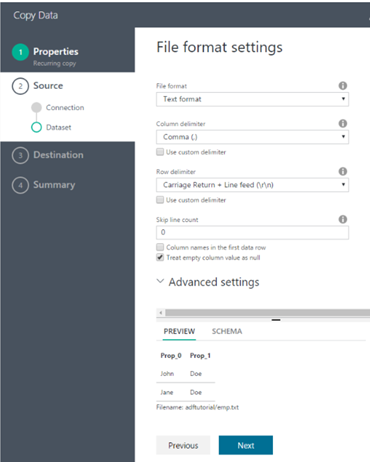
On the File format settings page, you see the delimiters and the schema that is auto-detected by the wizard by parsing the file. You can also enter the delimiters manually for the copy wizard to stop auto-detecting or to override. Click Next after you review the delimiters and preview data.
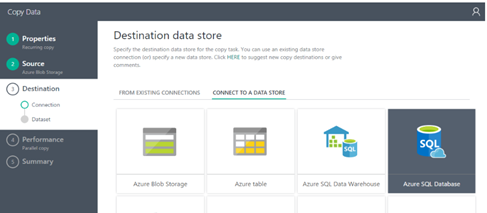
On the Destination data store page, select Azure SQL Database, and click Next.
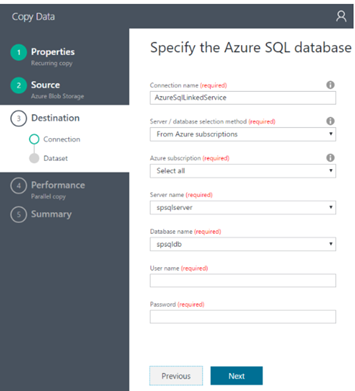
On Specify the Azure SQL database page:
Enter AzureSqlLinkedService for the Connection name field.
Confirm that From Azure subscriptions option is selected for Server / database selection method.
Select your Azure subscription.
Select Server name and Database.
Enter User name and Password.
Click Next.
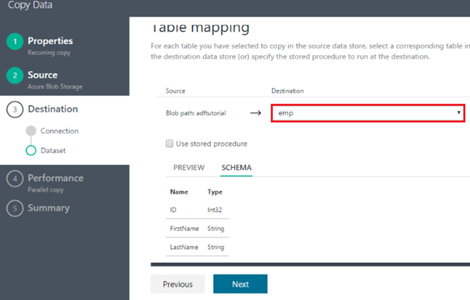
On the Table mapping page, select emp for the Destination field from the drop-down list, click down arrow (optional) to see the schema and to preview the data.
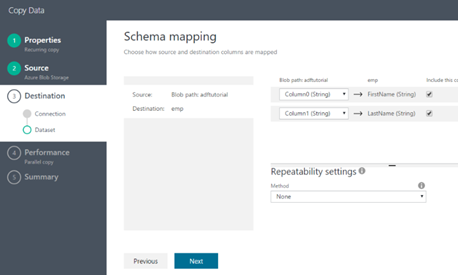
On the Schema mapping page, click Next.
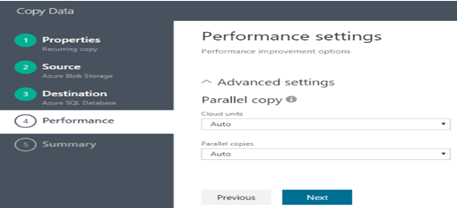
On the Performance settings page, click Next.
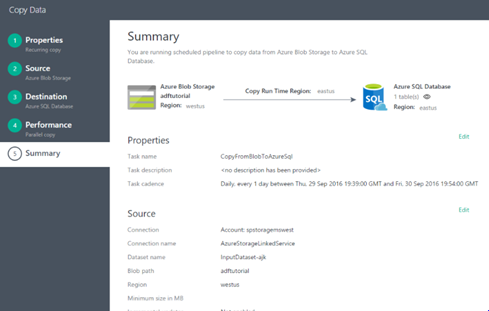
Review information in the Summary page, and click Finish. The wizard creates two linked services, two datasets (input and output), and one pipeline in the data factory (from where you launched the Copy Wizard).
Launch Monitor and Manage application
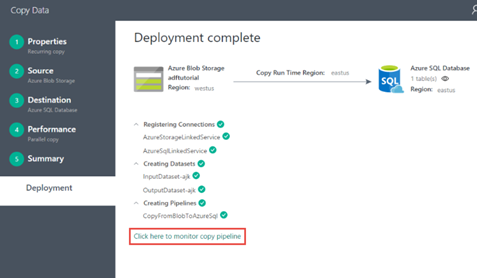
On the Deployment page, click the link:
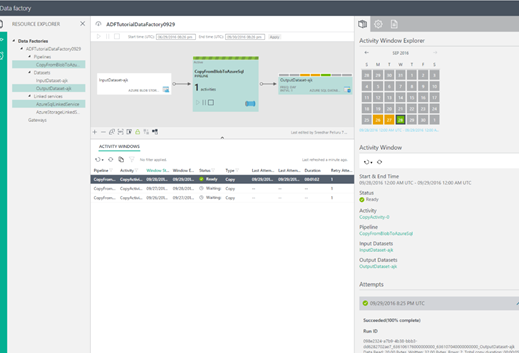
Click here to monitor copy pipeline.Use instructions from Monitor and manage pipeline using Monitoring App to learn about how to monitor the pipeline you created. Click Refresh icon in the ACTIVITY WINDOWS list to see the slice.
Note
Click Refresh button in the ACTIVITY WINDOWS list at the bottom to see the latest status. It is not automatically refreshed.
Resources
Data Movement Activities This article provides detailed information about the Copy Activity you used in the tutorial.
Scheduling and execution This article explains the scheduling and execution aspects of Azure Data Factory application model.
Pipelines This article helps you understand pipelines and activities in Azure Data Factory and how to use them to construct end-to-end data-driven workflows for your scenario or business.
Datasets This article helps you understand datasets in Azure Data Factory.
Monitor and manage pipelines using Monitoring App This article describes how to monitor, manage, and debug pipelines using the Monitoring & Management App.
Cloud Xplorer
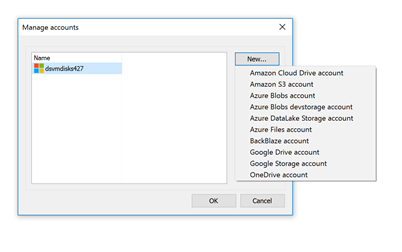
A tool I have seen in action recently is CloudXplorer by Clumsley Leaf https://clumsyleaf.com/products/cloudxplorer this product supports the following services
- Support for Amazon Cloud Drive.
- Support for Google Drive.
- Support for Azure DataLake store.
- Support for Microsoft OneDrive (Personal).
- Support for BackBlaze B2 storage.
- Copy/move your data from Amazon S3/Google Storage
The product offers some really nice features and is ideal for anyone moving large amounts of data between Google, Amazon and Azure
Copy/move your data from Amazon S3/Google Storage to Azure Blobs or Azure Files.
Slick UI with a modern Windows-style ribbon.
Fast and optimized multithreaded downloads and uploads.
Native copy/move blobs/files and folders between different Azure Blobs, Azure Files, Google Storage and Amazon S3 accounts.
Search for a specific blob/file/object or folder name/pattern within an account.
Report on the contents of a container/share/bucket.
Import/export the account information.
Organize accounts into logical groups.
Drag-and-drop enables dragging files and folders from ZIP-archives etc.
Favorites can be used as a container for shortcuts to frequently used locations.
Create, expand or shrink VHDs directly in Azure Blobs storage.
Access Azure Blobs/Azure Files accounts anonymously using container- and share-based shared access signature tokens.
Browse ZIP archives, ISO/CAB/VHD (including Ext, FAT and NTFS file systems) files in-place.
Simple and intuitive Windows Explorer-like interface.
Full support of Azure Blobs, Azure Files, Amazon S3 and Google Storage.
Works with the Azure development storage.
Copy and move blobs/files/objects between folders, containers/shares/buckets or even different accounts (Azure Blobs & Azure Files).
Rename and delete blobs/files/objects, create new containers/shares/buckets and folders.
Upload local files/directories and download blobs/files/objects or entire folders.
Auto-resume upload and download of large files.
Set and retrieve extended properties like Content-Encoding, Cache-Control etc.
Store and retrieve blob/file and container/share metadata.
Set container access control and manage container/share access policies.
Create, delete, promote or download blob snapshots (Azure Blobs) or object versions (Amazon S3/Google Storage).
Create shared access signatures for containers and blobs (Azure Blobs), shares and files (Azure Files) or signed URLs (Amazon S3/Google Storage).
Supports drag-and-drop (with Aero effects on Windows Vista/7).
Non-blocking operations with the native progress dialogs.
Conclusion
So there are a number options available if your considering moving data between cloud providers. Love to hear your thoughts and experiences on using these to move data to Azure.
