Getting Started with Docker and Azure Container Services
Docker is the world's most popular containerization platform.
Docker containers wrap a piece of software in a complete filesystem that contains everything needed to run: code, runtime, system tools, system libraries – anything that can be installed on a server. This guarantees that the software will always run the same, regardless of its environment.
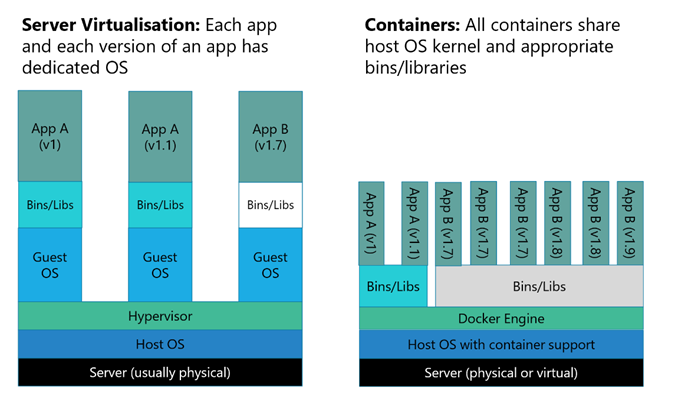
Containers are similar to virtual machines (VMs) in that they provide a predictable and isolated environment in which software can run.
Because containers are smaller than VMs, they start almost instantly and use less RAM. Moreover, multiple containers running on a single machine share the same operating system kernel.
Docker is based on open standards, enabling Docker containers to run on all major Linux distributions as well as Windows Server 2016. To simplify the use of Docker containers, Azure offers the Azure Container Service (ACS)
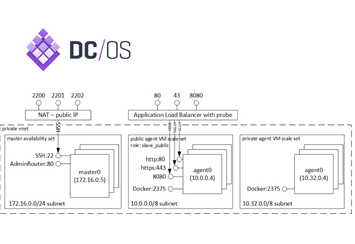
Which hosts Docker containers in the cloud. It also provides an optimized configuration of popular open-source scheduling and orchestration tools, including DC/OS and Docker Swarm
In the following tutorial we will package a Python app and a set of colour images in a Docker container. Then you will run the container in Azure and run the Python app inside it to convert the colour images to grayscale. You will get hands-on experience creating Azure Container Services and remoting into them to execute Docker commands and manipulate Docker containers
In this blog, you will learn how to:
- Create an Azure Container Service
- Remote into an Azure Container Service using SSH
- Create Docker images and run Docker containers in Azure
- Run jobs in containers created from Docker images
- Stop Docker containers that are running
- Delete a container service
Prerequisites
The following are required to complete this hands-on lab:
- An active Microsoft Azure subscription.
- PuTTY (Windows users only). You can either install the full package using the MSI installer, or install just two binaries: putty.exe and puttygen.exe.
- Docker client (also known as the Docker Engine CLI) for Windows, macOS, or Linux
To install the Docker client for Windows, open https://get.docker.com/builds/Windows/x86_64/docker-latest.zip and copy the executable file named "docker.exe" from the "docker" subdirectory to a local folder. To install the Docker client for macOS, open https://get.docker.com/builds/Darwin/x86_64/docker-latest.tgz and copy the executable file named "docker" from the "docker" subdirectory to a local folder. To install the Docker client for Linux, open https://get.docker.com/builds/Linux/x86_64/docker-latest.tgz and copy the executable file named "docker" from the "docker" subdirectory to a local folder. (You can ignore the other files in the "docker" subdirectory.)
You do not need to install the Docker client if you already have Docker (or Docker Toolbox) installed on your machine.
Task 1: Create an SSH key pair
Before you can deploy Docker images to Azure, you must create an Azure Container Service. And in order to create an Azure Container Service, you need a public/private key pair for authenticating with that service over SSH. In this exercise, you will create an SSH key pair. If you are using macOS or Linux, you will create the key pair with ssh-keygen. If you are running Windows instead, you will use a third-party tool named PuTTYGen.
Unlike macOS and Linux, Windows doesn't have an SSH key generator built in. PuTTYGen is a free key generator that is popular in the Windows community. It is part of an open-source toolset called PuTTY, which provides the SSH support that Windows lacks.
If you are running Windows, skip to Step 6. Otherwise, proceed to Step 2.
On your Mac or Linux machine, launch a terminal window.
Execute the following command in the terminal window:
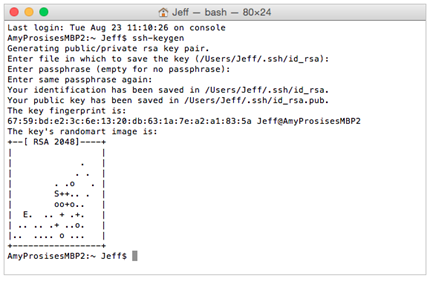
ssh-keygenPress Enter three times to accept the default output file name and create a key pair without a passphrase. The output will look something like this:
Generating a public/private key pair
Use the following commands to navigate to the hidden ".ssh" subdirectory created by ssh-keygen and list the contents of that subdirectory:
 cd ~/.ssh
ls
Confirm that the ".ssh" subdirectory contains a pair of files named id_rsa and id_rsa.pub. The former contains the private key, and the latter contains the public key. Remember where these files are located, because you will need them in subsequent exercises.
Proceed to Step 2. The remaining steps in this exercise are for Windows users only .
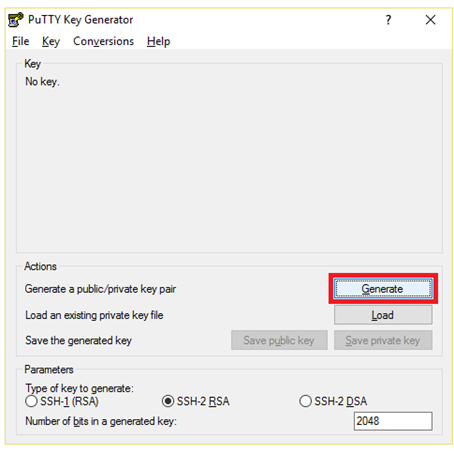
Launch PuTTYGen and click the Generate button. For the next few seconds, move your cursor around in the empty space in the "Key" box to help randomize the keys that are generated.
Generating a public/private key pair
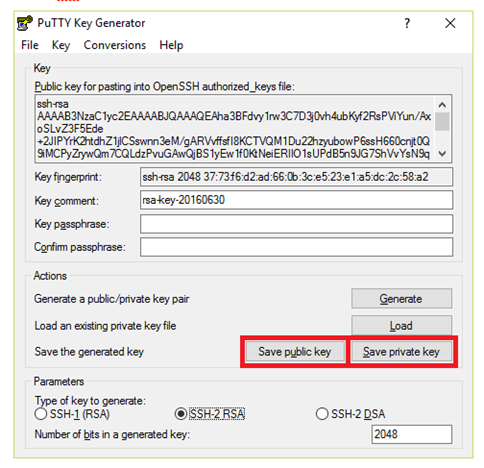
Once the keys are generated, click Save public key and save the public key to a text file named public.txt. Then click Save private key and save the private key to a file named private.ppk. When prompted to confirm that you want to save the private key without a passphrase, click Yes.
Saving the public and private keys
You now have a pair of files containing a public key and a private key. Remember where these files are located, because you will need them in subsequent steps.
Task 2: Create an Azure Container Service
Now that you have an SSH key pair, you can create and configure an Azure Container Service. In this exercise, you will use the Azure Portal to create an Azure Container Service for running Docker containers.
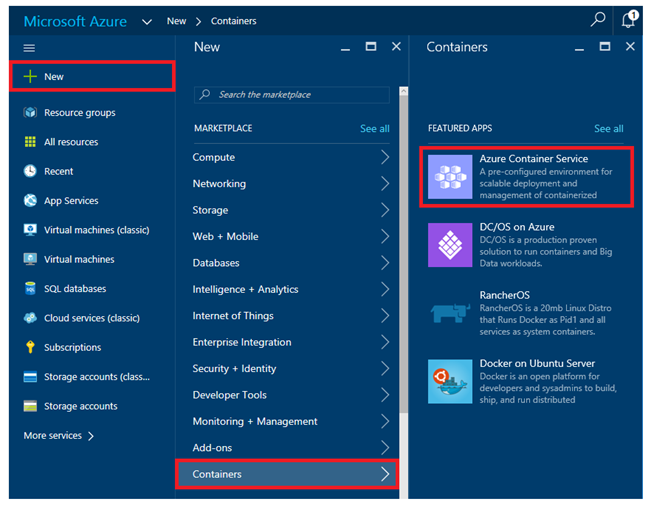
Open the Azure Portal in your browser. Select + New -> Containers -> Azure Container Service.
Creating a container service
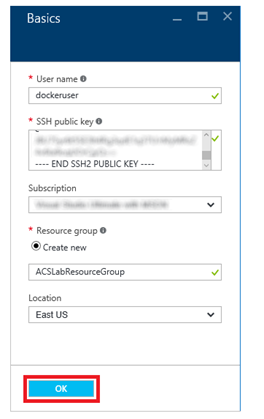
Click the Create button in the "Azure Container Service" blade. In the "Basics" blade, enter "dockeruser" (without quotation marks) for User name and the public key that you generated in Exercise 1 for SSH public key. Select Create new under Resource group and enter the resource-group name "ACSLabResourceGroup" (without quotation marks). Select the location nearest you under Location, and then click the OK button.
Basic settings
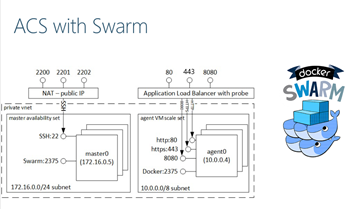
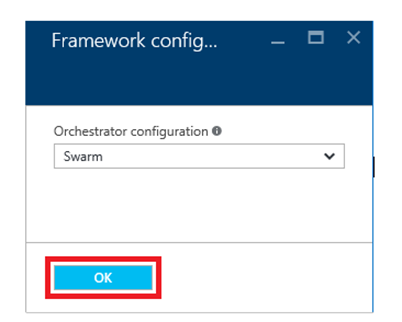
In the "Framework configuration" blade, select Swarm as the orchestrator configuration. Then click OK.
DC/OS and Swarm are popular open-source orchestration tools that enable you to deploy clusters containing thousands or even tens of thousands of containers. (Think of a compute cluster consisting of containers rather than physical servers, all sharing a load and running code in parallel.) DC/OS is a distributed operating system based on the Apache Mesos distributed systems kernel. Swarm is Docker's own native clustering tool. Both are preinstalled in Azure Container Service, with the goal being that you can use the one you are most familiar with rather than have to learn a new tool.
Framework configuration settings
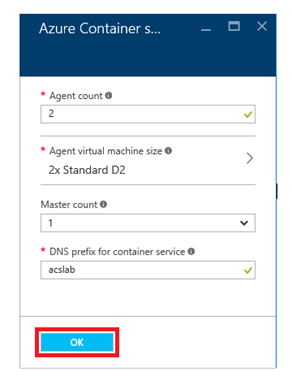
In the "Azure Container service settings" blade, set Agent count to 2, Master count to 1, and enter a DNS name in the DNS prefix for container service box. (The DNS name doesn't have to be unique across Azure, but it does have to be unique to a data center. To ensure uniqueness, you should include birth dates or other personal information that is unlikely to be used by other students working this lab. Otherwise, you may see a green check mark in the DNS prefix box but still suffer a deployment failure.) Then click OK.
When you create an Azure Container Service, one or more master VMs are created to orchestrate the workload. In addition, an Azure Virtual Machine Scale Set is created to provide VMs for the "agents," or VMs that the master VMs delegate work to. Docker container instances are hosted in the agent VMs. By default, Azure uses a standard D2 virtual machine for each agent. These are dual-core machines with 7 GB of RAM. Agent VMs are created as needed to handle the workload. In this example, there will be one master VM and up to two agent VMs.
Service settings
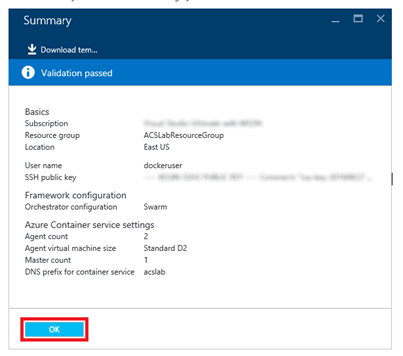
In the "Summary" blade, review the settings you selected. Then click OK.
Settings summary
In the ensuing "Purchase" blade, click the Purchase button to begin deploying a new container service.
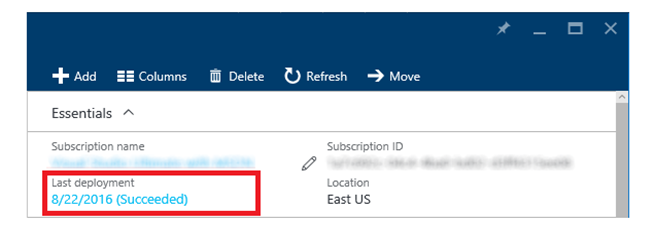
Deployment typically takes about 10 minutes. To monitor the deployment, click Resource groups on the left side of the portal to display a list of all the resource groups associated with your account. Then select the ACSLabResourceGroup resource group created for the container service to open a resource-group blade. When "Succeeded" appears under "Last Deployment," the deployment has completed successfully.
Click the browser's Refresh button every few minutes to update the deployment status. Clicking the Refresh button in the resource-group blade refreshes the list of resources in the resource group, but does not reliably update the deployment status.
Successful deployment
Task 3: Connect to the Azure Container Service
In this step you will establish an SSH connection to the container service you deployed in Exercise 2 so you can use the Docker client to create Docker containers and run them in Azure.
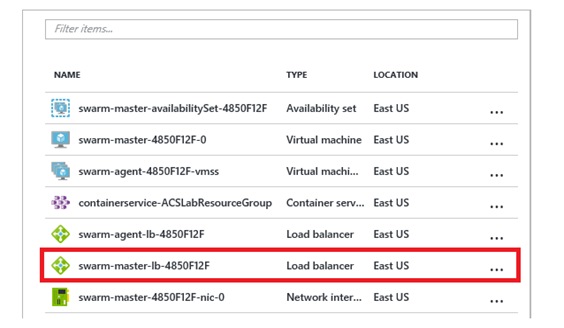
After the container service finishes deploying, return to the blade for the "ACSLabResourceGroup" resource group. Then click the resource named swarm-master-lb-xxxxxxxx. This is the master load balancer for the swarm.
Opening the master load balancer
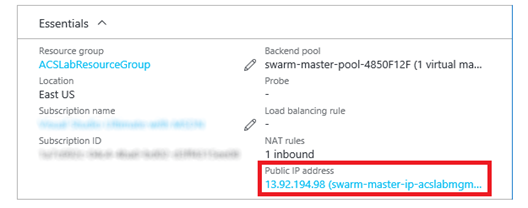
Click the IP address under "Public IP Address."
The master load balancer's public IP
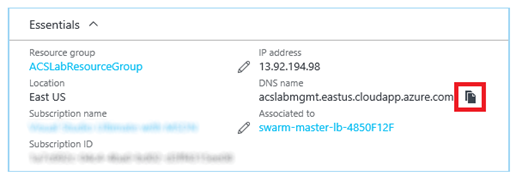
Hover over the DNS name under "DNS Name." Wait for a Copy button to appear, and then click it to copy the master load balancer's DNS name to the clipboard.
Copying the DNS name
If you are running Windows, skip to Step 9. Otherwise, proceed to Step 5.
On your Mac or Linux machine, launch a terminal window (or return to the one you opened in Exercise 1 if it's still open).
Execute the following command to SSH in to the Azure Container Service, replacing dnsname with the DNS name on the clipboard:
ssh dockeruser@dnsname -p 2200 -L 22375:127.0.0.1:2375The purpose of the -L switch is to forward traffic transmitted through port 22375 on the local machine (that's the port used by the docker command you will be using shortly) to port 2375 at the other end. Docker Swarm listens on port 2375. The -p switch instructs SSH to use port 2200 rather than the default 22. The load balancer you're connecting to listens on port 2200 and forwards the SSH messages it receives to port 22 on the master VM.
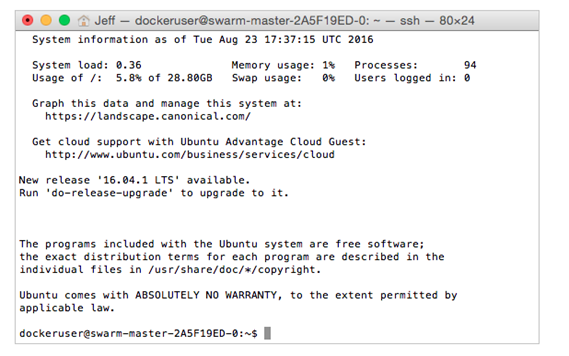
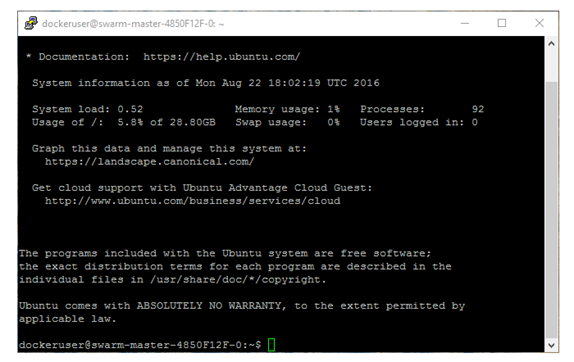
If asked to confirm that you wish to connect, answer yes. Once connected, you'll see a screen that resembles the one below.
Observe that you didn't have to enter a password. That's because the connection was authenticated using the public/private key pair you generated in Exercise 1. Key pairs tend to be much more secure than passwords because they are cryptographically strong.
Successful connection
Leave the terminal window open and proceed to Exercise 4. The remaining steps in this exercise are for Windows users only .
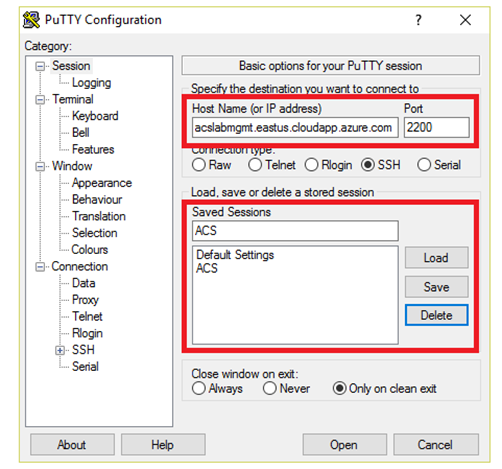
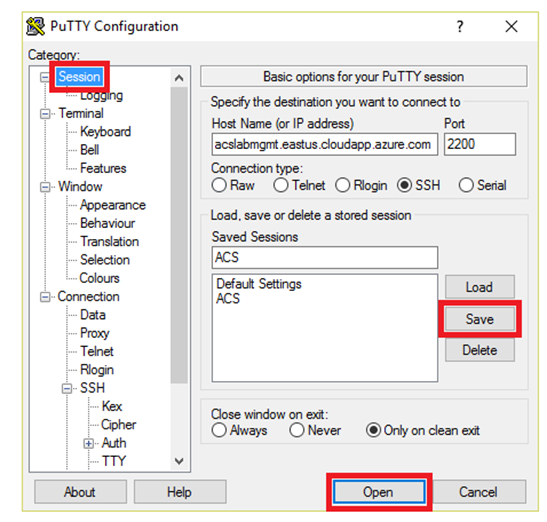
Launch PuTTY and paste the DNS name on the clipboard into the Host Name (or IP address) box. Set the port number to 2200 and type "ACS" (without quotation marks) into the Saved Sessions box. Click the Save button to save these settings under that name.
Why port 2200 instead of port 22, which is the default for SSH? Because the load balancer you're connecting to listens on port 2200 and forwards the SSH messages it receives to port 22 on the master VM.
Configuring a PuTTY session
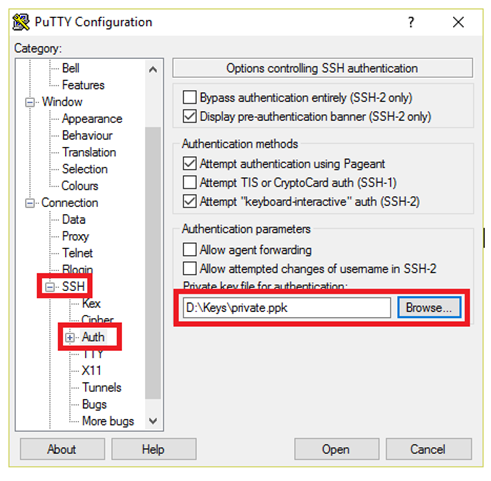
In the treeview on the left, click the + sign next to SSH, and then click Auth. Click the Browse button and select the private-key file that you created in Exercise 1.
Entering the private key
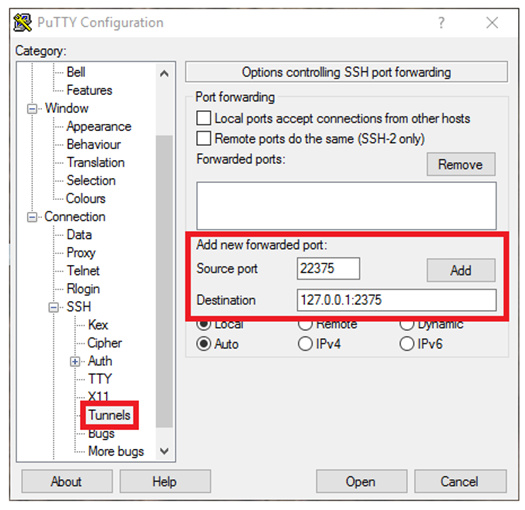
Select Tunnels in the treeview. Then set Source port to 22375 and Destination to 127.0.0.1:2375, and click the Add button.
The purpose of this is to forward traffic transmitted through port 22375 on the local machine (that's the port used by the docker command you will be using shortly) to port 2375 at the other end. Docker Swarm listens on port 2375.
Configuring the SSH tunnel
Click Session at the top of the treeview. Click the Save button to save your configuration changes, and then click Open to create a secure SSH connection to the container service. If you are warned that the server's host key isn't cached in the registry and asked to confirm that you want to connect anyway, click Yes.
Opening a connection to the container service
An SSH window will open and prompt you to log in. Enter the user name ("dockeruser") that you specified in Exercise 2, Step 2. Then press the Enter key. Once connected, you'll see a screen that resembles the one below.
Observe that you didn't have to enter a password. That's because the connection was authenticated using the public/private key pair you generated in Exercise 1. Key pairs tend to be much more secure than passwords because they are cryptographically strong.
Successful connection
Now that you're connected, you can run the Docker client on your local machine and use port forwarding to execute commands in the Azure Container Service. Leave the SSH window open while you work through the next exercise.
Task 4: Create a Docker image and run it in a container
Now comes the fun part: creating a Docker image and running it inside a container in Azure. If you haven't already installed the Docker client, refer to the instructions at the beginning of this lab to download and install the Docker client for your operating system.
Open a terminal window (macOS or Linux) or a Command Prompt window (Windows) and navigate to the "resources" subdirectory of this lab. It contains the files that you will build into a container image.
Take a moment to examine the contents of the "resources" subdirectory. It contains a file named Dockerfile, which contains the commands Docker will use to build a container image. It also contains a Python script named convertimages.py, a subdirectory named "input," and a subdirectory named "output." The latter subdirectory is empty. The "input" subdirectory contains several color JPG images. The Python script enumerates the files in the "input" subdirectory, converts them to grayscale, and writes the grayscale images to the "output" subdirectory.
If you are running macOS or Linux, execute the following command in the terminal window:
export DOCKER_HOST=tcp://127.0.0.1:22375If you are running Windows instead, execute this command in the Command Prompt window:
set DOCKER_HOST=tcp://127.0.0.1:22375This command directs the Docker client to send output to localhost port 22375, which you redirected to port 2375 in the Azure Container Service in the previous exercise. Remember that port 2375 is the one Docker Swarm listens on. The commands that you execute in the next few steps are typed into a local terminal window, but they are executed in the container service you deployed to the cloud using the SSH tunnel that you established in the previous exercise.
Be sure you're in the "resources" subdirectory. Then execute the following command to create a container image named "ubuntu-convert" containing the Python script as well as the "input" and "output" subdirectories and their contents. Be sure to include the period at the end of the command:
docker build --no-cache --tag ubuntu-convert .Wait for the command to finish executing. (It will take a few minutes for Docker to build the container image.) Then execute the following command to list the images that are present, and confirm that the list contains an image named "ubuntu-convert:"
docker imagesNow execute the following command to start the container image running and name the container "acslab:"
docker run -dit --name acslab ubuntu-convert /bin/bashThe container is now running. The next task is to execute the Python script in the root of the file system in the running container. To do that, execute the following command:
docker exec -it acslab /convertimages.pyIf the Python script ran successfully, the "output" subdirectory in the container should contain grayscale versions of the JPG files in the "input" subdirectory. Use the following command to copy the files from the "output" subdirectory in the container to the "output" subdirectory on the local machine:
docker cp acslab:/output .Because you are still in the lab's "resources" subdirectory, this command will copy the grayscale images to the "resources" subdirectory's "output" subdirectory.
Stop the running container by executing the following command:
docker stop acslabType the following command to delete the "acslab" container:
docker rm acslabList the contents of the "output" subdirectory under the "resources" subdirectory that you are currently in. Confirm that it contains eight JPG files copied from the container.
Open one of the JPG files and confirm that it contains a grayscale image like the one pictured below.
Grayscale image copied from the container
Congratulations! You just created a Docker container image and ran it in a Docker container hosted in Azure. You can close the SSH window now if you'd like because you are finished using the SSH connection.
Task 5: Suspend the master VM
When virtual machines are running, you are being charged — even if the VMs are idle. Therefore, it's advisable to stop virtual machines when they are not in use. You will still be charged for storage, but that cost is typically insignificant compared to the cost of an active VM.
Your container service contains a master VM that needs to be stopped when you're not running containers. The Azure Portal makes it easy to stop virtual machines. VMs that you stop are easily started again later so you can pick up right where you left off. In this exercise, you will stop the master VM to avoid incurring charges for it.
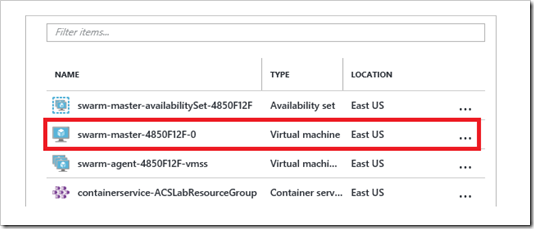
In the Azure Portal, open the blade for the "ACSLabResourceGroup" resource group. Click the virtual machine whose name begins with swarm-master to open a blade for the master VM.
Opening a blade for the master VM
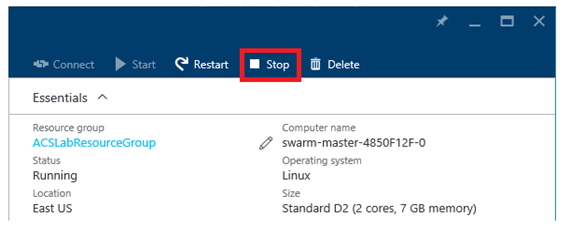
Click the Stop button to stop the master VM. Answer Yes when prompted to verify that you wish to stop it.
Stopping the master VM
There is no need to stop the agent VMs. They are part of an Azure Virtual Machine Scale Set and are automatically spun up and down as needed by the master VM. Note that if you wish to run containers again in this container service, you will need to restart the master VM.
Step 6: Delete the resource group
Resource groups are a useful feature of Azure because they simplify the task of managing related resources. One of the most practical reasons to use resource groups is that deleting a resource group deletes all the resources it contains. Rather than delete those resources one by one, you can delete them all at once.
In this exercise, you will delete the resource group created in TASK 2 when you created the container service. Deleting the resource group deletes everything in it and prevents any further charges from being incurred for it.
In the Azure Portal, open the blade for the "ACSLabResourceGroup" resource group. Then click the Delete button at the top of the blade.
Deleting a resource group
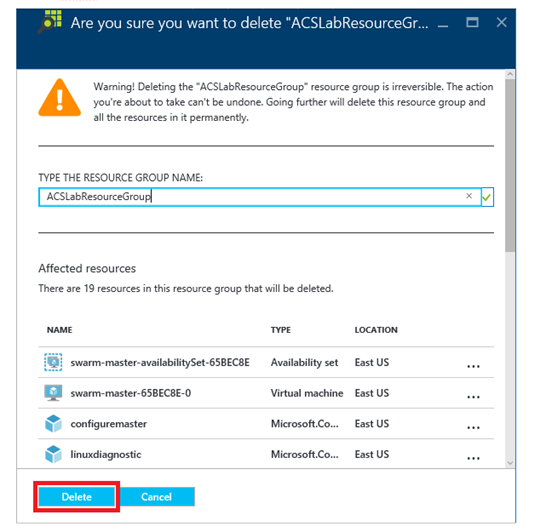
Because deleting a resource group is a permanent action that can't be undone, you must confirm that you want to delete it. Do so by typing the name of the resource group into the box labeled TYPE THE RESOURCE GROUP NAME. Then click Delete to delete the resource group and everything inside it.
Confirming resource-group deletion
After a few minutes, you will be notified that the resource group was deleted. If the deleted resource group still appears in the "Resource groups" blade, click that blade's Refresh button to update the list of resource groups. The deleted resource group should go away.
Summary
The Azure Container Service makes it easy to run apps packaged in Docker containers in the cloud without having to manage servers or install a container stack yourself. Container images are smaller than VM images, they start faster, and they typically cost less since a single VM can host multiple container instances. More importantly, Docker containers can be hosted in other cloud platforms such as Amazon Web Services (AWS). If you want to avoid being tied to a single cloud platform, containers are a great way to achieve that independence.
