Developing a Microsoft Health Bot based on Data captured from the Microsoft Band
The Microsoft Bot Framework provides just what you need to build and connect intelligent bots that interact naturally wherever your users are talking, from text/sms to Skype, Slack, Office 365 mail and other popular services. This is a step-by-step guide which my colleague Peter Daukintis has developed this tutorial which walks you through the development of a Microsoft Bot in C# using the Bot Framework Connector SDK .NET template.
You will need to have a Microsoft Band and have collected some sleep data using a Microsoft Band and have had that synchronised up to the Microsoft cloud as this tutorial uses the Bot Framework to provide access to that data. Heart Rate monitoring depends on the current Band mode, It only monitors hr continuously when in exercise mode (along with all other sensors), all of the other scenarios have pre-defined cadences that allow the data to have analytical relevance whilst only using the sensors as much as needed.
So what does the band record
· Exercise modes (Run and Workout): Heart rate records every second
· Sleep tracking : 2 minutes on, 8 minutes off. Repeats throughout duration
· All other times : 1 minute on, 9 minutes off, and repeating the cycle
· Manual: You can force-check your heart rate at any time by tapping the Me Tile
Where is the data stored and how it transfered
This is the information that is sent to MS Health, and as such is available through the Cloud API, along with the curated information that is derived by MS Health, e.g sleep efficiency, recovery time, etc. No application required on the phone.
If you haven't heard about Microsoft Bot see my previous blog at https://blogs.msdn.microsoft.com/uk_faculty_connection/2016/04/05/what-is-microsoft-bot-framework-overview/
Perquisites
1) Development Enivornment
- Visual Studio 2015 (latest update) – you can download the community version here for free:www.visualstudio.com
- Important: Please update all VS extensions to their latest versions Tools->Extensions and Updates->Updates
2) Download and install the Bot Application template
- Download the file from the direct download link here:
- Save the zip file to your Visual Studio 2015 templates directory which is traditionally in
“%USERPROFILE%\Documents\Visual Studio 2015\Templates\ProjectTemplates\Visual C#”
3) Open Visual Studio
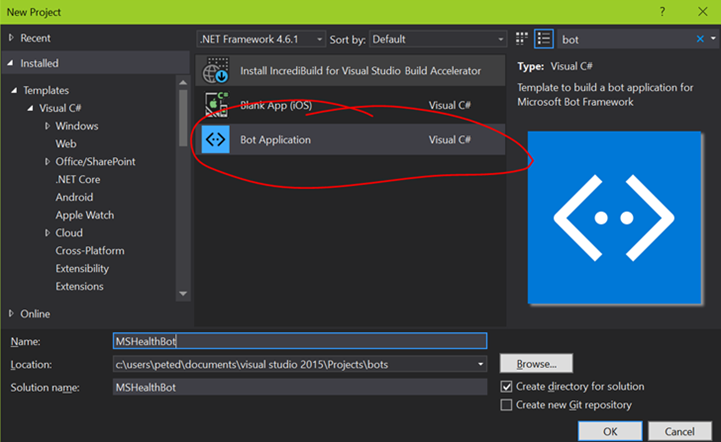
4) Select File > New > Project and you should see the dialog below. In the tree view on the left select Installed > Templates > Visual C# and click on the search box on the right and type bot
4) Select the Bot Application template and type in MSHealthBot as the Name and click OK
Visual Studio will now create and initialise your project.
The project that is created consists of an ASP.NET Web API project which is already set up with the Microsoft.Bot.Connector Nuget package and a MessagesController API end point with some boiler-plate Bot code.
ASP.NET Web API is an ideal platform for building RESTful applications on the .NET Framework
NuGet is the package manager for the Microsoft development platform including .NET
This represents the back-end of your bot and where the business logic code for your bot will all reside. The other main part of the system would be the bot client and that would represent the interface to your end-user. An example of a bot client might be Skype or Slack where the user might type in questions for your bot to answer or it could a voice recognition agent; ultimately your bot can work with any client. The Microsoft Bot Framework provides us with an emulator so that we can develop and test our bot.so the next step is to become familiar with its usage.
To install the Bot Framework Emulator, download it from here .
To set up the Bot Framework Emulator (please see https://docs.botframework.com/connector/getstarted/#getting-started-in-net for installation and set up instructions).
Note that the link between the bot you are currently developing and the emulator are the App ID and App Secret values which you find in your project’s Web.Config file:
 <appSettings>
 <!-- update these with your appid and one of your appsecret keys-->
 <add key="AppId" value="YourAppId" />
 <add key="AppSecret" value="YourAppSecret" />
 </appSettings>
view rawbot-id-secret hosted with ❤ by GitHub
This ensures that your bot can be authenticated but for the purpose of this tutorial you can use them as they are. Please follow the next steps to get the default bot up and running in the Bot Emulator:
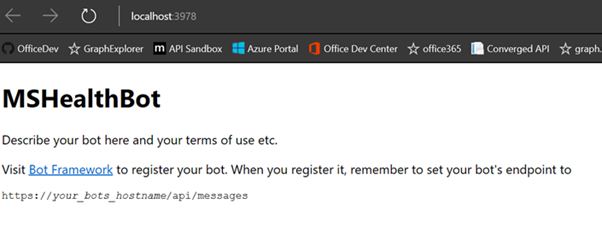
1) From Visual Studio select Debug > Start Debugging or press F5. This will start an instance of IISExpress on your machine which will locally host your bot and will open a browser window. This should look like the following:
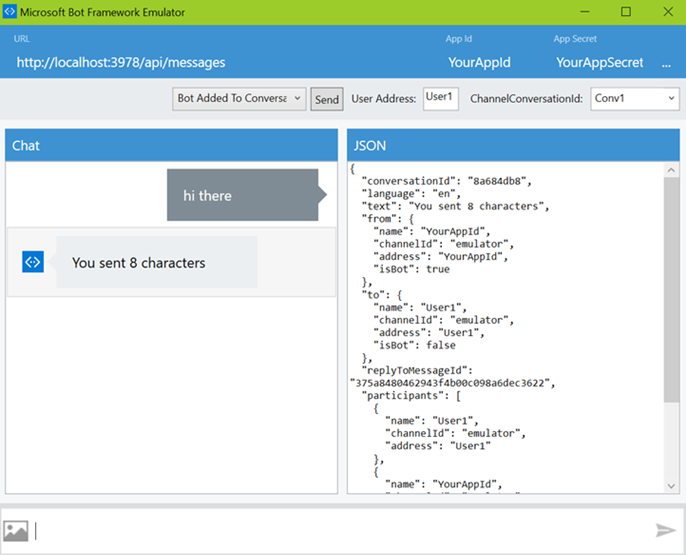
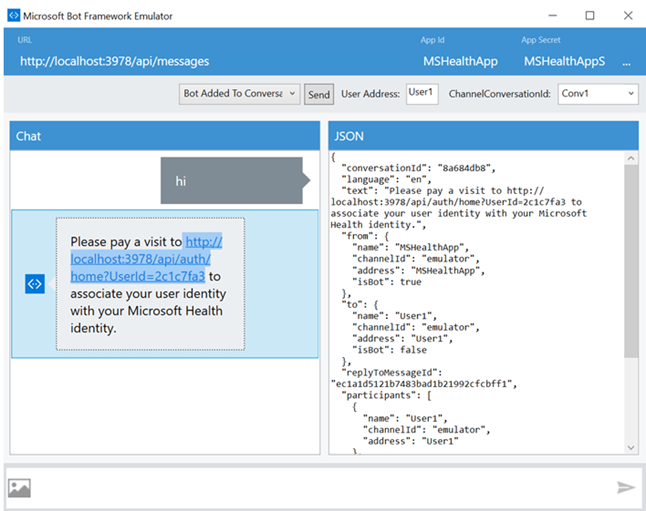
2) Whilst that is running, run up the emulator and ensure that it is pointing to the correct localhost url including port number and with the path /api/messages and the App ID and App Secret set correctly. Compare with:
3) Type ‘hi there’ into the emulator’s chat window and you should get the reply ‘you sent 8 characters’ and you will see some JSON metadata in the right-hand pane which is data from the client that you will have available from within your bot code. The reply you see comes directly from the code in your bot; compare with the default bot implementation.
 namespace MSHealthBot
 {
 [BotAuthentication]
 public class MessagesController : ApiController
 {
 /// <summary>
 /// POST: api/Messages
 /// Receive a message from a user and reply to it
 /// </summary>
 public async Task<Message> Post([FromBody]Message message)
 {
 if (message.Type == "Message")
 {
 // calculate something for us to return
 int length = (message.Text ?? string.Empty).Length;
 // return our reply to the user
 return message.CreateReplyMessage($"You sent {length} characters");
 }
 else
 {
 return HandleSystemMessage(message);
 }
 }
view rawbot-default-impl hosted with ❤ by GitHub
Now, let’s start to build up our own logic onto this baseline. The project will consume two external services; the Microsoft Health API and LUIS (Language Understanding Intelligent Service) so let’s consider each in turn:
MICROSOFT HEALTH API
This is an API over data from your Microsoft Band. The way that it works is that when you use your Microsoft Band to monitor your sleep or running it stores the data locally in it’s flash memory. When you are near your mobile phone the data is synchronised to the phone and from the phone synchronised up to the Microsoft cloud. From there you can access your data via this web dashboard or via the MS Health API. In order to access your data via the API you need to retrieve an OAuth 2 access token using a typical OAuth 2 authorisation code flow which typically requires browser-style redirects (see here for more details).
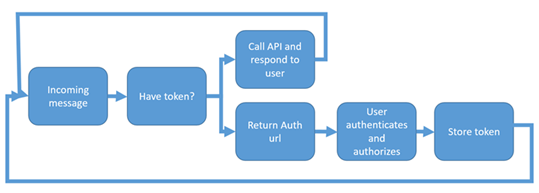
This poses a problem for a bot as it doesn’t have a browser window. None of the examples I had seen up to this point mentioned auth in terms of how would a bot user authenticate and authorise access to their data. Azure Active Directory auth allows web-browser-free auth using the OAuth2 client credentials flow to authorise an app but applications and APIs using Windows Live style application registration do not. Microsoft Health Cloud API uses “Microsoft account (formerly Live Id)” token-based OAuth (Open Authorization) 2.0 authentication and more specifically the OAuth 2.0 authorisation code flow which requires browser-style redirects which are not provided for by a typical Bot client. Since I specifically wanted to call the Health API this requires the user to give consent to access for the calling app – in order to support this we can implement the following flow:
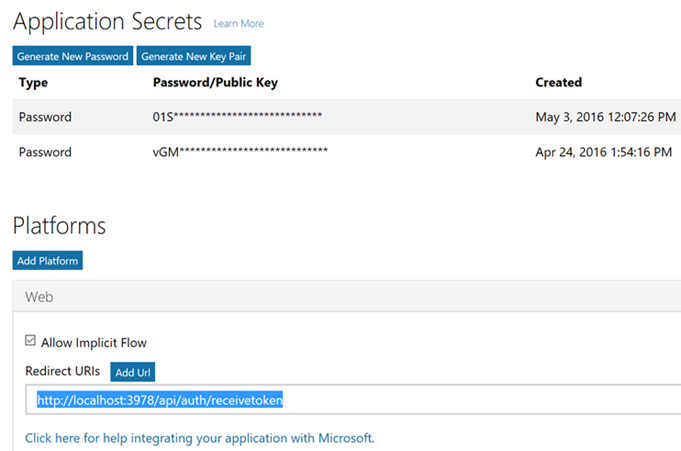
Your bot will need to be registered as an OAuth 2.0 client:
1) Navigate to the Microsoft account developer center https://account.live.com/developers/applications in a browser. Click on Add App.
2) Create an app and call it MSHealthBot
3) Make a note of the Application ID
4) Generate a new password and make a note of it
5) Click Add Platform and select Web
6) Enter a Rediirect Uri – use your bot’s base url and add /api/auth/receivetoken to it, e.g.https://localhost:3978/api/auth/receivetoken (we will implement this endpoint in the bot Web API).
7) Click Live SDK support
8) Save the settings
9) Copy the following code into your Global.asax.cs file:
 public interface iCredentialStore{
 string GetToken(string id);
 void AddToken(string id, string token);
 }
 public class CredentialStore : ICredentialStore
 {
 Dictionary<string, string> _idMap = new Dictionary<string,
 string>();
 public void AddToken(string id, string token)
 {
 _idMap[id] = token;
 }
 public string GetToken(string id)
 {
 string val = null;
 if (_idMap.TryGetValue(id, out val))
 {
 return val;
 }
 return null;
 }
 }
 public class MyDependencies
 {
 public static ICredentialStore _store = new CredentialStore();
 }
view rawbot-tokencache hosted with ❤ by GitHub
10) Right-click the Controllers folder in the Solution Explorer and choose Add > Class and name it AuthController. Replace the new files contents with the code below:
 using MSHealthBot;
 using Newtonsoft.Json;
 using System;
 using System.Net.Http;
 using System.Net.Http.Headers;
 using System.Text;
 using System.Threading.Tasks;
 using System.Web.Http;
 namespace MSHealthBot
 {
 public class AuthController : ApiController
 {
 ICredentialStore _creds;
 public AuthController()
 {
 ClientId =
 Environment.GetEnvironmentVariable("MSHEALTHBOT_HEALTHAPI_CLIENTID");
 ClientSecret =
 Environment.GetEnvironmentVariable("MSHEALTHBOT_HEALTHAPI_CLIENTSECRET");
 _creds = MyDependencies._store;
 }
 private static string RedirectUri =
 "https://localhost:3978/api/auth/receivetoken";
 private readonly string ClientId;
 private static string Scopes = "mshealth.ReadDevices
 mshealth.ReadActivityHistory mshealth.ReadActivityLocation mshealth.ReadDevices
 mshealth.ReadProfile offline_access";
 private readonly string ClientSecret;
 [Route("api/auth/home")]
 [HttpGet]
 public HttpResponseMessage Home(string UserId)
 {
 var resp = Request.CreateResponse(System.Net.HttpStatusCode.Found);
 resp.Headers.Location = CreateOAuthCodeRequestUri(UserId);
 return resp;
 }
 private Uri CreateOAuthCodeRequestUri(string UserId)
 {
 UriBuilder uri = new
 UriBuilder("https://login.live.com/oauth20_authorize.srf");
 var query = new StringBuilder();
 query.AppendFormat("redirect_uri={0}", Uri.EscapeUriString(RedirectUri));
 query.AppendFormat("&client_id={0}", Uri.EscapeUriString(ClientId));
 query.AppendFormat("&client_secret={0}",
 Uri.EscapeUriString(ClientSecret));
 query.AppendFormat("&scope={0}", Uri.EscapeUriString(Scopes));
 query.Append("&response_type=code");
 if (!string.IsNullOrEmpty(UserId))
 query.Append($"&state={UserId}");
 uri.Query = query.ToString();
 return uri.Uri;
 }
 private Uri CreateOAuthTokenRequestUri(string code, string refreshToken = "")
 {
 UriBuilder uri = new UriBuilder("https://login.live.com/oauth20_token.srf");
 var query = new StringBuilder();
 query.AppendFormat("redirect_uri={0}", Uri.EscapeUriString(RedirectUri));
 query.AppendFormat("&client_id={0}", Uri.EscapeUriString(ClientId));
 query.AppendFormat("&client_secret={0}",
 Uri.EscapeUriString(ClientSecret));
 string grant = "authorization_code";
 if (!string.IsNullOrEmpty(refreshToken))
 {
 grant = "refresh_token";
 query.AppendFormat("&refresh_token={0}",
 Uri.EscapeUriString(refreshToken));
 }
 else
 {
 query.AppendFormat("&code={0}", Uri.EscapeUriString(code));
 }
 query.Append(string.Format("&grant_type={0}", grant));
 uri.Query = query.ToString();
 return uri.Uri;
 }
 [Route("api/auth/receivetoken")]
 [HttpGet()]
 public async Task<string> ReceiveToken(string code = null, string state
 = null)
 {
 if (!string.IsNullOrEmpty(code) && !string.IsNullOrEmpty(state))
 {
 var tokenUri = CreateOAuthTokenRequestUri(code);
 string result = null;
 using (var http = new HttpClient())
 {
 var c = tokenUri.Query.Remove(0, 1);
 var content = new StringContent(c);
 content.Headers.ContentType = new
 MediaTypeHeaderValue("application/x-www-form-urlencoded");
 var resp = await http.PostAsync(new
 Uri("https://login.live.com/oauth20_token.srf"), content);
 result = await resp.Content.ReadAsStringAsync();
 }
 dynamic obj = JsonConvert.DeserializeObject(result);
 _creds.AddToken(state, obj.access_token.ToString());
 return "Done, thanks!";
 }
 return "Something went wrong - please try again!";
 }
 }
 }
view rawbot-authcontroller hosted with ❤ by GitHub
Find any red squiggles in the file, put your cursor on them and press CTRL + . to resolve any missing namespace.
Let’s take a moment to understand the code we just pasted in
- the code we put into global.asax.cs is simply a convenient way to store the auth token in memory on the server. In a production system we could use secure cloud storage.
- the AuthController code provides an endpoint to initiate an OAuth 2.0 authorization code flow and also a redirect uri to receive an auth code which can be exchanged for an access token
11) The code also relies on two other environment variables being set: MSHEALTHBOT_HEALTHAPI_CLIENTID & MSHEALTHBOT_HEALTHAPI_CLIENTSECRET which can be copied from your app registration. To set the variables from your dev machine you can use the setx command from the command prompt with the value as the last parameter:
Using this technique set the MSHEALTHBOT_HEALTHAPI_CLIENTID variable to the App ID you noted down from the earlier step and set the MSHEALTHBOT_HEALTHAPI_CLIENTSECRET to the App Secret we also noted earlier.
If the app is not authorised the bot will reply with a link
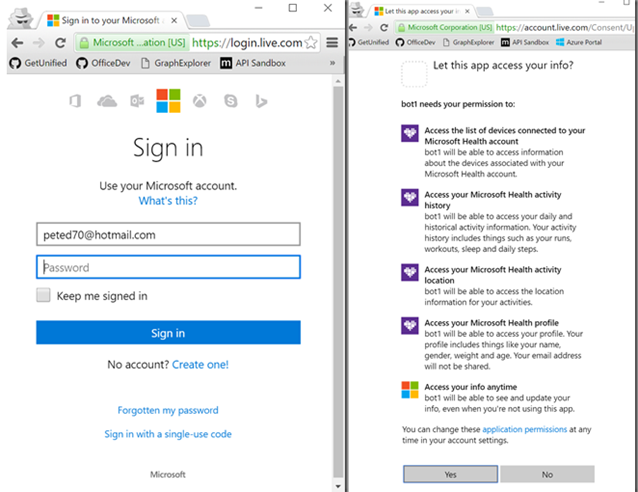
User clicks the link which will take them to authorisation server passing a unique ID from the Bot Framework
The user authenticates by logging in and then gives consent through the standard OAuth consent dialog
The unique user id is passed to the redirect uri which I have implemented as part of my Bot Web API along with the Health API access token
The bot Web API stores the access token and it’s related unique user id together
Subsequent calls to the Health API can use the access token to make calls (will stop working if the access token expires as I didn’t implement refresh tokens)
Subsequently, we have the access token which we can send in the auth header for requests to the Health API.
HEALTH API HELPERS
We need some code to call the Health API so let’s bring that in next:
1) Right-click on your project and select Add > New Folder and name the folder Models
2) Copy the code from here MS Health Model Code and paste it into a new file named Model.cs inside the Modelsfolder
3) Next, add the two helper methods below which wrap the calls to the Health APIs:to your MessagesControllerclass
 private async Task<string> MakeRequestAsync(string token, string path,
 string query = "")
 {
 var http = new HttpClient();
 http.DefaultRequestHeaders.Authorization = new
 AuthenticationHeaderValue("Bearer", token);
 var ub = new UriBuilder("https://api.microsofthealth.net");
 ub.Path = ApiVersion + "/" + path;
 ub.Query = query;
 string resStr = string.Empty;
 var resp = await http.GetAsync(ub.Uri);
 if (resp.StatusCode == HttpStatusCode.Unauthorized)
 {
 // If we are unauthorized here assume that our token may have expired and use
 the
 // refresh token to get a new one and then try the request again..
 // TODO: handle this - we can cache the refresh token in the same flow as the
 access token
 // just haven't done it.
 return "";
 // Re-issue the same request (will use new auth token now)
 //return await MakeRequestAsync(path, query);
 }
 if (resp.IsSuccessStatusCode)
 {
 resStr = await resp.Content.ReadAsStringAsync();
 }
 return resStr;
 }
view rawbot-makerequest hosted with ❤ by GitHub
Find the AuthenticationHeaderValue reference, put your cusrsor over it and press CTRL and . and then resolve the namespace
 private async Task<string> GetActivity(string token, string activity,
 DateTime Start, DateTime end)
 {
 string res = string.Empty;
 try
 {
 res = await MakeRequestAsync(token, "me/Activities/",
 string.Format("startTime={0}&endTime={1}&activityTypes={2}&ActivityIncludes=Details",
 Start.ToUniversalTime().ToString("yyyy'-'MM'-'dd'T'HH':'mm':'ss'.'fff'Z'"),
 end.ToUniversalTime().ToString("yyyy'-'MM'-'dd'T'HH':'mm':'ss'.'fff'Z'"),
 activity));
 }
 catch (Exception ex)
 {
 return $"API Request Error - {ex.Message}";
 }
 await Task.Run(() =>
 {
 // Format the JSON string
 var obj = JsonConvert.DeserializeObject(res);
 res = JsonConvert.SerializeObject(obj, Formatting.Indented);
 });
 return res;
 }
view rawbot-getactivity hosted with ❤ by GitHub
4) Finally add the following private member variable to your MessagesController class
private const string ApiVersion = "v1";
view rawbot-apiversion hosted with ❤ by GitHub
LUIS
To be effective a bot needs to allow the user to communicate using language which is natural and as we know language can sometimes be imprecise, ambiguous and nuanced. Trying to create a fixed grammar that could deal with these aspects would soon become very complex and hard to maintain. Instead we can leverage machine learning techniques and LUIS provides us with a way to do this which is very easy to set up and use.
1) Download the JSON file here https://github.com/peted70/ms-health-bot/blob/2bbdbd7ed311db0362f1f6d9c95ee489dee8544a/assets/MSHealthBot.json
2) Navigate to https://www.luis.ai
3) Choose New App with the option Import Existing Application
4) Upload the JSON file here
Note that this will import a LUIS model that I have already trained – for details about how this was done please see my previous post.
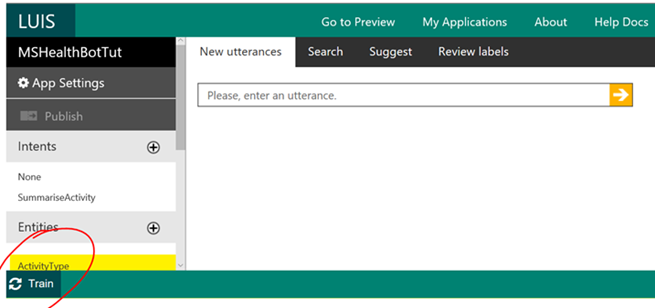
5) Once imported you will need to train the model so select your app and at the lower left of it’s property page click the train button
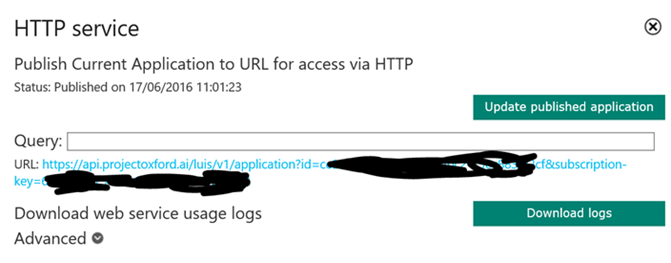
6) Once trained the publish button on the left will become enabled. Click publish followed by publish web service
7) Once published you will get back a url at which your LUIS service can be accessed. The url will include an id and a subscription key – these are used to monitor usage – if your key becomes compromised you can generate a new one here.
8) That’s it – you now have a web service which will enable you to carry out natural language processing and will recognise entities associated with the Health APIs such as sleep, run, walk, etc. and also to recognise points in time and time ranges such as last week, or a year ago, etc.
CALLING THE LUIS WEB SERVICE
1) Open your MessageController.cs class and place the following method somewhere inside the MessageController class:
 private async Task<MSHealthUserText> ParseUserInput(string input)
 {
 string escaped = Uri.EscapeDataString(input);
 using (var http = new HttpClient())
 {
 string key = Environment.GetEnvironmentVariable("MSHEALTHBOT_LUIS_API_KEY");
 string id = Environment.GetEnvironmentVariable("MSHEALTHBOT_LUIS_APP_ID");
 string uri =
 $"https://api.projectoxford.ai/luis/v1/application?id={id}&subscription-key={key}&q={escaped}";
 var resp = await http.GetAsync(uri);
 resp.EnsureSuccessStatusCode();
 var strRes = await resp.Content.ReadAsStringAsync();
 var data = JsonConvert.DeserializeObject<MSHealthUserText>(strRes);
 return data;
 }
 }
view rawbot-call-luis hosted with ❤ by GitHub
Note that the App ID and App Secret for the LUIS web service are again accessed as environment variables so you will need to set them using setx as done previously for the Health API ID and Secret (see above).
BOT IMPLEMENTATION
Now we have all of the moving parts to implement our health bot
1) Introduce the in-memory credential store into the MessageController class – remove the existing contructor and paste the following code into the class:
 ICredentialStore _creds;
 public MessagesController()
 {
 _creds = MyDependencies._store;
 }
view rawbot-constructor hosted with ❤ by GitHub
2) Replace the whole body of the Post method with:
 if (message.Type == "Message")
 {
 var userid = message?.From?.Id;
 // Lookup the user id to see if we have a token already..
 var token = _creds.GetToken(userid);
 string prompt = "";
 if (string.IsNullOrEmpty(token))
 {
 var loginUri = new
 Uri($"https://localhost:3978/api/auth/home?UserId={userid}");
 prompt = $"Please pay a visit to {loginUri.ToString()} to associate your user
 identity with your Microsoft Health identity.";
 }
 else
 {
 // TODO: implement bot logic here
 if (string.IsNullOrEmpty(prompt))
 prompt = "Please ask a question to the MS Health Bot";
 }
 // return our reply to the user
 return message.CreateReplyMessage(prompt);
 }
 else
 {
 return HandleSystemMessage(message);
 }
view rawbot-postshell hosted with ❤ by GitHub
This implements our auth logic described earlier and will return an auth url to the user if no token is stored for them
3) Next we will install the NodaTime Nuget package to help us to parse out some of the time formats used by the Health API responses. So right-click the References node in the Solution Explorer and choose Manage Nuget Packages. In the Nuget dialog that will open Click on the Browse tab and ensure that Include Pre-release is checked. Then search for NodaTime, click the list item and then choose the version 2.0.0-alpha20150728 and click install.
4) Find the TODO comment from the previous step and replace it with the following code.
 var data = await ParseUserInput(message.Text);
 if (data.intents.Length <= 0 || data.entities.Length <= 0)
 {
 return message.CreateReplyMessage("I don't have enough information to
 understand the question - please try again...");
 }
 var topIntent = data.intents[0].intent;
 switch (topIntent)
 {
 case "SummariseActivity":
 var entityStr = data.entities.FirstOrDefault(e => e.type ==
 "ActivityType").entity;
 // This could be either date, time or duration..
 var entityTime = data.entities.FirstOrDefault(e =>
 e.type == "builtin.datetime.time" ||
 e.type == "builtin.datetime.duration" ||
 e.type == "builtin.datetime.date");
 ParseResult<Period> res = null;
 var entity = data.entities[0].entity;
 if (entityTime.type == "builtin.datetime.duration")
 {
 res =
 PeriodPattern.NormalizingIsoPattern.Parse(entityTime.resolution.duration);
 // Now call the relevant Microsoft Health API and respond to the user...
 var st = SystemClock.Instance.GetCurrentInstant().InUtc().LocalDateTime -
 res.Value;
 DateTime start = st.ToDateTimeUnspecified();
 DateTime end = DateTime.Now;
 var res2 = await GetActivity(token, entityStr, start, end);
 var sleep = JsonConvert.DeserializeObject<Sleep>(res2);
 // create a textual summary of sleep in that period...
 int num = sleep.itemCount;
 if (num <= 0)
 {
 prompt = "You didn't track any sleep";
 break;
 }
 var total = sleep.sleepActivities.Sum((a) =>
 {
 if (a.sleepDuration != null)
 {
 var dur = PeriodPattern.NormalizingIsoPattern.Parse(a.sleepDuration);
 return dur.Value.ToDuration().Ticks;
 }
 else
 return 0;
 });
 var av = total / num;
 var sleepSpan = TimeSpan.FromTicks((long)av);
 var totalSpan = TimeSpan.FromTicks(total);
 var avSleepStr = $"{sleepSpan.ToString(@"%h")} hrs
 {sleepSpan.ToString(@"%m")} mins";
 var totalSleepStr = $"{totalSpan.ToString(@"%d")} days
 {totalSpan.ToString(@"%h")} hrs {totalSpan.ToString(@"%m")} mins";
 prompt = $"You have tracked {num} sleeps - average sleep per night
 {avSleepStr} for a total of {totalSleepStr}";
 }
 break;
 }
view rawbot-impl hosted with ❤ by GitHub
The last piece of code implements one possible scenario using the sleep activity however it is not difficult to see how this could be extended to work for all of the activities supported by the Health API – that is left as an exercise for the reader!
The full source is at https://github.com/peted70/ms-health-bot
SUMMARY
This tutorial has illustrated how to put together a real-world, useful bot not just be providing a text input interface to an API but allowing the user to use their natural voice input to query the aggregated data. Hopefully, this will leave you with some ideas about how to implement a bot for your own scenario.
If you need finer grain control of the sensors then the way to do this is through the Band SDK. This enables you to create an app (iOS, Android, Windows, Xamarin) that subscribes to the sensors you require and stream the data till you’re heart’s content (or usually the battery runs out – see above J). Reading frequencies for all of the sensors are detailed in section 1.2 of the Band SDK Documentation.
There are limitation to the amount of data collected see durations above, however you can create your own app reading whatever sensors you wish at the cadence you wish, and then use IoT Hub say, to push the data to Azure for Steam Analytics, ML, etc. Sensor frequency cannot be changed from specifications stated in the Band SDK documentation as these reflect the capability of the physical sensors.

