Porting your Unity 5.2 game to Windows 10
Unity recently announced support for Windows 10, starting with Unity 5.2. To help developers export their games and publish to the new Universal Windows Platform for Windows 10, I put together a quick tutorial.
Steps discussed in this blog:
1.Enable developer mode in Windows 10
2.Enter game details in Unity
3.Export to Windows 10 Universal format
4.Build Solution in VS2015 w/ Win10 SDK
5.Associate your app with Store App
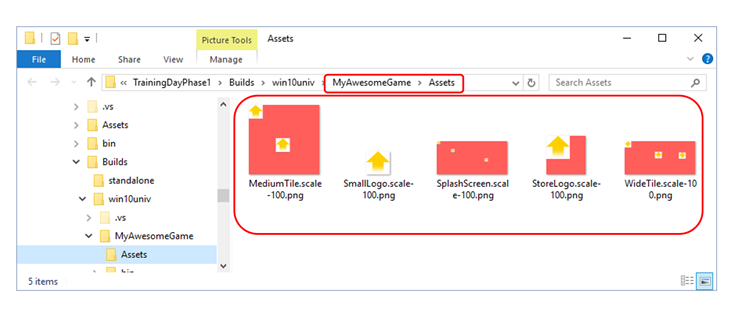
6.Add required images, e.g. logo, icon, splash
7.Run WACK (Windows App Certification Kit)
8.Publish to Windows Store!
Lets get started
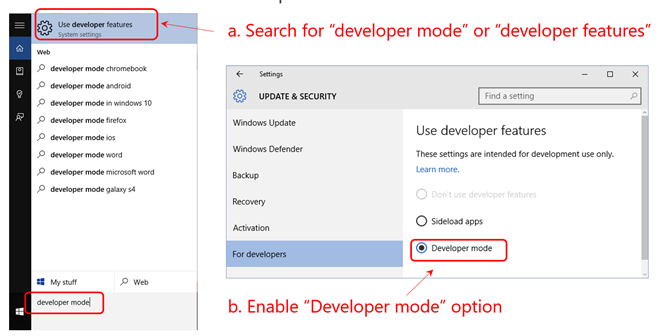
1. Enable developer mode in Windows 10
There is a different approach for development for Windows 10 devices. A developer license is no longer required for each device that you want to use to develop, install or test your app. You just enable a device once for these tasks from the settings for the device. That's it. No more renewing your developer licenses every 30 or 90 days!
If you are still using a Windows 8.1 device to develop or test your apps with Visual Studio 2013 or Visual Studio 2015, you still need to get a developer license or register your Windows Phone.
Enable your Windows 10 devices
For Windows 10, you choose what tasks you want to enable on the device. This includes any devices: Windows 10 desktops, tablets and phones. You can enable a device for development, or just sideloading.
Sideloading is installing and then running or testing an app that has not been certified by the Windows store. For example, an app that is internal to your company only. (Does the Windows store allow sideloading?)
Note If you sideload apps, you should still only install apps from trusted sources. When you install a sideloaded app that has not been certified by the Windows store, you are agreeing that you have obtained all rights necessary to sideload these apps and that you are solely responsible for any harm that results from installing and running these apps. See this privacy statement
More details at https://msdn.microsoft.com/library/windows/apps/xaml/dn706236.aspx?f=255&MSPPError=-2147217396
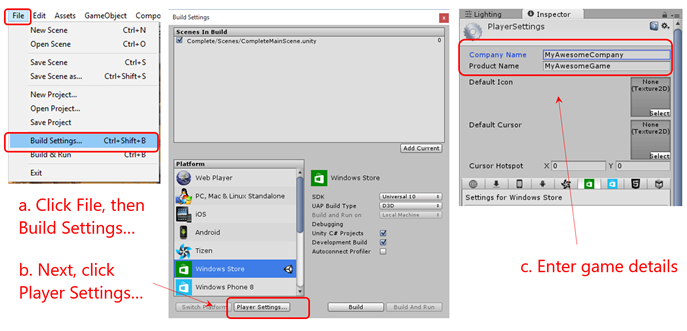
2. Enter game details in Unity
I'm making the assumption that you are familiar with already building a game in Unity3d this section focuses ensuring you have the right build settings configured for Windows 10
In order to build Unity games for Universal Windows 10 applications (UWP) you will need:
- Unity 5.2 or later
- A Windows 10 machine
- Visual Studio 2015 RTM, (the minimum version is 14.0.23107.0). Please note that earlier versions, for example Visual Studio RC, are not supported in Unity 5.2.
- You’ll also need to install the Windows 10 SDK.
For details of how to use Unity3d see https://unity3d.com/learn/tutorials
3. Export to Windows 10 Universal format
What is Windows 10 Universal Apps?
The Windows 10 Universal Apps platform was introduced in Windows 10:
- With one app developers can now target a family of devices running Windows 10: phones, tablets, PCs and other upcoming devices.
- There’s just one app store for all Windows 10 devices
- There’s a common API across the entire family of Windows 10 devices
More information is available here.
How can I use Unity 5.2 to make Windows 10 Universal Apps ?
Unity3d have added support for Windows 10 Universal Apps in Unity 5.2.
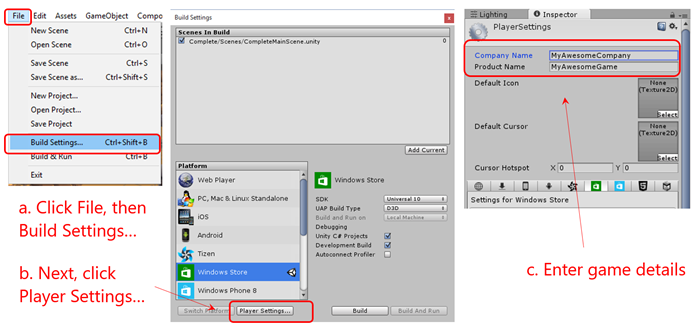
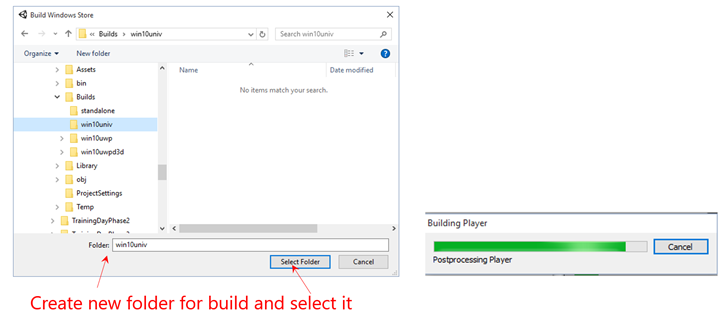
Currently, you can export to Windows 10 Universal Apps by selecting the Universal 10 SDK from the Windows Store platform in the Build Settings Window as illustrated below:
Unity 5.2 will export Visual Studio 2015 solution files which can then build and run on Windows 10 PCs plus Windows 10 phones and tablets. Three architectures are supported: ARM, x86 and x64. In addition, you can use .NET Core 5.0 in your game projects.
For more details see https://unity3d.com/pages/windows
4. Build Solution in VS2015 w/ Win10 SDK
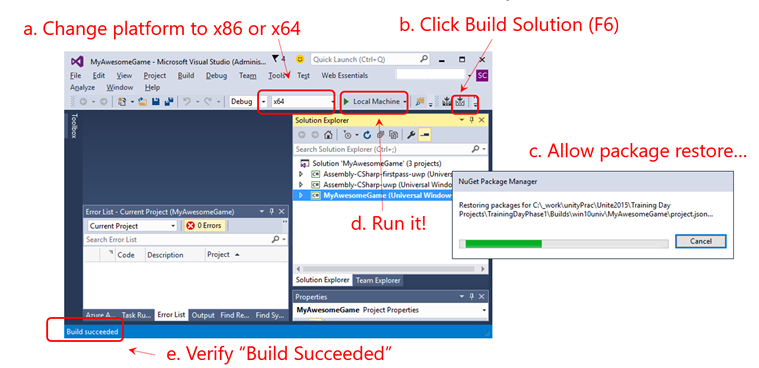
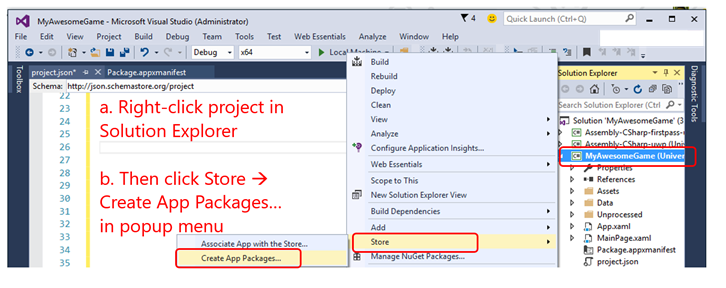
To sell your Universal Windows app or distribute it to other users, you need to create an appxupload package for it. When you create the appxupload, another appx package will be generated to use for testing and sideloading. You can distribute your app directly by sideloading the appx package to a device. (What is sideloading?).
For Windows 10, you generate one package (.appxupload) that can be uploaded to the Windows Store. Your app is then available to be installed and run on any Windows 10 device.
(If you need to create an app package for a Windows 8.1 app, go here.)
Here are the steps:
Before packaging your app: Follow these steps to make sure your application is ready to be packaged for store submission.
Configure an app package: Use the manifest designer to configure the package. For example, add tile images and choose the orientations that your app supports.
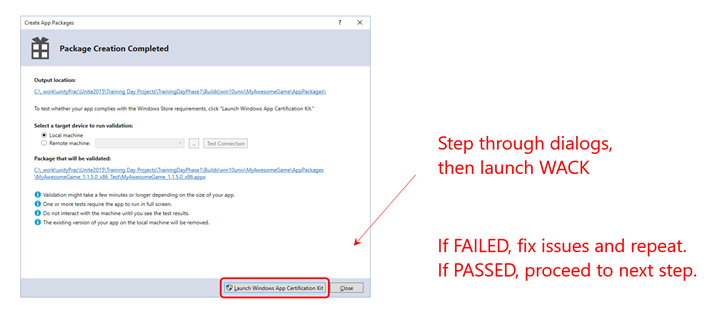
Create an app package: Use the wizard in Visual Studio and then certify your package with the Windows App Certification Kit.
Sideload your app package: After sideloading your app to a device, you can test it works correctly.
Once you’ve done this, you are ready to sell your app in the Store. If you have a line-of-business (LOB) app, that you don’t plan to sell because it is for internal users only, you can sideload this app to install it on any Windows 10 device.
for more detail see https://msdn.microsoft.com/en-us/library/hh454036.aspx
5. Associate your app with Store App
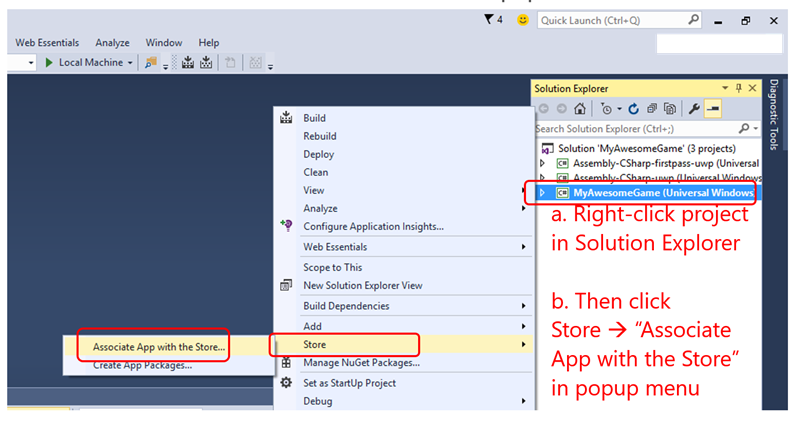
A: From the Project menu, choose Store -> Associate App with the Store. If you do this, you can test purchase and notification scenarios in your app. When you associate your app with the Store, these values are downloaded to the app manifest file for the current project on your local machine:
Package Display Name
Package Name
Publisher ID
Publisher Display Name
Version
If you override the default package.appxmanifest file by creating a custom .xml file for the manifest, you can’t associate your app with the Store. If you try to associate a custom manifest file with the Store, you will see an error message.
for more details see https://msdn.microsoft.com/en-us/library/hh454036.aspx
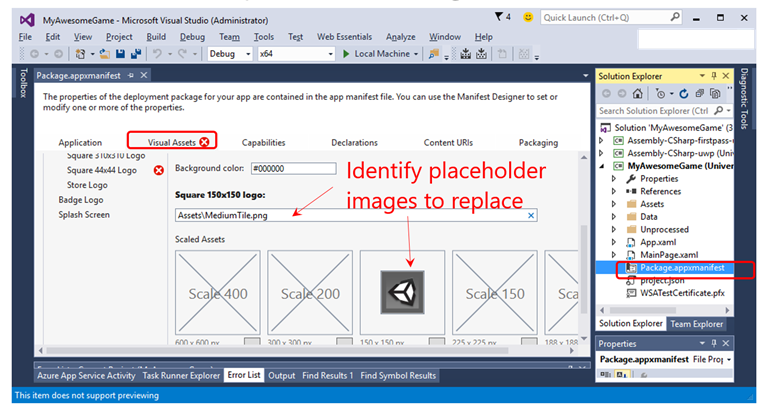
6. Add required images, e.g. logo, icon, splash
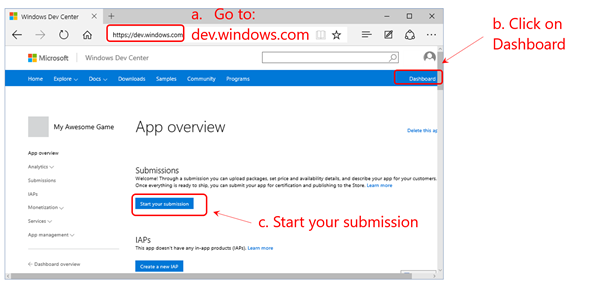
Once you've created your app by reserving a name, you can start working on getting it published. The first step is to create a submission.
You can start your submission when your app is complete and ready to publish, or you can start entering info even before you have written a single line of code. The submission will be saved in your dashboard, so you can work on it whenever you're ready.
After your app is published, you can publish an updated version by creating another submission in your dashboard. Creating a new submission lets you make and publish whatever changes are needed, whether you're uploading new packages or just changing details such as price or category. To create a new submission for an app, click Update next to the most recent submission shown on the App overview page.
App submission checklist
Items that you are required to provide or specify are noted below. Some areas are optional, or have default values provided that you can change as desired.
see https://msdn.microsoft.com/library/windows/apps/hh694062.aspx
7. Run WACK (Windows App Certification Kit)
To give your app the best chance of being published on the Windows Store, or becoming Windows Certified, validate and test it locally before you submit it for certification. This topic shows you how to install and run the Windows App Certification Kit. For more details on specific tests carried out by this kit refer to the following topics:
- Windows App Certification Kit tests for Windows Store apps
- Windows App Certification Kit tests for Windows Phone 8.1 apps
Prerequisites
If you are developing a Universal Windows app:
You must install and run Windows 7, Windows 8, Windows 8.1, or Windows 10. (Windows 10 recommended)
You must install Windows App Certification Kit version 10, which is included in the Windows Software Development Kit (SDK) for Windows 10.
For more details see https://msdn.microsoft.com/en-GB/Library/windows/apps/hh694081.aspx
8. Publish to Windows Store!
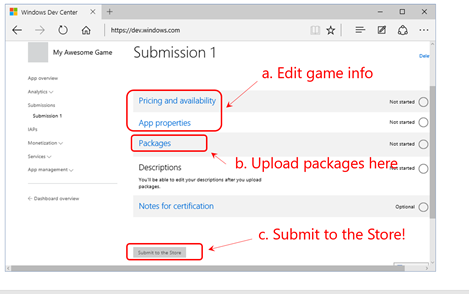
The Packages page is where you upload all of the package files (.xap, .appx, .appxupload, and/or .appxbundle) for the app that you're submitting. You can upload packages for any operating system that your app targets in this step. When a customer downloads your app, the Store will look through all of your app's available packages and will automatically provide each customer with the package that works best for their device.
For details about what a package includes and how it must be structured, see App package requirements. You'll also want to learn about how version numbers may impact which packages are delivered to specific customers, and how packages are distributed to different operating systems.
Uploading packages to your submission
To upload packages, drag them into the upload field or click to browse your files. The Packages page will let you upload .xap, .appx, .appxupload, and/or .appxbundle files.
Note For Windows 10, you should always upload the .appxupload file here, not the .appx or .appxbundle. For more info about packaging UWP apps for the Store, see Packaging Universal Windows apps for Windows 10.
If we detect issues with your packages while validating them, you'll need to remove the package, fix the issue, and then try uploading it again. For more info, see Resolve package upload errors.
You may also see warnings to let you know about issues that may cause problems but won't block you from continuing with your submission.
For more details see https://msdn.microsoft.com/library/windows/apps/mt148542.aspx
Happy Game Making! Love to hear about your games..

