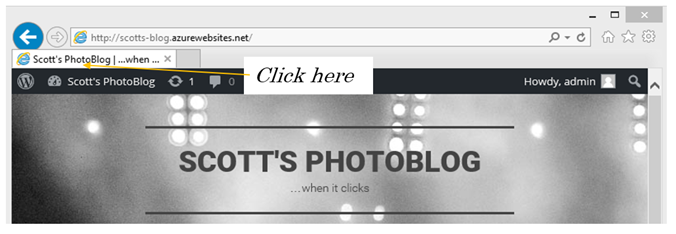
Using the Student FREE Azure Account to Setup a WordPress Blog
This blog is a result of a question on the computing at schools discussion forum, around schools setting up WordPress sites.
The intention of this blog is to guide you through the steps which show school teachers and students how to setup a free blog using Microsoft Azure.
Step 1. Setup Your Free Microsoft Azure Account
Step 2. Create a WordPress Blog
Step 3. Setup your WordPress Blog
Step 4. Give Your WordPress Blog a New Look
Step 5. Create Your First Blog
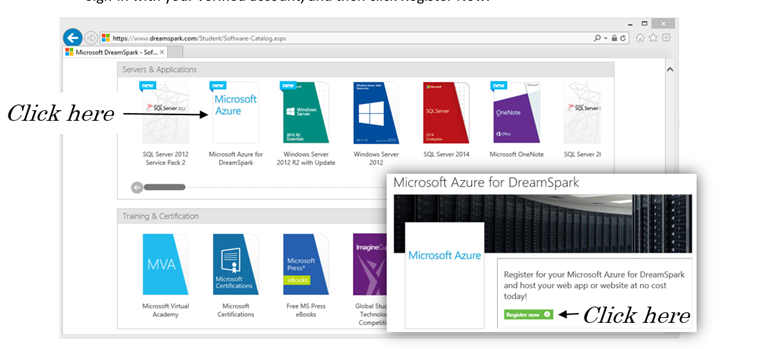
1. Go to www.dreamspark.com/Student/Software-Catalog.aspx or https://www.dreamspark.com/Product/Product.aspx?productid=99 and select Microsoft Azure for DreamSpark, Sign-in with your verified account, and then click Register Now.
Verifying you DreamSpark Account
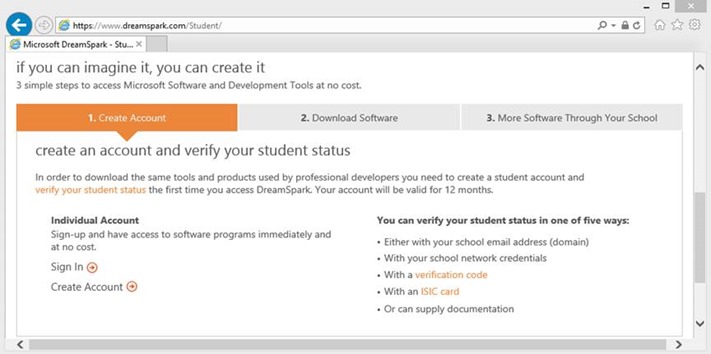
1. Go to www.DreamSpark.com/Student and select Create Account
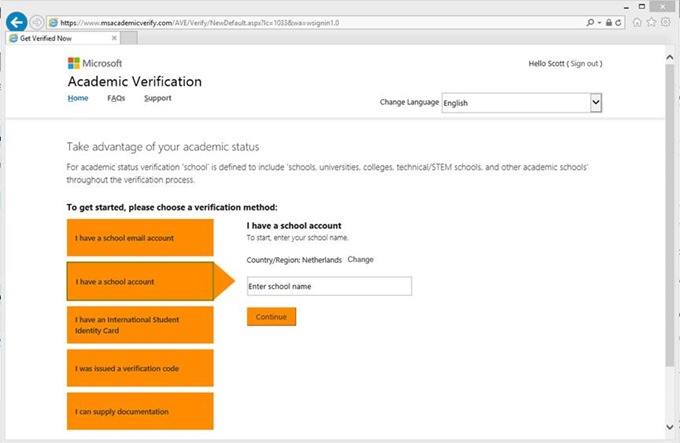
2. Sign-in with or create your Microsoft Account (eg: Hotmail, Outlook, or your Shibboleth academic login). On the Academic Verification page, select the best verification option for yourself, fill in the necessary data, and click Verify and then Continue. See here for more details instructions on account setup.
Step 1. Setup Your Free Microsoft Azure Account
1. With your verified account you can now start downloading Microsoft Azure
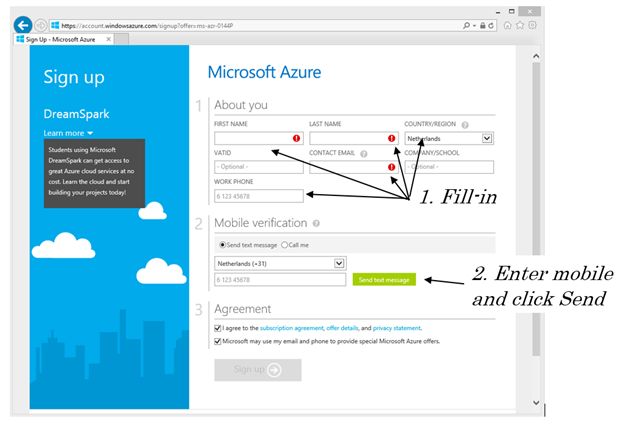
2. Complete setting up your Azure account by providing the required information in the account setup page
3 After a few minutes, your Azure account will be created. Click Start managing my service and get started creating web sites in the cloud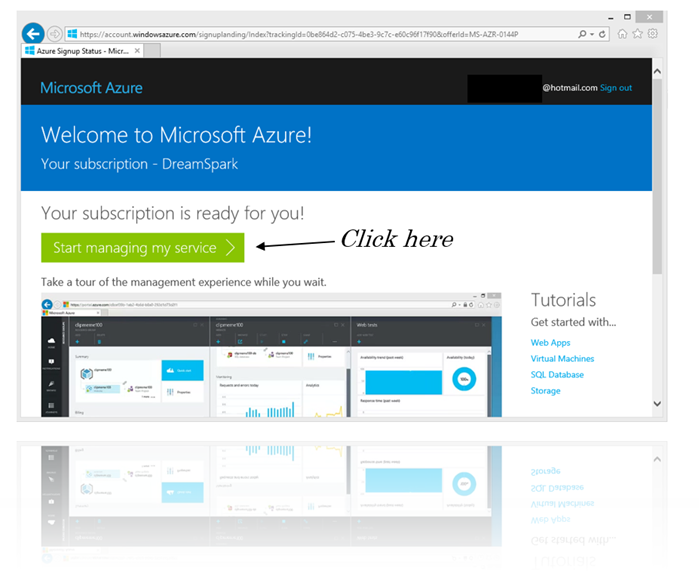
4. Take the tour and get to know Azure more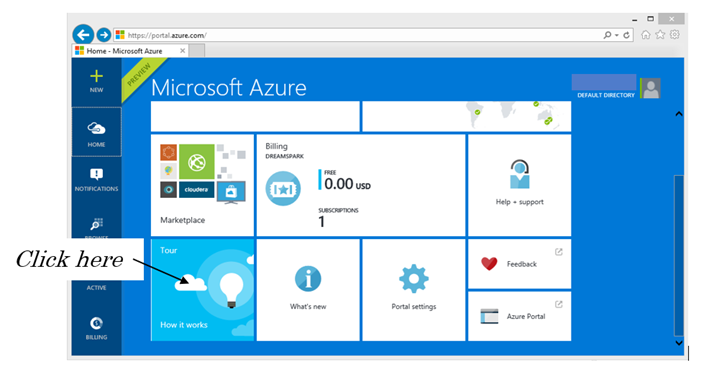
5. Get the most out of your membership and checkout these free course to help you learn more.
· Azure Fundamentals: https://www.microsoftvirtualacademy.com/training-courses/microsoft-azure-fundamentals
· Azure Fundamentals - Websites: https://www.microsoftvirtualacademy.com/training-courses/microsoft-azure-fundamentals-websites
Step 2. Create a WordPress Blog
1. Go to https://portal.azure.com and login with your verified DreamSpark account
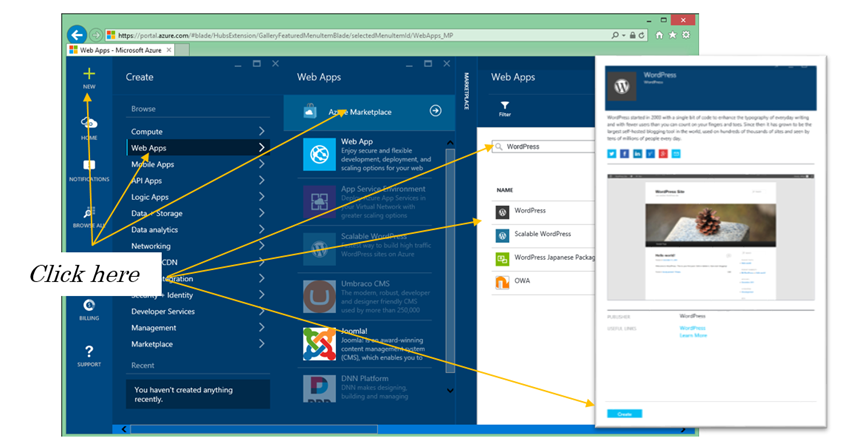
2. Click New, Web Apps, and Azure Marketplace. Search for WordPress and click WordPress and finally Create
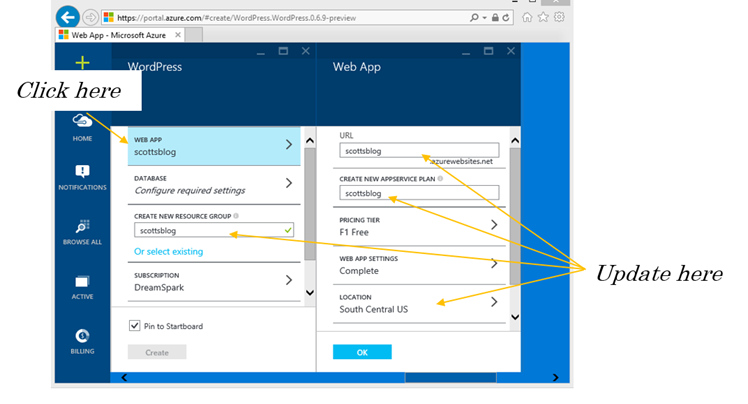
3. Click Web App, enter a unique URL for your blog. Then enter a unique name in the AppService Plan and the Resource Group. Change the location to where you are and leave all other settings to their default values
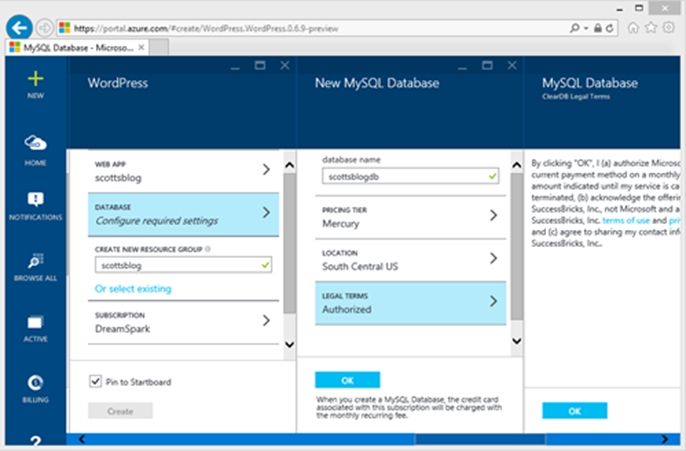
4. Click Database, then Legal Terms, then click OK to all open blades, and now click Create
5. You’ll see the following notifications and after a few minutes your new blog will be ready to go
Step 3. Setup your WordPress Blog
1. Go to https://portal.azure.com and login with your verified DreamSpark account
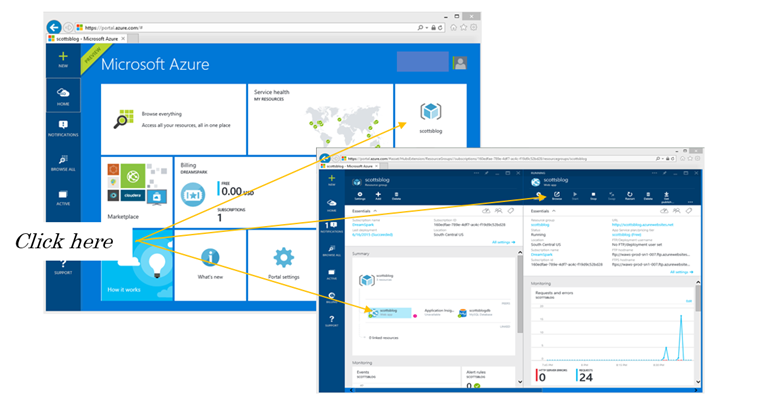
2. Click your blog, then click the app, and the click Browse
3. Finish configuring your blog by selecting the default language, completing the form and Install WordPress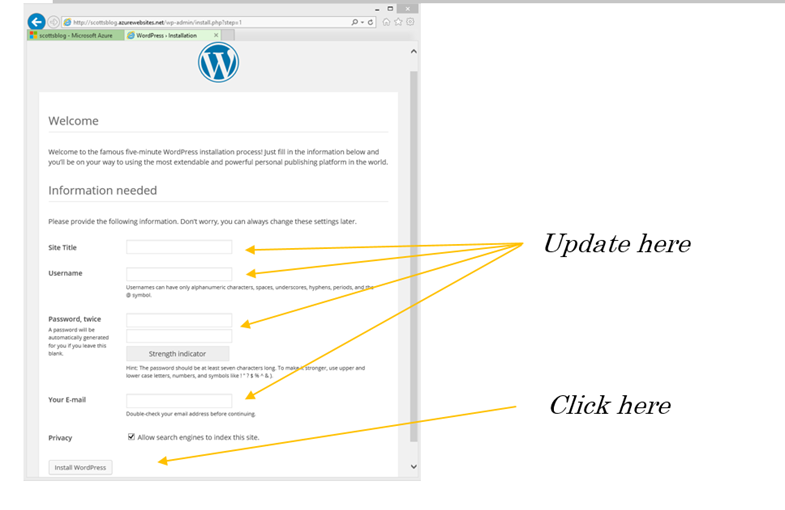
4. Your blog is now fully configured and ready for you to start making it your own. In the following learning cards, we’ll go through customizing your site. We’ll setup up a theme, add pages and content, and publishing live on the web.
Step 4. Give Your WordPress Blog a New Look
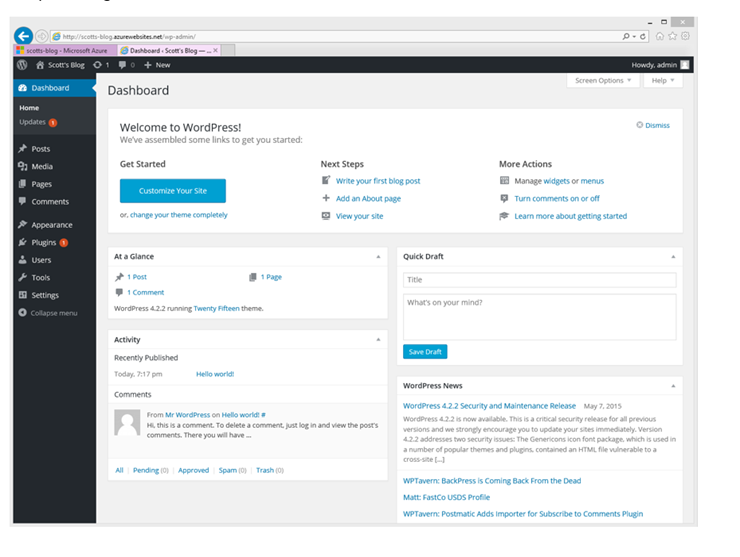
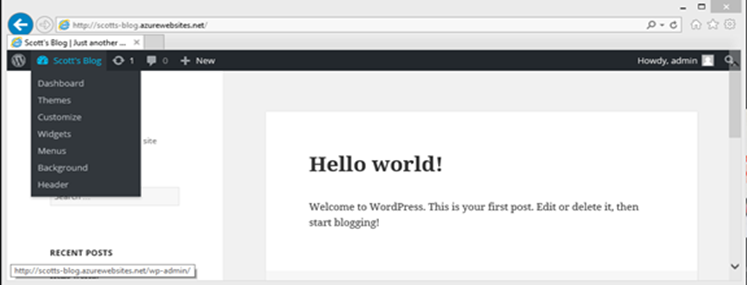
1. Go to https://yourblogname.azurewebsites.net and login. If you’re not taken to the WordPress dashboard after logging in, locate the button in the upper left hand area of the page, hover over it and click Dashboard. You can also go to it directly: https://yourblogname.azurewebsites.net/wp-admin
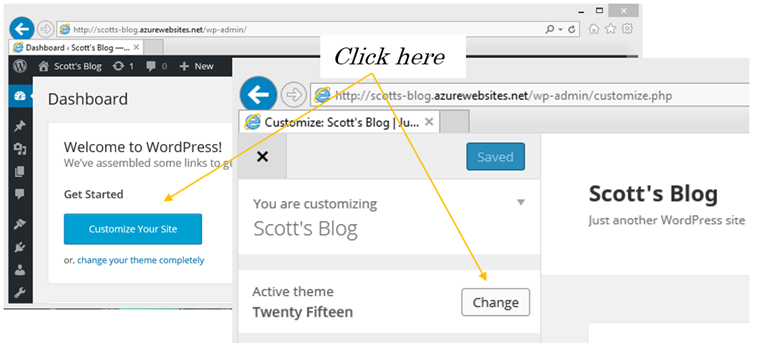
2. Click Customize Your Site and then click Change on the Active theme
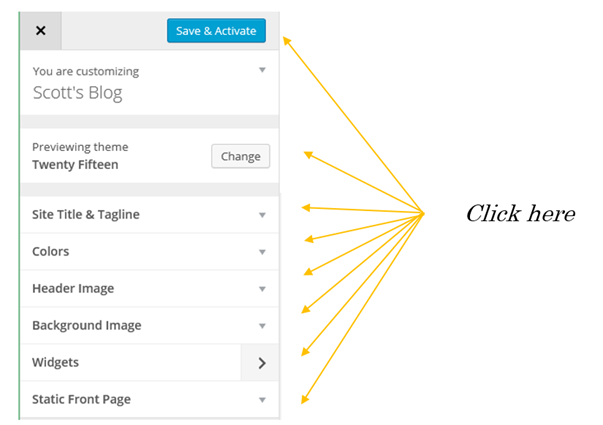
3. Once you’ve selected a theme you like, go through each of the remaining settings and adjust the options to best fit the content you’ll be sharing. Once you have everything set the way you like it, click Save & Activate
4. If you didn’t find a theme you like, you can install more to your site. Return to your dashboard, click Appearance and Add New Theme. Find something you like, and click Install and it will be added to your site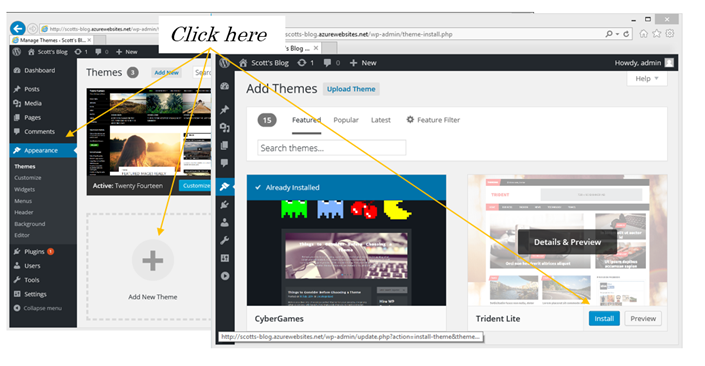
Step 5. Create Your First Blog
1. Go to https://yourblogname.azurewebsites.net and login. If you’re not taken to the WordPress dashboard after logging in, locate the button in the upper left hand area of the page, hover over it and click Dashboard. You can also go to it directly: https://yourblogname.azurewebsites.net/wp-admin
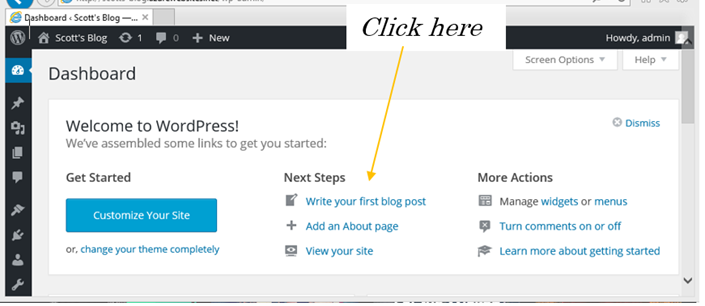
2. Click Write your first blog post to open the editor
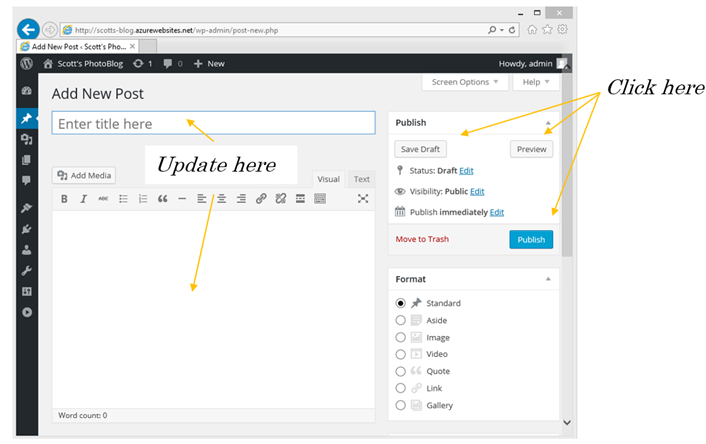
3. Complete the post by filling in the blanks. And you can either save the draft, preview the post, or publish it so others can see it. For more information, go to https://codex.wordpress.org/Posts\_Add\_New\_Screen
4. Once you publish your post, it’s live on the web and anyone can view it by going to https://yourblogname.azurewebsites.net

