Teaching Minecraft why not host your own server on Microsoft Azure for £1.50 per month
Discover how to create a Minecraft Virtual Machine on Ubuntu on Microsoft Azure in minutes using a pre-prepared Virtual Machine Image from VM Depot.
This image contains fully configured Minecraft server, with Spigot, a project which seeks to improve performance of the Minecraft server and mark2, a convenience wrapper for the Minexraft server tools.
To play on a shared server world, using this virtual machine image, you need a full (paid) version of the Minecraft client. If you would like to try out Minecraft first, give the single player free client a go.
There are many ways to deploy a Virtual Machine from VM Depot to Microsoft Azure.
So what is VMDepot
VMDepot is community managed repository of Linux and FreeBSD virtual machine images for easy deployment to Microsoft Azure.
VMDepot is a great resources for discovering and running open source software on Microsoft Azure.
VMDepot makes it easy. Publishers can share Virtual Machine Images for free. Users discover and deploy to Microsoft Azure with a Free Trial.
Setting Up Minecraft on Azure
In this tutorial, we will focus on a feature called VM Depot Easy Deploy. This method is available within the VM Depot web application and is designed for those new to VM Depot and Microsoft Azure. If your knowledge of Azure is more sophisticated, you could also opt to run through this process using the Cross Platform Command Line tools or the Microsoft Azure Portal.
Learn more about Minecraft
Skip ahead to the next section if you want to proceed with deploying a Minecraft virtual machine on Azure, but if you are not sure if Minecraft is the right option for you then you might find the resources below helpful:
- Minecraft Wiki
- New Player Tutorial
- Server Management Documentation
- Minecraft home page
- VM Depot page for Minecraft.
Overview of Creating a Virtual Machine Using VM Depot Easy Deploy
The steps below outline what you need to do to get your VM up and running. Each step is explained in more detail below.
Get a free trial of Microsoft Azure Subscription
Click the "Easy Deploy" Icon in VM Depot (or click the icon to the right)
- If necessary, set-up VM Easy Deploy
Configure your VM
Wait for an email, usually 5-15 Minutes
Login and start using your VM
The Details
Obtaining an Azure Subscription
If you do not already have an active Microsoft Azure subscription, you can sign up for a free trial in order to follow along with this tutorial. If you have an MSDN subscription then you are probably aware that you have Azure credits included.
All Student now get a Azure via DreamSpark.com however at present Azure for Student DOES NOT include Virtual Machines
The Student offer has the following Services
- Azure App Service Web Apps is a part of a fully managed cloud offering that enables you to build and deploy web apps in seconds. Use ASP.NET, Java, PHP, Node.js or Python. Run popular web apps and CMS solutions. Set up continuous integration and deployment workflows with VSO, GitHub, TeamCity, Hudson or BitBucket – enabling you to automatically build, test and deploy your web app on each successful code check-in or integration tests.
- MySQL Database from ClearDB adds the power of MySQL to your Web Apps. With clearDB MySQL you can deploy more kinds of web apps and CMS solutions such as Wordpress, Joomla, Acquia Drupal, phpBB, and more.
- Application Insights provides a 360° view across availability, performance and usage of your ASP.NET services and mobile applications for Windows Phone, iOS and Android platforms. Search and analyze your data to continuously improve your application, prioritize future investments and improve overall customer experience.
- Visual Studio Online is the fastest and easiest way yet to plan, build, and ship software across a variety of platforms. Get up and running in minutes on our cloud infrastructure without having to install or configure a single server.
To learn more about Azure, see What is Azure?
First time Set-Up
The first time you deploy an image using VM Depot Easy Deploy, you will need to provide your Azure subscription details. This information can be readily obtained from Azure once your subscription has been activated. Your browser will cache this information locally which means that while your first use of the Easy Deploy feature is simple, subsequent uses will be even easier. Note, however, that because the details are stored in your browser you will need to reconfigure them on each browser you use. If, for any reason, the authentication information contained within these settings are invalidated, the Easy Deploy web tool will prompt you to update them. You can also remove these settings from your browser cache, should you wish to do so (see Advanced Configurtion below).
The Deployment Process
For this exercise, we have elected to use Minecraft (distribution Ubuntu). You may find that many other Minecraft images are available on VM Depot. The availability of both newer and older versions may be useful for testing purposes. The deployment process for any Virtual Machine image is the same regardless of which one you select.
Once you have identified a VM Depot image that you would like to deploy, click "Create Virtual Machine".
Set-Up VM Depot Easy Deploy
If you have previously provided your publish settings file, you will bypass this step and be directed straight to the deployment configuration page.
As discussed above, the first time you use the Easy Deploy feature, you will need to provide your Azure Subscription profile settings. Simply drag and drop the appropriate file (download it from Azure) onto this page (or click to browse to the file). A link to download your publish settings file will also be conveniently provided on this page should you need to re-download it at any point in the future.
Configure Your Virtual Machine
On the deployment configuration page, you will be required to, at a minimum, provide a password for the default "azureuser" account and accept the terms of use. You can also see (and change) values for the DNS name and username. In addition, the default VM name (the name used in Azure to manage the image), VM Size and deployment region, are displayed. If you want to change these simply click them.
An important item to call to your attention: the username specified here is not the username for the Minecraft application; it is the default user on the VM. This means that you will use this username to login to the virtual machine itself. The image description on VM Depot should contain any required usernames and passwords.
You may also click on the “Advanced” link to access additional configuration options. More information about these options is detailed in the next section of this tutorial.
Virtual Machine Creation
After you have read and accepted the terms and conditions, you should click “Create Virtual Machine” to schedule the creation of your VM. Doing so will generate the following confirmation page, which also includes status information. Once you arrive at this page, you have completed all the deployment steps. An email will notify you when your VM is ready to be used (usually within 5-15 minutes).
For the curious, the confirmation page shows real-time status updates pertaining to your deployment. You may return to this page at any time by selecting "VM Deploy Status" within the "My Account" sidebar menu on the left side of the screen (which will only be available if you are currently logged in. This page will tell you the current status of your VM both during and after deployment. That is this page will later be used to review which VMs are currently running.
Changing Password
you need to SSH into your server
You can get SSH details from the Azure Portal look on the right hand side under quick glance
SSH (port 22)
username "mineadmin" and password "~1qaz2wsx" (it's better to change it ASAP)
Starting Minecraft Server
SSH into your server
Navigate to the Minecraft folder
cd minecraft
Start the Services by typing
mark2 start
You can now connect to your Azure Minecraft Server
So How much does it cost to run?
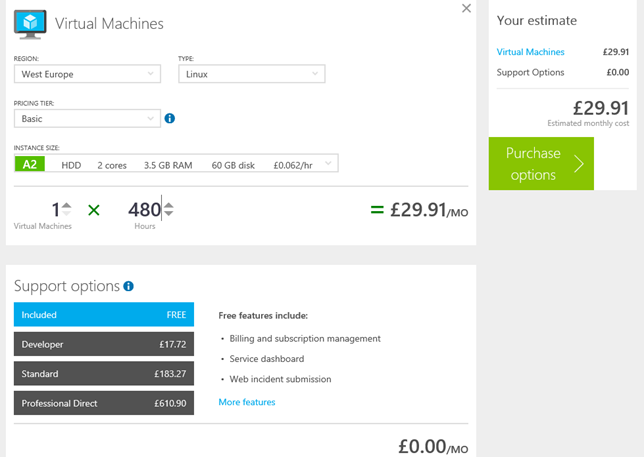
Using the Azure Pricing Calculator and the specification of the default setting here are your costs
The Azure pricing calculator is a great online tool which allows you to forecast expected costs per month based on the number of virtual Machines. The Cost above are for running a server 5 days per week 24 hours per day.
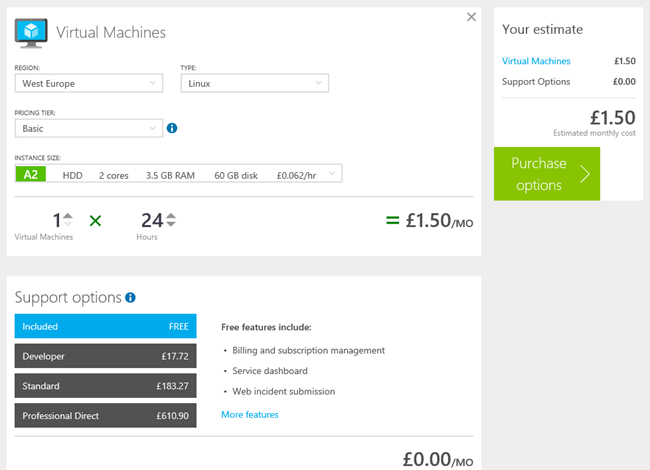
For a school lab where you have 6 hour of lesson per week so 24 hour per moth the costs would be £1.50
Advanced Configuration Options
As noted above, you may also take advantage of several advanced options. You can change the default settings before launching your image by clicking on the “Advanced” link on the configuration page. The screenshot below illustrates the available options:
Most users will only have one subscription associated with their account. If you have a Microsoft account with multiple Azure subscriptions enabled, each will be listed within the "Azure Subscription" dropdown at the bottom of this section. It is advisable that you first make changes to this, if you plan to do, as many of the other options depend on the selection here. If you wish to use a subscription not listed, then select the “Use another Azure Profile” link to remove the current settings from the cache and provide a new Azure Publish Settings file.
The “VM Name” field defines the name assigned to the VM in Azure. The portal and other management tools use this value to identify the VM to the user. The default names provided may not be very descriptive, but they are often sufficient for a small number of VMs. For those who wish to do so, you may configure a more memorable VM name here.
“VM Size” refers to the size of the Virtual Machine you wish to create, in terms of processor, memory, disk size and maximum IOPS. Descriptions of the codes used within this field are available in the Azure documentation on Virtual Machine Sizes for Azure.
The “Region” field specifies which data-center you wish to deploy to. The dropdown contains all valid regions for your deployment.
The default “Storage Account” is the first attached to your subscription. If you prefer to use a different account, simply select it from the options provided within the dropdown menu. Alternatively, you may create a new storage account using the text box provided.
Lastly, VM Depot Easy Deploy will automatically open any “Endpoints” defined by the publisher as being necessary. In the majority of cases, this setting will remain unchanged. If you have specific requirements, you have the option to add or remove endpoints, as needed.
Conclusion
Using the VM Depot Easy Deploy feature will enable you to deploy a community provided Virtual Machine image, such as Minecraft, in minutes.
Once your virtual machine has started, you can download the Minecraft client, connect to your new world server and build to your hearts content.
Further Reading
For more information on Minecraft see the following resources:


