Using your DreamSpark Azure accounts with GitHub to build a Node.js application which uses Azure Mobile Services
The Azure offers available to student via DreamSpark allows you gets you started developing services in the cloud at no cost:
The services offering which this blog is focusing on
- Azure App Service Web Apps is a part of a fully managed cloud offering that enables you to build and deploy web apps in seconds. you can use technologies such as ASP.NET, Java, PHP, Node.js or Python.
This blog is going to focus on Node.Js and deployment workflows with GitHub, enabling you to automatically build and deploy your application.
Source Control and GitHub
Many institutions request Students to use some form of source control source control DreamSpark offers this for FREE in the form of Visual Studio Online or the GitHub Student Developer Pack.
For this blog I am going to focus on GitHub, I have talked about Visual Studio Online in a number of other blogs see here
GitHub
student developer pack assembles a great set of tools and services, free to students! Get your own domain name with SSL, explore crowdsourcing, email services, and much more. Combined with the free Visual Studio Community 2015 and Visual Studio Online, it’s an unbeatable combination to get your coding project off the ground. Get your GitHub Student Developer Pack today!
https://www.dreamspark.com/Student/Software-Catalog.aspx
In the following blog I will share how to upload a Node.JS Package from GitHub repository to a Microsoft Azure Mobile Services
Register for your DreamSpark and GitHub accounts
1. Register for your DreamSpark account and an Azure Account for these instructions
2. Now we need to register and download the GitHub Student Developer Pack
Setting up GitHub
You will need a GIT client.
Git is a distributed revision control and source code management (SCM) system a number of colleges and Universities now stimplaute source control must be used,
Git was initially designed and developed by Linus Torvalds for Linux kernel development in 2005.
We will need Git in order to be able to add node.js packages to Azure mobile service.
Once you install, consider a reboot, simply follow the instruction from the installer.
Finding the Azure Mobile Services EndPoint Url
Azure Mobile Services directly supports GitHub
Navigate to the Azure Portal
Select Mobile Services
Select the CONFIGURE menu
COPY THE URL
Once you copy the url to the clipboard, proceed to the next step.
Cloning a Git Repository to an Azure Mobile Web Services
Open up a Command prompt in the desired folder where you want your source control
Type in git clone [ your Azure End Point URL]
Checking the result
You will need to provide a user name and password
Now if you take a look at the folder (the one I am using),
Now navigate to the folder. you defined it when you created your Azure Mobile Service.
Navigate into the service folder and view the file
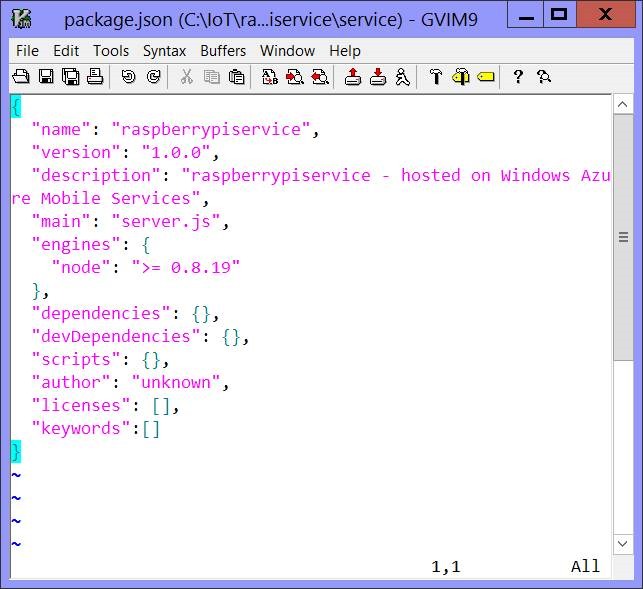
You can see the package.json file.
This is the key file to edit.
Node.js application resources
Your first goal is ensure you have your Node.js code and packages on your local machine.
For more details on Noje.Js and Azure see https://azure.microsoft.com/en-us/develop/nodejs/
Ensure that the package.json, which contains all of the packages that you require to be installed into Azure Mobile Services.
You can't just copy packages directly to the web services, ou must use Git to copy packages Azure mobile services
Modify the package.json file
Now you will need to modify the package.json file to include new node packages.
For example purposes, we will include the packages qs (QueryString)
- QS is a query string parser for node and the browser supporting nesting
The json package structure
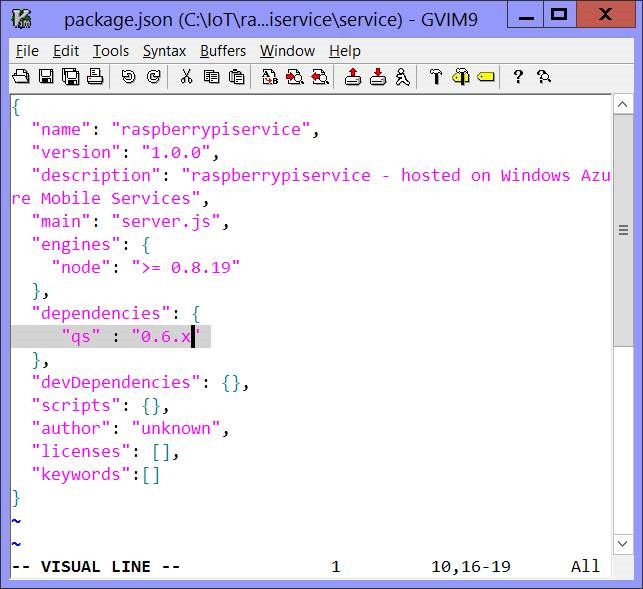
We need to modify the dependencies section of package.json.
For this example I will be adding an new dependency of quality of service (qs)
Simply edit the file in your favourite text editor
- Save and close the package.json
Commit the changes
You will need to commit the changes before you push them up to the portal.
The command is, git commit .
You will be asked to enter in a commit comment. Its always great best practice to add comments to any code revisions so enter a clear and concise comment to change/update undertake.
Pushing changes back to the Azure Mobile Service
Now we need to push the changes back to the Azure Mobile Services
The command for this is simple: git push [remote-name] [branch-name] .
But we want to push our master branch to the origin server (Azure Mobile Services)
We will push our work back up to Azure Mobile Services with this command:
- $ git push origin master
We have now successfully pushed up the latest copy of our Node code using Github
We have successfully added the node package qs to our Azure Mobile Services
Checking the update of Node.js Code is live on the Azure Mobile services
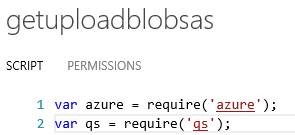
We will now make use of the **qs ** package in node.js
As you can see in the figure above, we are now able to leverage the node package known as qs .
Additional Resources Curriculum & Training
Using Microsoft Azure for students
Azure App Service Web Apps Overview
Node.Js and Azure Developer Center


