Desired State Configuration(DSC) for SQL Server ***Update

Over the past few months several individuals/customers have asked me for updated examples of the latest xSQLServer Resource. As of this post, the current version is 8.2.0.0. Throughout this post I will provide reference to configurations which are actually calling composite resources. If you haven't heard of composite resources, then the following reference will explain what they are and how they can be leveraged --> Reusing existing configuration scripts in powershell desired state configuration
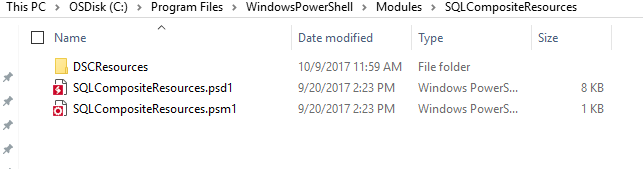
Before getting started, we will need to pull down a module with the required composite resources. On my GitHub repro (located here) you will find a module which has composite resources for stand alone SQL installation, AlwaysOn SQL Installation, and coming soon SQL Fail Over Cluster Instance (FCI). Download the Zip, extract the contents and copy the SQLCompositeResources folder to C:\Program Files\WindowsPowerShell\Modules. Aside from this module, you will also need xSQLServer, xComputerManagement, xFailoverCluster as the composite resources will utilize these resources. All example configurations are demonstrated utilizing a push configuration and assume the machine you are pushing from has the above referenced modules located in the PowerShell modules folder referenced previously.
***Update ensure the folder you copy is SQLCompositeResources, once you copy you should have something which looks like the below.
Single Instance Install Example
Credential Management
We will first cover the simplest configuration SingleInstanceInstall_Example.ps1. Let's look through what this configuration includes. First section of the script defines the credential objects we will pass to our configurations. In the example referenced, the same password is leveraged for each of the three windows accounts and is stored clear text in the script. This is done for demonstration purposes only. Please do not leverage this method in a production environment. All examples referenced in this post were tested utilizing LabInabox.
Metadata ($CofigData)
These are the variables that must be changed in order for the configuration to function properly. First three are our service accounts which are referenced above, provided we updated these we can move on to the next items. MofPath is the location where our Mof files will be created in. SetupSourcePath is the location of our SQL Server installation media. For my purposes I mounted the ISO to the domain controller and shared the location for my other machines. And finally we have SQLSysAdminAccounts, here I have utilized DSC\Administrator which is my domain admin account in my DSC Lab environment. This is not needed just the account I was logging into the machine with at the time. This could be a domain group such as your SQL administrator group. The last parameter needed to complete our metadata is NodeName. NodeName is the machine we are looking to push the configuration too, in my case it was DSC-SQL6. We now have all the required parameters defined that are required. I know many are reading and saying but wait there are so many more things required, and in one way you are correct, however, in this case many have been defaulted. Taking a look at the module for SingleInstanceInstall.schema.psm1 we will see there are many parameters defined such as installation directory which are defaulted just as they are typically if we were to run through a GUI install. Any parameter you see here can be defined in our configuration. Since we do not define them here they will utilize the default values.
LCM Config
Local configuration manager is configured as part of the example to ensure it is only Applying the configuration and the LCM is set in a Push mode. For your production workload this could vary and can be modified as needed.
SQL Server Configuration
Our SQL configuration looks very simplified here as there is not much required for input. Under the covers there is a lot more going on than meets the eye. As stated above, we are utilizing a composite resource here called SingleinstanceIntall. We are provided only a handful of parameters which are required and relying on the default values for all other parameters. As stated above, you can pass the additional parameters if needed/required. Lets dig further into what the composite resource SingleInstanceInstall provides us. If we look at he psm1 module referenced above we will see this composite resource makes a call to xSQLServerSetup which is a resource from the xSQLServer module and a call so SQLConfiguration which is a resource from SQLCompositeResources. Digging deeper into SQLConfiguration we see it does more than what it appears at first. Looking through this resource we can see it does the following:
- Sets PowerPlan to High Performance
- Sets Virtualmemory initial and maximum size for windows
- Sets SQL Server memory
- Sets SQL Server MaxDop
- Enables TCP for SQL Server listening on 1433 or the port passed
- And finally sets 10 different SQL Server Configuration items based on the paramaters supplied.
To recap a single call to:
SingleInstanceInstall Standalone
{
Server = $Node.Nodename
SetupSourcePath = $Node.SetupSourcePath
SQLSysAdminAccounts = $Node.SQLSysAdminAccounts
SqlInstallCredential = $Node.SqlInstallCredential
SqlServiceCredential = $Node.SqlServiceCredential
SqlAgentServiceCredential = $Node.SqlAgentServiceCredential
}
will give us a completely configured stand along SQL server ready to go.
Move Resources
Since we are in a push mode, we need to ensure all of our modules exist on on client before we push our configuration. In this section we are simply utilizing test-path to verify the if the module exists and if so remove before copying the module with copy-item.
Generate and Deploy
Finally we call the configuration to generate the mof file and start the configuration and wait for verbose output.
Next we will talk about AlwaysOn, there are two configurations here PrimaryAlwaysOn and SecondaryAlwaysOn. As the names imply PrimaryAlwaysOn is called for one and only one server and SecondaryAlwaysOn is called for all other servers participating in the cluster. We will look at each of these configurations separately.
PrimaryAlwaysOn Example
Several parts of our configuration will be identical to our Single Instance Install referenced earlier so we won't go into those details again. Taking a look at our example configuration PrimaryAlwaysOn_Example.ps1, we have the same layout as our first three sections. Credential management, Parms, and LCM config hold the same information we discussed earlier. The core difference in the example is in the SQL configuration, two resources are called PrimaryAlwaysOn and AvailabilityGroup.
Let's dig into each of these with PrimaryAlwaysOn first. To understand what's going on behind the scenes we need to look at the module which is PrimaryAlwaysOn.schema.psm1. Notice once again in our example we only pass the required parameters for the resource, there are many other parameters which can be passed if required. Looking into the resources called we see we call four different resources SingleInstanceInstall, WindowsClusterInstall, xcluster, and EnableAlwaysOn.
PrimaryAlwaysOn
SingleInstanceInstall
SingleInstanceInstall should sound familiar as this is the exact resource we just finished dissecting above.
WindowsClusterInstall
The next resource is WindowsClusterInstall for which we can look at the its module definition WindowsClusterInstall.schema.psm1. As we look at this resource we see it is simply ensuring the Windows Feature FailoverClustering is installed along with all the tools to manage it.
xCluster
xCluster is a resource provided with the xFailoverCluster resource which allows us to create a windows failover cluster. We must pass the clustername the cluster ip and an account which has the appropriate permissions to create the cluster.
EnableAlwaysOn
EnableAlwaysOn is another composite resource provided with SQLServerCompositeResources. Looking at the module EnableAlwaysOn.schema.psm1 we see it makes reference to several resources in xSQLServer which are the following:
- xSQLServerLogin - used to add cluster service account and SQL Service account to the instance
- xSQLServerPermission - used to grant clusterservice account permission to manage availability groups
- xSQLServerEndpoint - used to create endpoints for availability groups
- xSQLServerEndPointPermission - used to grant permissions to endpoints
- xSQLServerAlwaysOnService - used to enable alwayson on SQL instance
AvailabilityGroup
AvailabilityGroup is a composite resource which takes a handful of parameters in which only three are required:
- Server - Server to create availability group on
- SQLInstallCredential - Credential with permissions to create availability group
- Availability Group Name - availability group name or as an array of availability groups
Further exploring the AvailiabilityGroup module AvailabilityGroup.schema.psm1, we will find there are many additional parameters available if needed. We will also see that ultimately this resource is only calling one resource xSQLServerAlwaysOnAvailabilityGroup within it. The difference in this resource is that we are looping through the array of availability group names passed and creating each of them. One assumption made here is that all availability groups will have the same properties when they are created.
The remainder of the example is the same. We copy resources to the server, generate the configuration mof files and push the configuration.
Secondary AlwaysOn Example
SecondaryAlwaysOn_Example.ps1 will look very similar to PrimaryAlwaysOn_Example.ps1 with the difference being it passes all the secondary Nodes in the $ConfigData section as showed below, and calls SecondaryAlwyasOn and AvailabilityGroupJoin:
| $ConfigData = @{ | |
| AllNodes = @( | |
| @{ | |
| NodeName = '*' | |
| SqlInstallCredential = $SqlInstallCredential | |
| SqlServiceCredential = $SqlServiceCredential | |
| SqlAgentServiceCredential = $SqlAgentServiceCredential | |
| MofPath = 'C:\Mofs' | |
| SetupSourcePath = '\\dsc-dc\sqlserver' | |
| SQLSysAdminAccounts = 'DSC\Administrator' | |
| ClusterName = 'DSCTestCluster' | |
| ClusterIP ='192.168.210.99' | |
| PSDscAllowPlainTextPassword = $true | |
| PSDscAllowDomainUser =$true | |
| PrimaryAlwaysOnNode = 'DSC-SQL4' | |
| AvailabilityGroupName =@('AG1','AG2') | |
| } | |
| @{NodeName ="DSC-SQL5"} | |
| @{NodeName ="DSC-SQL6"} | |
| ) | |
| } |
SecondaryAlwayson
SecondaryAlwaysOn will look very similar to PrimaryAlwaysOn. Lets take a look at the differences in the module SecondaryAlwaysOn.schema.psm1. Here we call SingleInstanceInstall and windows ClusterInstall just as we did in PrimaryAlwaysOn. What's different here is that we need to wait for the Cluster to be created from the PrimaryAlwaysOn configuration before we can proceed, so we make a call to the resource xWaitForCluster. Once the cluster has been found, we make a call to xCluster to join the cluster and then to EnableAlwaysOn to enable alwaysOn on the node. We have now completed our alwayson configuration on our secondary.
AvailabilityGroupJoin
AvailabilityGroupJoin is utilized to join our secondary servers to our primary availability group. Looking into the the module AvailabilityGroupJoin.schema.psm1, we see again that we are looping through each of the availability group names passed. First we call out to resource xWaitForAvailabilityGroup to ensure the AvailabilityGroup was created on the primary. Once it has been found, we will leverage xSQLServerAlwaysOnAvailabilityGroupReplica to create the replica and join the server to the availability group.
The remainder of the example is the same way we copy resources to the server, generate the configuration mof files and push the configuration.
Conclusion
Composite resources allow you to simplify your configurations so they are not as complex to read, and more importantly allow you to reuse code so that it is not duplicated but rather referenced. Please let me know if there are questions or if there is any confusion around how the resource is put together. I will be working on the FCI resources and examples and will be publishing them to the GitHub repo and blogging on them here.
Call out to Ashley McGlone as I leveraged the his PowerShell module to build the composite resources. You can read about how to utilize them on his blog.