SQL DSC Encrypted Configuration
Following up on my last post about new changes coming to xSQLServer. Today I want to talk about two additional Example scripts which have been provided with the new updates. The first script is DSCSqlBuild.ps1. This new script adds a couple of items SQLPush_SingleServer.ps1 doesn't have. DSCSQLBuild.ps1 like DSCClusterSQLBuild.ps1 adds a timer to the configuration as well as the StartConfiguration and TestConfiguration are provided as workflows so configurations can be done in parallel. Moving on to the second script DSCSQLBuildEncrypted.ps1. This script will allow you to push a configuration to a server encrypting all the credentials ensuring we are secure across our environment. In order to do this, we need to have certificates for each of our servers in place with the document encryption property. You can use self-signed certificates for this, however, in an enterprise environment, you will likely want to have a certificate authority with a GPO which automatically enrolls your server with the certificate. In my lab, I have setup a Windows 2008R2 certificate authority, and I will walk through the steps of how to configure your servers with certificates. In addition, I will then walk through the example script and explain how the script can leverage the certificate to encrypt the passwords.
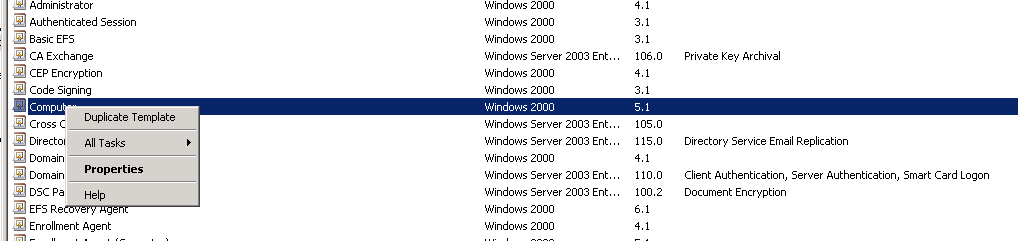
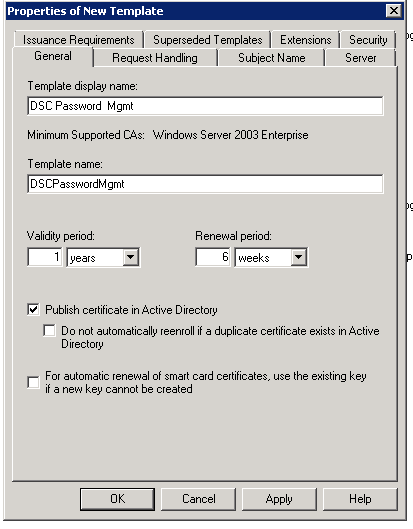
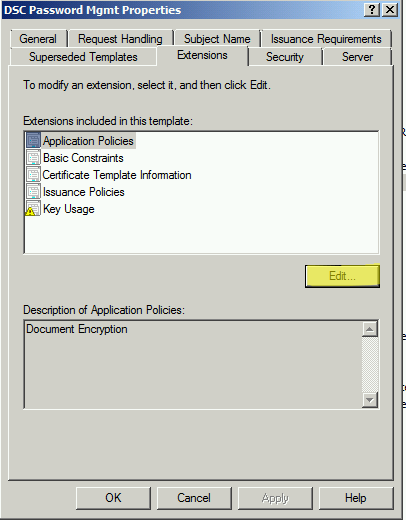
The first thing we will need to do is duplicate an existing template. Since we will be assigning to a computer I will duplicate the Computer Template and name it DSC Password Mgmt.
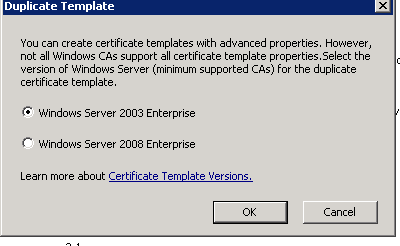
Once I've done this I'm presented with an option of Windows Server 2003 Enterprise or Windows Server 2008 Enterprise. We want to choose Windows 2003 Enterprise to make sure we use the older CSP since DSC doesn’t support CNG certificates. If your CA is 2012 R2 you wont have to do this since its default behavior is the older CSP.
Walking through the remaining options of the Certificate Template:
Set the name and validity period.
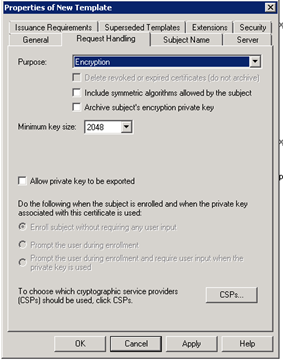
Select Encryption Purpose on the Request Handling tab.
Extensions Tab. Edit the Application Policies.
Remove Client Authentication and Server Authentication
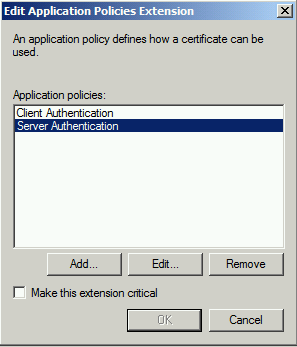
Then click Add.
On Add Application Policy click New then provide values shown below.
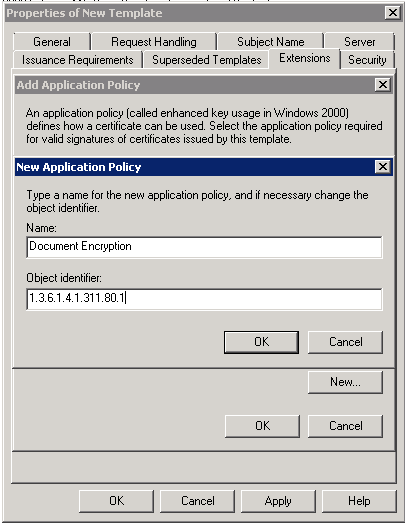
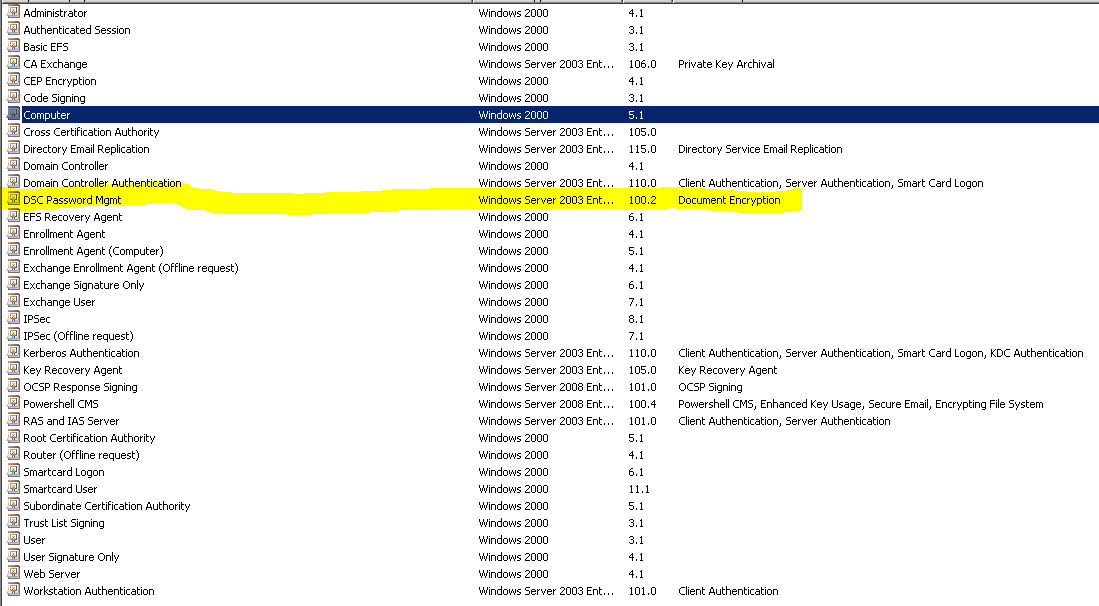
Click OK and Apply changes to Template. We should now see the new Template in the list as below.
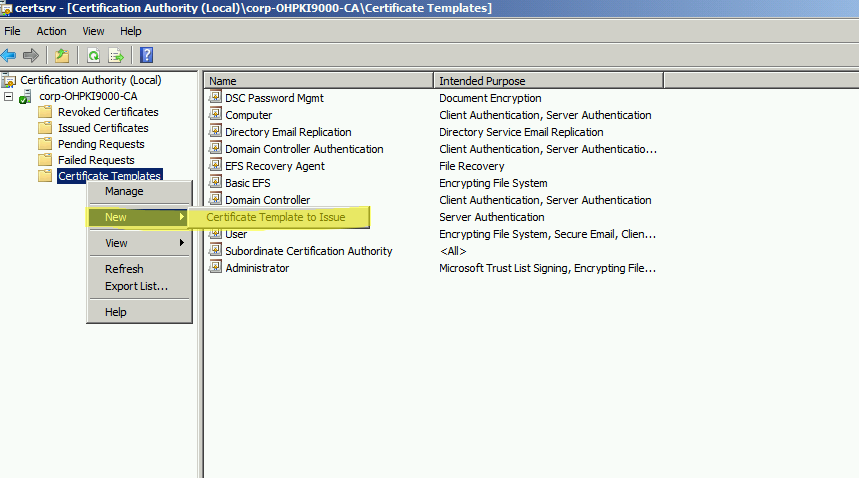
Now we can make the template available for clients to enroll against. We do this by using the new option under Certificate Templates.
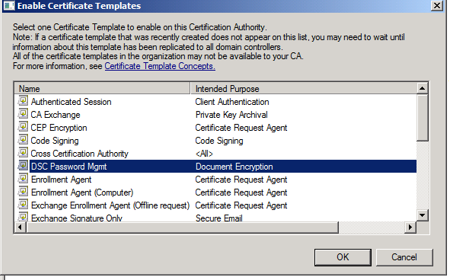
We select the new Certificate Template from the dialog and then its available for computers to use during enrollment
At this point we could create a GPO to auto enroll this certificate. As there are blog posts already on this, I won't walk through this here.
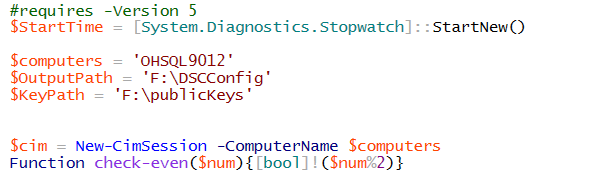
Next, let's look at the script which will leverage this certificate. The first thing we set as usual is the $computers variable and the $OutputPath. Additionally, we will now set a $KeyPath. This is where we will be storing the public keys of the computers we will push configurations to.
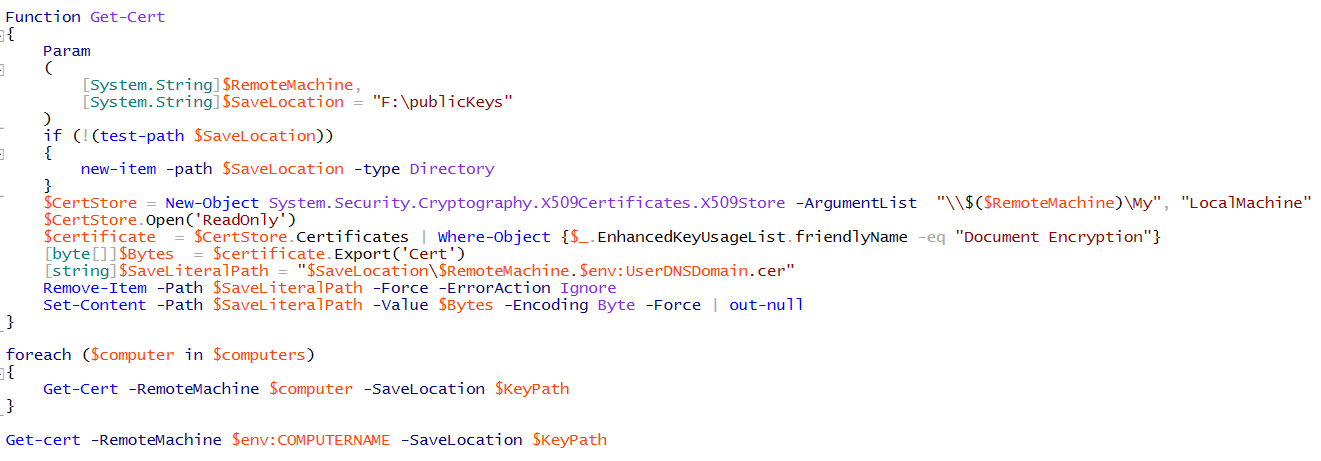
Let's create a function we can use to go export the public certificate of the target computer on our machine we are pushing configurations from. We will then call this function for each computer we are pushing the configuration to and the machine we are pushing the configuration from. This gives us all the certificates we need to deploy an encrypted configuration.
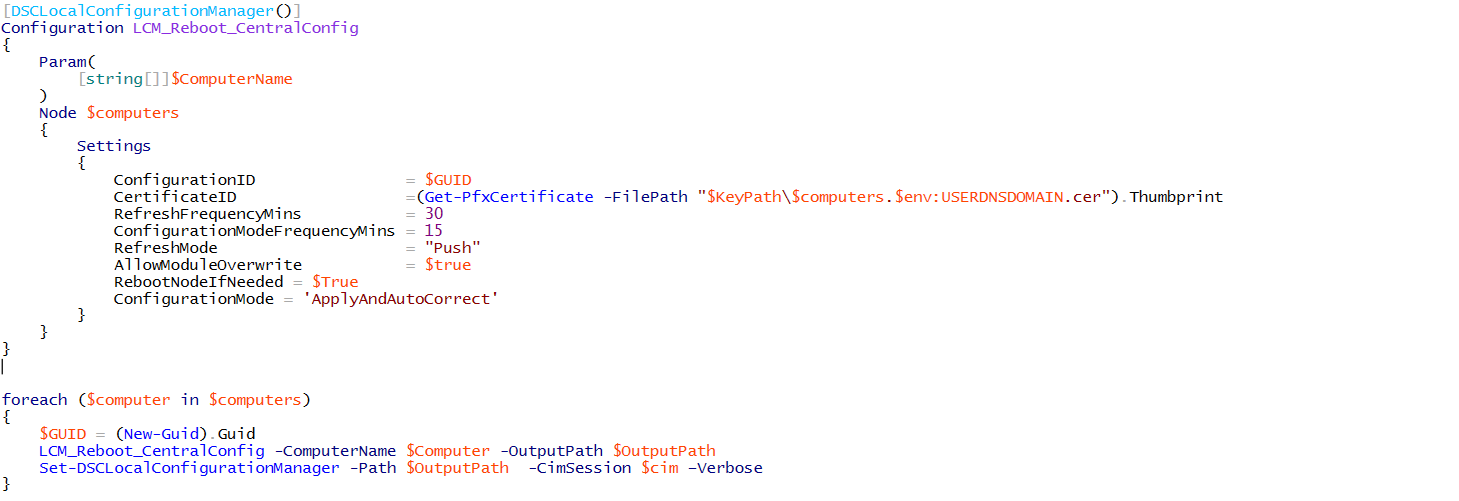
 Next we set the LCM for each node. Notice here we set a couple of different properties we didn’t in our other configurations. ConfigurationID which we set to a GUID and CertificateID which we are setting to the Thumbprint of the computer we are targeting. Here we use the Get-PfXCertificate cmdlet to help us get the thumbprint easily.
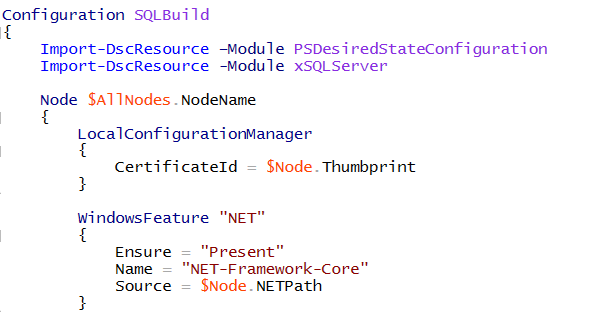
 Three additional places in our original script need to be modified as well and are noted below. The DSCLocalConifgurationManager just inside the $AllNodes.NodeName. We need to again note the certificateId with the Nodes Thumbprint.
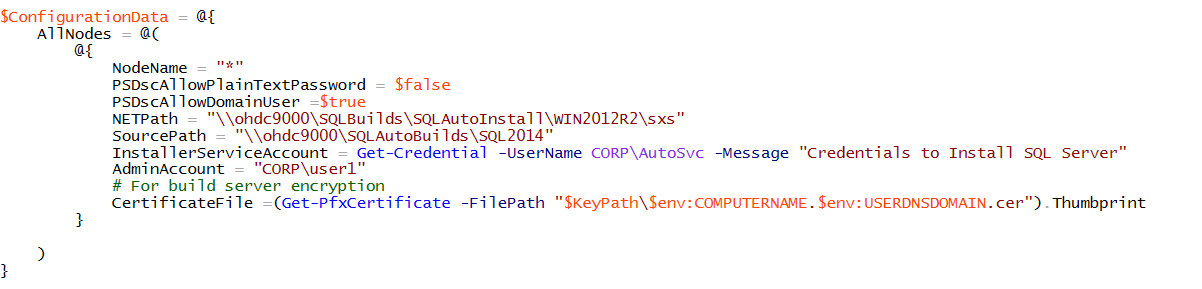
Within $ConfigurationData we need to set the CertificateFile property to the Thumbprint of the BuildServer. Again here we leverage Get-PfxCertifcate cmdlet
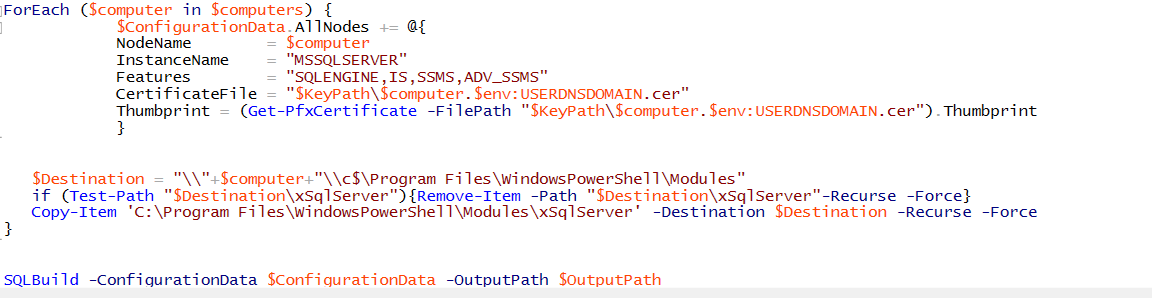
 And finally need to set the Thumbprint for each Computer in the $ConfigurationData. Since we dynamically build this property we only set it once just using the same cmdlet.
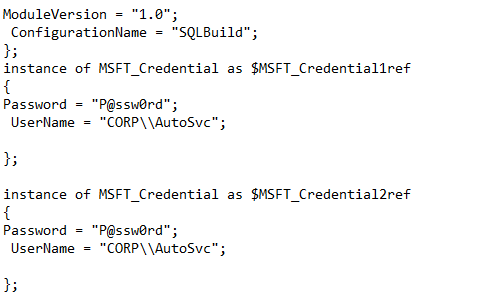
 The remainder of our script is unchanged from the DSCSQLBuild.ps1. So why go to all this work? Let's take a look at a mof file which is generated with DSCSQLBuild.ps1 compared to one generated from DSCSQLBuildEncrypted.ps1. This is just a portion of the mof file. Notice password is stored clear text.
Contrast that with the mof file from the DSSQLBuildEncrypted.ps1
 Our Password here is encrypted and longer than I can get a screen shot of. Overall, a little bit of work may be required to get the environment ready, but in the end worth the effort to ensure your passwords are stored securely.
Additional Reference:
https://blogs.msdn.microsoft.com/powershell/2015/10/01/powershell-dsc-faq-sorting-out-certificates/