Configuring NLB for TFS 2010
This walkthrough details the steps in configuring a Network Load balancing solution for Team Foundation Server 2010 Application tiers. With this release of TFS 2010, you could create an application tier farm and also configure network load balancing (both Software and hardware load balancing).
Note: This document server as a guide. I have used NLB (Network Load balance) also called as WLBS (Windows load balancing service) that comes inbuilt with Windows 2003 and 2008. There are other NLB solutions available in the farm of Hardware solutions.
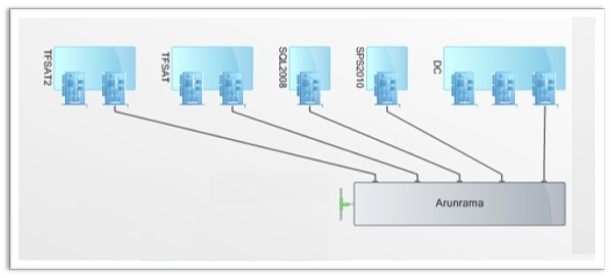
Machines Used:
All the virtual machines used in this walkthrough are built on a Windows 2008 R2 hyper-v server that runs SCVMM 2008 R2
DC: Windows 2003 (serves as a Domain controller with DNS delayed on the same server)
TFSAT : Windows 2008 R2, SQL 2008 Reporting services (TFS application tier – node1)
TFSAT2: Windows 2008 R2 (TFS application tier – node 2)
SQL 2008: Windwos 2008 X64, SQL 2008 Sp1 with CU 5 (TFS Database engine and Analysis services)
SPS2010: Windows 2008 R2, SharePoint Server 2010 (TFS project portal server)
Domain name: Arunrama.com
Walkthrough:
1) Prepare both the TFS application tier nodes (TFSAT and TFSAT2) with IIS on both the servers and add the servers to the domain
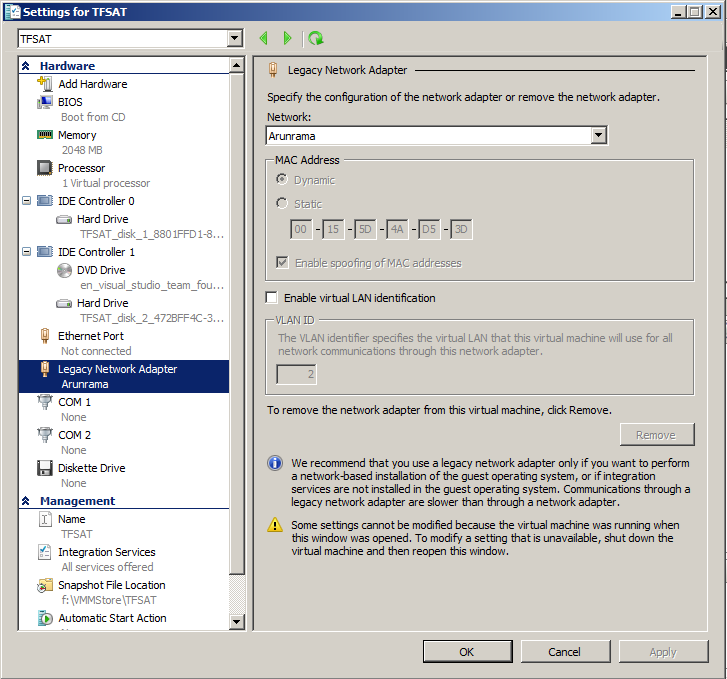
2) By default the virtual machines (TFSAT and TFSAT2) will be installed with a “Synthetic Network adapter”. For the Network Load balance to work in a virtualized environment enable “Legacy Network Adapter” for both the Application Tier servers. To enable “Legacy Network Adapter” on a virtual machine, shut down the machine and go to the Hyper – V manager, select the virtual machine. Select the Settings tab and in the “Settings for xxx”, in the left panel select “Add Hardware”. You can select “Legacy Network Adapter” from the list
3) Once the “Legacy Network Adapter” is added, Select the adapter from the Left panel and add the card to the network you are virtual machines on.
4) Make sure you select the check box “Enable spoofing of MAC addresses”.
5) Disable the other network cards on both the application tier servers (TFSAT and TFSAT2)
6) If you have DHCP served IP address for your network, Disable the Dynamic IP assignment on the application tier servers and give a static IP for both the application tier servers. Do a Ipconfig /flushdns on both the servers to refresh DSN records
7) To verify that both the servers are talking to each other, Ping the other application tier servers from each other.
8) Since the application tier servers are running Windows 2008 R2, Enable “Network Load balancing (NLB)” feature on both the application tiers. Restart the servers.
9) On the Domain Controller, Create the accounts needed for TFS (TFssetup, TFSService and TFSreports)
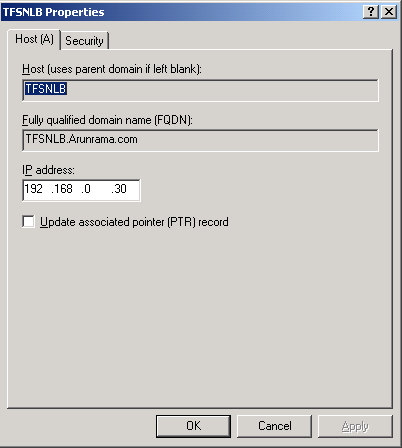
10) On the Domain controller, In DNS create a host record for the VIP (Virtual name for the NLB cluster), by assigning an IP
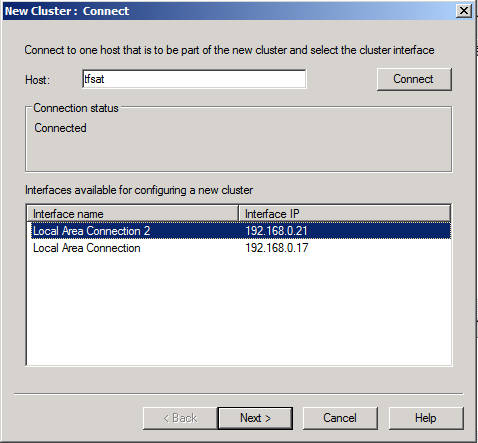
11) Start configuring the NLB cluster. On one of the application tier nodes (TFSAT), Click on Start > Administrative tools > “Network Load balancing manager”
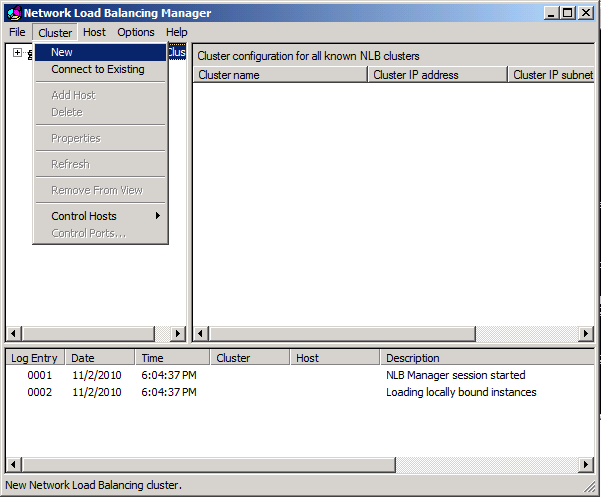
12) The new cluster wizard pops up. In the Host section enter the name of one of the Application Tier server (TFSAT) and click connect. The Interface name section brings up the available network connections. Select the connection that is configured to use the “legacy Network Adapter” and click Next.
13) Note: If you still have the DHCP assigned IP address (Dynamically) for the selected network connection, you will be prompted with the following message:
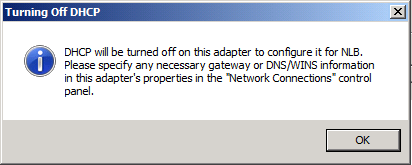
You can still change the network settings to enable static IP and enter the DNS and Gateway IP.
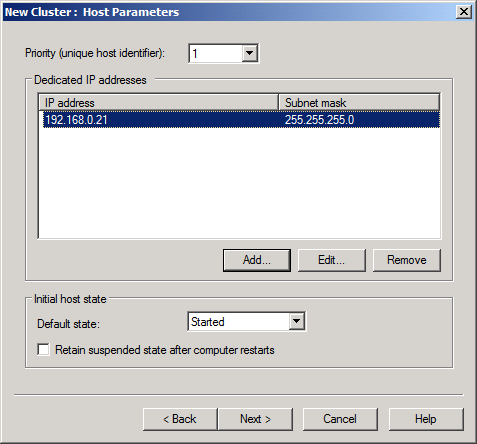
14) Back in the “new cluster” Wizard, accept the defaults and click Next
15) Now, you will be prompted for the cluster IP. Enter the VIP you created on step 10.
16) The Virtual name of the cluster would be populated by the new cluster wizard
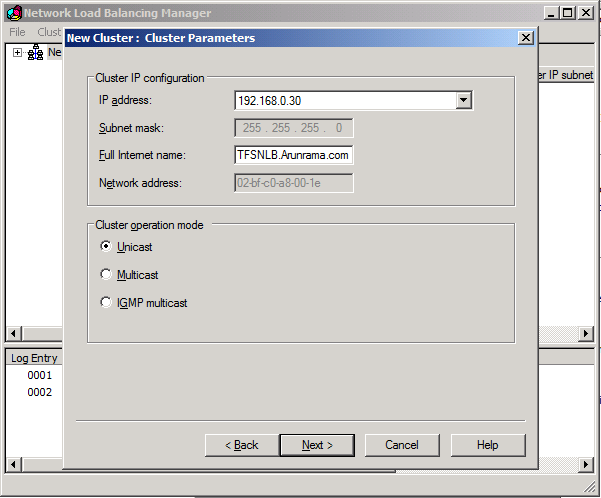
Note: We would be configuring the NLB with “Unicast” mode.
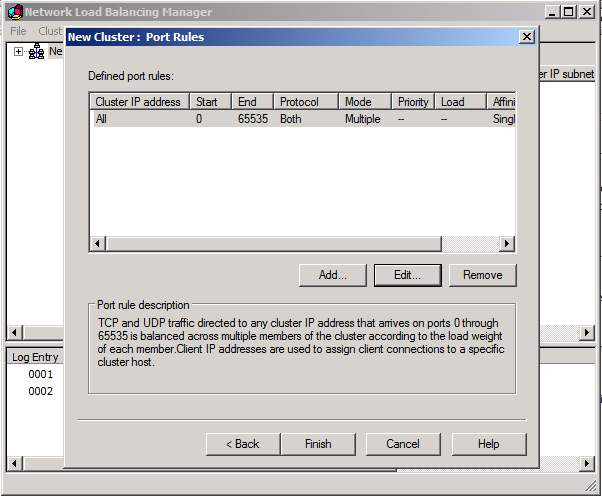
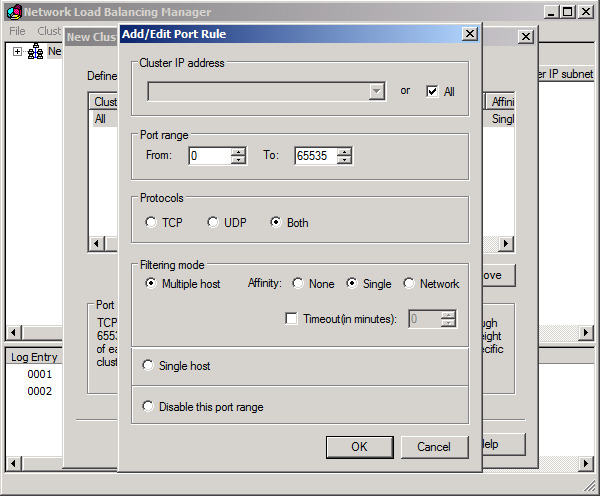
17) On the Port rule section, accept the defaults and click Finish
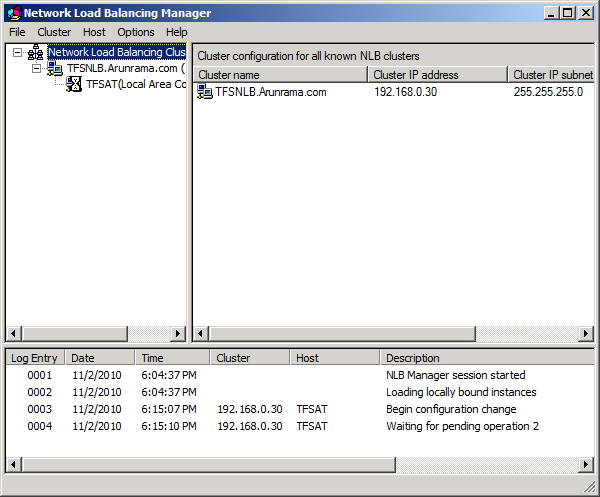
18) Now, your first application tier (TFSAT) is added to the NLB cluster.
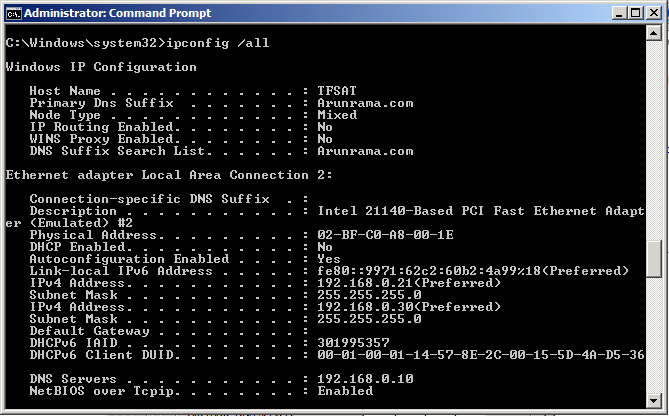
19) To verify the configuration, open a command prompt on the Application tier that is just added to the NLB cluster and do a IPCONFIG /all. You will see that the MAC Address is changed and now have a address 02-BF-WW-XX-YY-ZZ. The starting two hexadecimal values “02- BF” refers to a MAC address participating in a Unicast NLB cluster. Also, you will see two IP addresses assigned to the single Network Card (Original IP of the server and the Virtual IP of the NLB cluster)
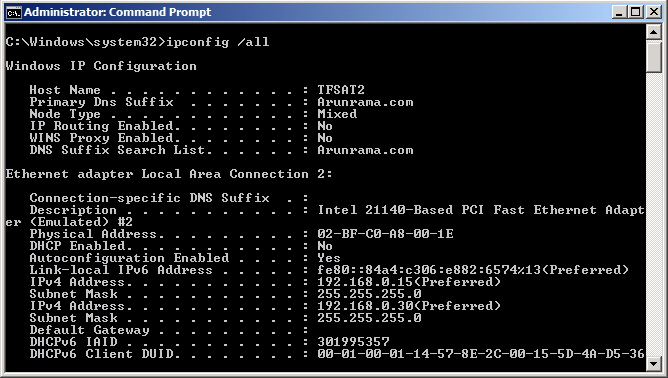
20) On the second application server (TFSAT2), Start doing the steps 11 thru 19 (as above). You can start the configuration, right click on the NLB cluster name (TFSNLB.Arunrama.com) and select “Add host to cluster”. Go thru the wizard and once completed, when you run the IPCONFIG /ALL, you should see the values as given below
21) You are done with creating a NLB cluster with two nodes (Application tier servers )
22) Verify if you are able to ping the NLB, You can log in to the Domain Controller (DC) and ping the Virtual name of the NLB (TFSNLB)
23) Start Installing TFS2010.On the Application tier server (TFSAT) that has Reporting services installed and configured, Install TFS 2010 and configure it as a “Advanced” configuration.
24) Once installed and Configured, Launch “Team Foundation Server Administration Console”
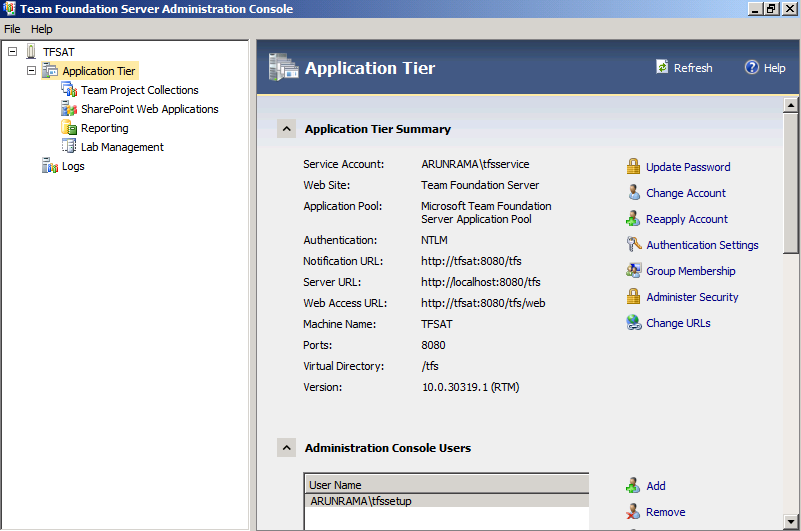
25) Move on to the other application tier server (TFSAT2) and install TFS 2010 and configure it as “Application tier only” configuration. Once configured, you should be able to see both the application tier names in the “Application Tier”

26) Configure the Virtual Name for TFS. On one of the application tier, launch “Team Foundation Server Administration Console” and select the “Application Tier” node from the left panel. Select “change URLs” from the right panel and in the “Notification URL” section, edit the url with the Virtual name (TFSNLB) of the NLB cluster. By default the URL should be replaced to https://TFSNLB:8080/TFS
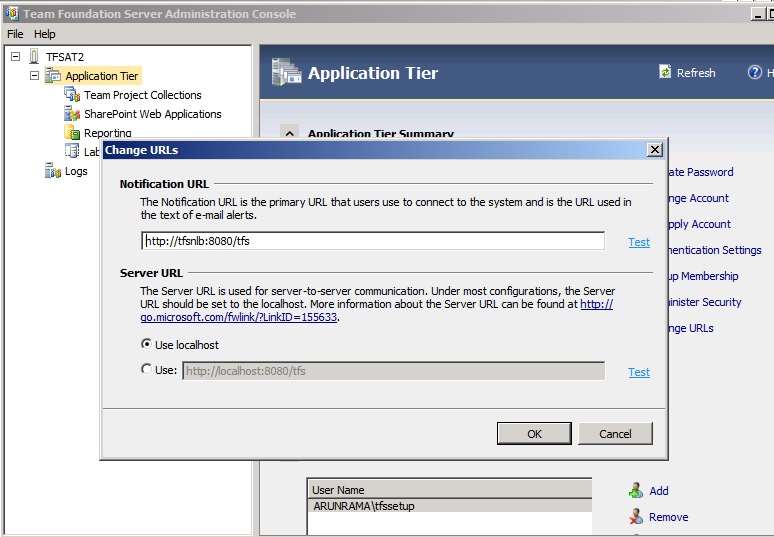
27) Click OK on the “Change URLs” window and you should now see the URL changed on the “Team Foundation Server administration console”, in the section “Notification URL”.
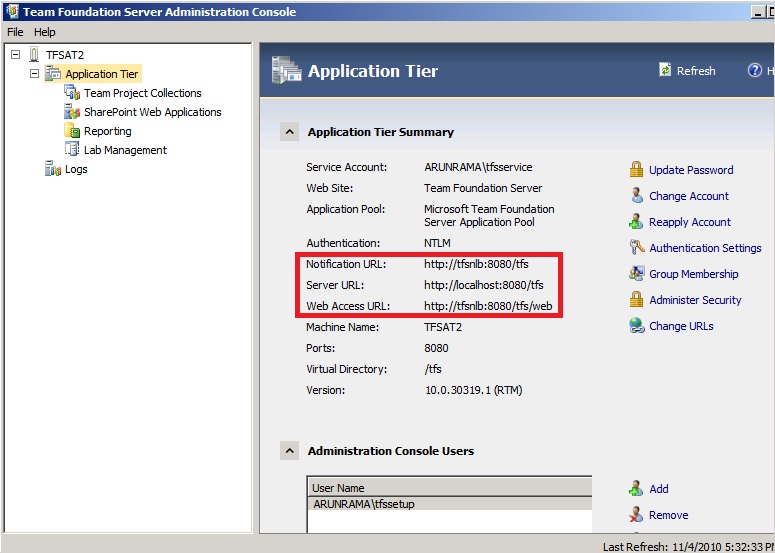
28) To connect to TFS from a Client running Visual Studio 2010, use the URL mentioned in the “Notification URL” (https://TFSNLB:8080/TFS)
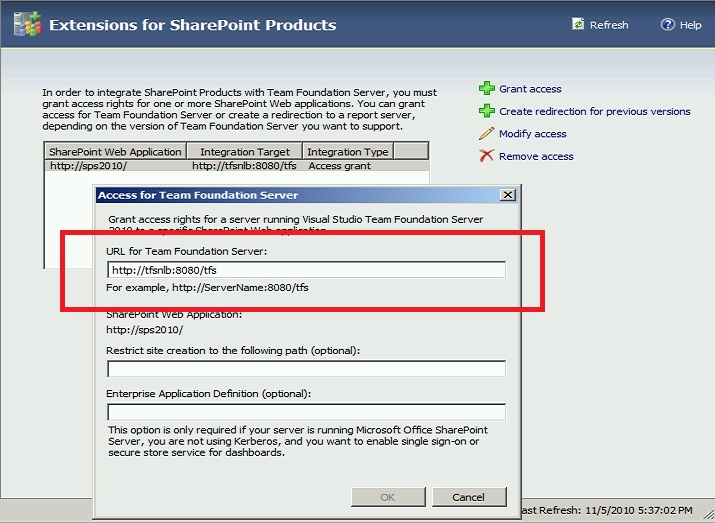
29) SharePoint configuration: Once the TFS application tiers are added to the NLB cluster and if the SharePoint server is running on a remote server other than the application tiers, then on the SharePoint server, launch the “Extensions for SharePoint products” and modify the URL for the TFS server.
Author: Arun Ramalingam
Reviewed by: Lakhminder Singh