Using Windows Azure Drive part 2: modifying my application to use the drive
The first thing I did was to split my file access classes into a separate library, so that I could use them from both my “legacy” Desktop application and the Windows Azure version. As you can imagine, my goal is to port the rest of the application without touching or modifying this file access library in any way, so that it keeps working for my Desktop version.
I then proceeded to rewrite my front-end application in ASP.NET, reusing my original file access methods. This allowed me to reorganize my front-end without having to worry about introducing the Windows Azure Drive into the mix yet. This means that at this point, when testing on my local machine using the Windows Azure Development Fabric, I am going directly to the local disk drive. This is fine and will work on my development machine. Once this is all working, I will work on changing the root path for the application to a Windows Azure Drive.
The front-end basically uses three main methods to access the file system:
- PDFThumbs.getDirectoryList(string path)
- Returns a list of directories available for browsing; in my magazine-reading application, this represents collections of issues (e.g. one directory per year).
- This method uses DirectoryInfo.GetDirectories() to generate the list of directories present under the “path” parameter, which represents the root of my magazine collection.
- PDFThumbs.getPDFList(string path)
- For a given magazine collection, this method returns all the issues available for reading.
- This method uses DirectoryInfo.GetFiles() to find all PDF files under the “path” parameter, which represents the collection the user is accessing.
- PDFThumbs.getThumbnailPathForPDF(string path)
- Finally, this method will return the path for the JPEG thumbnail for a given magazine issue, so that the thumbnail can be used in the front-end application.
- This method uses GhostscriptWrapper.GeneratePageThumb(), from the P/Invoke GhostscriptSharp wrapper for the Ghostscript native DLL, to generate a new thumbnail if it does not exist, and return the path for this thumbnail.
- Under the covers, the Ghostscript DLL uses many more disk I/O calls to open the original PDF file, read it, and save the generated JPEG thumbnail to disk.
I also have another method, PDFThumbs . syncThumbnailsForDirectory(string path) that combines several of these methods into one, scanning a directory like getPDFList() does, but also calling GhostscriptWrapper.GeneratePageThumb() on each PDF found; here it is:
 /// <summary>
/// Will scan a complete directory to make sure every PDF file has a thumbnail.
/// </summary>
/// <param name="path">The directory path to check, e.g. D:\MyDirectory</param>
public static void syncThumbnailsForDirectory(string path)
{
    DirectoryInfo dir = new DirectoryInfo(path);
    FileInfo[] files = dir.GetFiles("*.pdf");
    foreach (FileInfo f in files)
    {
        string thumbPath = String.Format("{0}.jpg", f.FullName);
        if (!File.Exists(thumbPath))
        {
            GhostscriptWrapper.GeneratePageThumb(f.FullName, thumbPath, 1, 128, 128);
        }
    }
}
As you can see here, I am using some fairly simple calls to the System.IO API, and calling into my P/Invoke wrapper without any changes.
In order to port the front-end, I simply call these methods with the path of my local magazine collection root (e.g. D:\Magazines or something).
Of the three main methods I described, the third does require some special adaptations to work with the new ASP.NET front-end, but it is not specific to Windows Azure, but rather to migration of Desktop-based applications to the Web in general: in my WPF application, the thumbnail path is used to create a BitmapImage that is then used as the ImageSource for an Image WPF control. In the ASP.NET application, I need a way to go from a physical image path to an URL for an <img> element, and the way I did it was using ASP.NET HTTP Handlers (*.ashx files) to dynamically return the image contents.
In other words, where my original WPF application used to do this:
 thumbPath = PDFThumbs.getThumbnailPathForPDF(curPDFList[curIndex]);
i = new BitmapImage();
i.BeginInit();
i.UriSource = new Uri(thumbPath);
i.DecodePixelWidth = 320;
i.EndInit();
imgThumb.Source = i;
The ASP.NET application will do something like this:
 string thumbPath = PDFThumbs.getThumbnailPathForPDF(curPDFList[curIndex]);
ImgThumb.ImageUrl = "/Thumbnail.ashx?p=" + System.Web.HttpUtility.UrlEncode(thumbPath);
And the handler will read the file from disk and return it as a JPEG image to the browser, like this:
 public void ProcessRequest(HttpContext context)
{
    string path = context.Request.Params["p"];

    FileStream stream = File.OpenRead(path);
    long length = stream.Length;
    byte[] image = new byte[length];
    stream.Read(image, 0, (int)length);
    stream.Close();

    context.Response.ContentType = "image/jpeg";
    context.Response.OutputStream.Write(image, 0, (int)length);
}
As you can see in the handler, one again I am using regular file I/O calls and expecting them to work as usual.
Another important note here is that this method absolutely does not make a good use of the tools Windows Azure is offering: here my stated goal is to migrate my application as fast and as easily as possible (and this is where the Azure Drive as well as Azure support for legacy native DLLs is helping). Once my application is ported, I can then start thinking about how to best leverage Windows Azure features to optimize my application and make it really “Cloud-aware”; in this case, I should obviously use Blob Storage for my PDF files and their thumbnails, which would make my code less cluttered ad my application much more scalable. However, this would imply more work up front, especially considering that I use a legacy native DLL that I would need to interface with cloud storage.
As a side note, and because I am using a precompiled native library, there is one thing I have to pay attention to: the Windows Azure Compute runtime environment is 64bit, and my application currently uses the 32bit version of the Ghostscript DLL. Thus I have to switch to the 64bit version of the DLL in my Azure version.
Adding the Windows Azure Drive to the application
Now that I have a Windows Azure Web Role running my ASP.NET application, but still accessing my local drive, how do I tell it to connect to my Windows Azure Drive?
First, let’s recap from my previous post that we had created a brand new VHD with all the content my application needs (e.g. my magazine PDF collections) and uploaded it to the cloud as a Page Blob.
As an aside, if you use Cerebrata Cloud Studio Storage, you don’t need to develop your own upload client for Page Blobs anymore: the latest version has a “Page Blob Upload” feature that will let you upload your VHD to Blob Storage.

Now, we need to do two things in our Web application:
- Mount the Windows Azure drive so that it appears to the application like a regular disk drive
- Feed the application the path of our newly mounted drive
Configuring the application
As you can see above, I have uploaded my “Test.VHD” Page Blob to my “tcontepub” storage account, in a private container called “vhd”; this means my Page Blob is not publicly accessible. To mount it as a Drive, I first have to configure my application to connect to this storage account and properly authenticate itself.
This is all performed using the Azure Tools configuration panes. Right-click on your Azure Web Role and select “Properties”:

Now click on the “Settings” tab, click on “Add Setting” and select “Connection String”:

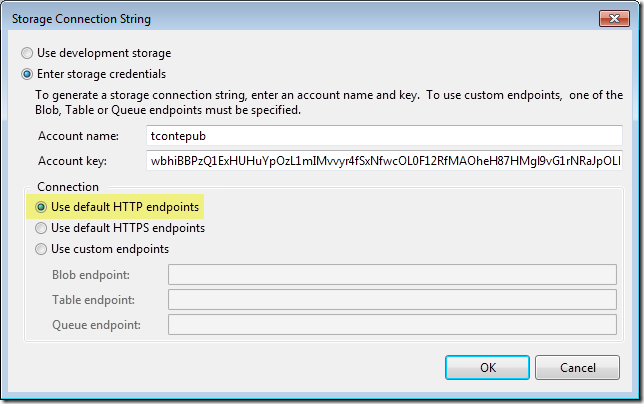
You can then name your connection string (mine is called “CloudStorageAccount” and then click on the ellipsis at the end of the “Value” field to launch the connection string dialog, where you can enter your account name and account key. Please note that you must select “Use default HTTP endpoints”, as Windows Azure Drives to not support HTTPS.

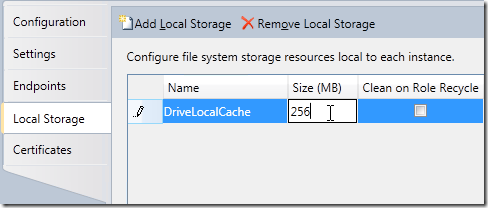
While we are in the Properties page, we need to configure right now some Local Storage to use as a local cache for the Windows Azure Drive. This local cache is useful to reduce the amount of transactions with the Blob Storage, and thus to improve performance and reduce your transactions costs! Although the Azure Drive white paper presents the local on-disk cache as “optional”, it is actually mandatory in order to mount your drive.
Click on the “Local Storage” tab, click on “Add Local Storage”:

Here, I chose 256 MB because my test drive is fairly small (512 MB). However, you should size your local disk cache by taking into account the total size of your Azure Drive as well as the typical working set for your application.
Just in case you are wondering, the Properties page is just a graphical frontend for the ServiceConfiguration.cscfg and ServiceDefinition.csdef files, where the settings are actually stored. You can open these XML files in Visual Studio if you want to see how the settings are stored there.
Mounting the Drive
The API calls required to mount the Azure Drive are well documented, and the sequence looks like this:
- Create a CloudStorageAccount object to access Blob Storage
- Initialize the Azure Drive Cache using the Local Storage defined in our configuration
- Mount the drive
In our case, we do not need to create the Drive using CloudDrive.Create(), because we already have uploaded our VHD.
We also have to decide where to perform these steps. The obvious location is within the WebRole.OnStart() method, which is automatically created for you in the <WebRole>.cs file when you create the Web Role in Visual Studio. The Web Role will be in “Busy” state until the OnStart() method returns, which is good since we will not be ready to serve requests until the drive is mounted.
Here is the code I added, right before the “return base.OnStart()” statement. You will need to add a reference to the Microsoft.WindowsAzure.CloudDrive DLL.
 CloudStorageAccount account = CloudStorageAccount.FromConfigurationSetting("CloudStorageAccount");
LocalResource azureDriveCache = RoleEnvironment.GetLocalResource("DriveLocalCache");
CloudDrive.InitializeCache(azureDriveCache.RootPath + "cache", azureDriveCache.MaximumSizeInMegabytes);
CloudDrive drive = account.CreateCloudDrive("vhd/Test.VHD");
string path = drive.Mount(azureDriveCache.MaximumSizeInMegabytes, DriveMountOptions.None);
Accessing the Drive
Now this is all fine, but we need to pass the path to the newly mounted drive to our Web Application. For this purpose, I created a Global.asax file in my Web Application, and then added a single static variable to the Global class:
 public class Global : System.Web.HttpApplication
{
    public static string azureDrivePath;
In the OnStart() method, I can then set this variable:
Global.azureDrivePath = path;
And within my Web Application, instead of retrieving the path from a local configuration setting:
string baseDir = System.Configuration.ConfigurationManager.AppSettings["baseDir"];
I will retrieve it from my global variable like so:
string baseDir = Global.azureDrivePath;
And everything else should now work automatically! The application will use the path of the Windows Azure Drive as root directory where it will find the directories for the magazine collections, and the PDF files inside. I don’t have to touch anything else in the original application.
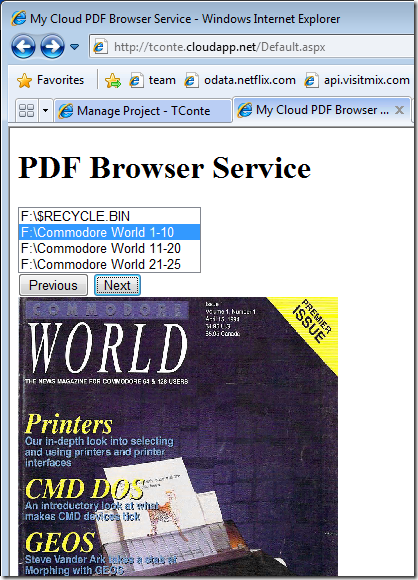
Finally, I can show you my application, running in Windows Azure; it’s not much to look at, and there are a couple details de work out (like the fact that $RECYCLE.BIN shows up in there), but it works, and I did not have to change anything to my File I/O code!

Post Scriptum: testing in the Development Fabric
This is probably a good place to try and clarify what may be quite obscure to most: how do I test my Windows Azure Drive application in the Dev Fabric?
- You can’t run your application locally and attach to a remote Windows Azure Drive (i.e. a VHD in the cloud). You can only attach to a Page Blob VHD in the same datacenter as your Compute instance.
- You can’t upload a Page Blob to the local Development Storage simulation and mount it as a Drive.
The way it works is like this:
- First, you need to switch your application to the local Development Storage simulation: in my case, I changed my CloudStorageAccount setting above (in ServiceConfiguration.cscfg) to:
- UseDevelopmentStorage=true
- You must create the Page Blob locally, using the CloudDrive.Create() method; you can’t create the local Page Blob VHD using any other method (like a tool)
- You only need to create the Page Blob once
- You can do this via the debugger: just break at the CloudStorageAccount.CreateCloudDrive() line above, and use the Immediate window, or just insert a line that you will delete afterwards; the exact method call is:
- drive.Create(512);
- just substitute the size (in MB) of your VHD
- When you do this in the local Development Fabric, the Development Storage simulation will create a directory like this:
- C:\Users\Thomas\AppData\Local\dftmp\wadd\devstoreaccount1\vhd\TEST.vhd
- The directory is initially empty, thus simulating an brand new Page Blob VHD
- This is now your local Drive Simulation!
- You can copy your test files in the directory
- Or you can use the Disk Management MMC snap-in to mount the VHD and then attach it to the directory
Now you can execute your application locally. Your CloudDrive will point to the directory in the %LOCALAPPDATA% directory.