Developing A Custom VMConnect Application
Some folks have asked creating there own VMConnect application – it’s actually really easy. Here’s a very basic example of how to create your own VMConnect application. You would likely want to add some error handling, change the window sizing, maybe a WMI call to retrieve the name of the VM vs the ID but with Hyper-V’s WMI API you can do all of that and more after all now it’s your VMConnect application.
Steps To Create Basic Application
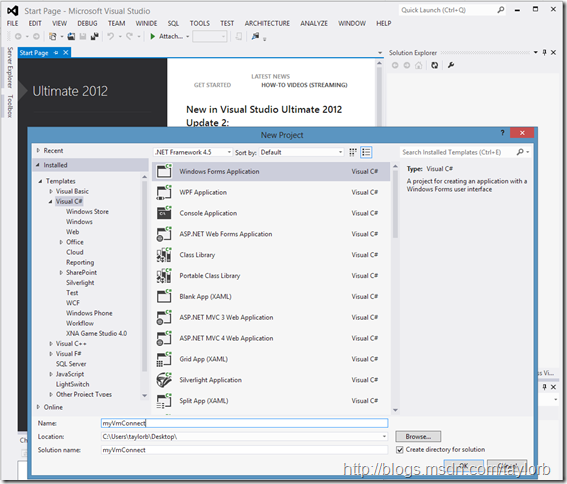
- Create a new C# Windows Forms project In Visual Studio
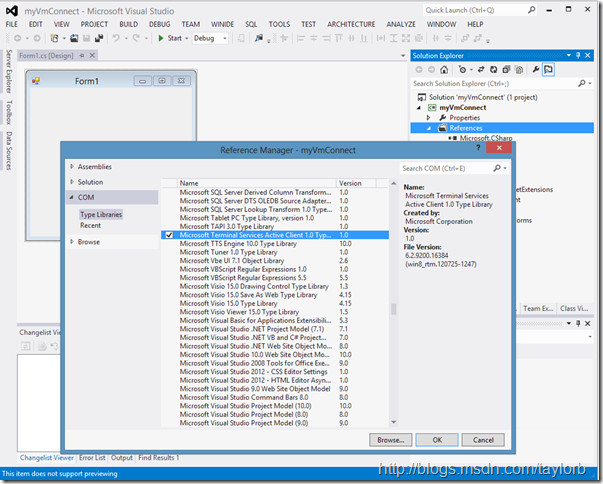
- Add a COM reference to mstscax.dll (Microsoft Terminal Service Active Client 1.0 Type Library)
- Add a new RDP Client Control to the form
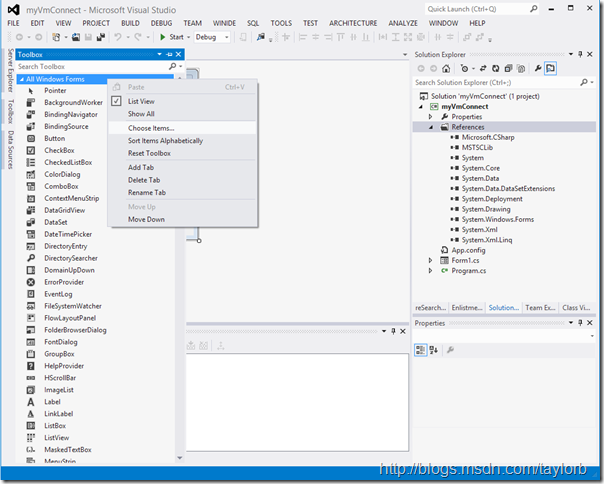
- From the form designer right click in the toolbox and select Choose Toolbox Item
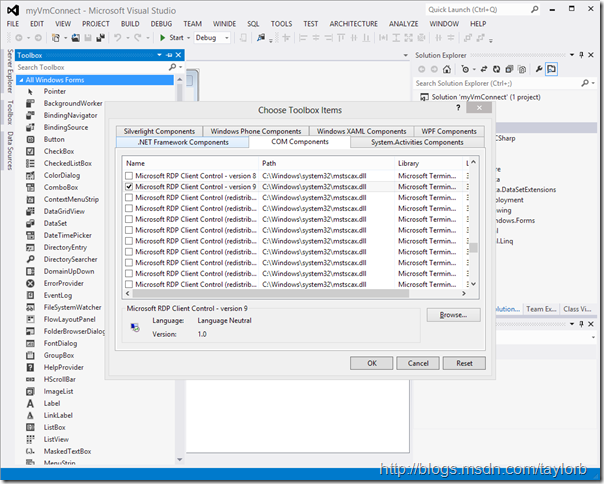
- Select COM Components and find and check “Microsoft RDP Client Control – version 9
- From All Windows Forms (generally at the bottom) find the “Microsoft RDP Client Control – version 9” option and drag it to the form
- Add a text box for the VM ID and a connect button to the form
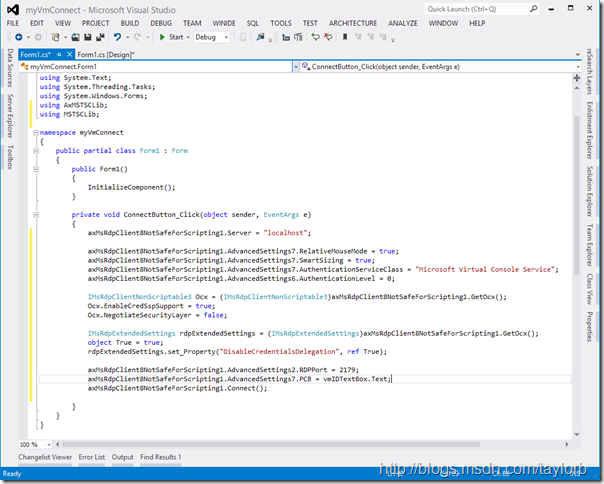
- For the connect button’s click event specify the following basic code
 private void ConnectButton_Click(object sender, EventArgs e)
{
    //specify the server the VM is running on
    axMsRdpClient8NotSafeForScripting1.Server = "localhost";

    //enable relative mouse mode and smart sizing
    axMsRdpClient8NotSafeForScripting1.AdvancedSettings7.RelativeMouseMode = true;
    axMsRdpClient8NotSafeForScripting1.AdvancedSettings7.SmartSizing = true;

    //specify the authentication service - this is required and set the authentication level
    axMsRdpClient8NotSafeForScripting1.AdvancedSettings7.AuthenticationServiceClass =
        "Microsoft Virtual Console Service";
    axMsRdpClient8NotSafeForScripting1.AdvancedSettings6.AuthenticationLevel = 0;

    //retrieve the activeX control and enable CredSSP and disable NegotiateSecurity
    MSTSCLib.IMsRdpClientNonScriptable3 Ocx =
        (MSTSCLib.IMsRdpClientNonScriptable3)axMsRdpClient8NotSafeForScripting1.GetOcx();
    Ocx.EnableCredSspSupport = true;
    Ocx.NegotiateSecurityLayer = false;

    //retrieve the activeX control and disable CredentialsDelegation
    MSTSCLib.IMsRdpExtendedSettings rdpExtendedSettings =
        (MSTSCLib.IMsRdpExtendedSettings)axMsRdpClient8NotSafeForScripting1.GetOcx();
    object True = true;
    rdpExtendedSettings.set_Property("DisableCredentialsDelegation", ref True);

    //set the RDPPort and set the PCB string to the VM's ID
    axMsRdpClient8NotSafeForScripting1.AdvancedSettings2.RDPPort = 2179;
    axMsRdpClient8NotSafeForScripting1.AdvancedSettings7.PCB = vmIDTextBox.Text;

    //connect to the VM
    axMsRdpClient8NotSafeForScripting1.Connect();
}
Step 1 - Create a new C# Windows Forms project In Visual Studio
Step 2 - Add a COM reference to mstscax.dll (Microsoft Terminal Service Active Client 1.0 Type Library)
Step 3.1 - Add a new RDP Client Control to the form, From the form designer right click in the toolbox and select Choose Toolbox Item
Step 3.2 - Add a new RDP Client Control to the form, Select COM Components and find and check “Microsoft RDP Client Control – version 9
Step 3.2 - Add a new RDP Client Control to the form, From All Windows Forms (generally at the bottom) find the “Microsoft RDP Client Control – version 9” option and drag it to the form
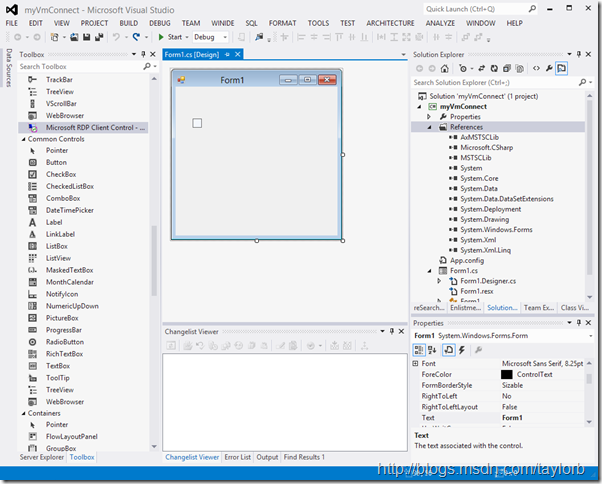
Step 4 - Add a text box for the VM ID and a connect button to the form
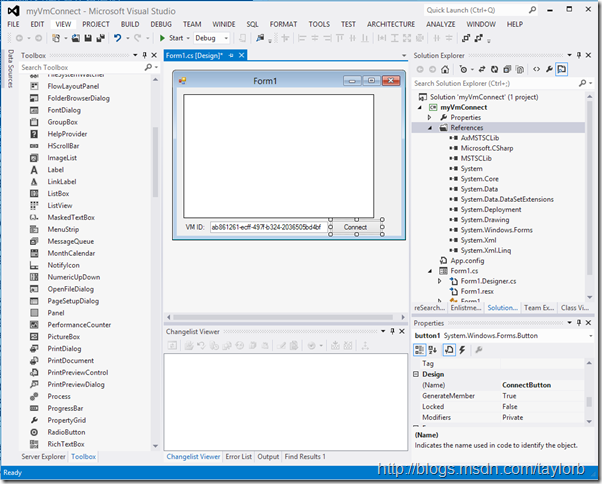
Step 5 - For the connect button’s click event specify the following basic code
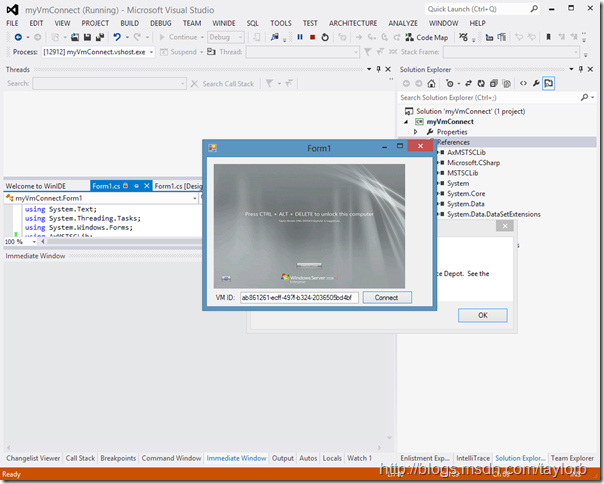
Your new solution in action!
-taylorb
Program Manager, Hyper-V