Putting Virtual Earth in Groove
Later on today, I will be showing my manager how our distributed team could use Microsoft Office Groove 2007 to share information and track activities. I first heard of Groove, when I was at Mindjet and we had built a Mind Mapping plug-in for Groove (before it was a Microsoft product). That product was discontinued for various reasons, but I really understood the power of Groove's peer-to-peer workspace paradigm.
Now that I am part of a virtual team (we all work out of our home offices) spanning the United States, I have been investigating Groove. Because Groove works very well offline and online, handling the synchronization behind the scene, it is appropriate for the way our team works. We want to use it to do the following:
- Cut down the email traffic
- Online/Offline collaboration
- Change notification
- Discussions
- File Sharing
My first experiments with Groove forms were to create some form that tracked our activities. I found that the forms architecture was very easy to use. I then tried, in another Groove workspace, to put a Silverlight control in a Groove space; that worked as well. When I blogged about that, I got a note from Robert Roy on the Virtual Earth team who was very excited about getting maps into Groove. He meant geographic maps, not mind maps, but that got me thinking, maybe I could use the same technique that Hugh Pyle showed to put the Virtual Earth control in a Groove form. If I could do that, I could integrate the information in the Groove forms with maps. The only caveat was that since Virtual Earth relied on a web service, it couldn't work when disconnected from the web. It had to "fail gracefully" when disconnected. Well, I did it! Here's how you can too.
Open an existing Groove 2007 Workspace or create a new "Standard" workspace.
In that workspace, create a Forms tool and press the Start Here button
Name the Form "Map"
Once the design sandbox is created, click on the Create New Field... link on the left side
Add a Static Text field, naming it "Map"
Click on the Form Scripts tab on the right
Press Add Script and Browse...
Instead of browsing for a file, put this in the File Name box and press Open:
https://dev.virtualearth.net/mapcontrol/mapcontrol.ashx?v=5
The file will be downloaded from the web (you must be connected)Press OK once the file has been downloaded (it should be named something like mapcontrol[1].ashx_v=5
Check the box to the left of System callout script for Form_1.js
Click on System callouts script for Form_1.jsand press Modify...
Select the function OnAfterInitialze and put the following code in it:
var mapElement = document.getElementById("Map");
mapElement.style.width="400px";
mapElement.style.height="400px";
var map = new VEMap("Map");
map.LoadMap();Press OK, and then Save.
Add a view by checking at least one of the fields and pressing Save.
Press Publish Sandbox.
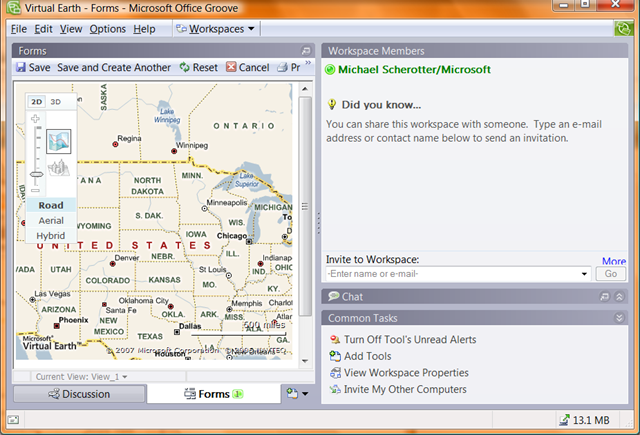
Press New...Map and you should see a Virtual Earth map in the Groove form!
Using the Form Scripts, you can write code in JavaScript to control the map. To see what you can do with the Virtual Earth control, take a look at the Virtual Earth Interactive SDK.
If you would like to be invited to this Groove workspace, send me a message.