Consuming an Entity Data Model using the EntityDataSource control (tutorial)
With this tutorial I want to show you how you can use the EntityDataSource control in order to build an ASP.NET Web Page which is consuming an Entity Data Model (created with Entity Framework); you will see what are the typical problems you may find when working with this control.
EntityDataSource allows you to bind your data into the UI and is really powerful in case you want to do Rapid Application Development; but because it lives completely in the UI it does not allow you to have a separation of the logic between the layers. If you want to have such a separation you are probably better with the ObjectDataSource control.
The Entity Data Model we want to consume is represented by the following diagram and has been generated from the Northwind sample database.
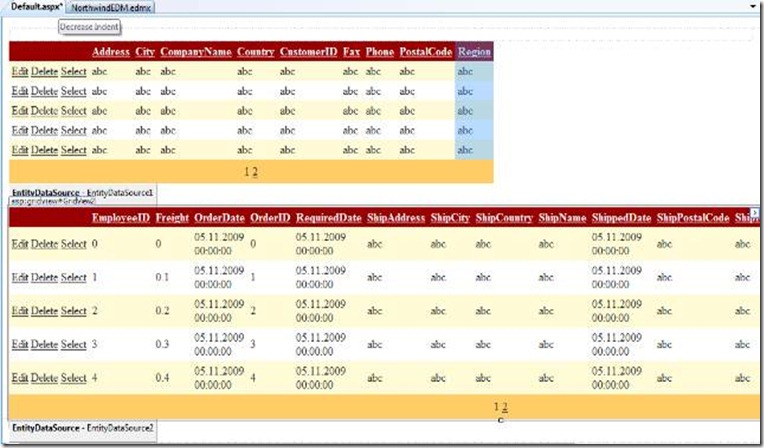
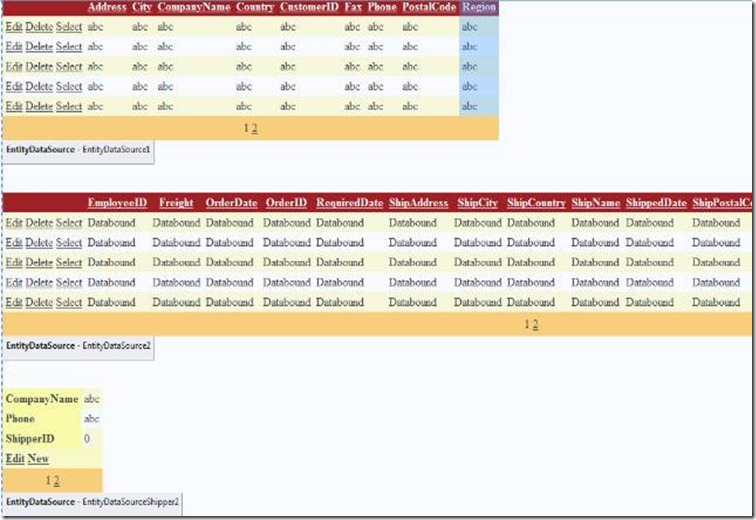
The sample page we want to build will be like the following one: a typical master-detail solution with Edit functionality. You select a customer and you get the details about the Order. You can change the customer details, the order details (including the assigned shipper) and modify the shipper’s details.
In order to start you have to create an ASP.NET Web Application using Visual Studio, add an ADO.NET Entity Data Model (please include the following tables: customers, orders and shippers). We are now ready to consume the model.
Open the default.aspx page within the Visual Studio designer and drag & drop a GridView control. Click on the top-right corner of the GridView controller and choose <New data source…> as dataSource.
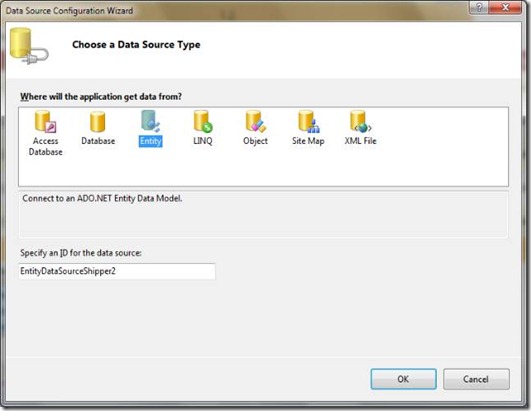
When the wizard starts, select Entity as data source. By choosing Entity an EntityDataSource control with ID EntityDataSource1 will be automatically generated for you. Press OK.
On the following mask you have to select the connection string and the object container name (just one single choice is available, take this one). Then press Next.
You now have to configure the data selection. Because in the first GridView control (GridView1) we want to display the list of customers and we also want to expose edit functionality, choose customers as EntitySetName, select Select All (Entity Value) and put the hacks by Enable automatic inserts/updates/deletes.
Note: a huge number of people don't realize that when they select some specific columns from the following dialog, they are actually creating an anonymous type and therefore it is not possible to have automatic inserts, updates and deletes.
Press Finish and then by the following dialog activate all functionalities (Enable Paging, Enable Sorting, … ) as shown below:
In order to put some color, click on Auto Format… and select classic color. Set also the PageSize property of the Gridview1 control to 5. You should now have something like this:
We now want to show the related orders. That’s why we need to add a second GridView control by placing it into the designer using drag&drop.
From the GridView Tasks menu, select New data Source (Choose Data Source) as you did before…the wizard will start. Follow the same steps you did before for the GridView1 control representing the list of customers. The only difference here, is that you have of course to choose Orders instead of Customers as EntitySetName from the Configure Data Selection mask.
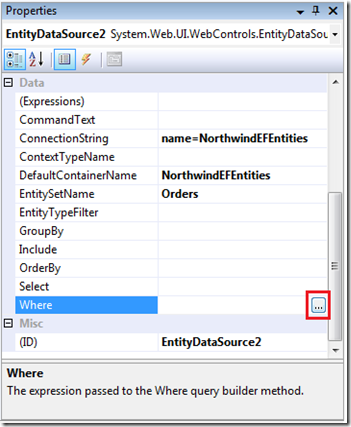
Because we want to display just the order related to the selected customer within the first GridView control we have to define a “where condition”. In order to do that select the EntityDataSource2 control (the one which is related to the second GridView control- GridView2). In the properties window, select the Where property and click on the ellipse button as showed below:
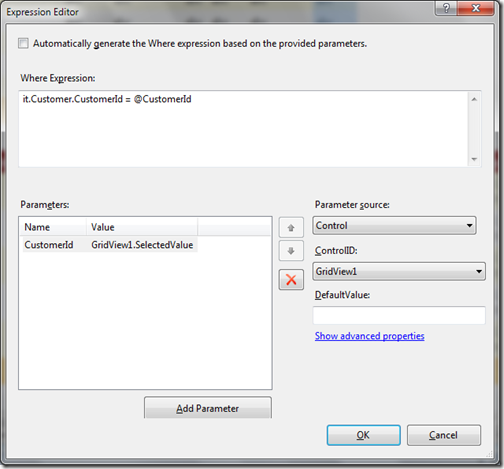
Set the where expression (which is an EntitySQL expression) as shown below. Then add a parameter and name it CustomerId (must correspond to the @ parameter within the where expression).From the Parameter source dropdown list select Control and as ControlID select GridView1. Within the Parameters section the value GridView1.SelectedValue appears, which represents the ID of the selected customer within the customers grid.
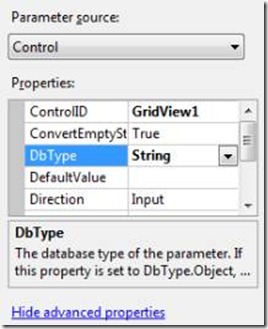
One last thing has to be done. Click on the Show advanced properties and select String as DbType.
You can now start the application by pressing F5. By selecting one customer you should get the related orders.
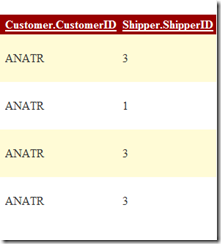
Note: ShipperId (Shipper.ShipperID), which represents the ID of the related entity (Shipper), is shown within the GridView, even though the related entity Shipper has not been loaded (no include statement has been defined).
Now suppose we want to show the CompanyName of the Shipper Navigation Property (have a look at the Order entity within the first figure, which represents the Entity Data Model). Because CompanyName is not the key, in order to show it we have to explicitly tell to the EntityDataSource2 control (the one bind to the orders GridView control-GridView2) that when the orders are loaded, the related shipper must also be loaded. In order to do that you have to set the include property of EntityDataSource2 control to Shipper.
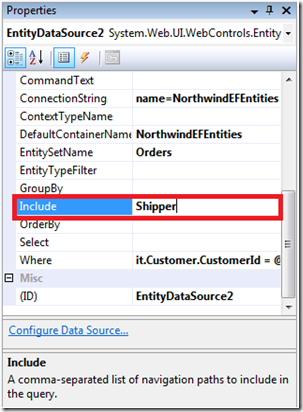 What you are doing here, is just a sample of Eager Loading.
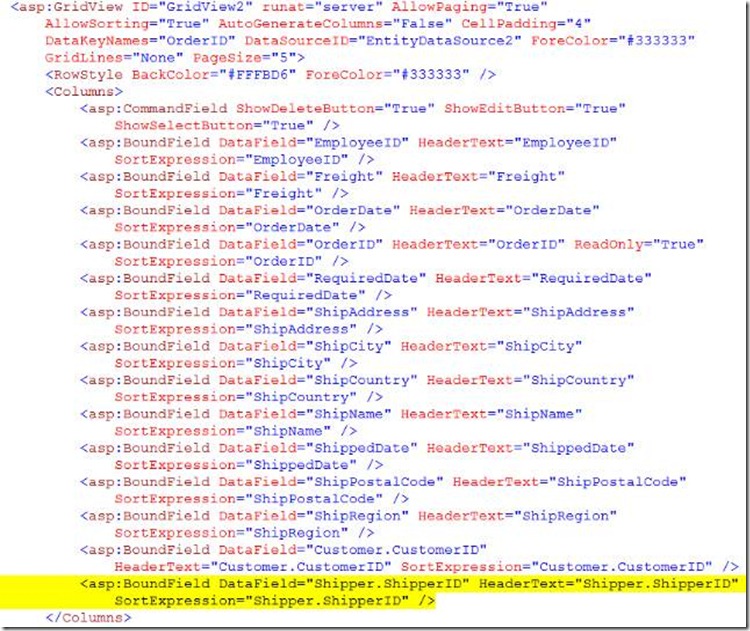
The next step is to define a column to show the CompanyName: switch to source view and copy the following piece of xml highlighted in yellow.
Paste it below and replace ShipperID with CompanyName:
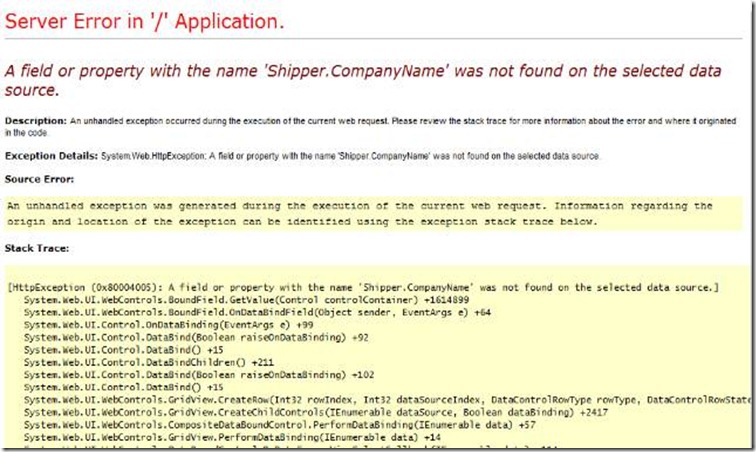
If you try now to start the application (F5), by selecting one customer you will get the following strange error: “A field or property with the name ‘Shipper.CompanyName’ was not found on the selected data source”.
Why that?
Because you cannot access properties of related entities with BoundFields, even if the related entity has been loaded with the Include clause. What we need in order to show properties which are not keys of related entities, is a TemplateField.
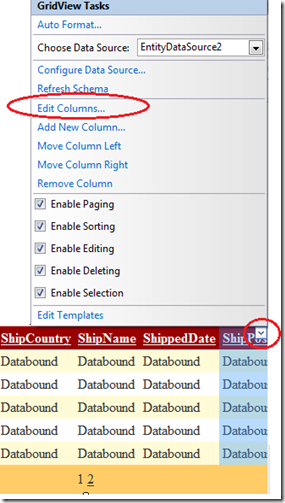
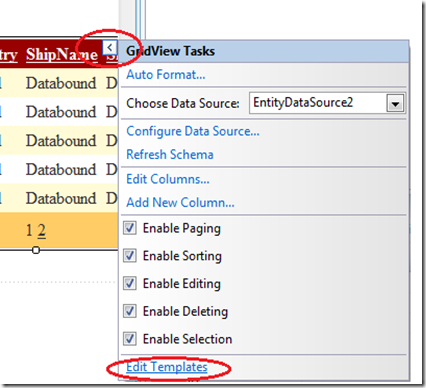
One easy step is needed to transform your BoundField in TemplateField. Switch to Design view and from the GridView Task menu (of the GridView2 control) select Edit Columns …
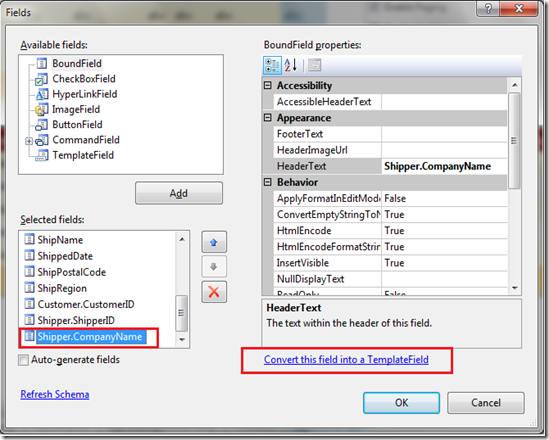
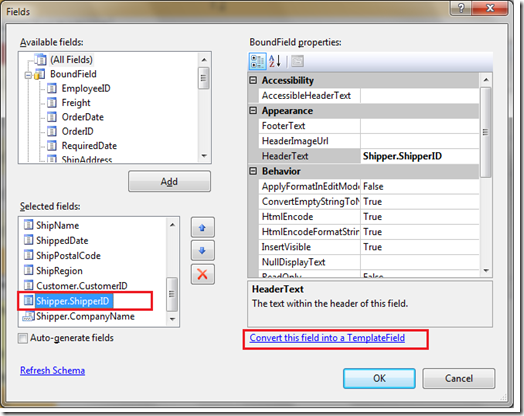
When the Fields dialog appears, select the Shipper.CompanyName and click on the Convert this field into a TemplateField and press OK.
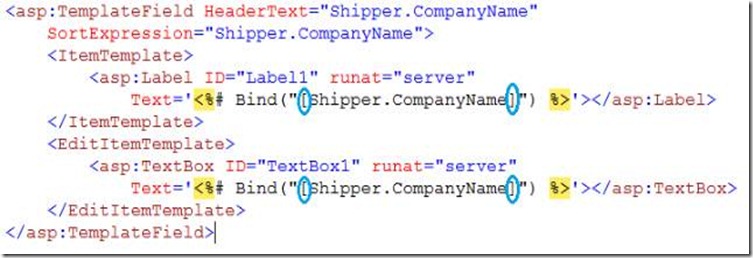
Go to the source view and remove the generated square brackets from the template field. If you don’t do it, you will get a strange error.
If you now try to go in Edit mode within the Orders grid you will see that the cells of CompanyName column are being transformed in TextBox control. This doesn’t make really sense; in fact what you need here is a DropDownList control; what you want to do here is evtl. to assign another shipper and not to edit shipper information.
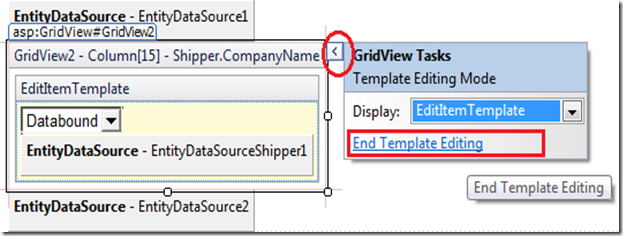
In order to get the DropDownList we have to change the Edit template. Switch again back to the design view. Select Edit Templates.
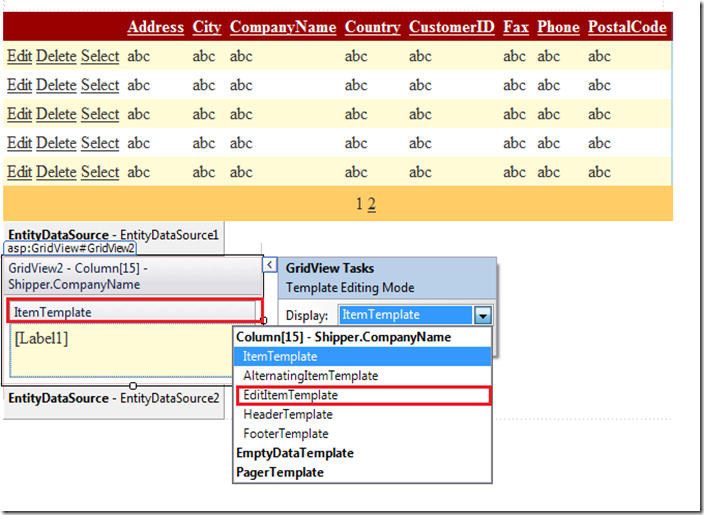
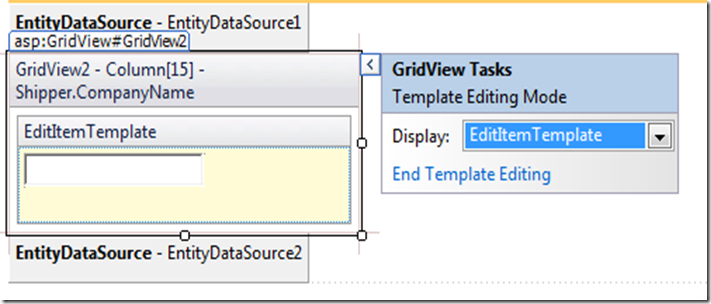
Per default Visual Studio is displaying the ItemTemplate, but Be Careful…what we want to change here is the EditItemTemplate. Switch to the EditItemTemplate.
You should now have the following situation:
Replace the TextBox control with a DropDownList control. Then from the DropDownList Tasks menu select Choose Data Source …
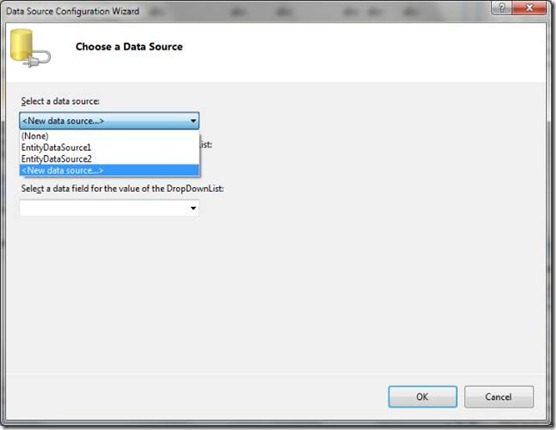
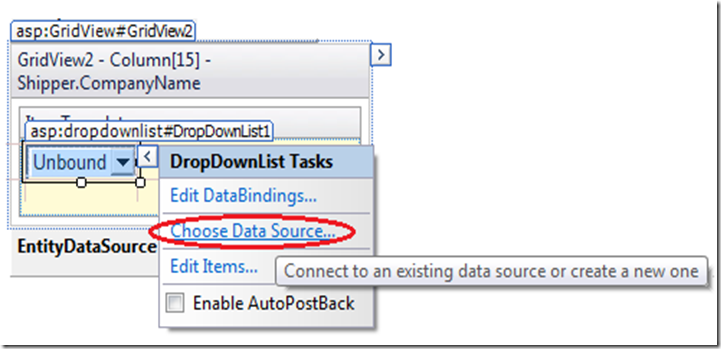 From the Choose Data Source dialog select <New data source…> (we need a new EntityDataSource control in order to display shipper information).
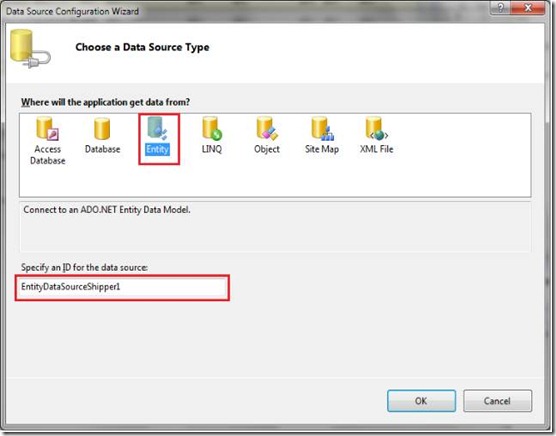
Select once again Entity and put as ID EntityDataSourceShipper1.
Press OK and follow the wizard as you did before (of course by selecting all related Shipper information and without enabling any inserting, updating and deleting functionality).
At the end select CompanyName as data field to be displayed within the combobox and ShipperID to be used as ID.
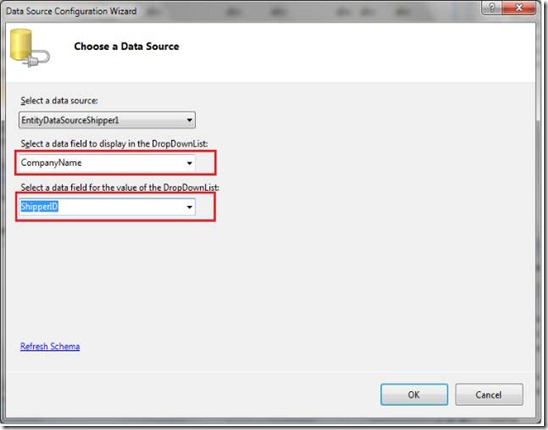
Press OK.
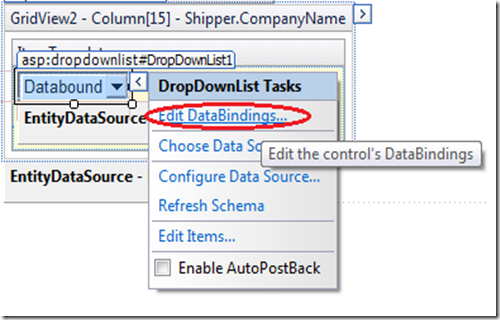
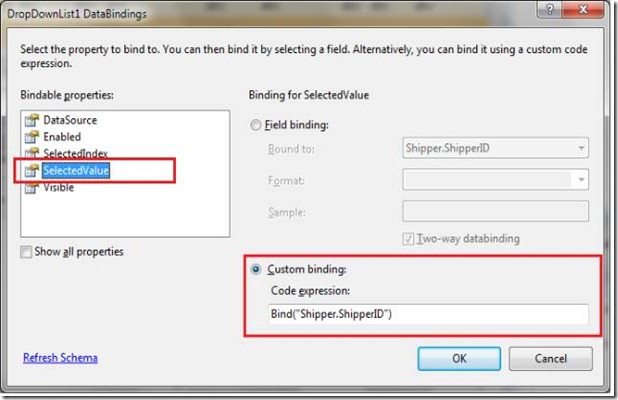
We now have to synchronize the value of the DropDownList (SelectedValue) with currently item being edit. To do that click on the EditDataBinding… link within the DropDownList Tasks menu.
and within the DataBindings dialog set a custom binding expression for the SelectedValue property (as shown below without square brackets).
We are now finished with the Editing Template. Click on End Template Editing.
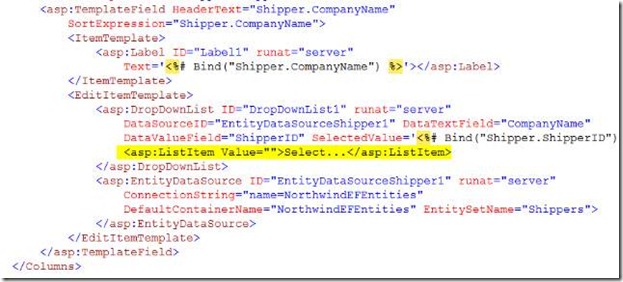
There is another problem to be solved. There may be situation where we do not have a shipper assigned to an order yet. Because of that we have to add an empty entry in the DropDownList control, otherwise you will get an error.
Add the empty entry by adding the following line within the DropDownList control definition:
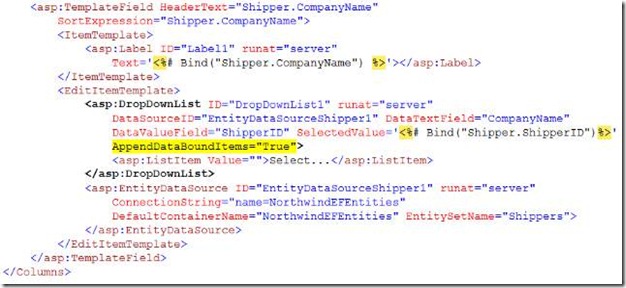
You also have to set the AppendDataBoundItems propertyof the DropDownList control to true.
Let’s also hide the ShipperID column by setting his attribute Visible to false (later if you want you can also hide others columns by simply doing the same thing).
What do we want to do next?
We want to be able to edit shipper information. So when I select an order I want to get all shipper information and being able to edit them. In order to display the shipper information we are going to use a DetailsView control.
First switch to design view and add a DetailView control on the bottom of the page.
When you start the Data Source Configuration wizard, set EntityDataSourceShipper2 as ID for the data source control being generated.
Press OK and follow the wizard as you did before (of course by selecting all related Shipper information and this time by only enabling inserting and updating …no deleting functionality).
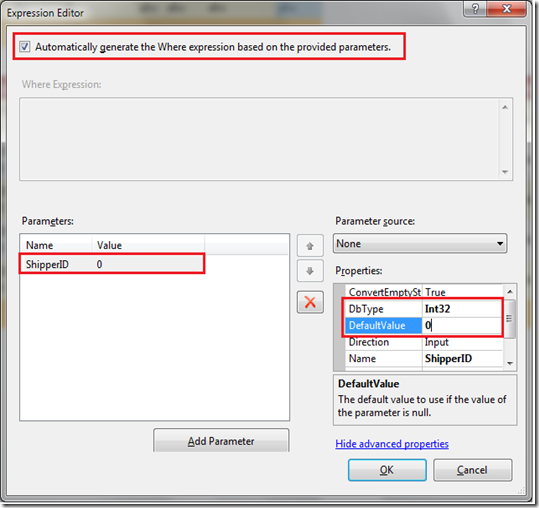
Open the Where dialog of the new generated EntityDataSourceShipper2 and do the following changes:
Press OK.
And now we need of course to provide this parameter (ShipperID) or if you prefer a value for this parameter to the DetailView control (in fact we didn’t defined any parameter source information yet). Where can I find this information?
First you have to convert the ShipperID BoundField in a TemplateField. In order to do that open the field dialog of the GridView2 control by clicking Edit columns… within the GridView2 Task menu and Convert the Shipper.ShipperID BoundField into a TemplateField.
Switch to the source view, remove the generated square brackets and rename the generated label in lblShipperID.
Remove the part highlighted in yellow:
Generate the SelectedIndexChanged event handler on the second grid (orders grid) and add the following code.
By doing this every time another order is being selected the ShipperID value can be retrieved from the lblShipperID label control and used to set the where parameter of the EntityDataSourceShipper2 control (used to automatically generate a where condition, which at the end retrieves the shipper of the selected order).
We also have to generate the following event handler, which makes a refresh on the second grid, whenever a change is done to the Shipper information (DetailsView control).
protected void DetailsView1_ItemUpdated(object sender, DetailsViewUpdatedEventArgs e)
{
GridView2.DataBind();
}
There is still another small problem. When I change selection on the first grid, of course the second grid with the orders is being reloaded. The problem is that in this specific case the DetailsView control will still show the old shipper information (because the WhereParameter[“lblShipperID”] still contains the old id).
To fix this we can implement the DataBound event handler of the second grid (GridView2 control). First we have to generated the GridView2_DataBound event handler: 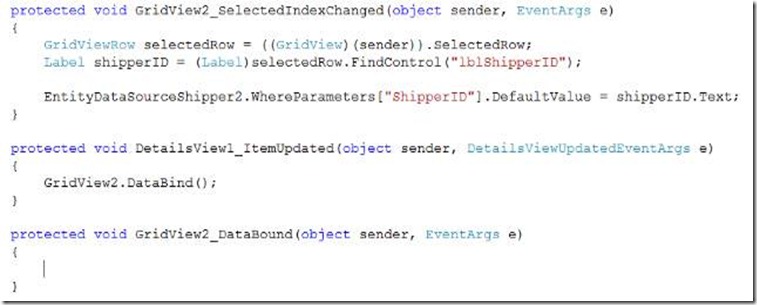
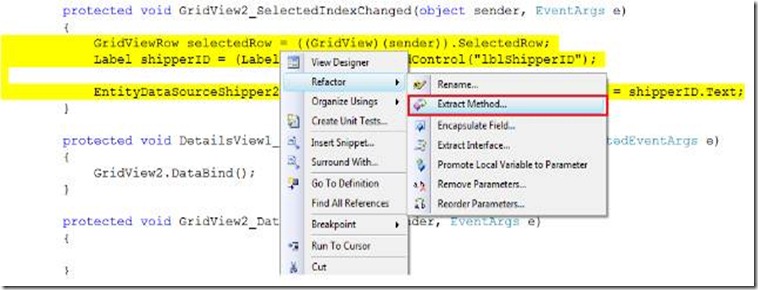
Now we have to refactor the content of the GridView2_SelectedIndexChanged event handler by selecting the method’s code, right-clicking on it and selecting Refactor|Extract Method …
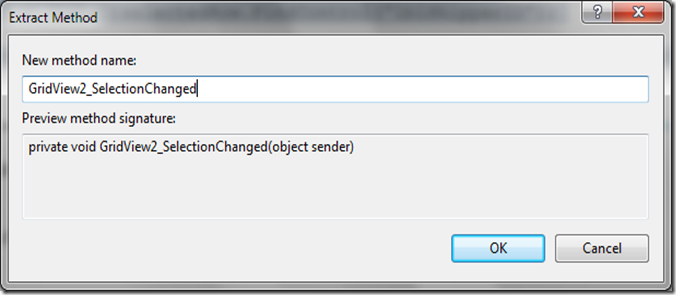
Change the method name as follow and press OK.
Add the following code to the GridView2_DataBound event handler:
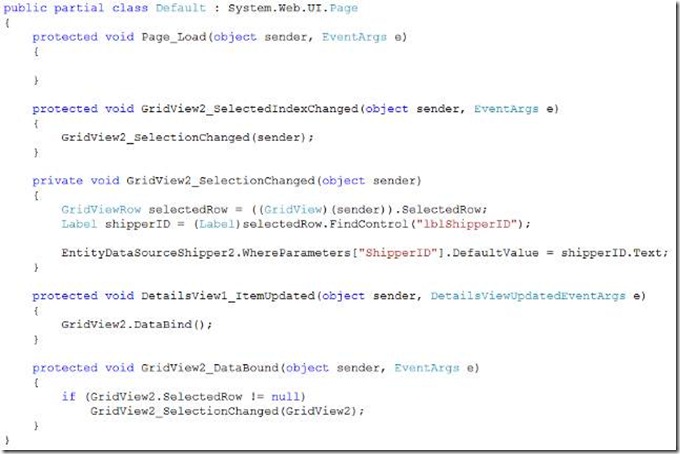
We should now have the following code:
One last detail…. you should know that Bind (in write mode) only understands properties that are on your root entity. In fact if you try to delete an order, instead of getting a “Reference Constraint” error (because the order is related to other entities), you get something like “System.NullReferenceException: Object reference not set to an instance of an object.”…a strange error message….
If you want to get what you expect, you have to change Bind with Eval; but you then also have to know that Eval can be used for read-only databinding…
In our case we can replace Bind with Eval for the CompanyName field (which is not defined on the root entity).
The final solution is available in the enclosed zip file.
Hope it helps,
Ken Casada


