Well Performing Silverlight Application with XAML On Demand
With this post I’ll show you how you can extend the user interface of a Silverlight application with additional content downloaded on user’s demand. This is sometimes required if you want to have well performing Silverlight applications. What does it mean? That the content (UI + Assemblies) of an application can be splitted into multiple assemblies and pieces of UI can be organized into different XAML files and therefore downloaded on demand. Thus, at some point, the extra needed content must be brought down to the client.
In order to do that Silverlight comes with a WebClient class, which can be used each time you need to download stuffs from a web server.
In case you just need to download something that can be processed as a string (for instance JS code or plain XAML, but not managed code), then you can use the DownloadStringAsync method of the WebClient class. In this particular case you can then make use of the XAMLReader class in order to parse and transform the downloaded string into a Silverlight tree object, which can then be appended to the UI of the main application (for instance by using a stackpanel control as a placeholder).
If you think about what a more complex Silverlight application might needs, you will probably see that in many scenarios you will need to download not just some XAML but also some related code (for instance a code-behind file), which is compiled into an assembly. So, the next question is, how can I download and integrate extra assemblies into a Silverlight application on demand?
So, in this specific case you are not working with a string, but you are working with binaries which can also include XAML code. To solve this more challenging part, you can use once again the WebClient class, but this time you have to use the OpenReadAsync method, which connects to a specific URL (passed as a parameter) representing the additional xap package you want to download and returns a stream of data. Once you get the stream of data you can extract all the contained assemblies (including the XAML code) and load them in memory. 
Once the assembly has been loaded in memory you can instantiate the class you need.
In order to execute this big task Silverlight offers you once again some out-of the box classes: the StreamResourceInfo and the AssemblyPart class.
OK, this was just an introduction; let’s now start building our “on-demand” sample solution!
Create a new Silverlight project named MainSLApp within Visual Studio 2008. This will be our main Silverlight application and will be hosted inside a Web Site application (MainSLAppWeb).
Once you have created the project you will notice that 2 XAML files have been created: App.xaml and Page.xaml files (with related code-behind files). If you have a look at the App.xaml file you will see that there is a reference (x:Class="MainSLApp.App" ) to the App class, which is the main Silverlight Application entry point. If you have a look at the constructor of the App class you can also notice that an handler for the Startup event is registered and that the code defined inside this handler (which runs when the application is instantiated by the Silverlight’s plug-in) instantiates the Page class (new Page();).
public partial class App : Application
{
public App()
{
this.Startup += this.Application_Startup;
this.Exit += this.Application_Exit;
this.UnhandledException += this.Application_UnhandledException;
InitializeComponent();
}
private void Application_Startup(object sender, StartupEventArgs e)
{
this.RootVisual = new Page();
}
…
}
The Page class is defined within the Page.xaml.cs file and is bind to the Page.xaml file which represents the User Interface of our application. Now, in order to build our “on-demand” sample application let’s modify the XAML code of the Page.xaml file in the following way (note that the UI is represented by a UserControl):
<UserControl x:Class="MainSLApp.Page"
xmlns="https://schemas.microsoft.com/winfx/2006/xaml/presentation"
xmlns:x="https://schemas.microsoft.com/winfx/2006/xaml"
Width="450" Height="300">
<Grid x:Name="LayoutRoot" Background="White">
<StackPanel Width="400" HorizontalAlignment="Left" Background="YellowGreen">
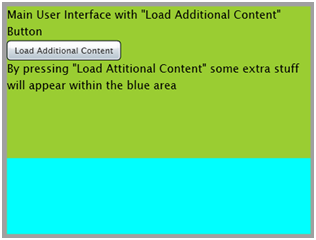
<TextBlock TextWrapping="Wrap">Main User Interface with "Load Additional Content" Button</TextBlock>
<Button HorizontalAlignment="Left" Width="150" x:Name="LoadExtraUI" Content="Load Additional Content"></Button>
<TextBlock TextWrapping="Wrap">By pressing "Load Attitional Content" some extra stuff will appear within the blue area</TextBlock>
</StackPanel>
<StackPanel x:Name="myPlaceHolder" Width="400" HorizontalAlignment="Left" Height="100" Background="Aqua" VerticalAlignment="Bottom"></StackPanel>
</Grid>
</UserControl>
By replacing the XAML inside the XAML designer you will get the following result:
Note that I have defined a StackPanel control as a placeholder for the additional content to be shown. It’s now time to implement the whole logic responsible for downloading all additional content (xaml + assemblies) from the web server down to the client machine. As mentioned before we are going to use the WebClient class with the OpenReadAsync method and the StreamResourceInfo and AssemblyPart classes.
In order to do that I’ll now implement a helper class named ManagedDownloader. Why this strange name and not just Downloader? Because I don’t want to create confusion between this class and the one available for Javascript.
Let’s add a new SilverlightClassLibrary project and name it SilverlightHelper. Then rename the Class1.cs file and the relative class name to ManagedDownloader.
Let’s now implement ManageDownloader. As first let’s define an event (PackageDownloaded ) , which will be fired when the ManagedDownloader class has finished downloading the whole xap package. Note that the event argument is of type PackageDownloadedEventArgs and that PackageDownloadedEventArgs implements a public member returning a UserControl (which represents the additional UI).
public class PackageDownloadedEventArgs : EventArgs
{
public UserControl Downloadedobj;
}
public class ManagedDownloader
{
public event EventHandler<PackageDownloadedEventArgs> PackageDownloaded;
}
Now add the following methods to the ManagedDownloader class.
public void LoadPackage(string xapURL, string assemblyName, string userControlClassName)
{
_assemblyName = assemblyName;
_userControlClassName = userControlClassName;
WebClient wc = new WebClient();
wc.OpenReadCompleted += new OpenReadCompletedEventHandler(wc_OpenReadCompleted);
wc.OpenReadAsync(new Uri(xapURL));
}
void wc_OpenReadCompleted(object sender, OpenReadCompletedEventArgs e)
{
throw new NotImplementedException();
}
Also, do not forget to add the definition of the 2 private members (_assemblyName, _userControlClassName) to the ManagedDownloader class. If you have a look at the LoadPackage method you see that this method receives the address of the xap package to be downloaded, the assembly’s name to be loaded (assembly which is included in the xap package) and the class name of the UserControl to be instantiated (representing the additional UI). An instance of the WebClient class is then created created. Before calling the OpenReadAsync method (which returns a stream of data representing the xap package defined by the passed URL), an handler for the OpenReadCompleted event is registered (wc_OpenReadCompleted). This handler is called at the point the download of the xap package from the web server down to the client is completed. Let’s implement it.
void wc_OpenReadCompleted(object sender, OpenReadCompletedEventArgs e)
{
//e.Result contains the stream representing the xap package
//Extract the assembly from the xap package (zip package)
//and load it into the current application domain
Assembly assembly = LoadAssembly(_assemblyName, e.Result);
}
private Assembly LoadAssembly (string AssemblyName, Stream zipStream)
{
//assemblyURI defines the relative URI that indentifies the resource file to be extracted from the zip file)
Uri assemblyURI = new Uri(_assemblyName, UriKind.Relative);
//Extract and load the assembly containing the additional UI.
//The StreamResourceInfo class provides resource stream information
StreamResourceInfo zipPackageSRI = new StreamResourceInfo(zipStream, null);
StreamResourceInfo assemblySRI = Application.GetResourceStream(zipPackageSRI, assemblyURI);
//An AssemblyPart is an assembly that is to be included in a Silverlight application's application package (xap)
AssemblyPart assemblyPart = new AssemblyPart();
//Load converts a Stream to an Assembly that is subsequently loaded into the current application domain
Assembly assembly = assemblyPart.Load(assemblySRI.Stream);
return assembly;
}
The LoadAssembly method takes the _assemblyName and the stream representing the xap/zip package (e.Result) and returns the loaded assembly which has been extracted from the original passed stream. I’m not going to describe each single step inside the LoadAssembly method…that’s the reason why I decided to add some comments to the code J.
The returned assembly contains the code behind file and the XAML of the additional content we want to display.
We now need to extract and create an instance of the UserControl representing the additional UI that must be added to the main Silverlight UI application. In order to return the UserControl’s instance we have to raise the PackageDownloaded event and populate the argument of the event by setting the Downloadedobj member to the UserControl’s instance. Add the following code to the wc_OpenReadCompleted event handler:
void wc_OpenReadCompleted(object sender, OpenReadCompletedEventArgs e)
{
//e.Result contains the stream representing the xap package
//Extract the assembly from the xap package (zip package)
//and load it into the current application domain
Assembly assembly = LoadAssembly(_assemblyName, e.Result);
if (PackageDownloaded != null)
{
PackageDownloadedEventArgs args = new PackageDownloadedEventArgs();
object userControlobj = assembly.CreateInstance(_userControlClassName);
args.Downloadedobj = userControlobj as UserControl;
//Raise the event
PackageDownloaded(this, args);
}
}
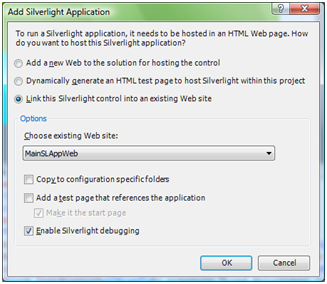
Now that our helper class is ready we just need to use it. But in order to use it we first need to create a new Silverlight Application project containing the additional UI to be displayed. Create a new Silverlight Application project and name it AdditionalUI. When the following dialog appears configure it as follow:
Modify the Page.xaml file content as above
<UserControl x:Class="AdditionalUI.Page"
xmlns="https://schemas.microsoft.com/winfx/2006/xaml/presentation"
xmlns:x="https://schemas.microsoft.com/winfx/2006/xaml"
Width="400" Height="100">
<Grid x:Name="LayoutRoot" Background="Transparent">
<StackPanel HorizontalAlignment="Left">
<Button Content="Press Me" Click="Button_Click" Width="200"></Button>
<TextBlock x:Name="myTextBlock"></TextBlock>
</StackPanel>
</Grid>
</UserControl>
and implement the Button_Click event handler as follow
private void Button_Click(object sender, RoutedEventArgs e)
{
myTextBlock.Text = DateTime.Now.ToLongTimeString();
}
You now need to compile the entire solution by pressing Ctrl+Shift+B. In the ClientBin folder of the web hosting application (MainSLAppWeb) you should now find 2 xap files: the MainSLApp.xap file, representing the main application package and the AdditionalUI.xap file, representing the additional content to be loaded on demand.
We are now ready to use the helper class. Open the Page.xaml file of the MainSLApp project and register an event handler for the click event of the “Load Additional Content” button control.
. . .
<Button Click="LoadExtraUI_Click" HorizontalAlignment="Left" Width="150" x:Name="LoadExtraUI" Content="Load Additional Content"></Button>
. . .
Implement the LoadExtraUI_Click event handler in the following way:
private void LoadExtraUI_Click(object sender, RoutedEventArgs e)
{
ManagedDownloader mdownloader = new ManagedDownloader();
mdownloader.PackageDownloaded += new EventHandler<PackageDownloadedEventArgs>(mdownloader_PackageDownloaded);
mdownloader.LoadPackage("https://localhost:57561/MainSLAppWeb/ClientBin/AdditionalUI.xap",
"AdditionalUI.dll",
"AdditionalUI.Page");
}
void mdownloader_PackageDownloaded(object sender, PackageDownloadedEventArgs e)
{
myPlaceHolder.Children.Add(e.Downloadedobj);
}
Note that an instance of our helper ManagedDownloader class is created. An handler (mdownloader_PackageDownloaded) for the PackageDownloaded event is registered and then implemented. The PackageDownloaded event fires when our ManagedDownloader helper class has downloaded the xap package defined in the URL (https://localhost:57561/MainSLAppWeb/ClientBin/AdditionalUI.xap), has extracted the assembly (AdditionalUI.dll) and has instantiated the proper class/object (AdditionalUI.Page). Be sure that the provided address is correct (you probably need to change the port number).
Note also that in the event handler the downloaded object (which is our UserControl) is added to the Children collection of the myPlaceHolder StackPanel control we defined before.
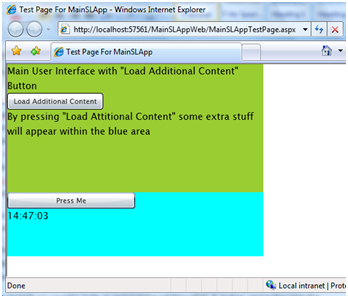
You can now start the web application by pressing Ctrl+F5 and if everything is fine, by pressing “Load Additional Content” you will see the additional content downloaded and displayed. It’s now possible to interact with the additional part.
If, for any reason you need to hide or remove the additional UI, it makes sense to save the downloaded object (e.Downloadedobj) in a local variable so that you can avoid downloading again the same UI. To remove the added part it’s enough to call the Remove method from the Children collection of the myPlaceHolder control.
Of course the whole implementation lacks of error handling and could have been written in a more structured way; anyway it gives you an idea how you can implement an on-demand solution.
The final sample application is available as attachment to this post!
Hope it helps,
Ken