Vista Sidebar Gadgets - Code Signing - HowTo
Based on a recent inquiry, I have compiled the following, simple How-To on digitally signing Vista Sidebar gadgets. Much of the information can be found on the two, following URLs:
- https://blogs.conchango.com/stuartpreston/archive/2007/01/30/Vista_2C00_-gadgets-and-code_2D00_signing_2E00_.aspx
- https://blogs.msdn.com/maximelamure/archive/2007/01/24/create-your-own-pfx-file-for-clickonce.aspx
Thanks a lot to the original authors!
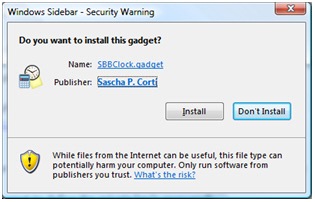
Running an unsigned “.gadget” file will result in the following warning:
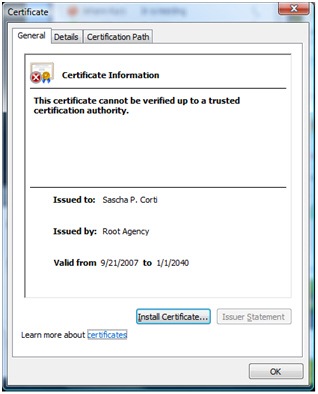
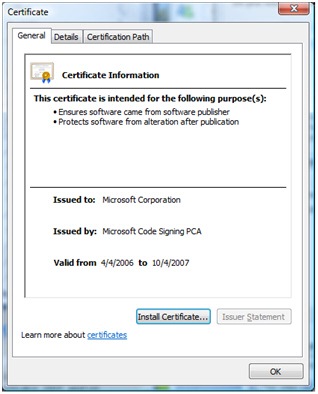
Installing a Sidebar Gadget that is digitally signed results in a similar dialog, that shows the publisher and the certificate to the user:
Clicking the “Name” hyperlink shows the website of the publisher (part of the digital signature) and clicking “Publisher” hyperlink shows the certificate itself:
Gadgets must be created using CAB compression if you want to code-sign them. Zip files renamed to .gadget cannot be code-signed - therefore gadgets created in this way for distribution will always show up as "untrusted publisher" if a user clicks on them.
- To make a redistributable gadget that is code-signed, you must compress the file as a Windows CAB file using the “cabarc” utility (if you've opened a VS2005 Command Prompt it should be in the path or you'll probably find it in %ProgramFiles%\Microsoft Visual Studio 8\Common7\Tools\Bin). Example command line: (from within gadget folder):
cabarc -r -p n DemoGadget.gadget "*.*"
Now, if you have no valid certificate to sign code at hand, you may want to create your own PFX file with your personal information. You can do this by completing these two steps:
Create your public & private Keys (You will be prompt to define the private key’s password):
makecert.exe -sv TestKey.pvk -n "CN=Your Name Here" TestKey.cerCreate your PFX file from the public and private key:
pvk2pfx.exe -pvk TestKey.pvk -spc TestKey.cer -pfx TestPFX.pfx -po secure_passwordSigntool.exe (found in the same folder) can then be used to code sign the .gadget file. I tend to have a .pfx (packaged certificate and private key) so that the build process is portable across machines. Example command line (assuming you are signing with a public certificate):
signtool.exe "sign" /f "TestPFX.pfx" /p "secure_password" /d "Test’s Demo Gadget" /du "https://www.test.com" /t "https://www.mycertprovider/timestampurl" "DemoGadget.gadget"
One perhaps useful bit of information about this - unlike webserver SSL certificates where the certificate expires and you get warnings in a web browser, if you code-sign with a public certificate and timestamp as in the example above (most public certificate providers provide this URL) - you'll find that Windows will trust the file forever, even when the certificate has expired.
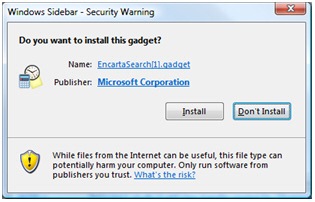
The resulting installation looks as follows: