SharePoint and Windows Azure’s Interlude in Vegas: Building Apps using the Autohosted App Model
Back in Seattle…
Wow, a whirlwind week in Vegas meeting with customers, colleagues, the community and of course conference-goers. If you didn’t catch the conference, last week was the SharePoint Conference 2012. It was a great week full of new areas for the SharePoint community to explore. For me, it was especially interesting as this conference brought together two keen areas of focus for me into focus: SharePoint and Windows Azure. This intersection manifested through the introduction of the new SharePoint cloud-hosted app model to the SharePoint community, and it is here where you really find these two platforms intersecting.
It started with the keynote, which was headlined by Jeff Teper, top brass in Office, who with the help of the SharePoint gang showed off some of the new Social, Mobile and Cloud-centric aspects of SharePoint 2013. To the theme above, it was also good to see Scott Guthrie there as well—introducing the 10,000-ish people to the cloud developer story. The discussion and buzz around this new app model continued throughout the week with many questions focusing on the what and how of these new apps.
Discussing Autohosted and Provider-Hosted…
Having spent some time in this area, I had the chance to present a session on the topic as well as deliver a post-con workshop to a group of very enthusiastic developers with tons of questions about the new cloud app model. I’ve posted my deck below here so for those that couldn’t attend, you can peruse the deck and at least get a sense for what we were discussing—which focused on the Autohosted app and the Provider-Hosted app. These are in essence the two new app models introduced in SharePoint 2013 having strong integration with Windows Azure.
The Autohosted app model natively leverages Windows Azure when you deploy the app to SharePoint, and the Provider-Hosted app enables you to use Windows Azure or other Web technologies (such as PhP). Now one of the questions that kept coming up this week was as follows: “if they both use Windows Azure, then what is the difference between the two?” And this is where things get interesting.
Both hosting models are intended to move code off of the server; this is part of the reason for the move to a new cloud-hosted model. For you SharePoint admins out there, this should make you happy—this abstraction of code away from the server should mitigate ill-performing or malicious code from running on the server. However, this is only part of the reason. The other part is in the new world of Cloud computing, services are rolled out in a more frequent cadence. And at the same time you’re introducing value to the customer through the ability to leverage services that constantly improve and evolve over time (and in a much shorter cycle), you don’t want those updates to cross-sect with your customizations. Updates should be seamless, and abstracting the code from the server helps support this process.
Okay, so we’ve moved off of the server into these two models. You still haven’t answered how they’re different? And the Autohosted and Provider-hosted models are different in a number of ways:
- The Autohosted app model leverages Windows Azure natively, so when you create the app and deploy it to Office 365 the Web app components and database are using the Windows Azure Web role and Windows Azure SQL Database under the covers. This is good because it’s automatic and managed for you—although you do need to ensure you programmatically manage the cross-domain OAuth when hooking up events or data queries/calls into SharePoint. So, top-level points of differentiation: 1) the Autohosted app model uses the Web Sites and SQL Database services of Windows Azure, and 2) it is deployed to Windows Azure (and of course to the SharePoint site that is hosting the app). If you’re building departmental apps or light data-driven apps, the Autohosted option is good. And there are patterns to use if you want to replace the default ASP.NET Web project with, say, an ASP.NET MVC4 Web project to take advantage of the MVVM application programming.
- The Provider-hosted app model supports programming against a much broader set of Windows Azure features—mainly because you are managing the hosting of this type of app so you can tap into, say, Cloud Services, Web Sites, Media Services, BLOB Storage, and so on. (And if these concepts are new to you, then check out the Windows Azure home page here.) Also, while the Autohosted app model tightly couples Windows Azure and SharePoint within a project and an APP that is built from it, the Provider-hosted app provides for a much more loosely-coupled experience. And as I mentioned earlier, this broader experience of self-hosting means that you can also use other Web technologies within the Provider-hosted app.
So, let’s spend a little time in this post on the Autohosted app model, and then I’ll return in a follow-up post with the Provider-hosted app model.
Building your first Autohosted App…
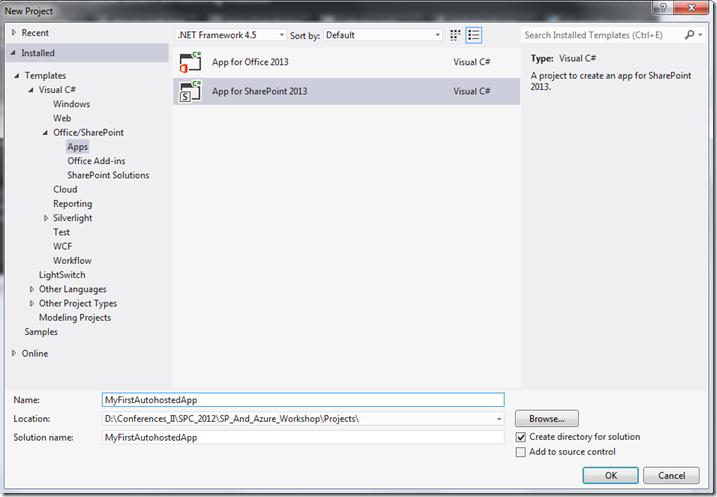
First, open up Visual Studio 2012 and click File, New Project. Select Office/SharePoint, and then select Apps and then App for SharePoint 2013. Provide a name for the app and click OK.
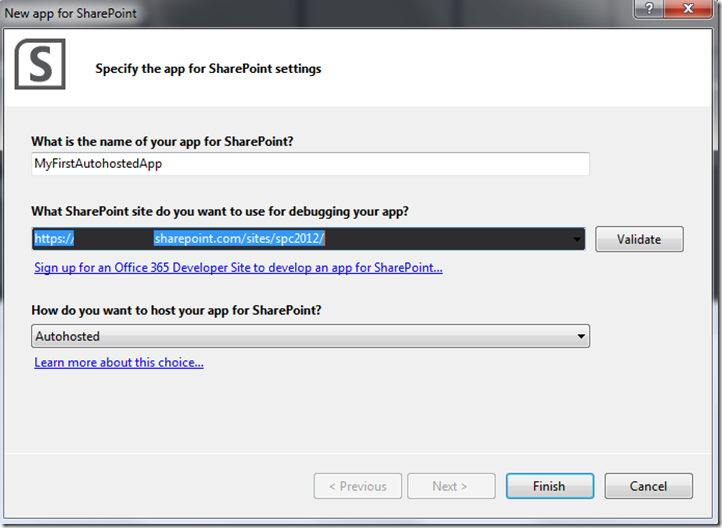
When prompted in the New app for SharePoint dialog, leave the default name for the app, select your O365 tenancy and then select Autohosted as the project type. Click Finish when done.
Visual Studio creates two projects for you: a SharePoint app project and a Web project. Right-click the project and select Add, Class. Call the class Sales, and then add the bolded code below. This is a simple class with three properties: an ID, a Quarter (which represents a fiscal quarter), and TotalSales (representing the total sales for that quarter).
using System;
using System.Collections.Generic;
using System.Linq;
using System.Web;
namespace MyFirstAutohostedAppWeb
{
public class Sales
{
public int ID { get; set; }
public string Quarter { get; set; }
public string TotalSales { get; set; }
}
}
Then double-click the Default.aspx page and replace the <form> element contents with the following bolded code. This provides you with a GridView object, to which you will bind some in-memory data, and a LinkButton, which will trigger the binding.
<%@ Page Language="C#" AutoEventWireup="true" CodeBehind="Default.aspx.cs" Inherits="MyFirstAutohostedAppWeb.Pages.Default" %>
<!DOCTYPE html PUBLIC "-//W3C//DTD XHTML 1.0 Transitional//EN" "https://www.w3.org/TR/xhtml1/DTD/xhtml1-transitional.dtd">
<html xmlns="https://www.w3.org/1999/xhtml">
<head runat="server">
<title></title>
</head>
<body>
<form id="form1" runat="server">
<div>
<p style="font-family: calibri">Simple Autohosted Sales App</p>
<asp:GridView ID="salesGridView" runat="server" CellPadding="4" Font-Names="Calibri" Font-Size="Small" ForeColor="#333333" GridLines="None">
<AlternatingRowStyle BackColor="White" ForeColor="#284775" />
<EditRowStyle BackColor="#999999" />
<FooterStyle BackColor="#5D7B9D" Font-Bold="True" ForeColor="White" />
<HeaderStyle BackColor="#5D7B9D" Font-Bold="True" ForeColor="White" />
<PagerStyle BackColor="#284775" ForeColor="White" HorizontalAlign="Center" />
<RowStyle BackColor="#F7F6F3" ForeColor="#333333" />
<SelectedRowStyle BackColor="#E2DED6" Font-Bold="True" ForeColor="#333333" />
<SortedAscendingCellStyle BackColor="#E9E7E2" />
<SortedAscendingHeaderStyle BackColor="#506C8C" />
<SortedDescendingCellStyle BackColor="#FFFDF8" />
<SortedDescendingHeaderStyle BackColor="#6F8DAE" />
</asp:GridView>
<br />
<asp:LinkButton ID="lnkGetSalesData" runat="server" Font-Names="Calibri" Font-Size="Small" OnClick="lnkGetSalesData_Click">Get Sales</asp:LinkButton>
</div>
</form>
</body>
</html>
Right-click the Default.aspx page and in the code-behind file (Default.aspx.cs), amend the file as per the bolded code below. You’ll see a List collection here, the object you’ll use for the binding, a number of key objects that are used by OAuth to generate the access token for the app and some simple logic to create an in-memory data object and bind it to the GridView.
using System;
using System.Collections.Generic;
using System.Linq;
using System.Web;
using System.Web.UI;
using System.Web.UI.WebControls;
namespace MyFirstAutohostedAppWeb.Pages
{
public partial class Default : System.Web.UI.Page
{
List<Sales> mySalesData = new List<Sales>();
SharePointContextToken contextToken;
string accessToken;
Uri sharepointUrl;
protected void Page_Load(object sender, EventArgs e)
{
TokenHelper.TrustAllCertificates();
string contextTokenString = TokenHelper.GetContextTokenFromRequest(Request);
if (contextTokenString != null)
{
contextToken = TokenHelper.ReadAndValidateContextToken(contextTokenString, Request.Url.Authority);
sharepointUrl = new Uri(Request.QueryString["SPHostUrl"]);
accessToken = TokenHelper.GetAccessToken(contextToken, sharepointUrl.Authority).AccessToken;
lnkGetSalesData.CommandArgument = accessToken;
}
}
protected void lnkGetSalesData_Click(object sender, EventArgs e)
{
string accessToken = ((LinkButton)sender).CommandArgument;
if (IsPostBack)
{
sharepointUrl = new Uri(Request.QueryString["SPHostUrl"]);
}
Sales FY11 = new Sales();
Sales FY12 = new Sales();
Sales FY13 = new Sales();
FY11.ID = 1;
FY11.Quarter = "FY11";
FY11.TotalSales = "$2,002,102.00";
mySalesData.Add(FY11);
FY12.ID = 2;
FY12.Quarter = "FY12";
FY12.TotalSales = "$2,500,201.00";
mySalesData.Add(FY12);
FY13.ID = 3;
FY13.Quarter = "FY13";
FY13.TotalSales = "$2,902,211.00";
mySalesData.Add(FY13);
salesGridView.DataSource = mySalesData;
salesGridView.DataBind();
}
}
}
When you’re done, hit F6 and build the app. Then, double-click the AppManifest.xml file to open the designer, click the Permissions tab and set the Web scope to have Read permissions.
At this point, you can right-click and Deploy (and sign into your tenancy to deploy) or right-click and Publish, navigate to your SharePoint site, click new app to deploy, and then upload, click Deploy and then trust your app.
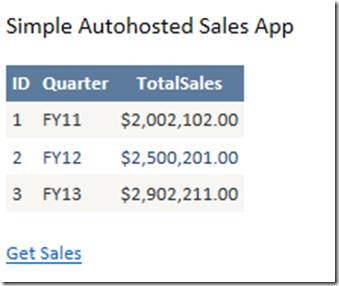
The result should be a deployed app, and when you click it and hit the Get Sales link button, the result should be something fantabulous like the following:
Now if you inspect the URL for this new app, you’ll see something interesting. As per the URL below, you’ll see the GUID for the app, the fact that it’s being hosted in the o365apps.net domain (in Windows Azure), and then you have token(s) and data that are embedded within the URL such as the SPHostUrl, the Language, and so on.
So, congrats if this was your first Autohosted app you built. It was a relatively simple one, but in time you’ll build some interesting apps that leverage more complex patterns. You can download the code from here. (Open the project, click the App project and then change the SharePoint Site URL to point to your SharePoint Online site before you build and deploy.)
For those that want to do more, there’s also a great sample from the SDK that illustrates OAuth and OData, which you can find here. Nice walkthrough that actually works without any rework save for changing the site property because it uses an existing hidden list.
Well, that’s it for today. More to come on the Provider-hosted app model soon.
Happy coding!
Steve


