SharePoint and Azure at SharePoint Summit
Here in Toronto this week and wanted to follow up with a blog post on a session I did earlier in the week: Integrating SharePoint and Windows Azure. In the spirit of continuing to expose how you can integrate SharePoint 2010 with the different parts of Azure, I walked through some of the different ways in which you can bring these technologies together.
Specifically, I addressed:
- How to create your first Azure application (gave the developers a tour of the Azure portal and the tools in VS 2010);
- The high-level ‘pillars’ of how Azure and SharePoint come together (i.e. reach, resource and reusability); and
- Walkthroughs of a number of integrated examples that showed: a) Azure Marketplace DataMarket integration with Silverlight, b) SQL Azure and BCS, c) SQL Azure and SSRS, d) BLOB Storage and Silverlight in SharePoint, and e) Bing, Azure, Silverlight, and Client Object Model integration.
The deck I walked through can be seen here:
I’ve posted some Azure and SP code/rough demo walkthroughs in past blogs (which are posted here), but let’s take a look at one of the examples I showed this week: integrating Azure Marketplace DataMarket (aka ‘Dallas’) data using Excel Services and then programmatically using Silverlight.
To get started with Dallas, you go here: https://datamarket.azure.com/. You can sign in using your LiveID and then get a developer key so you can code against the data that is exposed on the site.
Dallas data, for the most part, uses oData to expose data using a REST/WCF service. This makes it very easy to go ahead and query/use data in your applications.
There are quite a few data subscriptions on the site, some of which are free and others which charge fees. When you explore the datasets, you’ll see which one charge vs. which ones don’t. One of the free services is the DATA.gov service, which is a great service to get started with your development efforts.
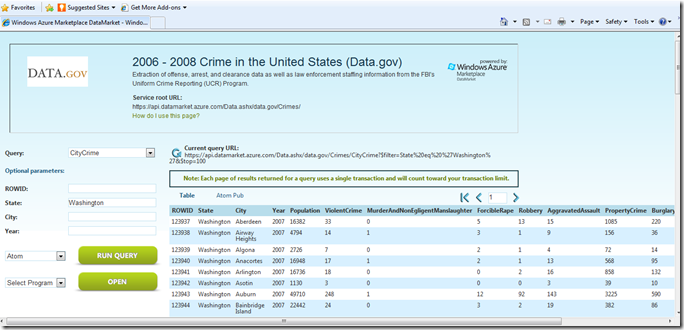
For example, the figure below shows how you can explore the DATA.gov crime data in-browser. You’ll notice the REST URI provides a return dataset filtered on ‘Washington’ --
https://api.datamarket.azure.com/Data.ashx/data.gov/Crimes/CityCrime?$filter=State%20eq%20%27Washington%27&$top=100. You can use this URI to construct a programmatic query using the HttpWebRequest object, as we’ll explore later in this blog-post.
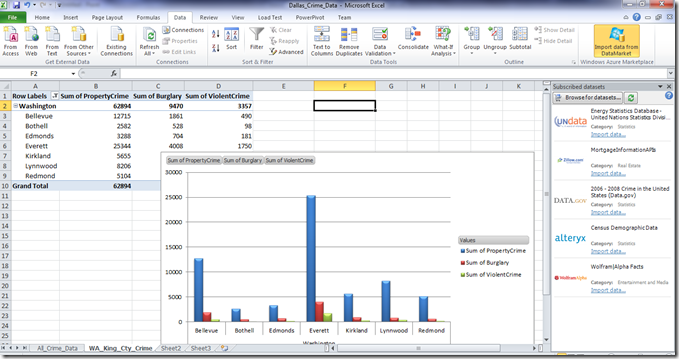
On the Dallas site, you can also download an Excel 2010 add-in; this is a great way to very easily integrate the Dallas data with an everyday productivity experience. For example, the figure below shows the Excel add-in that loads my data subscriptions. I can then click Import data to import the data from the DataMarket into Excel. As per the figure, you can then create PivotTables/Charts and then save those to SharePoint and expose them using the Excel Services. The process is similar to what I walked through in this blog post: https://blogs.msdn.com/b/steve_fox/archive/2011/02/01/developing-for-sharepoint-online-spo.aspx.
However, what if you want to programmatically interact with Dallas data in SharePoint? This is where you want to implement a web part or other application that uses the data from Dallas for some decision point. Examples of how you could integrate with SharePoint run the gamut; you could build event receivers, web parts, Silverlight applications, etc., etc.
As a part of building a crime dashboard, I created a simple Silverlight-based application to illustrate an integration pattern. The pattern I used was implementing the HttpWebrequest call to Dallas in a locally deployed WCF service. I did this to optimize use across different devices/platforms. You could equally deploy the WCF service to Azure so you truly have a beyond-the-firewall service that can be leveraged globally across your devices. So, given the above you could potentially architect the app in a couple of ways:
- Silverlight application that calls into Dallas;
- Silverlight application that leverages a WCF service deployed to IIS (locally) to call Dallas; and
- Silverlight application that leverages a WCF service deployed to Azure (remote IIS) to then call Dallas.
Since I went with number 2, this means that a) I need to create and deploy my WCF service and b) I need to create the Silverlight application to load the data from Dallas.
WCF Service
When you create a new WCF service application in VS 2010, this is a sample of code that you could use to get data from Dallas that you could then issue to a calling application—in this example a Silverlight application.
using System;
using System.Collections.Generic;
using System.Linq;
using System.Runtime.Serialization;
using System.ServiceModel;
using System.ServiceModel.Web;
using System.Text;
using System.Net;
using System.IO;
using System.Xml.Linq;
using System.Linq;
namespace GetDallasData
{
public class DallasCrimeData : IDallasCrimeData
{
string myAccountKey = "<insert your account key>";
string myUniqueUserId = "<insert your developer key>";
string myDallasURL = "https://api.datamarket.azure.com/Data.ashx/data.gov/Crimes/CityCrime?$filter=State%20eq%20%27Washington%27&$top=100";
public List<CrimeData> GetCrimeData(string stateFilter)
{
List<CrimeData> listOfCrimesInWashington = new List<CrimeData>();
WebRequest azureWebRequest = WebRequest.Create(myDallasURL);
azureWebRequest.Credentials = new NetworkCredential(myAccountKey, myUniqueUserId);
HttpWebResponse azureWebResponse = (HttpWebResponse)azureWebRequest.GetResponse();
Stream AzureDataStream = azureWebResponse.GetResponseStream();
StreamReader reader = new StreamReader(AzureDataStream);
string responseFromAzure = reader.ReadToEnd();
XDocument xmlAzureResultData = XDocument.Parse(responseFromAzure);
XNamespace nsContent = "https://www.w3.org/2005/Atom";
XNamespace nsProperties = "https://schemas.microsoft.com/ado/2007/08/dataservices/metadata";
XNamespace nsValue = "https://schemas.microsoft.com/ado/2007/08/dataservices";
var result = (from q in xmlAzureResultData.Descendants(nsContent + "entry")
select new CrimeData
{
City = q.Element(nsContent + "content").Element(nsProperties + "properties").Element(nsValue + "City").Value.ToString(),
Year = q.Element(nsContent + "content").Element(nsProperties + "properties").Element(nsValue + "Year").Value.ToString(),
Population = q.Element(nsContent + "content").Element(nsProperties + "properties").Element(nsValue + "Population").Value.ToString(),
ViolentCrime = q.Element(nsContent + "content").Element(nsProperties + "properties").Element(nsValue + "ViolentCrime").Value.ToString(),
Robbery = q.Element(nsContent + "content").Element(nsProperties + "properties").Element(nsValue + "Robbery").Value.ToString(),
PropertyCrime = q.Element(nsContent + "content").Element(nsProperties + "properties").Element(nsValue + "PropertyCrime").Value.ToString(),
Burglary = q.Element(nsContent + "content").Element(nsProperties + "properties").Element(nsValue + "Burglary").Value.ToString()
});
foreach (var c in result)
{
CrimeData tempCustomer = new CrimeData();
tempCustomer.City = c.City;
tempCustomer.Year = c.Year;
tempCustomer.Population = c.Population;
tempCustomer.ViolentCrime = c.ViolentCrime;
tempCustomer.Robbery = c.Robbery;
tempCustomer.PropertyCrime = c.PropertyCrime;
tempCustomer.Burglary = c.Burglary;
listOfCrimesInWashington.Add(tempCustomer);
}
reader.Close();
AzureDataStream.Close();
azureWebResponse.Close();
return listOfCrimesInWashington;
}
}
}
Note that the code includes a custom class for the incoming data from Dallas called CrimeData. The properties for this are below.
using System;
using System.Collections.Generic;
using System.Linq;
using System.Web;
namespace GetDallasData
{
public class CrimeData
{
public string City { get; set; }
public string Year { get; set; }
public string Population { get; set; }
public string ViolentCrime { get; set; }
public string Robbery { get; set; }
public string PropertyCrime { get; set; }
public string Burglary { get; set; }
}
}
The service contract is very simple, as we really only have one method—which is illustrated below.
using System;
using System.Collections.Generic;
using System.Linq;
using System.Runtime.Serialization;
using System.ServiceModel;
using System.ServiceModel.Web;
using System.Text;
namespace GetDallasData
{
[ServiceContract]
public interface IDallasCrimeData
{
[OperationContract]
List<CrimeData> GetCrimeData(string stateFilter);
}
}
Also, because you’ll be calling this service from Silverlight make sure you handle the cross-domain calls. This means a) you need to include the crossdomain.xml and clientaccesspolicy.xml files in the WCF application project, and b) you need to ensure you also drop these files in your root SharePoint directory. The files look like the following:
<?xml version="1.0" encoding="utf-8"?>
<access-policy>
<cross-domain-access>
<policy>
<allow-from http-request-headers="SOAPAction">
<domain uri="*"/>
</allow-from>
<grant-to>
<resource path="/" include-subpaths="true"/>
</grant-to>
</policy>
</cross-domain-access>
</access-policy>
<?xml version="1.0"?>
<!DOCTYPE cross-domain-policy SYSTEM "https://www.macromedia.com/xml/dtds/cross-domain-policy.dtd">
<cross-domain-policy>
<allow-http-request-headers-from domain="*" headers="*"/>
</cross-domain-policy>
Deploy your WCF application to IIS. More information on MSDN for this is here.
Silverlight Application
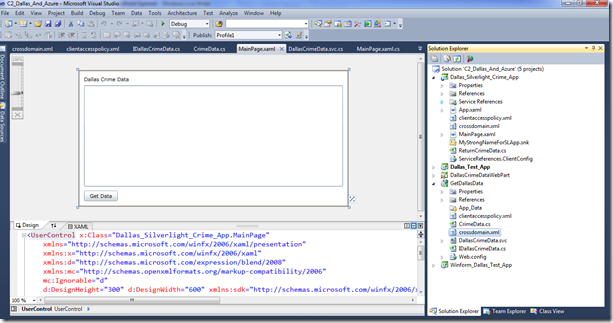
With your service complete, you can now create a simple Silverlight application that will call the service and load the code. Here is what the simple UI should look like:
The UI code is as follows:
<UserControl x:Class="Dallas_Silverlight_Crime_App.MainPage"
xmlns="https://schemas.microsoft.com/winfx/2006/xaml/presentation"
xmlns:x="https://schemas.microsoft.com/winfx/2006/xaml"
xmlns:d="https://schemas.microsoft.com/expression/blend/2008"
xmlns:mc="https://schemas.openxmlformats.org/markup-compatibility/2006"
mc:Ignorable="d"
d:DesignHeight="300" d:DesignWidth="600" xmlns:sdk="https://schemas.microsoft.com/winfx/2006/xaml/presentation/sdk">
<Grid x:Name="LayoutRoot" Background="White" Width="600">
<sdk:DataGrid AutoGenerateColumns="True" Height="223" HorizontalAlignment="Left" Margin="12,33,0,0" Name="dataGridDallasCrimeData" VerticalAlignment="Top" Width="576" />
<sdk:Label Content="Dallas Crime Data" Height="15" HorizontalAlignment="Left" Margin="12,12,0,0" Name="lblTitle" VerticalAlignment="Top" Width="120" />
<Button Content="Get Data" Height="23" HorizontalAlignment="Left" Margin="12,265,0,0" Name="btnGetData" VerticalAlignment="Top" Width="75" Click="btnGetData_Click" />
</Grid>
</UserControl>
You’ll need to add a service reference to your WCF service, and after you’ve done this your code could look like the following:
using System;
using System.Collections.Generic;
using System.Linq;
using System.Net;
using System.Windows;
using System.Windows.Controls;
using System.Windows.Documents;
using System.Windows.Input;
using System.Windows.Media;
using System.Windows.Media.Animation;
using System.Windows.Shapes;
using Dallas_Silverlight_Crime_App.DallasAzureCrimeDataService;
using System.Collections;
namespace Dallas_Silverlight_Crime_App
{
public partial class MainPage : UserControl
{
List<ReturnCrimeData> returnCrimeDataFromService = new List<ReturnCrimeData>();
public MainPage()
{
InitializeComponent();
}
private void btnGetData_Click(object sender, RoutedEventArgs e)
{
DallasCrimeDataClient myWCFProxy = new DallasCrimeDataClient();
myWCFProxy.GetCrimeDataCompleted +=new EventHandler<GetCrimeDataCompletedEventArgs>(myWCFProxy_GetCrimeDataCompleted);
myWCFProxy.GetCrimeDataAsync(null);
}
void myWCFProxy_GetCrimeDataCompleted(object sender, GetCrimeDataCompletedEventArgs e)
{
var myCrimeData = e.Result;
foreach (var item in myCrimeData)
{
ReturnCrimeData tempEntity = new ReturnCrimeData();
tempEntity.City = item.City;
tempEntity.Year = item.Year;
tempEntity.Population = item.Population;
tempEntity.ViolentCrime = item.ViolentCrime;
tempEntity.Robbery = item.Robbery;
tempEntity.PropertyCrime = item.PropertyCrime;
tempEntity.Burglary = item.Burglary;
returnCrimeDataFromService.Add(tempEntity);
}
dataGridDallasCrimeData.ItemsSource = returnCrimeDataFromService;
}
}
}
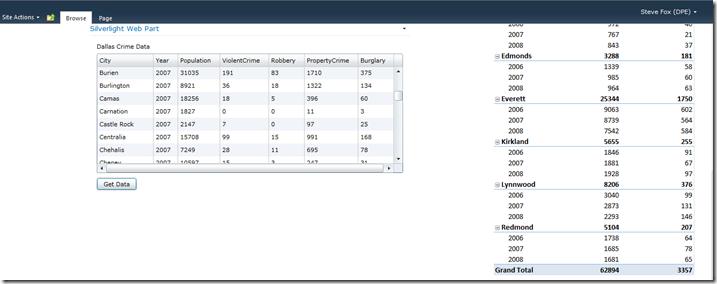
You’ve now got the major pieces, and you can build the Silverlight application, add the built XAP file to a document library in your SharePoint site, and then use the native Silverlight web part in SharePoint to expose the Azure data. The result would be similar to the site below.
This blog-post represented a first step for those of you who are looking to integrate with Azure. There are a ton of applications that you can create for SharePoint—ranging from data storage in the cloud, service deployment for use across devices, cloud-based BI solutions, and so on.
Be sure to check back regularly as I work through and post other samples.
If you’re looking to learn more about SharePoint and Windows Azure, we’ll be hosting a 100-200 level Academy Live session later on in the month. You can get more information here:
https://www.eventbuilder.com/microsoft/event_desc.asp?p_event=1c5d2g1o
Cheers,
Steve


