Your First Outlook Add-in...
I just finished a private technical briefing and during the session showed a few demos. Many of the attendees asked me to share the code, so I thought I'd post to my blog to get my butt in gear and actually post some useful stuff and get the code up here so the attendees could read up on it.
When thinking about OBAs, one of the key integration points in Office is Outlook. It makes sense; a ton of people use this tool every day, so why wouldn't you leverage the Outlook OM and VSTO to create some killer OBAs? To get you started, I put together a small demo that shows how you integrate Outlook with AdventureWorks using VSTO. The demo shows i) how to add a custom task pane that's bound to data and enables you to create a new contact (or more widely access the Outlook OM).
First, the environment. My dev environment is Windows Server 2003, MOSS 2007 (which I won't use in this demo), VS 2008 (which includes VSTO 3.0), Expression Blend, SQL Server 2005, and Office Enterprise 2007. I've also downloaded the Adventureworks 2005 sample db off of Codeplex.
To begin, open Visual Studio and create a new project (File, New, Project, click Visual C# (or Visual Basic), Office, and then select Outlook Add-in). Name the project what you want and click OK. This creates the VSTO Outlook project shell for you.
In my project, I first added the Adventureworks database (Data, Add New Data Source, and walk through the wizard to add the database). The only table you'll want to add to the project is the vSalesPerson table. Once the database is added, click Data, Show Data Sources to make sure it's there.
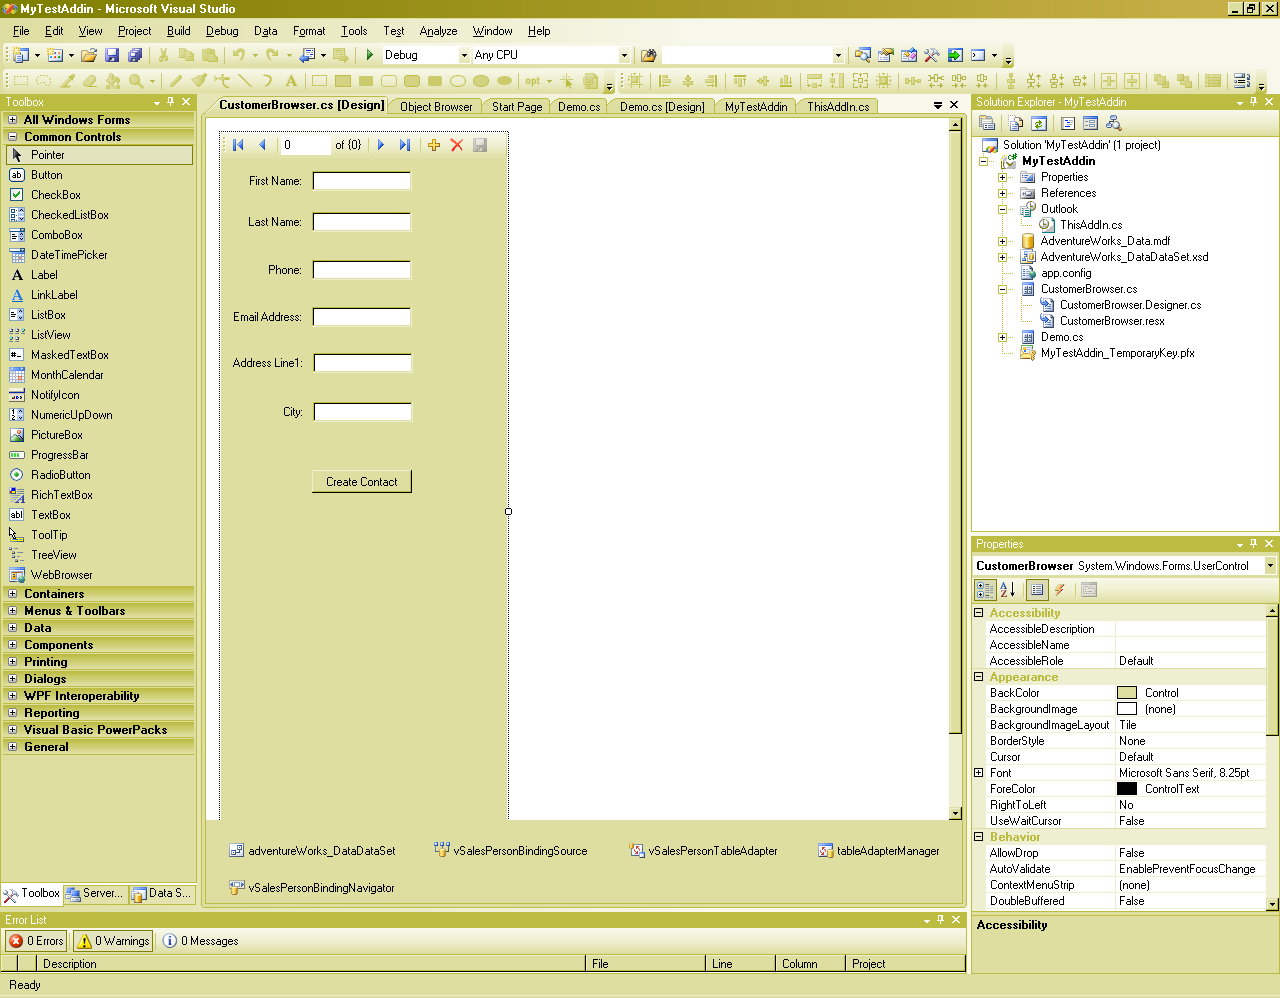
I then added a new user control (right click project, click Add, New Item, and then select User Control in the New Item dialog). Resize the control to be about 300 x 760. I then dragged a few of the fields from the Data view onto the user control--specifically, I added FirstName, Lastname, Phone, Email, AddressLine1, and City. You can select the ones you want; just remember you'll need to account for them in your code-behind. Once you've done this, add a button to the user control (see attached image).
I added some code-behind to the button, which is listed below:
using System;
using System.Collections.Generic;
using System.ComponentModel;
using System.Drawing;
using System.Data;
using System.Linq;
using System.Text;
using System.Windows.Forms;
using Outlook = Microsoft.Office.Interop.Outlook;
namespace MyTestAddin
{
public partial class CustomerBrowser : UserControl
{
string strFirstName;
string strLastName;
string strPhone;
string strEmail;
string strAddress;
string strCity;
public CustomerBrowser()
{
InitializeComponent();
}
private void CustomerBrowser_Load(object sender, EventArgs e)
{
vSalesPersonTableAdapter.Fill(this.adventureWorks_DataDataSet.vSalesPerson);
}
private void button1_Click(object sender, EventArgs e)
{
strFirstName = firstNameTextBox.Text;
strLastName = lastNameTextBox.Text;
strPhone = phoneTextBox.Text;
strEmail = emailAddressTextBox.Text;
strAddress = addressLine1TextBox.Text;
strCity = cityTextBox.Text;
createCustomerContact(
strFirstName,
strLastName,
strPhone,
strEmail,
strAddress,
strCity);
}
private void createCustomerContact(
string firstName,
string lastname,
string phone,
string email,
string address,
string city)
{
Outlook._Application myOutlookObject = new Outlook.Application();
Outlook.MAPIFolder custContacts = (Outlook.MAPIFolder)myOutlookObject.Session.GetDefaultFolder(Outlook.OlDefaultFolders.olFolderContacts);
Outlook.ContactItem newSalesContact = (Outlook.ContactItem)custContacts.Items.Add(Outlook.OlItemType.olContactItem);
newSalesContact.FirstName = firstName;
newSalesContact.LastName = lastname;
newSalesContact.Business2TelephoneNumber = phone;
newSalesContact.Email1Address = email;
newSalesContact.BusinessAddress = address;
newSalesContact.BusinessAddressCity = city;
newSalesContact.Save();
}
}
}
You'll note that you need to call the FIll method when the user controls loads to ensure the data from the Adventureworks database loads. But, most of the other data is pretty self-explanatory. You're essentially grabbing the string variables and then mapping them to the properties of the new contact item you've created. You need to note that there is no error handling in this code, though. So, for example I could add the same person from the data source over and over again. You may not want to do that.
Hit F6 to build, but don't run just yet. After you've successfully built the app, go to the ThisAddIn class and make sure you have the following code in it:
using System;
using System.Collections.Generic;
using System.Linq;
using System.Text;
using System.Xml.Linq;
using Outlook = Microsoft.Office.Interop.Outlook;
using Office = Microsoft.Office.Core;
namespace MyTestAddin
{
public partial class ThisAddIn
{
Microsoft.Office.Tools.CustomTaskPane ctp;
private CustomerBrowser ctrl = new CustomerBrowser();
string title = "Demo";
private void ThisAddIn_Startup(object sender, System.EventArgs e)
{
ctp = this.CustomTaskPanes.Add(ctrl, title);
ctp.Visible = true;
ctp.Width = 350;
ctp.DockPosition = Microsoft.Office.Core.MsoCTPDockPosition.msoCTPDockPositionRight;
}
private void ThisAddIn_Shutdown(object sender, System.EventArgs e)
{
}
#region VSTO generated code
/// <summary>
/// Required method for Designer support - do not modify
/// the contents of this method with the code editor.
/// </summary>
private void InternalStartup()
{
this.Startup += new System.EventHandler(ThisAddIn_Startup);
this.Shutdown += new System.EventHandler(ThisAddIn_Shutdown);
}
#endregion
}
}
The important code here is that you need to create a custom task pane object (CTP) and then add an instance of the newly created user control to the CTP object and then set some properties on the CTP object. What this will do (notice that we've added some of the code in the ThisAddinStartup method) is invoke the custom task pane.
You can now F5 to build. You should see the user control on the right-hand side of the screen. Open your Contacts folder, and then browse to a sales person from the Adventureworks db and click the button to add them to your Contacts. Voila! You've created your first Outlook add-in.
The extrapolation for an OBA is connecting to a LOB system via a service. You can try and wrap the Adventureworks db in a service and do the same thing we did above--just do it through a service call--and you'd have built a small OBA.
Well, happy coding!
Steve
PS I recently picked up the book Programming Applications for Office Outlook 2007, and this helped me with some questions I had about coding against the Outlook OM. Lots of code samples in it, and very well written.