Configuring the Azure Kubernetes infrastructure with Bash scripts and Ansible tasks
This article is the fourth one about a solution we have built with my friend Hervé Leclerc (Alter Way CTO) in order to automate a Kubernetes Cluster deployment on Azure:
· Kubernetes and Microsoft Azure
· Programmatic scripting of Kubernetes deployment
· Provisioning the Azure Kubernetes infrastructure with a declarative template
· Configuring the Azure Kubernetes infrastructure with Bash scripts and Ansible tasks
· Automating the Kubernetes UI dashboard configuration
· Using Kubernetes…
As we have seen previously, it’s possible to use ARM extension to execute commands on the provisioned machines. In order to automate the required setup on each machine, we may consider different options. We could manage the cluster configuration with a collection of scripts but the more efficient way is surely to keep a declarative logic instead of a pure programming approach. What we need is a consistent, reliable, and secure way to manage the Kubernetes cluster environment configuration without adding extra complexity due to an automation framework. That’s why we’ve chosen Ansible.
Ansible role in Kubernetes configuration
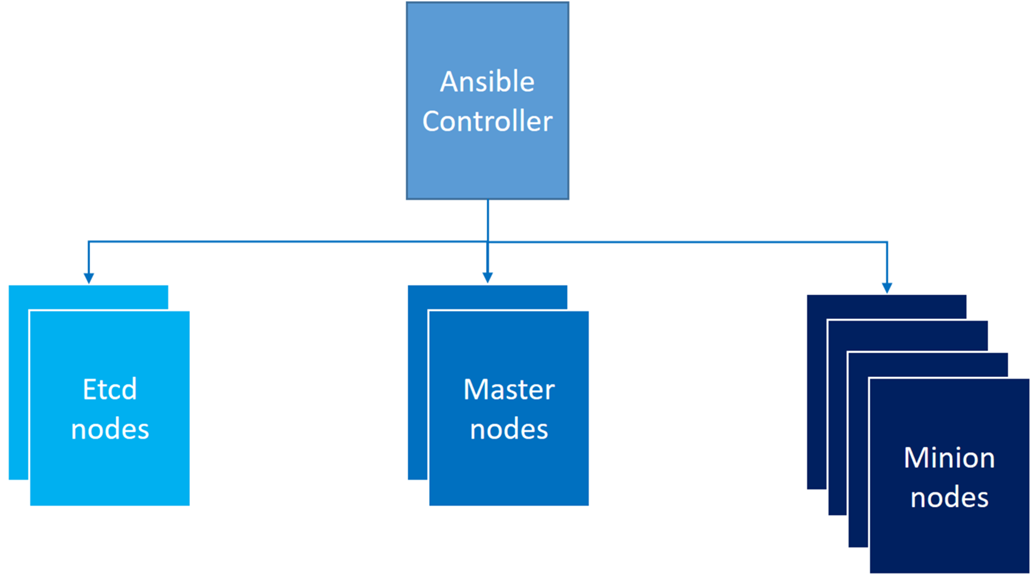
Ansible is a solution for configuration management based on a state-driven resource model that describes the desired state of the target, not the paths to get them to this state. Ansible role is to transform the environment to the desired state and to allow reliable and repeatable tasks without the failures risks related to scripting. So in order to handle the Kubernetes configuration, we have provisioned a dedicated Ansible controller which role is to enact configuration on the different type of nodes.
Ansible playbooks
Ansible automation jobs are declared with a simple description language (YAML), both human-readable and machine-parsable, in what is called an Ansible playbook.
Ansible playbook implementation
Playbooks are the entry point of an Ansible provisioning. They contain information about the systems where the provisioning should be executed, as well as the directives or steps that should be executed. They can orchestrate steps of any ordered process, even as different steps must bounce back and forth between sets of machines in particular orders.
Each playbook is composed of one or more “plays” in a list, which goal is to map a group of hosts to some well-defined roles (in our Kubernetes cluster: “master”, “node”, “etcd”) represented by tasks that call Ansible modules. By composing a playbook of multiple “plays”, it is possible to orchestrate multi-machine deployments. In our context, Ansible playbook enables to orchestrate multiple slices of the Kubernetes infrastructure topology, with very detailed control over how many machines to tackle at a time. So one of the critical task of our implementation was to create these playbooks.
When Hervé and I began to work on this automated Ansible CentOS Kubernetes deployment, we checked if there weren’t any existing asset we should build the solution upon. And we found exactly what we were looking for with the repository “Deployment automation of Kubernetes on CentOS 7” on GitHub (https://github.com/xuant/ansible-kubernetes-centos)
Note: Hervé did a fork from this git repository in order to enable further modification ( https://github.com/herveleclerc/ansible-kubernetes-centos.git ) and I made a submodule ["ansible-kubernetes-centos"] from this fork in order to clone this Git repository and keep it as a subdirectory of our main Git repository (to keep commits separate).
Here's what the main playbook (https://github.com/herveleclerc/ansible-kubernetes-centos/blob/master/integrated-wait-deploy.yml) currently looks like:
---
- hosts: cluster
become: yes
gather_facts: false
tasks:
- name: "Wait for port 3333 to be ready"
local_action: wait_for port=3333 host="{{ inventory_hostname }}" state=started connect_timeout=2 timeout=600
- hosts: cluster
become: yes
roles:
- common
- kubernetes
- hosts: etcd
become: yes
roles:
- etcd
- hosts: masters
become: yes
roles:
- master
- hosts: minions
become: yes
roles:
- minion
- hosts: masters
become: yes
roles:
- flannel-master
- hosts: minions
become: yes
roles:
- flannel-minion
Ansible playbook deployment
Ansible allows you to act as another user (through the “become: yes” declaration), different from the user that is logged into the machine (remote user). This is done using existing privilege escalation tools like sudo. As the playbook is launched through the ARM custom extension, the default requirement for a “tty” has to be disabled for the sudo users (and after playbook execution, to be re-enabled). The corresponding code that triggers the “integrated-wait-deploy.yml” playbook deployment is given with the following function:
function deploy()
{
sed -i 's/Defaults requiretty/Defaults !requiretty/g' /etc/sudoers
ansible-playbook -i "${ANSIBLE_HOST_FILE}" integrated-wait-deploy.yml | tee -a /tmp/deploy-"${LOG_DATE}".log
sed -i 's/Defaults !requiretty/Defaults requiretty/g' /etc/sudoers
}
Solution environment setup
This Kubernetes nodes and the Ansible controller should have the same level of OS packages.
Ansible controller and nodes software environment
The software environment of the virtual machines involved in this Kubernetes cluster is setup through the usage of the Open Source EPEL (Extra Packages for Enterprise Linux) Linux repository (a repository of add-on packages that complements the Fedora-based Red Hat Enterprise Linux (RHEL) and its compatible spinoffs, such as CentOS and Scientific Linux).
Current EPEL version is the following:
EPEL_REPO=https://dl.fedoraproject.org/pub/epel/7/x86_64/e/epel-release-7-8.noarch.rpm
Please note that sometimes a new EPEL release is published without any guaranty for the previous one retention. So a current limitation with our current template is the requirement to update this EPEL url when there’s a new version for software packages hosted on EPEL repository.
The version of the EPEL repository is specified in “ansible-config.sh” and “node-config.sh” scripts with the following function:
function install_epel_repo()
{
rpm -iUvh "${EPEL_REPO}"
}
Ansible controller setup
Ansible setup is achieved through a simple clone from GitHub and a compilation of the corresponding code.
Here is the code of the corresponding function:
function install_ansible()
{
rm -rf ansible
git clone https://github.com/ansible/ansible.git --depth 1
cd ansible || error_log "Unable to cd to ansible directory"
git submodule update --init --recursive
make install
}
The “make install” that does the compilation first requires “Development Tools groups” to be installed.
function install_required_groups()
{
until yum -y group install "Development Tools"
do
log "Lock detected on VM init Try again..." "N"
sleep 2
done
}
Ansible configuration
Ansible configuration is defined in two files, the “hosts” inventory file and the “ansible.cfg” file. The Ansible control path has to be shorten to avoid errors with long host names, long user names or deeply nested home directories. The corresponding code for the “ansible.cfg” creation is the following:
function configure_ansible()
{
rm -rf /etc/ansible
mkdir -p /etc/ansible
cp examples/hosts /etc/ansible/.
printf "[defaults]\ndeprecation_warnings=False\n\n" >> "${ANSIBLE_CONFIG_FILE}"
printf "[defaults]\nhost_key_checking = False\n\n" >> "${ANSIBLE_CONFIG_FILE}"
echo $'[ssh_connection]\ncontrol_path = ~/.ssh/ansible-%%h-%%r' >>
"${ANSIBLE_CONFIG_FILE}"
printf "\npipelining = True\n" >> "${ANSIBLE_CONFIG_FILE}"
}
Ansible connection management
Ansible represents the machines it manages using a simple INI file that organizes the Kubernetes nodes in groups corresponding to their role. In our solution we created “etcd”,”master”,”minion” groups completed by a “cluster” role that gathers all the nodes.
Here's what the plain text inventory file (“/etc/ansible/hosts”) looks like:
This inventory has to be dynamically created depending on the cluster size requested in the ARM template.
Inventory based on Kubernetes nodes dynamically generated private IP
In our first ARM template implementation, each Kubernetes node launches a short “first-boot.sh” custom script in order to specify its dynamically generated private IP and its role in the cluster.
privateIP=$1
role=$2
FACTS=/etc/ansible/facts
mkdir -p $FACTS
echo "${privateIP},${role}" > $FACTS/private-ip-role.fact
chmod 755 /etc/ansible
chmod 755 /etc/ansible/facts
chmod a+r $FACTS/private-ip.fact
exit 0
In this version, the “deploy.sh” script makes ssh requests to nodes to get their private IP in order to create the inventory file. Here is an extract of the code of the corresponding function:
function get_private_ip()
{
let numberOfMasters=$numberOfMasters-1
for i in $(seq 0 $numberOfMasters)
do
let j=4+$i
su - "${sshu}" -c "ssh -l ${sshu} ${subnetMasters3}.${j} cat $FACTS/private-ip-role.fact" >> /tmp/hosts.inv
done
#...and so on for etcd, and minions nodes
}
Inventory based on Kubernetes nodes static ARM computed IP
In our second ARM implementation (the “linked” template composed from several ones), private IPs are computed directly in the ARM script. The following code is extracted from “KubeMasterNodes.json”:
"resources": [
{
"apiVersion": "[parameters('apiVersion')]",
"type": "Microsoft.Network/networkInterfaces",
"name": "[concat(parameters('kubeMastersNicName'), copyindex())]",
"location": "[resourceGroup().location]",
"copy": {
"name": "[variables('kubeMastersNetworkInterfacesCopy')]",
"count": "[parameters('numberOfMasters')]"
},
"properties": {
"ipConfigurations": [
{
"name": "MastersIpConfig",
"properties": {
"privateIPAllocationMethod": "Static",
"privateIPAddress" : "[concat(parameters('kubeMastersSubnetRoot'), '.',add(copyindex(),4) )]" ,
"subnet": {
"id": "[parameters('kubeMastersSubnetRef')]"
},
"loadBalancerBackendAddressPools": [
{
"id": "[parameters('kubeMastersLbBackendPoolID')]"
}
],
"loadBalancerInboundNatRules": [
{
"id": "[concat(parameters('kubeMastersLbID'),'/inboundNatRules/SSH-', copyindex())]"
}
]
}
}
]
}
},
In the “ansible-config.sh” custom script file, there is the function that creates this inventory:
function create_inventory()
{
masters=""
etcd=""
minions=""
for i in $(cat /tmp/hosts.inv)
do
ip=$(echo "$i"|cut -f1 -d,)
role=$(echo "$i"|cut -f2 -d,)
if [ "$role" = "masters" ]; then
masters=$(printf "%s\n%s" "${masters}" "${ip} ansible_user=${ANSIBLE_USER} ansible_ssh_private_key_file=/home/${ANSIBLE_USER}/.ssh/idgen_rsa")
elif [ "$role" = "minions" ]; then
minions=$(printf "%s\n%s" "${minions}" "${ip} ansible_user=${ANSIBLE_USER} ansible_ssh_private_key_file=/home/${ANSIBLE_USER}/.ssh/idgen_rsa")
elif [ "$role" = "etcd" ]; then
etcd=$(printf "%s\n%s" "${etcd}" "${ip} ansible_user=${ANSIBLE_USER} ansible_ssh_private_key_file=/home/${ANSIBLE_USER}/.ssh/idgen_rsa")
fi
done
printf "[cluster]%s\n" "${masters}${minions}${etcd}" >> "${ANSIBLE_HOST_FILE}"
printf "[masters]%s\n" "${masters}" >> "${ANSIBLE_HOST_FILE}"
printf "[minions]%s\n" "${minions}" >> "${ANSIBLE_HOST_FILE}"
printf "[etcd]%s\n" "${etcd}" >> "${ANSIBLE_HOST_FILE}"
}
As you may have noticed, this file completes the IP addresses with a path for the SSH private key.
Ansible security model
Ansible does not require any remote agents to deliver modules to remote systems and to execute tasks. It respects the security model of the system under management by running user-supplied credentials and as we’ve seen includes support for “sudo”. To secure the remote configuration management system, Ansible may also rely on the default transport layer through the usage of OpenSSH, which is more secure than password authentication. This is the way we decided to secure our deployment.
In our second ARM implementation SSH key generation is done through a simple call to “ssh-keygen” (In the first one, we use existing keys).
function generate_sshkeys()
{
echo -e 'y\n'|ssh-keygen -b 4096 -f idgen_rsa -t rsa -q -N ''
}
Then the configuration is done by copying the generated key file in the .ssh folder for “root” and “Ansible” users and by changing their permissions.
function ssh_config()
{
printf "Host *\n user %s\n StrictHostKeyChecking no\n" "${ANSIBLE_USER}" >> "/home/${ANSIBLE_USER}/.ssh/config"
cp idgen_rsa "/home/${ANSIBLE_USER}/.ssh/idgen_rsa"
cp idgen_rsa.pub "/home/${ANSIBLE_USER}/.ssh/idgen_rsa.pub"
chmod 700 "/home/${ANSIBLE_USER}/.ssh"
chown -R "${ANSIBLE_USER}:" "/home/${ANSIBLE_USER}/.ssh"
chmod 400 "/home/${ANSIBLE_USER}/.ssh/idgen_rsa"
chmod 644 "/home/${ANSIBLE_USER}/.ssh/idgen_rsa.pub"
}
We also have to define a way to propagate SSH keys between Ansible controller and Kubernetes nodes. At least the SSH public key is stored in the .ssh/authorized_keys file on all the computers Ansible has to log in to while the private key is kept on the computer the Ansible user log in from (in fact we have automated the copy of both public and private keys, because having the ability to SSH from any machine to the other was sometimes quite useful during development phase…). In order to do this, we use Azure Storage.
SSH Key files sharing
The “ansible-config.sh” file launched in Ansible controller generates the SSH keys and stores them in a blob in an Azure storage container with the “WriteSSHToPrivateStorage.py” Python script.
function put_sshkeys()
{
log "Push ssh keys to Azure Storage" "N"
python WriteSSHToPrivateStorage.py "${STORAGE_ACCOUNT_NAME}" "${STORAGE_ACCOUNT_KEY}" idgen_rsa
error_log "Unable to write idgen_rsa to storage account ${STORAGE_ACCOUNT_NAME}"
python WriteSSHToPrivateStorage.py "${STORAGE_ACCOUNT_NAME}" "${STORAGE_ACCOUNT_KEY}" idgen_rsa.pub
error_log "Unable to write idgen_rsa.pub to storage account ${STORAGE_ACCOUNT_NAME}"
}
Here is the corresponding “WriteSSHToPrivateStorage.py” Python function:
import sys,os
from azure.storage.blob import BlockBlobService
from azure.storage.blob import ContentSettings
block_blob_service = BlockBlobService(account_name=str(sys.argv[1]), account_key=str(sys.argv[2]))
block_blob_service.create_container('keys')
block_blob_service.create_blob_from_path(
'keys',
str(sys.argv[3]),
os.path.join(os.getcwd(),str(sys.argv[3])),
content_settings=ContentSettings(content_type='text')
)
The “node-config.sh” file launched in Ansible controller gets the SSH key files in Azure storage with the “ReadSSHToPrivateStorage.py” Python script which code is the following:
import sys,os
from azure.storage.blob import BlockBlobService
blob_service = BlockBlobService(account_name=str(sys.argv[1]), account_key=str(sys.argv[2]))
blob = blob_service.get_blob_to_path(
'keys',
str(sys.argv[3]),
os.path.join(os.getcwd(),str(sys.argv[3])),
max_connections=8
)
These two Python functions require the corresponding Python module to be installed on the Ansible controller and Kubernetes nodes. One easy way to do it is first to install “pip”. Pip is a package management system used to install and manage software packages written in Python. Here is the code corresponding to this setup.
function install_required_packages()
{
until yum install -y git python2-devel python-pip libffi-devel libssl-dev openssl-devel
do
sleep 2
done
}
function install_python_modules()
{
pip install PyYAML jinja2 paramiko
pip install --upgrade pip
pip install azure-storage
}
But providing the technical mechanism to share SSH keys files between Kubernetes nodes and Ansible controller is not sufficient. We have to define how they both interact with each other.
Synchronization between Ansible controller and nodes
One of the complex requirements of the solution we propose is the way we handle the synchronization of the different configuration tasks.
ARM “depensOn” and SSH key files pre-upload solution
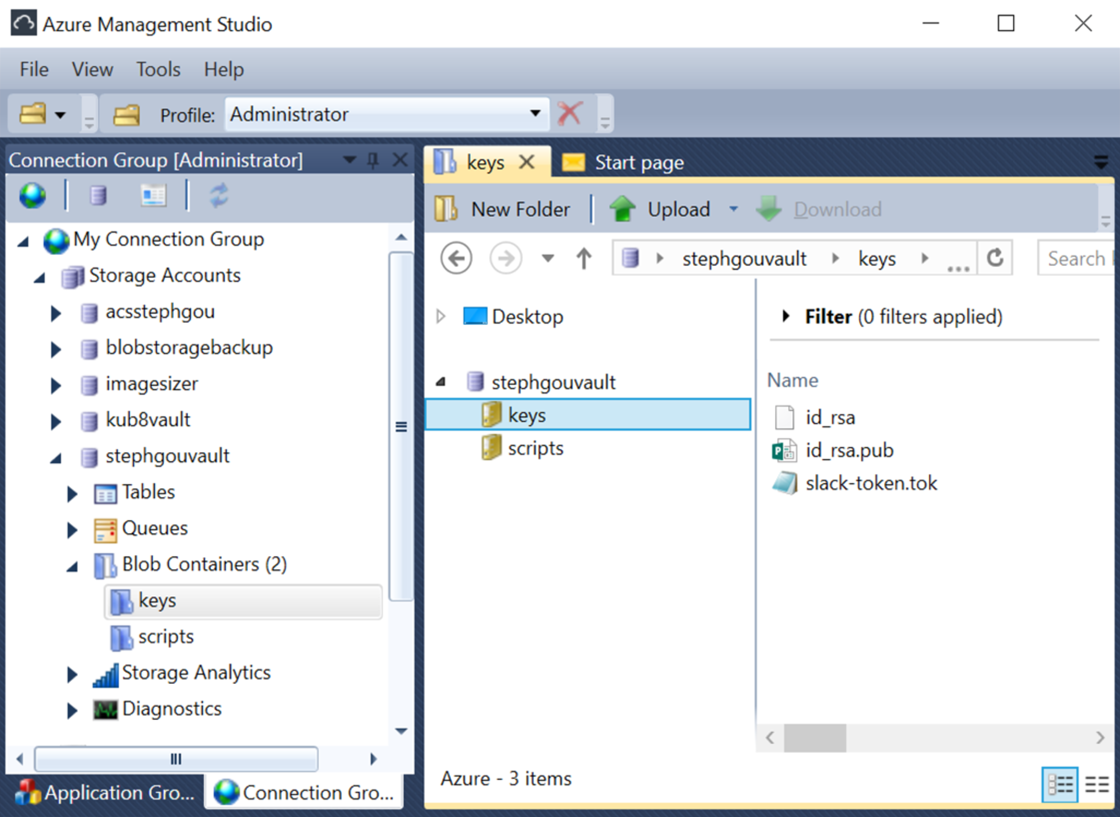
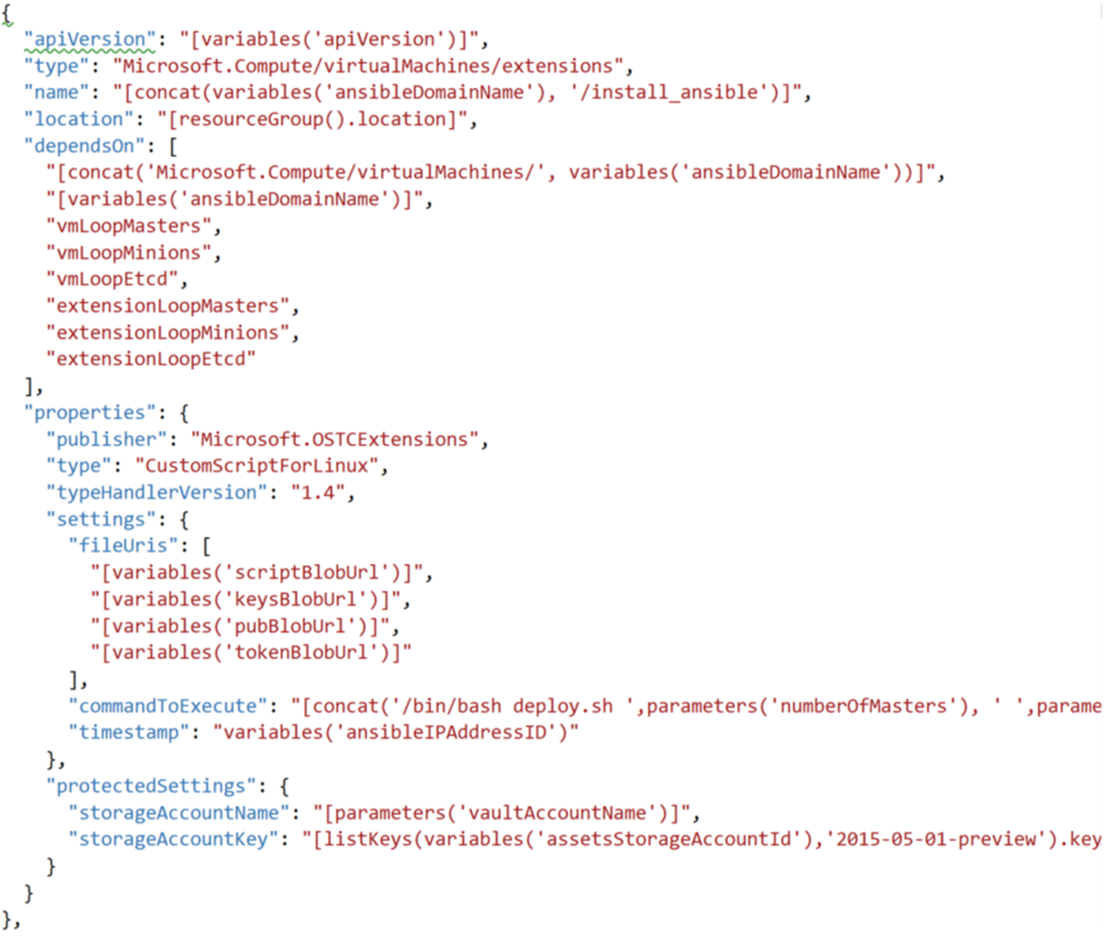
In our first ARM template implementation, this is easily handled through the usage of “dependsOn” attribute in the ARM template. This solution requires all the nodes to be deployed before launching the Ansible playbook with a custom “deploy.sh” script extension. This script is deployed on the Ansible controller with the “fileUris” settings (“scriptBlobUrl”). The others filesUris correspond to the SSH key files used for Ansible secure connection management (and another token file used for monitoring through Slack).
In this solution, synchronization between Ansible controllers and node is quite easy but requires the publication of SSH key files in an Azure storage account (or an Azure Key vault) before launching the template deployment, so Ansible controller may download them before running the playbooks. If these files are not deployed before launching the deployment, it will fail. Here are the corresponding files displayed with the Azure Management Studio tool.
The following code is extracted from the “azuredeploy.json” and corresponds to the Ansible extension provisioning.
Netcat synchronization and automated Python SSH key files sharing through Azure Storage
The second ARM implementation (the “linked” template composed from several ones) enables to avoid to pre-publish keys in a vault by directly generating these keys during deployment. As this solution may appear more elegant and more secure, by specializing a generated SSH key for Ansible configuration management instead of sharing existing keys for other purpose, it adds a significant level of complexity, because it requires now to handle in parallel both Ansible controller and Kubernetes nodes configuration.
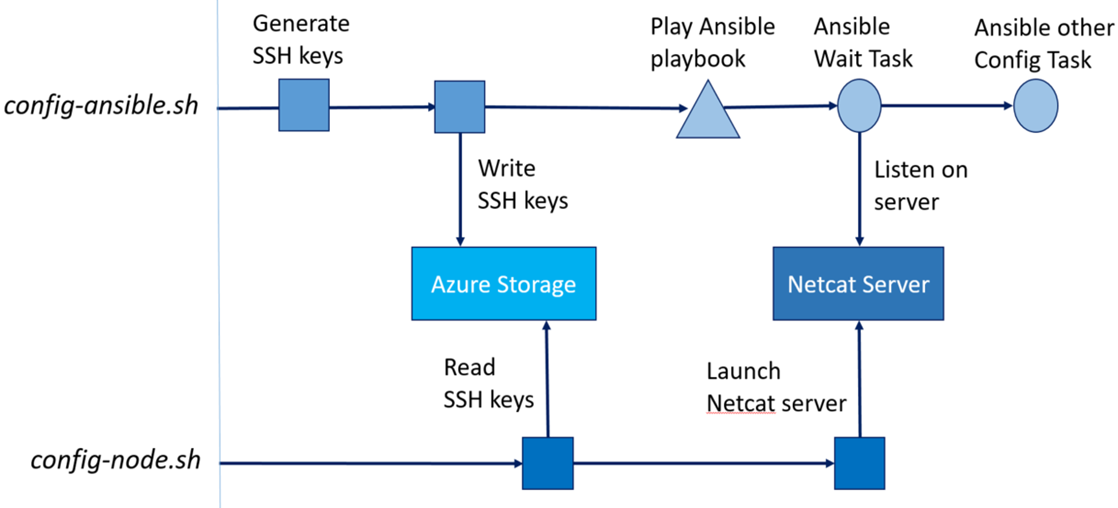
The bash script on the Ansible controller generates SSH keys but have to wait for the nodes to get theses keys and declared them as authorized for logon before launching the Ansible playbook. A solution to this kind of scenario may be implemented thanks to the usage of Netcat, a networking utility using the TCP/IP protocol, which reads and writes data across network connections, and that can be used directly or easily driven by other programs and scripts. The way we synchronized both scripts “config-ansible.sh” and “config-node.sh” is described with the following schema.
So the first machines which have to wait are the nodes. As they are waiting for getting a file, it’s quite simple to have them making this request periodically in pull mode until the file is there (with a limit on attempts number). The code extracted from “config-node.sh” is the following.
function get_sshkeys()
{
c=0;
sleep 80
until python GetSSHFromPrivateStorage.py "${STORAGE_ACCOUNT_NAME}" "${STORAGE_ACCOUNT_KEY}" idgen_rsa
do
log "Fails to Get idgen_rsa key trying again ..." "N"
sleep 80
let c=${c}+1
if [ "${c}" -gt 5 ]; then
log "Timeout to get idgen_rsa key exiting ..." "1"
exit 1
fi
done
python GetSSHFromPrivateStorage.py "${STORAGE_ACCOUNT_NAME}" "${STORAGE_ACCOUNT_KEY}" idgen_rsa.pub
}
In order to launch the Netcat server in the background (using the & command at the end of the line), and logout from the “config-node.sh” extension script session without the process being killed, the job is executed with “nohup” command (which stands for “no hang up”).
To make sure that the Netcat server launching will not interfere with foreground commands and will continue to run after the extension script logouts, it’s also required to define the way input and output are handled. The standard output will be redirected to “/tmp/nohup.log” file (with a “> /tmp/nohup.log” and the standard error will be redirected to stdout (with the “2>&1” file descriptor), thus it will also go to this file which will contain both standard output and error messages from the Netcat server launching. Closing input avoids the process to read anything from standard input (waiting to be brought in the foreground to get this data). On Linux, running a job with “nohup” automatically closes its input, so we may consider not to handle this part, but finally the command I decided to use was this one.
function start_nc()
{
log "Pause script for Control VM..." "N"
nohup nc -l 3333 </dev/null >/tmp/nohup.log 2>&1 &
}
The “start_nc()” function is the last one called in the “config-node.sh” file, which is executed on each cluster node. On the other side, the “ansible-config.sh” file launched in Ansible controller executes without any pause and launches the Ansible playbook. This is the role of this playbook to wait for the availability of the Netcat Server (that shows that the “config-node.sh” script is terminated with success). This is easily done with the simple task we’ve already seen. This task is executed for any host belonging to the Ansible “cluster” group, i.e all the Kubernetes cluster nodes.
- hosts: cluster
become: yes
gather_facts: false
tasks:
- name: "Wait for port 3333 to be ready"
local_action: wait_for port=3333 host="{{ inventory_hostname }}" state=started connect_timeout=2 timeout=600
One last important point is how we handle the monitoring of the automated tasks.
Monitoring the automated configuration
Monitoring this deployment part supposes to be able to monitor both custom script extension and Ansible playbook execution.
Custom script logs
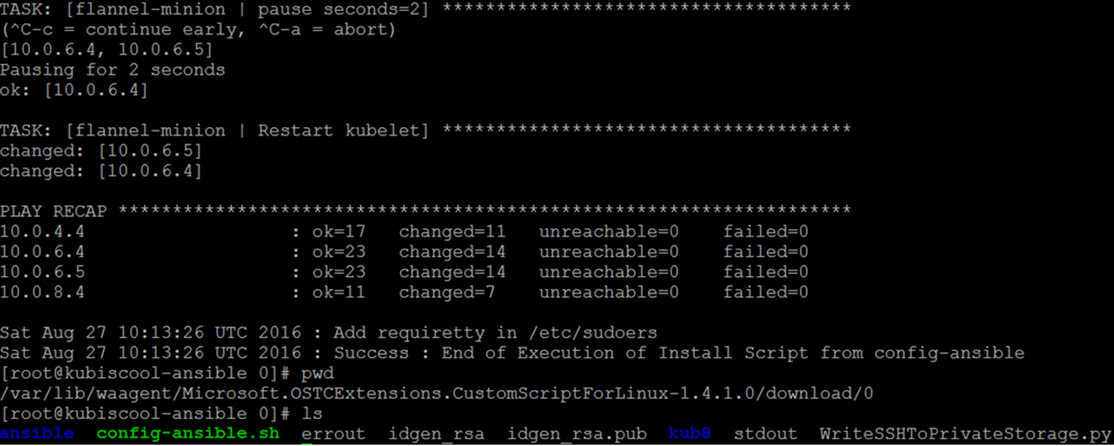
One way to monitor both script extension and Ansible automated configuration is to connect to the provisioned VM and check the “stdout” and the “errout” files in the waagent (Azure Microsoft Azure Linux Agent that manages Linux VM interaction with the Azure Fabric Controller) directory : “/var/lib/waagent/Microsoft.OSTCExtensions.CustomScriptForLinux-1.4.1.0/download/0”
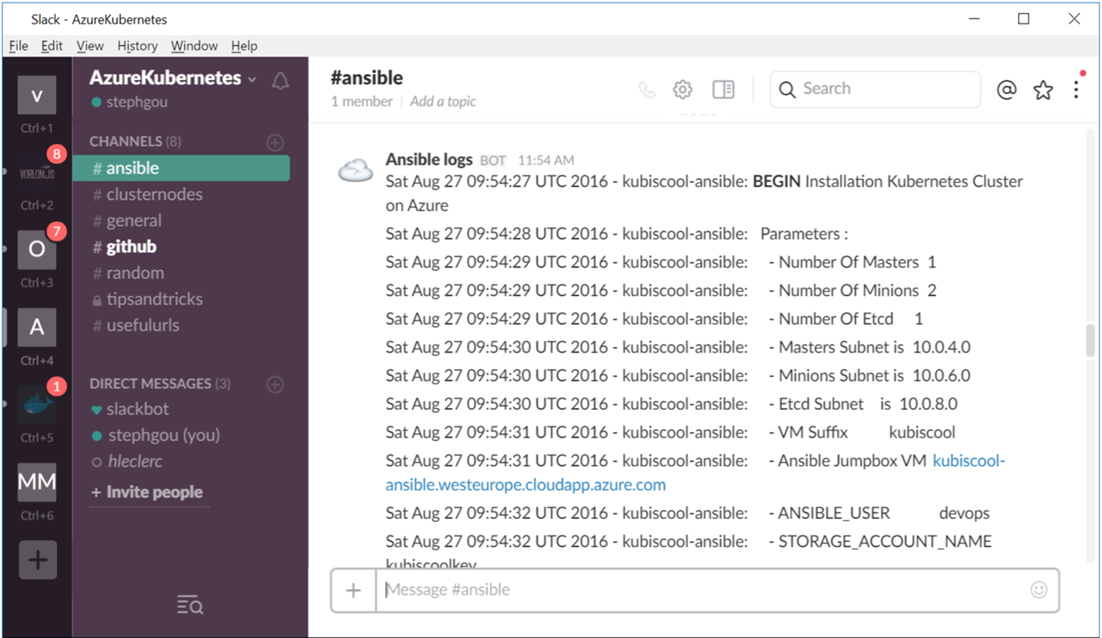
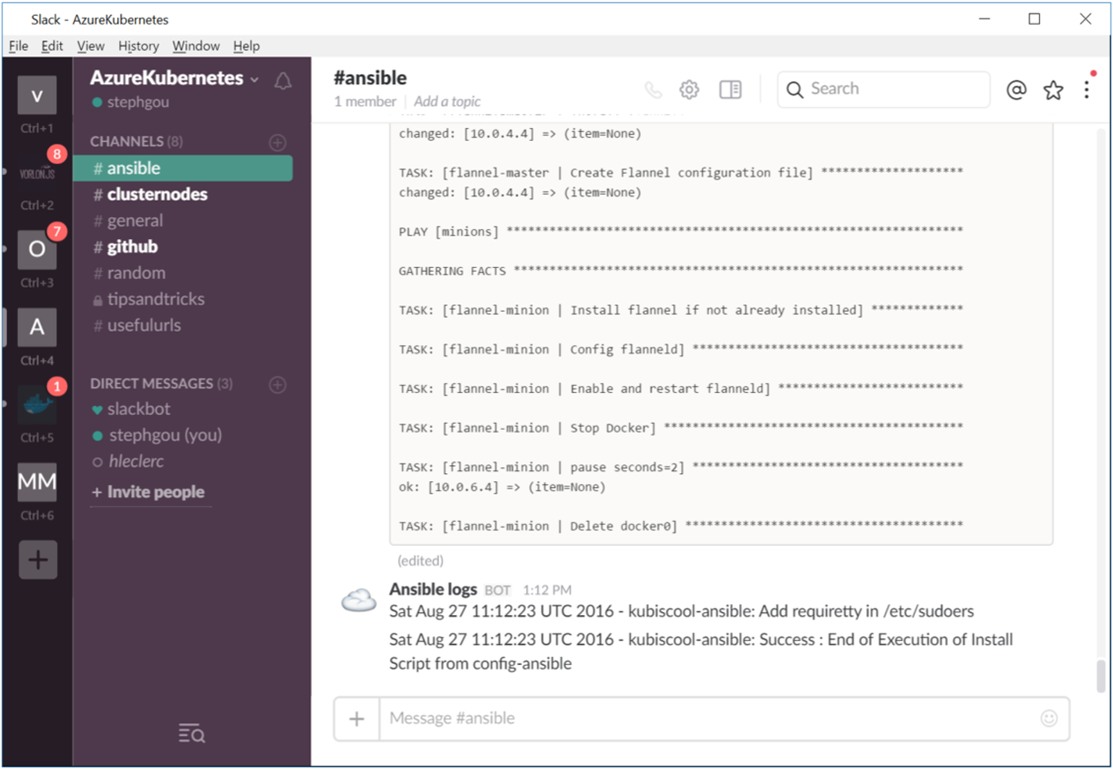
A more pleasant way is to monitor the custom script execution directly from Slack.
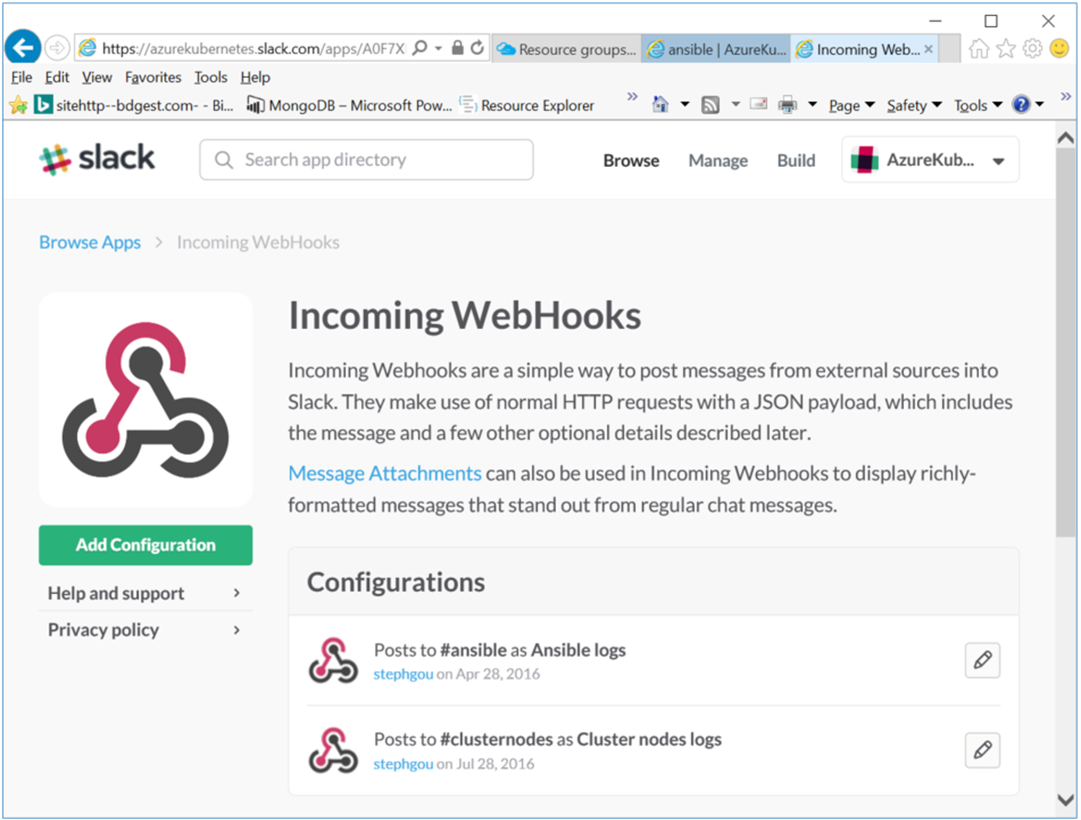
In order to get in realtime the output from the “ansible-config.sh” and “node-config.sh” deployment custom script, you just have to define “Incoming WebHooks” in your Slack team project.
This gives you a WebHook extension URL which can directly be called from those bash scripts in order to send your JSON payloads to this URL.
LOG_URL=https://hooks.slack.com/services/xxxxxxxx/yyyyyyy/zzzzzzzzzzzzzzzzzzzzzz
Then it’s quite easy to integrate this in a log function such as this one:
function log()
{
#...
mess="$(date) - $(hostname): $1 $x"
payload="payload={\"icon_emoji\":\":cloud:\",\"text\":\"$mess\"}"
curl -s -X POST --data-urlencode "$payload" "$LOG_URL" > /dev/null 2>&1
echo "$(date) : $1"
}
Ansible logs
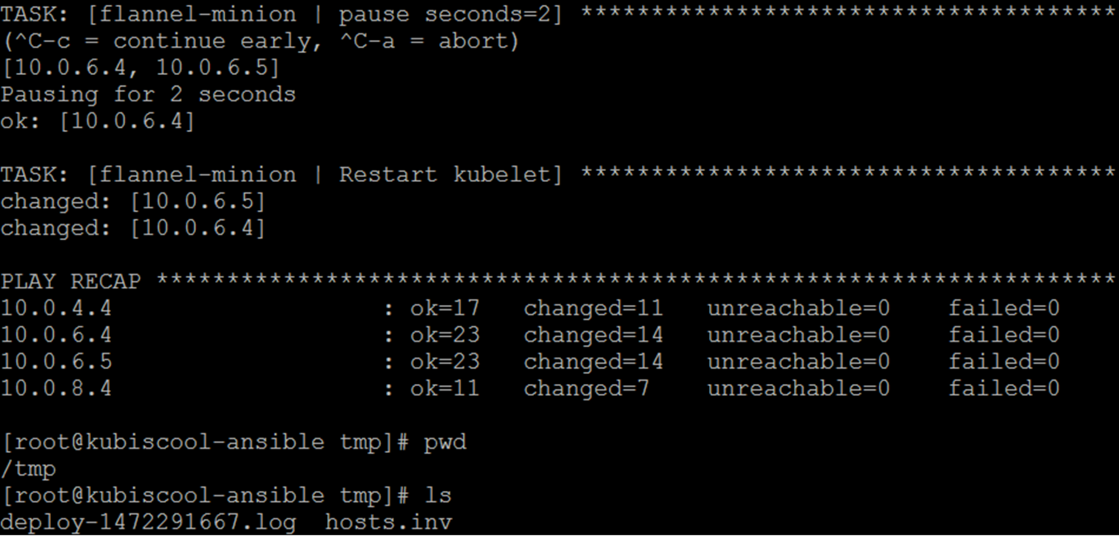
Ansible logs may also be read from playbook execution output which is piped to a tee command in order to write it to the terminal, and to the /tmp/deploy-"${LOG_DATE}".log file.
Once again it’s possible to use Slack to get Ansible logs in realtime. In order to do that we have used an existing Slack Ansible plugin (https://github.com/traveloka/slack-ansible-plugin) which I added as submodule of our GitHub solution (https://github.com/stephgou/slack-ansible-plugin). Once it’s done, we just have to get the Slack incoming WebHook token in order to set the SLACK_TOKEN and SLACK_CHANNEL.
Please note that for practical reasons, I used base64 encoding in order to avoid to handle vm extension “fileuris” parameters outside of Github, because Github forbids token archiving. This current implement choice is definitely not a best practice. An alternative could be to put a file in a vault or a storage account and copy this file from the config-ansible.sh.
The corresponding code is extracted from the following function:
function ansible_slack_notification()
{
encoded=$ENCODED_SLACK
token=$(base64 -d -i <<<"$encoded")
export SLACK_TOKEN="$token"
export SLACK_CHANNEL="ansible"
mkdir -p "/usr/share/ansible_plugins/callback_plugins"
cd "$CWD" || error_log "unable to back with cd .."
cd "$local_kub8/$slack_repo"
pip install -r requirements.txt
cp slack-logger.py /usr/share/ansible_plugins/callback_plugins/slack-logger.py
}
Thanks to this plugin it’s now possible to directly get Ansible logs in Slack.
Conclusion
The combination of ARM templates, custom script extension files and Ansible playbooks enabled us to install the required system packages to setup and configure Ansible, to deploy required Python modules (for example in order to share SSH key files through Azure Storage), to synchronize our nodes configuration and execute Ansible playbooks to finalize the Kubernetes deployment configuration.
Next time we’ll see how to automate the Kubernetes UI dashboard configuration… Stay tuned !
