How To Perform Database Migration Assessment Using SSMA Console Application
[Updated 2/7/2012 Selina Jia - Microsoft SQL Server Migration Assistant (SSMA) for Oracle v5.2. The information provided below is still valid for SSMA for Oracle v5.2. Users should download the lastest SSMA for Oracle]
SSMA 4.2 [Updated: Please obtain the lastest SSMA] includes a console application which you can use to automate assessment/migration for multiple instances / servers.
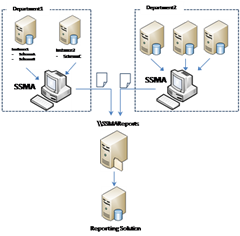
The console application also produces an XML report assessment summary which you can import into a database for further reporting. For example, different department can perform assessment and generate reports that are saved into a shared location. From there, the XML reports can be imported into a SQL Server to generate status summary report for migration project across different departments.
Figure 1
In this article, we are going to walk you through an example of using SSMA console to perform assessment on Oracle’s sample HR and OE schema. The methodology is applicable to other SSMA console applications for Sybase, MySQL and Access as well.
- Download the SQL Server Migration Assistant for Oracle from here. After download, extract the installation files.
- Install SSMA for Oracle on your client machine.
- Prepare script file. Script file defines connection, configuration, and command to execute SSMA. The script file can optionally call variable file (that defines all parameter variables you use in the script) and connection file (that defines server connection information). You can find example of script, variable, and connection file under the installation folder (e.g. C:\Program Files\Microsoft SQL Server Migration Assistant 2008 for Oracle\Sample Console Scripts\ [Updated: in the latest SSMA, it will be C:\Program Files\Microsoft SQL Server Migration Assistant for Oracle\Sample Console Scripts\]).
Separating script file and variable file provides flexibility in performing an assessment. You may consider two approaches to automate the assessment:
A. Using a separate script file and variable file.
In this approach, information such as shared folder location (e.g. \\SSMAReports) and assessment report option is defined in a script file which used for all assessments. See the example below:
<?xml version="1.0" encoding="utf-8" ?> <ssma-script-file xmlns:xsi="https://www.w3.org/2001/XMLSchema-instance"xsi:noNamespaceSchemaLocation="..\Schemas\O2SSConsoleScriptSchema.xsd"> <config> <output-providers> <output-window suppress-messages="true" /> </output-providers> </config> <script-commands> <create-new-projectproject-folder="\\SSMAReports\Projects\OracleMigrationTest_$OracleInstance$_$OracleSchemaName"project-name="OracleMigrationTest_$OracleInstance$_$OracleSchemaName$"overwrite-if-exists="true" /> <connect-source-database server="OracleServer" /> <generate-assessment-reportobject-name="$OracleSchemaName$"object-type="Schemas"write-summary-report-to=" \\SSMAReports\Reports"verbose="true"report-errors="true"assessment-report-folder="\\SSMAReports\Reports\$OracleInstance$_$OracleSchemaName$"assessment-report-overwrite="true" /> <save-project /> <close-project /> </script-commands> <servers> <oracle name="OracleServer"> <standard-mode> <connection-provider value="OracleClient" /> <host value="$OracleHostName$" /> <port value="$OraclePort$" /> <instance value="$OracleInstance$" /> <user-id value="$OracleUserName$" /> <password value="$OraclePassword$" /> </standard-mode> </oracle> </servers> </ssma-script-file>
The script file specifies the following commands:
- Create project files on shared folder location (e.g. \\SSMAReports\Projects) with project name that include the instance and schema name (this instance and schema name are parameterized with variable name enclosed by ‘$’). Note: make sure to create the shared folder \\SSMAReports and provide write access to the user who is executing the assessment.
- Generate assessment report and save the assessment report to the shared folder location (e.g. \\SSMAReports\Reports) and name the report folder to include instance and schema name
- Save the project
- Close the project
All variable (enclosed by ‘$’) is defined in a separate XML file called variable file. Different Oracle instances may have different dba, hence the variable file can be provided with the dba to update with connection information. The following is an example of the variable file to complement the script file above:
<?xml version="1.0" encoding="utf-8" ?> <variables xmlns:xsi="https://www.w3.org/2001/XMLSchema-instance"xsi:noNamespaceSchemaLocation="..\Schemas\ConsoleScriptVariablesSchema.xsd"> <variable-group name="OracleConnection"> <variable name="$OracleHostName$" value="YourOracleHostName" /> <variable name="$OracleInstance$" value="YourOracleInstanceName" /> <variable name="$OraclePort$" value="1521" /> <variable name="$OracleUserName$" value="YourOracleAccount" /> <variable name="$OraclePassword$" value="YourOraclePassword" /> <variable name="$OracleSchemaName$" value="YourOracleSchemaName" /> </variable-group> </variables>
The benefit of this approach is that you can ensure consistent command and configuration from a single script file. You can provide the variable file template above to different dba for each department to modify while the script file can be located centrally (e.g. shared folder location) as a read only file. Note that the dba must prepare separate variable file for each combination of Oracle instance and schema that they own. For example in Figure 1 above, dba for department1 needs to prepare 3 variables file: Instance1\SchemaA, Instance1\SchemaB, and Instance2\SchemaC.
B. Using a single script file.
In this approach, a separate script file needs to be created for each instance of Oracle. The dba must update each script file with connection information. This approach provides a better performance (compared to approach a) when there are many schemas (>10) for each instance. SSMA console connects to each instance and load the specified schemas information (see the force-load element ) at once before performing the assessment. Since there may be shared object (such as those in SYSTEM), those objects are loaded only once. You then define all the schemas to be included in the assessment report as metabase-object elements under the generate-assessment-report element)
Script file example:
<?xml version="1.0" encoding="utf-8" ?> <ssma-script-file xmlns:xsi="https://www.w3.org/2001/XMLSchema-instance"xsi:noNamespaceSchemaLocation="..\Schemas\O2SSConsoleScriptSchema.xsd"> <config> <output-providers> <output-window suppress-messages="true" /> </output-providers> </config> <script-commands> <create-new-projectproject-folder="C:\SSMAReports\Projects\"project-name="OracleMigrationTest_Test"overwrite-if-exists="true" /> <connect-source-database server="OracleServer" /> <force-load metabase="source"> <metabase-object object-name="SYSTEM" object-type="Schemas" /> <metabase-object object-name="HR" object-type="Schemas" /> <metabase-object object-name="OE" object-type="Schemas" /> </force-load> <generate-assessment-reportwrite-summary-report-to=" \\SSMAReports\Reports"verbose="true"report-errors="true"assessment-report-folder=" \\SSMAReports\Reports\AssessmentReports_Test"assessment-report-overwrite="true"> <metabase-object object-name="HR" object-type="Schemas" /> <metabase-object object-name="OE" object-type="Schemas" /> </generate-assessment-report> <save-project /> <close-project /> </script-commands> <servers> <oracle name="OracleServer"> <standard-mode> <connection-provider value="OracleClient" /> <host value="YourOracleHostName" /> <port value="1521" /> <instance value="YourOracleInstanceName" /> <user-id value="YourOracleAccount" /> <password value="YourOraclePassword" /> </standard-mode> </oracle> </servers> </ssma-script-file>
After you prepare script/variable files based on the approach above, you are ready to run the console application.
- Start SSMA console application by going to Start > All Programs > Microsoft SQL Server Migration Assistant 2008 for Oracle > Microsoft SQL Server Migration Assistant 2008 for Oracle Command Prompt[Updated: in the latest SSMA, it will be Start > All Programs > Microsoft SQL Server Migration Assistant for Oracle > Microsoft SQL Server Migration Assistant for Oracle Command Prompt]. Execute the command based on the approach you selected in Step 3:
Approach a: Execute the following from the command prompt:
>SSMAforOracleConsole.exe -s "C:\ScriptFileName.xml" -v "C:\VariableFileName.xml”You can use powershell script to automatically run the console for each variable file saved in the specified folder (e.g. C:\SSMA\VariableFiles)
PS C: > foreach ($file in dir "C:\SSMA\VariableFiles") { SSMAforOracleConsole.exe -s "C:\ScriptFileName.xml" -v "C:\SSMA\VariableFiles\$file” }Approach b: Execute the following from the command prompt:
>SSMAforOracleConsole.exe -s "C:\ScriptFileName.xml"The powershell script to automatically run the console for each variable file saved in the specified folder (e.g. C:\SSMA\ScriptFiles)
PS C: > foreach ($file in dir "C:\SSMA\ScriptFiles") { SSMAforOracleConsole.exe -s "C:\SSMA\ScriptFiles\$file” }
-
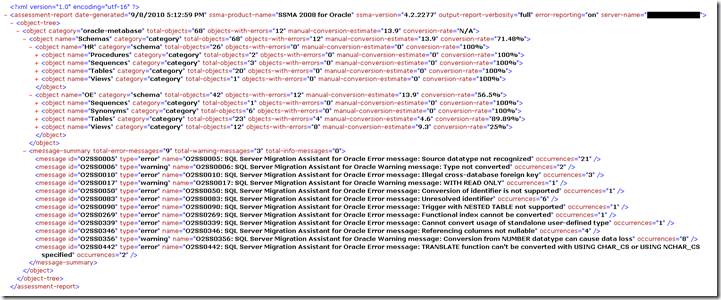
- Locate the assessment report(s) from the specified location (e.g. \\SSMAReports\Reports\AssessmentReport.xml) in your script file. The report provides the assessment report under different category (such as procedures, sequences, tables, views, synonyms, etc.) as well as automatic conversion rate and estimated manual conversion hours. Below is an example of the assessment report:

Using SSMA console to perform assessment not only allows script automation but also provides flexibility in the execution approach and generates an XML output which you can import into a reporting solution.
Let us know what you think about SSMA console.
