Welcome!
Welcome to the SQL Server Developer Tools, Codename “Juneau” team blog!
In this initial blog post, we want to give you a general idea of what our product offers. Stay tuned as we roll out more posts in the near future. We look forward to your feedback via this blog as we progress through the project!
A Lap Around SQL Server Developer Tools
SQL Server Developer Tools (SSDT) provides functionalities for both data-tier and app-tier developers to perform all their development work against any SQL Server platform within Visual Studio.
The Server Explorer in VS now provides you with an SSMS-like view of your database objects. Developers will also appreciate the familiar VS tools we bring to database development, specifically; code navigation, IntelliSense, language support that parallels what is available for C# and VB, platform
specific validation, debugging and declarative editing in the TSQL Editor, as well as a visual Table Designer for both database projects and online database instances. You can also integrate your database projects with Entity Framework projects. When it’s time to deploy your project, you can choose to deploy to all available SQL platforms, including SQL Azure and SQL Server "Denali". You can also output to a DACPAC directly from the database project.
The following sections will guide you around the major scenarios that SSDT can help you in your development work.
Project-Oriented Offline Database Development
Application Project & Database Project Integration
You can also watch this demo which was presented at TechEd Europe 2010 to see SSDT in action.
Online Database Development
Browsing Existing Database Objects
You can use the Server Explorer in Visual Studio to connect to a running SQL instance (from any platform including SQL Azure), and browse all of its objects in an SSMS-like hierarchy. You can then create or edit tables on-the-fly using the Table Designer. From the Table Designer, you can switch to a script pane which allows you to directly edit the script that defines this table. Edits in either the script or designer pane will always be in sync.
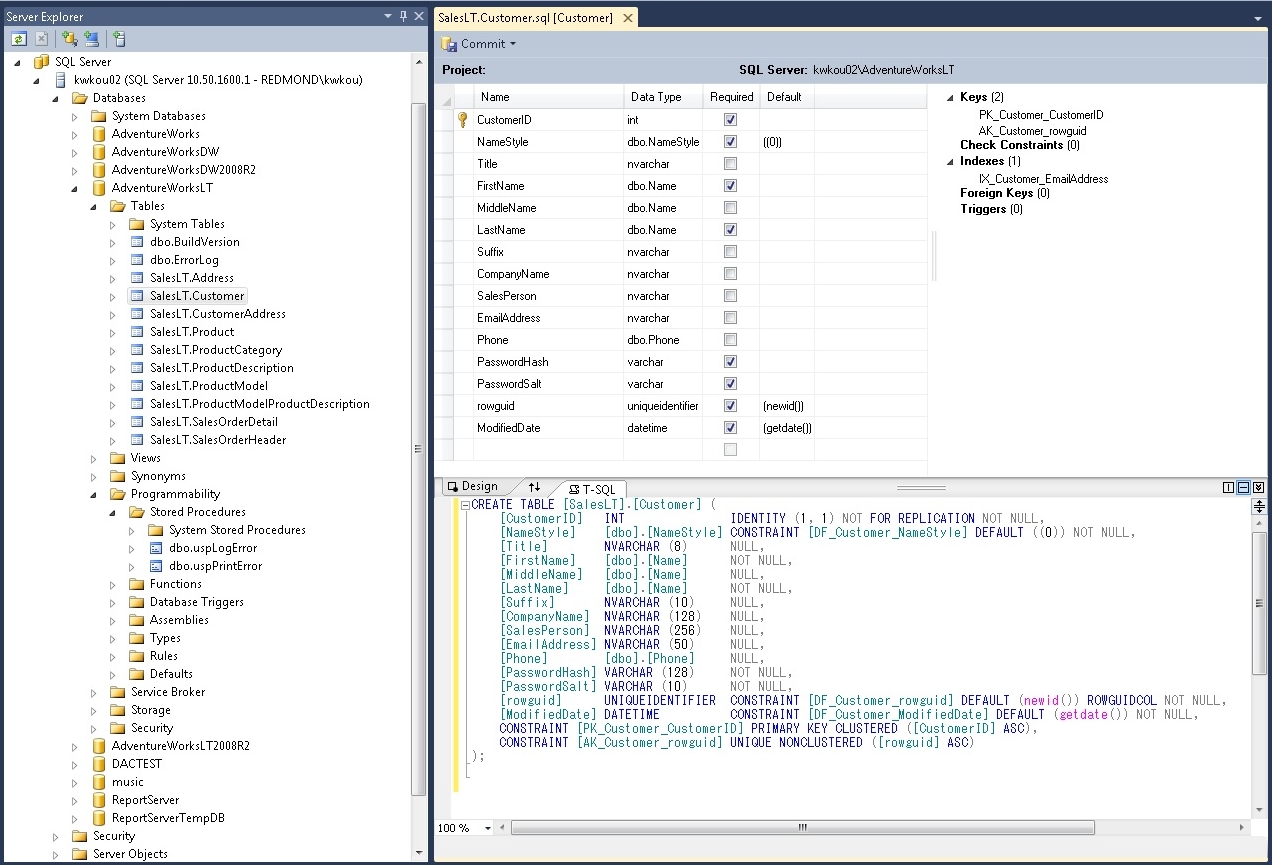
Fig. 1 Viewing a table structure from a connected database
Creating and Editing Database Objects
From the Server Explorer, you can also create or edit views, stored procedures, functions, triggers, user-defined-types, etc., inside the TSQL Editor which supports connected IntelliSense. This means that the identifiers that are listed in the completion list are enumerated by querying the database that is currently selected in Server Explorer.
Troubleshooting Errors
Any errors caused by editing in either the TSQL Editor or Table Designer immediately show up in the Error List pane, which enables you to follow the errors identified for further troubleshooting.
Committing Changes
After you are satisfied with your edits, you can commit your pending changes to the live database. You have a choice of committing only the changes in the active editing pane to the database, or committing all the changes across all open panes. The commit operation will provide a deployment report, which contains a preview of all the actions it is going to take, together with potential issues it has identified, as seen from the following screenshot. Notice that SSDT has generated a change script at the background automatically. Clicking the Script button gives you the flexibility to view the change script directly and manually edit it before executing.
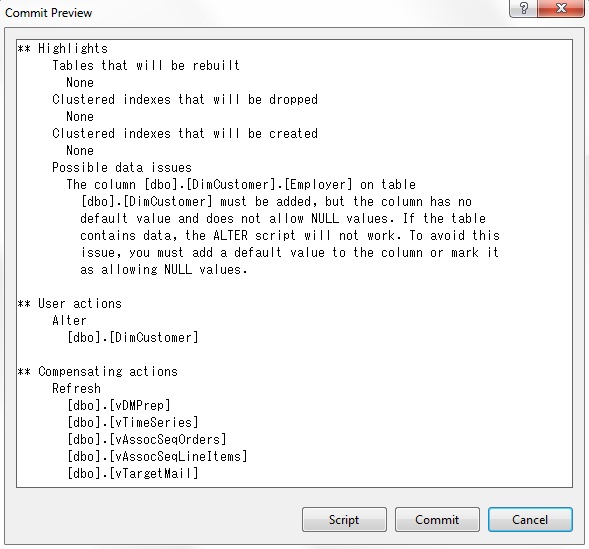
Fig. 2 Preview changes before committing
Project-Oriented Offline Database Development
Managing Database Scripts
Inside the Server Explorer, you can create a new database project from a running database for offline development. The schema of the current database is then imported into the database project, with each database object represented by a script in the Solution Explorer. For a better viewing experience, you have the option of creating a folder in the Solution Explorer for each schema and/or each object type during the import operation.

Fig. 3 Objects are organized neatly in their own folder
While you are working offline, you can invoke the same visual designer tools (TSQL editor and Table Designer) available for online development to make changes to the database scripts, and save all changes to be deployed later.
Deploying Scripts
Using the Project Properties dialog box, you can change the target platform to different versions of SQL (including Azure), or choose whether you want to output to a DACPAC.
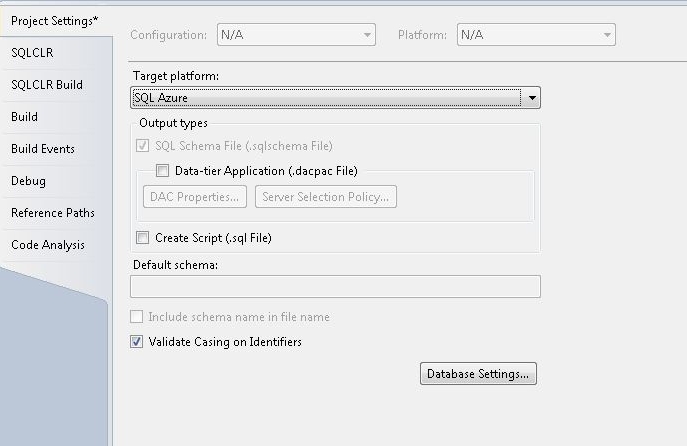
Fig. 4 Target platform options
When it's time to publish your project, SSDT will automatically resolve all object interdependencies and validate the project model. At this point, you can fine-tune your desired deployment behavior, as seen from the following screenshot. Your publishing preference can also be saved in a profile to be reused later.

Fig. 5 Deployment options
Source Control
The offline development experience also provides you with source control functionalities to manage all your scripts.
Seamless Integration with SQLCLR
You can now add SQLCLR objects directly to the same database project that is opened, without resorting to opening a specific SQL CLR project. Your TSQL store procedures can interact with your SQLCLR objects within the same project. Debugging and deployment can also happen seamlessly.
First Class Coding Experience
The enhanced TSQL Editor provides you with similar coding support that C# and VB programmers have always enjoyed. For example, IntelliSense; navigation tools that are familiar to VS developers: Go To Definition and Find All References; the Refactor contextual menu which enables you to rename or move an object and do a preview of all affected areas before committing to the change; debugging across scripts, etc.
In addition, SSDT provides platform-specific validation while you edit your script. Depending on the target platform specified in the Project Properties dialog box, SSDT will catch any error caused by illegal syntax for that specific SQL platform.
Schema Compare
The Schema Compare tool allows you visually compare the differences between two databases (e.g., a production database and a test database), and update one of them to synchronize with the other.
Modern Code and Designers
Using the Table Designer to Manage Tables and Relationships Online and Offline
The Table Designer provides a visual experience alongside the TSQL Editor for creating and editing table structure, including table specific programming objects, for SQL Server databases. It is launched when you create a new table either from the Server Explorer (online) or Solution Explorer (offline). You can also edit an existing table in the designer by explicitly choosing it from the contextual menu.
The designer consists of the Columns Grid, Properties Window, Script Pane and Context Pane. The Columns Grid is the major designer surface, which lists all the columns in the table. You can also view and edit the properties of any object in the Properties Window.
The Context Pane gives you a quick view of objects related to the table (Keys, Constraints, Triggers, etc.), and enables you to add new objects to the table. To view relationships between objects and columns, you can highlight one of them in either the Context Pane or Columns Grid and have the other highlighted in its own pane.
Script Pane shows you the scripts of the selected object in the Context Pane, and enables to you edit the code side-by-side with the Columns Grid in view. Any changes from either side will propagate to the other side immediately.
Using the TSQL Editor to Edit Scripts Effortlessly
The TSQL Editor provides you with a rich editing and navigation experience when you are working with scripts. In addition to IntelliSense which is available both online and offline, the TSQL Editor for offline project development provides two very useful navigation tools that are familiar to VS developers: Go To Definition and Find All References. For example, you can right click on a table name and use “Find All References” to list all references to the table in the database. You can double click a search result to go to the specific code file. In this file, you can right-click the table name again, and choose “Go to Definition” to go back to the table definition. In addition, using the Refactor contextual menu, you can rename an object directly in the editor and do a preview of all affected areas before committing to the change. All the applied changes will propagate to all open editors to ensure that you have the most updated references to work with. The TSQL Editor also provides you with the ability to partially execute a fragment SQL statement by just highlighting it.
The Refactor contextual menu in the TSQL Editor enables you to rename or move an object and do a preview of all affected areas before committing to the change. Committed changes will propagate to all open editors to ensure that you always have the most updated references to work with.
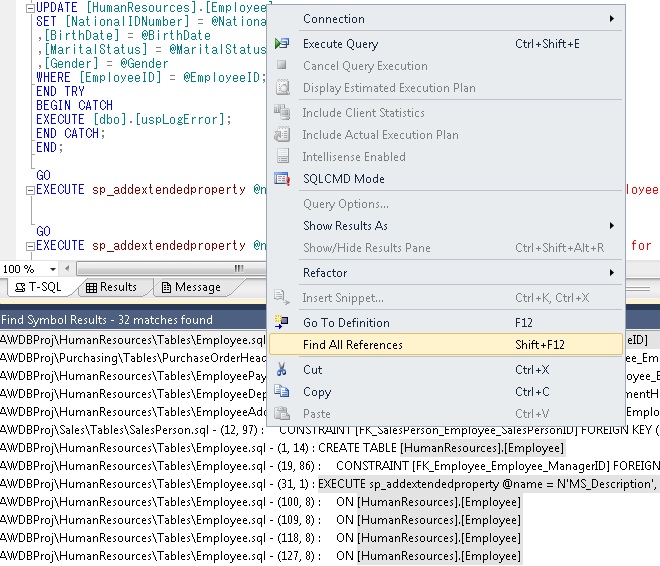
Fig. 6 Navigation tools in TSQL Editor
Application Project & Database Project Integration
Whether you are working on an application, class or web project, you can create an ADO.NET Entity Data Model and choose to have the model contents generated from an existing database project. You can then control how the entities are mapped to database objects (e.g., tables, columns and store procedures) in the project.
You can use the Entity Designer to visualize and edit your model. Fine-grained synchronization control settings are provided to enable you to specify how changes are propagated between the entity data model and the database project. If you specify to always have changes sync’d up, any changes in the entity data model will result in an update of the mapped database object, and vice versa. This can happen even when one of them is closed. For example, if you create a new column in the Table Designer for a mapped table in the database project, the relevant entity will immediately show the new property. Since they now reside in the same solution, debugging can also flow across your existing application and the database project.
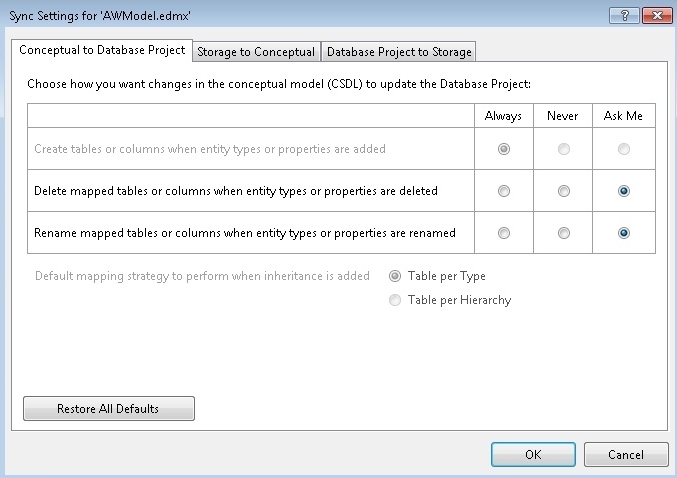
Fig. 7 Sync options